

.jpg.7c299227e42cdbe080dc07d4b72c474c.jpg)

Bizman62
-
Posts
5,600 -
Joined
-
Last visited
-
Days Won
169
Content Type
Profiles
News and Information
Tutorials
Product Reviews
Supplier Listings
Articles
Guitar Of The Month
Links and Resources
Forums
Gallery
Downloads
Everything posted by Bizman62
-

Wrap around bridge placement
Bizman62 replied to Maurice Lavergne's topic in In Progress and Finished Work
Looking at the picture @henrim posted made me think of a known issue with wraparound bridges, i.e. the stud holes potentially becoming oval at some stage. It's a minor issue and may not become serious during the life span of an instrument but it does exist. Now if the bridge is at a 90 deg angle to the strings and there's a steep neck break angle, wouldn't that pose a risk of the posts being slowly pulled out? Again, a minor issue but obvious when looking at the lowest exaggerated sketch. But if the studs were vertical to the body, wouldn't that mean that they should be closer to the nut? The strings meeting the bridge at 87 or so degrees may not be any issue as it's the edge that matters.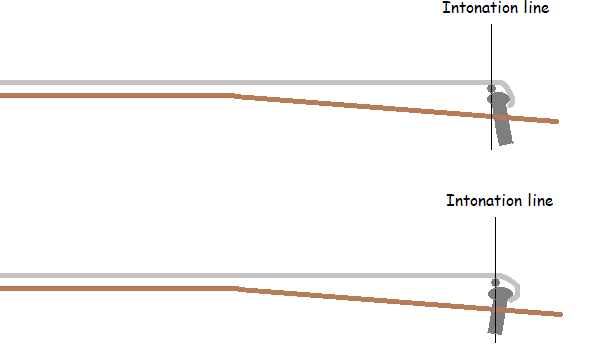
-
Ahh, of course. Flat surfaces, silly me.
-
Keep us informed about how it goes!
-
Absofreakinglutely gorgeous, then again that's what I was expecting. One question though: The golden control plate is inlayed but the bridge plate isn't. Why the difference?
-
I've used Abranet also for wet sanding, it can hold lots of water and the dust doesn't roll over the surface that much.
-
That's true only for Made in USA Stanley planes, those made in GB or Australia are more Frankensteinish regarding their details. The video is interesting but as they say and stress at 1:30 you can only use that method on a clearcoated surface. The clearcoat of cars is most likely 2k poly or at least acryl/alkyd lacquer, not nitro or shellac. That said, as the handles already are "ruined" with the blue paint you won't be doing much further damage by accidentally stripping some of the original finish. Three of my four Stanleys were made in England made so I wasn't too worried about saving the original crackled finish. The fourth one is a US made from 1925-28 but as the handles apparently weren't original I didn't care about saving their finish either. The story of that one: https://www.projectguitar.com/forums/topic/55200-restoration-of-an-old-hand-plane/?do=findComment&comment=635001 p. There's another restoration story by @curtisa: https://www.projectguitar.com/forums/topic/53060-stanley-handplane-restoration/?do=findComment&comment=596904
-
That can be a tough one as the old plane handles often were finished with shellac. And we all know that shellac works with most every finish available so the blue paint most likely is properly stuck. It would help a bit to know what type of paint that is to choose a solvent to remove it but as shellac dilutes to both alcohol and acetone those are mostly out of question. Xylene might work for the paint without reacting with shellac but you never know. Any chemical may remove more than you'd want to. If you try any solvent or paint remover, don't let it go through all layers. Instead be alert to flush the handles to stop the reaction when you get a start and go with elbow grease from there on. The original finish might also be nitrocellulose lacquer as it became widely used in industry after its invention in 1921. So scraping might be the best option at least when it comes to detail work. A plastic scraper might be gentler than a steel one, they even make razor blade type scrapers out of plastic but any piece of plexi should work. All that said, at least the knob looks like there's no finish left on the top. Also in my experience the original finish tends to flake which makes it very uncomfortable to use as you can get a shard of it under your skin. Thus when I restored four Stanley planes last summer I removed the flaky finish and even used some solvents to get rid of the tiniest chips. I then used some sandpaper/abrasive felt to smoothen the surface, applied some dye to make the pale wood look like rosewood and finished with a few coats of my self mixed TruOil. Guess that's close enough to the original finish. Something I noticed during the process was that even after having sanded the surface smooth and clean the wood felt somewhat impregnated with something that didn't let the dye in. That makes me suspect that the handles have originally been treated with Boiled Linseed Oil or Tung Oil which has filled the outermost cells and sealed the surface. Or maybe even with their own mix of oil and lacquer because that's what Tru or Danish Oil is, BLO/Tung-oil mixed with resin (nowadays poly but originally resin from conifers) and turpentine. Anyhow, the wooden parts can't be peeled to reveal a flawless original finish as parts of it have worn off so refinishing is the best option if you're going to use the tool. The blue paint tells that the original finish had already worn off to the level of sending chips to your palms which also means there won't be much left of the water decal in the rear handle - if there was any in the first place. Just so you know, the black stuff on the cast iron isn't paint, it's BLO and asphalt which has been baked on the surface. The same finish was used for T model Fords and Singer sewing machines.
-
Again I repeat myself: Take the neck off to see what the neck pocket looks like. If it's square, a Tele style neck might fit. If rounded, a Strat style neck might fit. They can be very inexpensive (~50) depending on where you buy them. For minor adjustments you can use shims. Then just cut the headstock off and attach the end block. All you'd need is a screwdriver and/or hex key and a drill. More importantly, everything you do can be reversed if you're not happy with the result. Before doing that, figure out the fretboard radius and the neck profile of the Fender you like.
-
Doing that would ruin the intonation. Think about the #1 rule of scale length: The 12th fret has to be right in the middle of the fretboard, no matter the scale. The position of each fret is based on mathematics: You divide the scale length by 17.817 for the first fret, then divide the distance between your 1st fret and the bridge by 17.817 for the second fret and so on until you've reached your desired number of frets. More here: https://www.liutaiomottola.com/formulae/fret.htm#12th2about The pickups have nothing to do with intonation or scale length, they're just placed in the free area. As I said in my first post here, the issue is in the neck/fingerboard profile rather than in the number of frets. You can test that by putting the Kiesel and the Fender face to face, nut against nut and each and every fret should match except the two last ones of the Kiesel. As you said, the radiuses are very different to each other, 20" is almost flat compared to 9.5. Also, Kiesel allows you to choose from three thicknesses of a C shaped neck. Fender has at least 20 neck profiles, many of which are available or have been used in Strats. Doesn't that make 60 different Zeus-Strat pairs? Which one matches your experience?
-
And the eternal saga goes on slowly but not so surely. One step forward, two back or so it seems at times. Anyhoo... In the previous episode I flattened the end for the trapeze. In the meantime the sharp edges were rounded so it was time to redo the inlaying. Scribing along the edges went fine and a 12 mm gouge was close enough to match the shape of the ears. But the wood kept fighting me! The wood is soft and brittle and somehow I lost the line and the other end and while finessing the edge the carve got too wide. Even after rounding the edges with a piece of sandpaper and blending the colour with some more oil mix the difference was obvious. So I did the Jazz fix: If you make a mistake, repeat it so it becomes a feature! Cutting the other side equally wide added the required symmetry and the result doesn't strike the eye as badly. So finally now that that issue was fixed it was time to attack the other end. The headstock veneer was originally added to bring the nut high enough to bypass the end of the fretboard. But as the headstock is slanted the seating point had to be flattened. The file has a safe edge so it only took a few strokes. The bone is now plenty tall but I don't think I'll carve a groove for it, instead there'll be some smelly filing in the near future. I like the Chinese acoustic guitar bone nuts, they're inexpensive compared to raw bone and have precut string grooves. They're tall and thick so there's plenty of material for shaping them just right for any purpose. And finally it was time to start thinking about the eletrickery. Originally I was going to put the switch between the pots but after some discussing with fellow builders I decided that a reverse Tele would be a better choice. So the last hole was widened and the switch is now in. Sort of. I thought I had the pots for this one already packed in the workshop bag but I couldn't find them. But it seems that I'll have to do some more routing, the top of the cavity seems to be too thick. Not a biggie but it will nullify the tape job. The pots are now packed into the bag so hopefully next week we'll start to finally get there!
.thumb.jpg.11ddad44aa6793a2df739ec7001c3977.jpg)
.thumb.jpg.6b9adb73f2459bfadbc9f80d5801bb6c.jpg)
.thumb.jpg.e9780bef01804fe50ea3629c696acd17.jpg)
.thumb.jpg.adf848076095d3f3423ffb7c3008d208.jpg)
.thumb.jpg.972e5932de23e782e62a691a45d9d2b1.jpg)
.thumb.jpg.5719b684cfdecc69df948e771f77d093.jpg)
.thumb.jpg.e48ee446f2871dc2a2302cd370c3d982.jpg)
-
So despite the scale length being 25.5" on both versions the 22 fret neck is shorter on a Fender? That would mean that the bridge would be closer to the end and the overall layout would be an inch or so closer to the bottom.
-
Hi and welcome! And holy necro bump! Someone correct me if I'm wrong here, but if the scale length remains the same, there's no difference between a 22 to a 24 fret fingerboard other than the two extra frets that require moving the neck pickup closer to the bridge. From the nut to the 22th fret they should be identical. Same thing with a 30 fret guitar, the extra length is just eating the space where you'd normally put the pickups. Ibanez RG2011SG is a perfect example of that. Thus your problem isn't the number of frets, it's more about the neck profile and/or the fingerboard radius. Replacing the entire neck would be the easiest solution as the Kiesel has a bolt-on neck. The main problem with that would be to find a neck that fits the neck pocket unless you do it from scratch. I mean, for example there's a difference between Strats and Teles despite being from the same maker, the Strat neck has a rounded end whilst the one of the Tele is straight. Taking the Kiesel neck apart might give a hint whether you could take a standard Fender 24 fret neck with your desired radius and just cut the headstock off. That might work within the intonation range.
-
Wrap around bridge placement
Bizman62 replied to Maurice Lavergne's topic in In Progress and Finished Work
Hi and welcome to the addiction! Coincidentally I've built an LP Jr with a somewhat similar bridge, link to some pictures here: https://www.projectguitar.com/forums/topic/49819-guitar-of-the-month-july-2019/?do=findComment&comment=579304. The most accurate tool I used for measuring the scale was a 1 metre steel ruler with 1 mm increments which did the job accurately enough. As far as I know there's nothing too different in measuring the scale length on a guitar with a neck break angle, the angle is so subtle that it doesn't significantly shorten the scale. A simple way to visualize that is to take a tape measure locked to 25" and lift it by half an inch (the height of your bridge) at the 12.5" mark. You really can't see the end move, that's how much it affects. As the bridge has adjustment backwards you'd want it to be as front as possible. If you want to get the intonation as good as possible, you can make a trapeze sort of jig of something like a clothes hanger or other stiff wire. Bend it to a V with eyelets for the ball ends of both E strings and hook it to the end pin hole. Tighten the E strings and lay the bridge with makeshift spacers where you think it should be. Measure the intonation and move accordingly, then mark the place. Something like that, don't forget protective padding:
-
Can't you accept a rescue route when it's offered to you on a golden plate?
-
Are you 100% positive that it's dye? To me it looks similar to the discoloration caused by fungus seen in many pale woods. The vertical lines on the top seem to have similar bluish greyness in a number of shades.
-
Slowly but surely it's starting to get there. After once having seen someone inlay the jack plate it has been a detail I prefer. Not too long ago someone told having spread some DNA on his build. It took me a while to figure out that it wasn't of this ilk: The old pine seemed to be quite brittle around the hole so some solidifier was needed And voilà! Next step was the trapeze which looked like something that has been slammed on without proper planning. So I thought the same recipe would fix that. No, that plan wasn't going to work so I took it to the belt sander. Some rounding to blend the flat spot in is on the to do list. And maybe also inlaying the plate.
.thumb.jpg.a1503b767b858a1017ab91000ab192f4.jpg)
.thumb.jpg.980ea4119a831852d96cfcd4465e31c8.jpg)
.thumb.jpg.a0217d5685ca8b945714640afd96852f.jpg)
.thumb.jpg.ae124eca189bad41eefe9b9e7df8ff4d.jpg)
.thumb.jpg.b04d24fc4e6f512457ccad6f9b800ddd.jpg)
.thumb.jpg.2dccbf8c68116d7fbd3464d18d832fac.jpg)
.thumb.jpg.68943360c987bcbe9d0f9fc1c9a79e5c.jpg)
.thumb.jpg.07b45354de64cfe9933b452c6ef0ec08.jpg)
-
Dean ML Dimensions/Blueprints
Bizman62 replied to CravingAlpaca43's topic in Solidbody Guitar and Bass Chat
Looked odd in my browser as well, I thought the sketchy looks was intentional. -
Dean ML Dimensions/Blueprints
Bizman62 replied to CravingAlpaca43's topic in Solidbody Guitar and Bass Chat
For me there was no problems to download and open it. It's big so it took 40 seconds to download and 10 seconds to open with my Internet connection and PC. -
Hi and welcome! Regarding your first concern, I guess the post is appropriately placed but if it isn't the Forum Gods most likely will move it without issues. The actual question may seem a bit more complicated, but it took only a few seconds to find answers like this: https://www.thespringstore.com/spring-finder.html Remember, there's no such things as "guitar springs" or "guitar screws" or even "guitar paint", some companies just make living easier for people who don't think with their own brains! Installing the spring... Well, the car repair shops use threaded rods with dedicated cups for the spring ends. Modified locking pliers might provide a similar tool for a trem spring. All you'd need is a tool that would compress the spring leaving the end loops free to be put around the studs.
-
There's finishes and there's finishes. Cellulose can be much softer than 2k poly. No wonder I got the 3M pads from a car paint shop! Last summer I bought and sort of restored some older hand planes which led me to search for some information about the black finish on old Stanley planes. No wonder that the finish on them (and old Singer sewing machines and T-Fords) has been able to last a century: It's not paint! Instead it's a mixture of BLO and asphalt melted on the surface.
-
Exactly. My observations tell a similar story.
-
If there's too much glue under the veneer or if the veneer is sort of "too large" to nicely fit that place, you can try cutting the bubble along the grain line and ironing. I've even seen a video where they cut a slice off of a larger bubble to make it fit but that was scary! For a fingertip sized bubble a single cut may well do the trick, test in a hidden area first!
-
I've noticed something similar with Abranet. It works fine for some surfaces but not so well on others. My local car paint dealer once gave me a sample pack of 3M™ Cubitron™ II Hookit™ pads which are intended for sanding finishes smoothly but effectively. They also seem to work well on wood. Abranet still has its use but it depends on the task at hand, often requiring testing which one works best.
-
I consider you pro enough, just pointing out that there's really rough grits for really tough finishes. And I guess after all these years you knew what I meant. Or, as @mistermikev put it shortly after I followed you to this forum, "I thought he was your friend!"
-
Back in the day when we bought this house we wanted to get rid of the old paint on the floor and hired a pro to do it with a big belt sander, the base was a square foot or so. And the belts: Starting at 16 grit he used several sequences before getting to 100 g for bare wood. The actual thickness of the old paint may have been somewhere around one mm or even less but the old skool floor paint was made to last.


.jpg.27e0c70b88a4c9549097675aa1a8e28d.jpg)
.jpg.ef3881e413e181b386f0ccea70b51d6e.jpg)
.jpg.3ee142882d5ce1523d37581637c63f45.jpg)
.jpg.810af9d835bfab8c49aea7cde5a8857e.jpg)
.jpg.8ec8d2d33f1bb9a74c2a8ec195022e87.jpg)
.jpg.570279e21500ea298d2e06291b0b325a.jpg)
.jpg.7891d0d77209e38f4fd4a7e4d43ee014.jpg)

.jpg.7af3e3f7bd6f64ad2817756db0ffcd2a.jpg)
.jpg.c04450f19ff1c0fb15000311c08cb7bc.jpg)
.jpg.f7e538a6365d280edbd68e10f0520298.jpg)
.jpg.d8fd54b486b099338033a20e000a5cab.jpg)
.jpg.889932fdc42cd6382aaecda3dc3a7662.jpg)
.jpg.411e3e51f0002e72337623fff0c1ac9c.jpg)
.jpg.cced6d7d0a746df4f8f77d5e85a744c2.jpg)
.jpg.d362cc9f31b3dab6e4966a6459f91027.jpg)