


Blackdog
-
Posts
717 -
Joined
-
Last visited
-
Days Won
6
Content Type
Profiles
News and Information
Tutorials
Product Reviews
Supplier Listings
Articles
Guitar Of The Month
Links and Resources
Forums
Gallery
Downloads
Posts posted by Blackdog
-
-
1 hour ago, Bizman62 said:
The right one is what caught my eye by being familiar yet unique.
And that exactly was the goal. Thanks !
-
48 minutes ago, ScottR said:
Superlative work as always Blackdog!
So clean, so exquisitely detailed and the finishes are perfect.
Damn.
SR
Hi Scott ! Thanks, but finishes are not really perfect... I still have a long way to go. Definitely the part of the job that can make my life miserable at any given moment...
-
1 minute ago, Prostheta said:
Holy shitballs! Wow. You've really made that shape your own, and to see it in a pristine goldtop. Seriously man, what are you doing holding out on us for this long eh? haha
Always good to hear from you.
Hey ! Likewise !
The Goldtop is a sexy thing, isn't it ?
I love how it ended up. First time I make a Goldtop but wanted one for a very long time.
-
 1
1
-
-
54 minutes ago, Bizman62 said:
Somehow the math doesn't match... I thought it was about three guitars but I can see four. Which one of the two is the FiftyNine?
Well, technically, the two are Fifty Nines
 ... The left one is a '59 Les Paul Replica I built some years ago. The right one is the new FiftyNine...
-
1
-
-
And...
The Hollowbody: Same carve as the FiftyNine, on top of more evenly flamed hard maple. Trans-Black finish on the top, natural on the back. Hollowed Mahogany back and honduras mahogany neck. Faux binding on the top (exposed maple), a single sound hole and cocobolo binding on the B. rosewood fretboard. Fret markers are black MOP/abalone “V” blocks. Humbuckers, ABR-1 bridge and aluminium tailpiece. Schaller tuners and a cocobolo faceplate.


-
3
-
-
The FiftyNine: Has a bit more dramatic carve on the top of nicely flamed hard maple. Light Sunburst. Solid, light Mahogany back and a mahogany neck. It has a faux binding on the top (exposed maple edge) and flamed maple binding on the cocobolo fretboard. Fret markers are MOP trapezoids. Humbuckers, ABR-1 bridge and aluminium tailpiece. Vintage Kluson tuners and a cocobolo faceplate.


-
3
-
-
(Descriptions from the earlier posts)
The FiftySeven: A gentle carve, more LP-ish, on a hard maple top finished as a Goldtop. Solid, light Mahogany back and a Spanish cedar neck. Cream plastic binding on the top and the cocobolo fretboard. Fret markers are simple offset dots. Humbuckers, ABR-1 bridge and aluminium tailpiece. Vintage Kluson tuners and a simple black faceplate.


-
2
-
-
Hi guys ! I hope everything has been fine with you and your families.
I can't believe that more than a year passed by since the last posting.Day job during the pandemic has been very hectic. Very difficult to find the time to do the things that bring me pleasure, but I managed to finish these three concept guitars.
I wanted to provide some closure to the thread and show you the finished products. I believe that the goal of achieving a Les Paul that is not a Les Paul has been successfully achieved. In playability and sound they are very much what I expected.
Pictures are not the best, but here we go... -
2 hours ago, Prostheta said:
It's a crazy amount of material removed by the spot facer. I'm of the opinion that the traditional brass hex nut being reduced to a threaded Allen bullet is a viable option for reducing the amount needing to be removed. A large headstock angle allows for long Allen wrench access, hence less need for a wide cavity for a wrench that fits over a nut. There's only so much distance under that rod access cover though! Obviously your mitigation by splining the headstock within the short grain helps a lot. How confident do you feel about going this close to the Gibson approach? I decapped a Thunderbird once. Once. It drove me insane.
Very valid point. And actually simpler to execute. Actually, a bullet nut like the 70s Fenders could do the trick nicely.
The centerline of the spotfacer is 1/8" above the TR center just to reduce the weakening of the headstock a bit. I will consider your point for the future, this is one of those things you do automatically after building a few Gibsony tributes...
I never broke a headstock, but saw a few. I believe the splines should take care of most of the risk.
-
On 6/21/2020 at 6:46 PM, ScottR said:
The siblings.

SR
This is serious stuff my friend !
These are so organic in a Catalan Modernistic kind of way ! Amazing work ! And that finish !!! How do you get such a good polish inside those scrolls ?
Not my style (I'm a lot more boringly predictable), but deeply impressed by the quality of your work.
Nice touch that signature carved volute of yours !
-
1
-
-
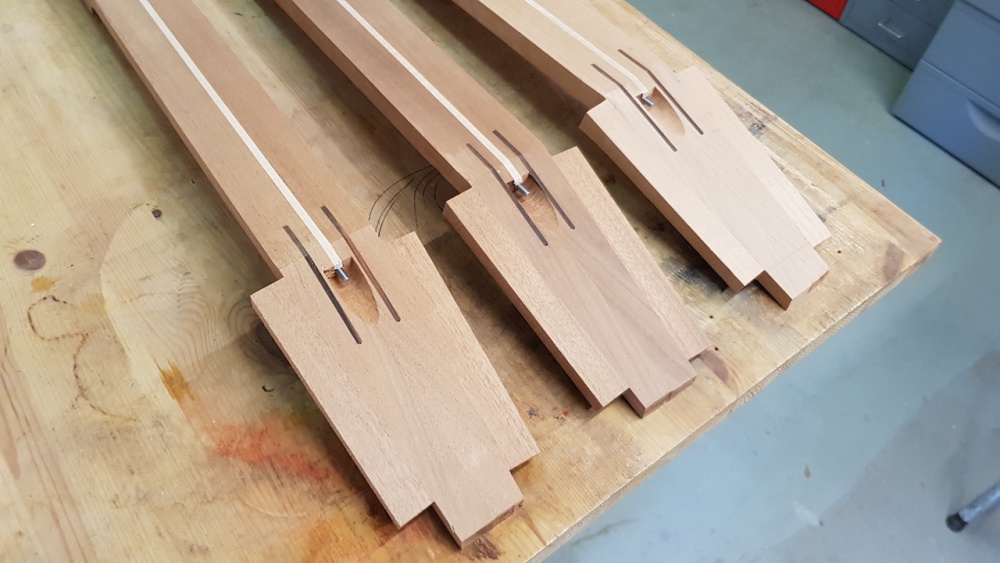
And then I cut the headstock shape.

-
Now about the "ears" for the headstock...
The ears usually added to the sides of the headstock have the double purpose of making up width for the headstock shape (so you don't have to use a very wide neck blank), and to add reinforcement to the headstock, which is all short grain due to the tilt back. The somewhat snake-head shaped headstock of this design calls for oblique ears to properly fulfil the second objective. This is actually in-between the classic Gibson shaped headstock and the vintage Flying Vee headstock ears.

-
On 6/30/2020 at 5:46 PM, Prostheta said:
For the most part it's just knowing the places to define cross sections and how they flow into each other.
Exactly this ! This was the idea behind the template design.
-
Time to continue with this story.
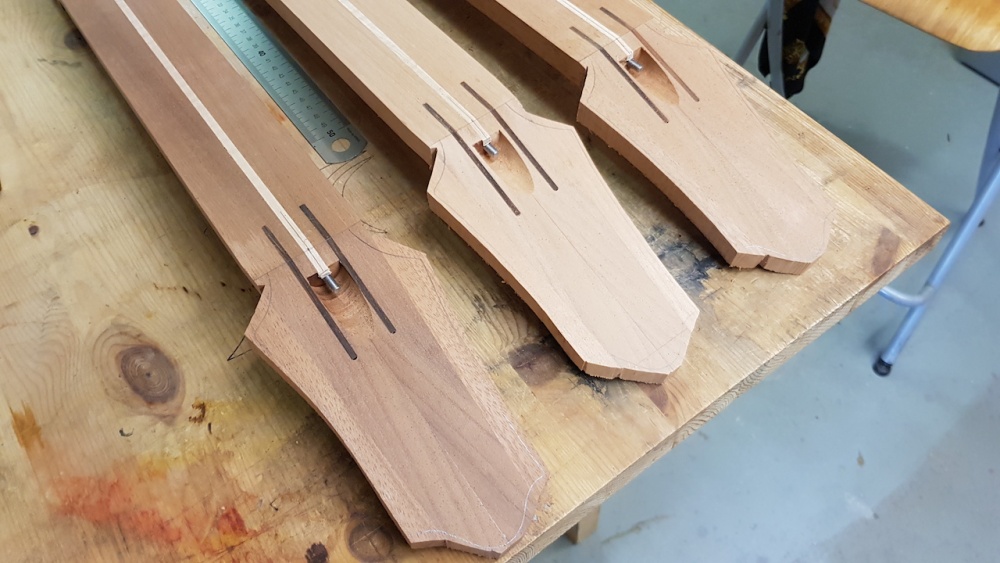
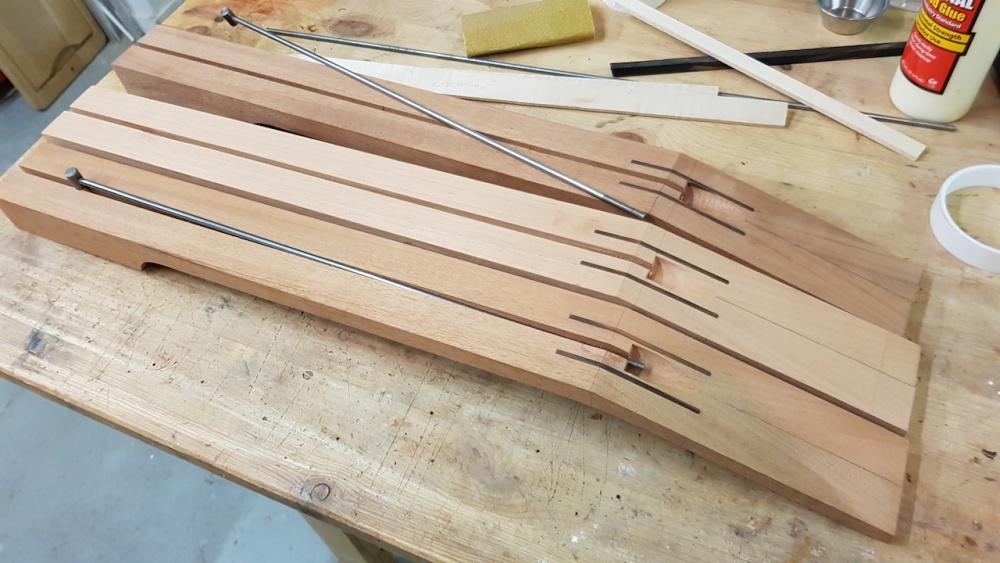
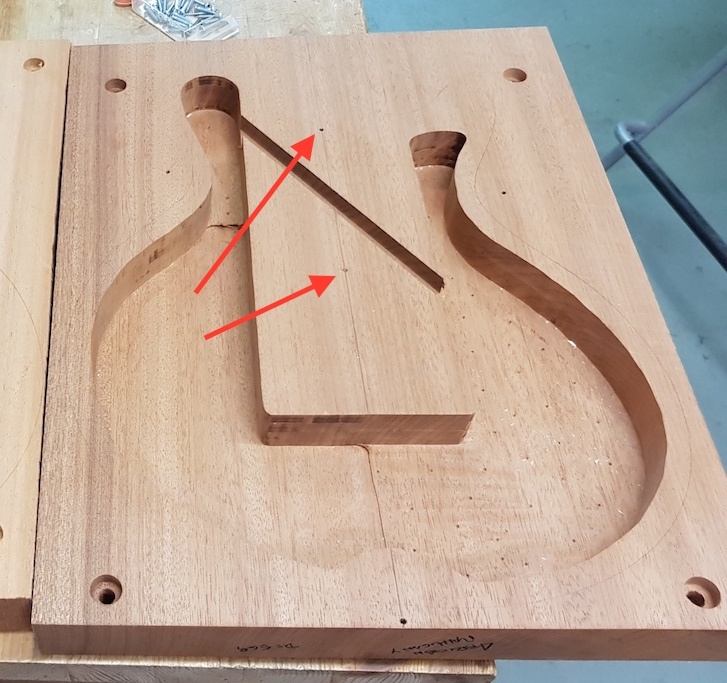
Now it was truss rod installation time. I opted for a vintage style, straight/tilted channels with a maple fill strip for the three guitars.
I have been using this simple TRs with good success. This is the TR style used in classic Gibsons up to the early 60s. This is a straight rod in a slighly oblique channel that is 1/8" shallower at the headstock. It needs to run fairly close to the back of the neck to be effective, and this is why Gibson changed to the curved ones when they went for thinner necks in the 60s.
Frankly, if I were to make any changes I might go for the curved ones, but it is unlikely I will use the two way TRs for the foreseeable future. I like the idea of less steel and more wood on the neck, and in my experience, with careful neck construction and stable wood there’s no real need for a two way TR.
-
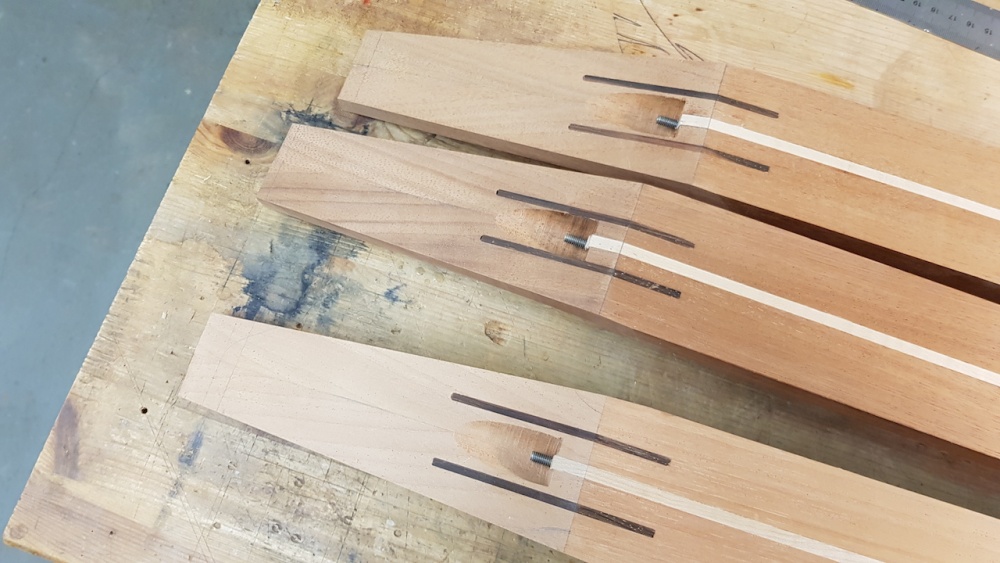
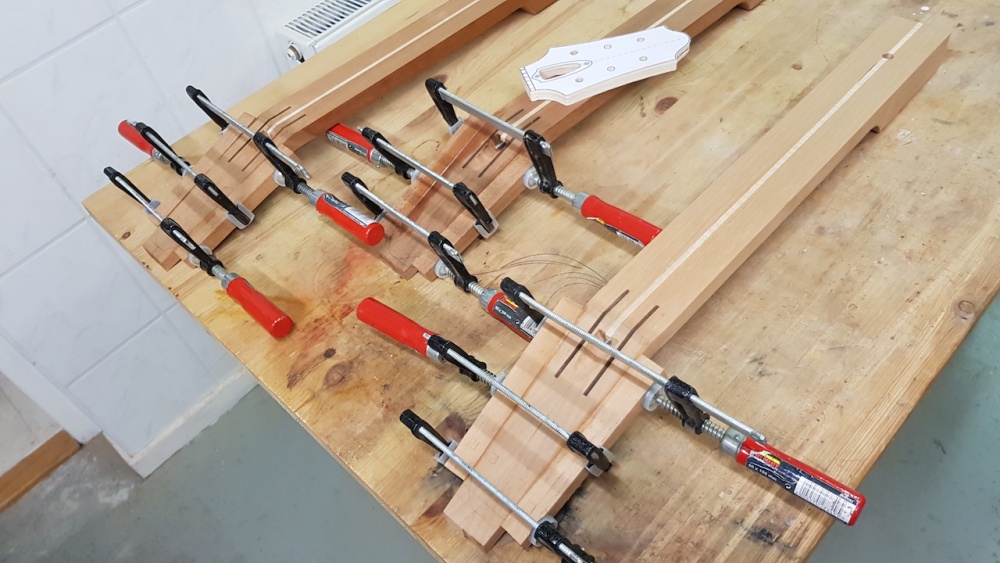
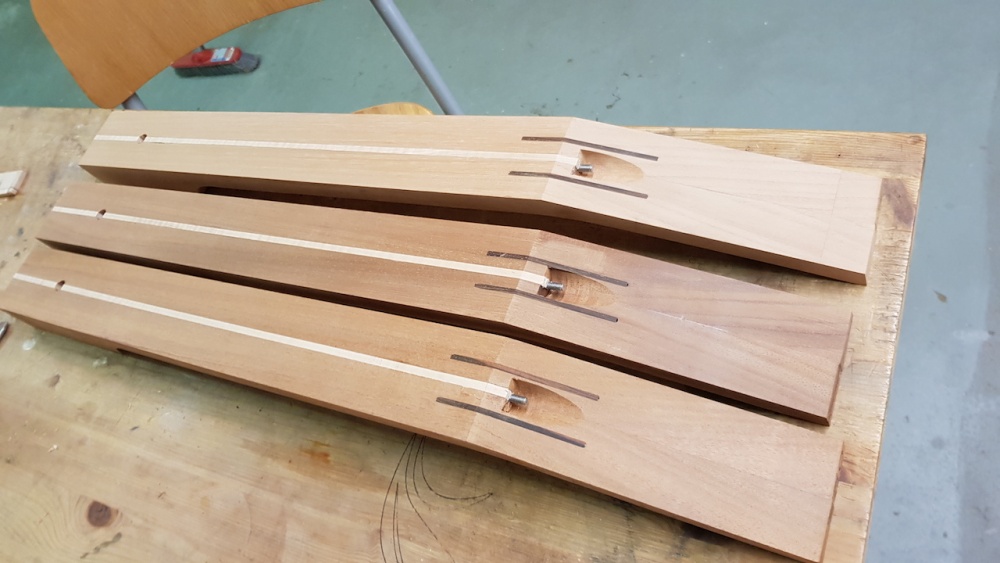
The headstock tilted at 17* is a known weak point in this design: lots of short grain in the transition from neck to headstock. I am not using a volute as reinforcement, and I do not like the look of scarved necks. So I have for a while adopted a spline reinforcing approach. In this case I used rosewood splines, with straight grain following the headstock plane. These will end up invisible, covered by the fretboard and the headstock face plate (and of course the will not show at the back of the neck).
At the time I was thinking of using a two-way rod for the Hollowbody, but I endeed up using a traditional compression rod for all there.

-
1
-
-
A bit of neck action.
Neck and fretboard blanks. All three necks are laminated. Since the grain was more at 45* than quartered, I decided to laminate the necks in two halves, with one half flipped. Once laminated the neck blanks were planed and squared to the standard dimensions I need to use my existing jigs (basically 60mm wide). In a couple of instances, the neck blanks were not deep enough for the headstock length at 17* tilt, so these were extended using a piece from the same blank.
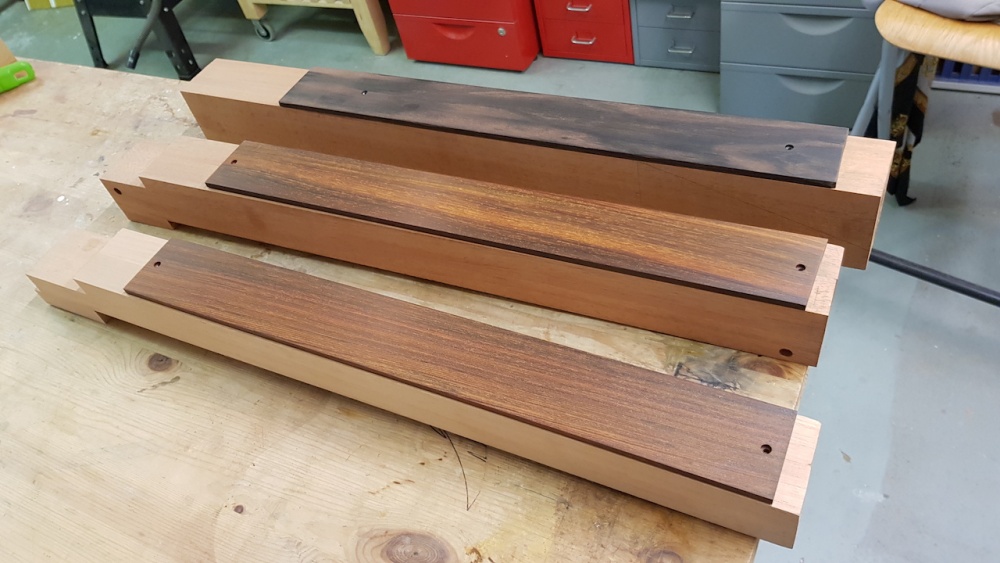
Fretboards are also planed and thicknessed to 60mm and 5.5mm. You can see here the different woods: Honduras Mahogany/B-Rosewood for the hollowbody, Khaya mahogany/Cocobolo for the Fiftynine and Spanish Cedar/Cocobolo for the Fiftyseven.
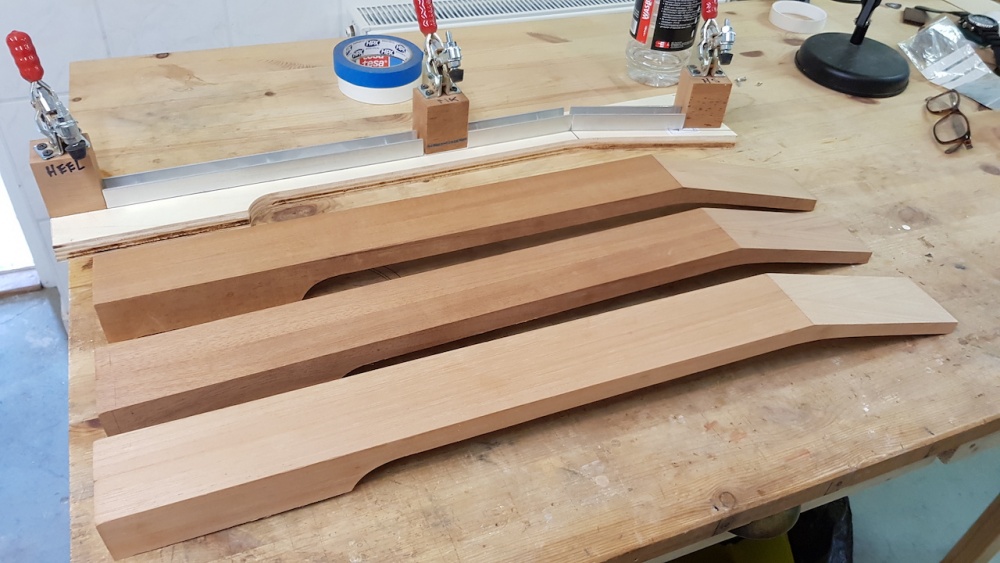
Neck blanks profiled. The headstock face is done first, at 17* tilt. Then the jig shown is used to shape the back of the necks with the flush-trim robosander after the rough cut. This ensures a consistent front-to-back profile.
-
The jig for cutting the neck angle on the top is pretty straightforward. And this was the next step for the bodies.

These were now ready for proper carving.
-
On 6/24/2020 at 5:29 PM, Prostheta said:
How are your topographics derived? I've been playing around with the idea of modelling a carved top in Rhino until I'm happy with the result, then Split intersecting a series of planes to output as a template set. In fact, I might just do this as a proof of concept when I get around to making a carved top instrument....
Sorry for the delay in responding.
I do not work on any 3D software. I'm a bit of a cave-man in that respect. I still work on 2D, basically on CorelDraw, that is a bit of a middle ground between a CAD and an Illustrator.
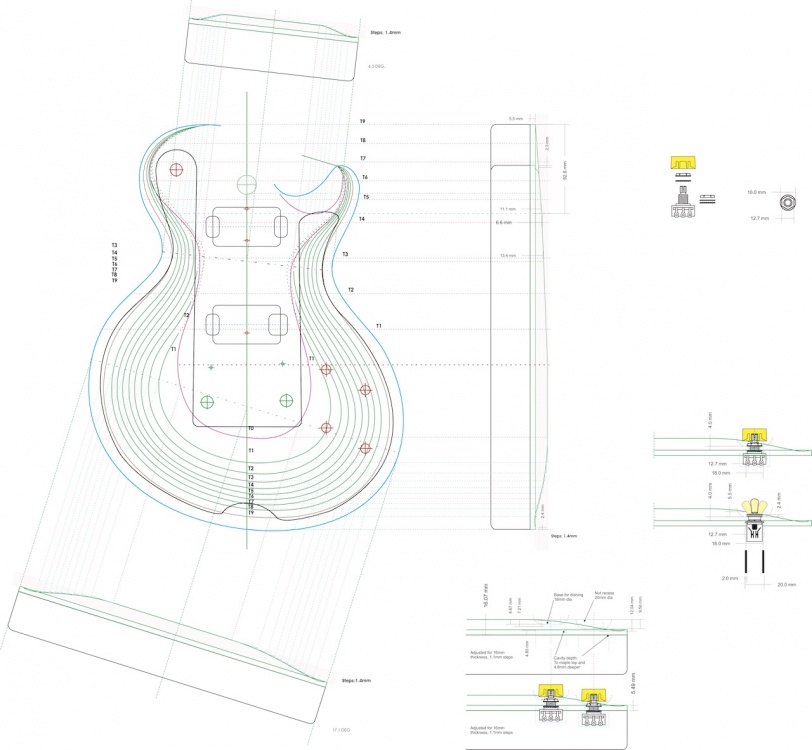
How I derived the templates it's a bit hard to put in words... I decided how I wanted the carve to flow across the two major sections defined by the offset shape (the lower bout at its widest and the waist at the narrowest points), and the centre-line. Then allocated the total thickness of the top to a number of equally incremental steps, and transported the intersections to the outline drawing. Finally I just joined the dots with curves that made proper sense. And that was it really.
-
2
-
-
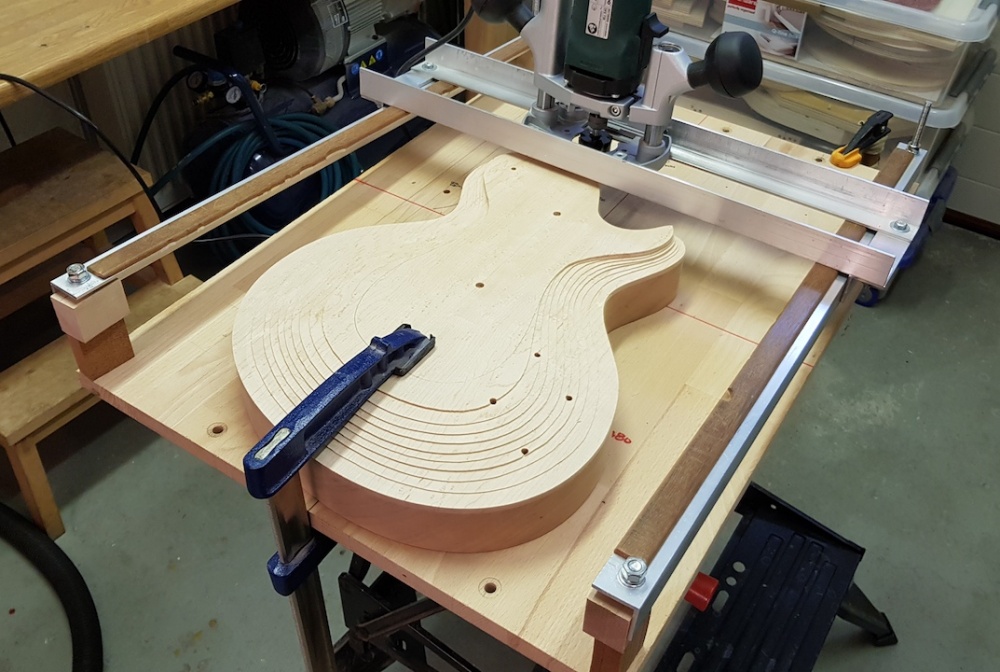
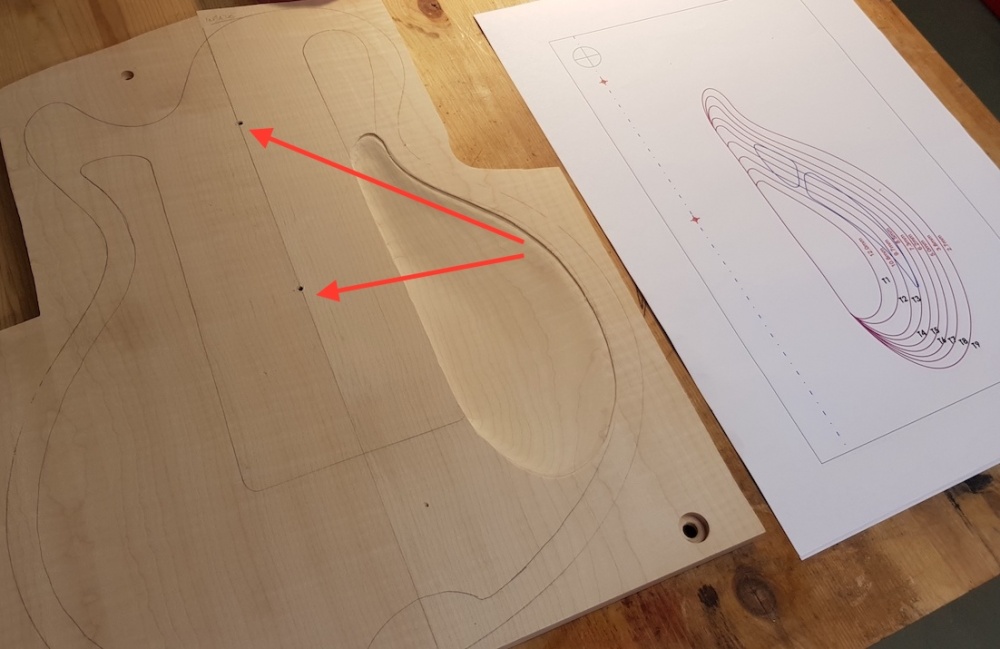
Next was my usual process of the topographic templates for the top carve.
The 9 templates were derived from the ones I developed before for the double cut design, and corrected for the new single cut body shape.
All three done.
-
1
-
-
A few more pics from the archive.
First route for the back control cavities. The initial wood removal I do with forstners, then the usual template for the rest. Never mind the forstner marks at the bottom of the cavity, this is still not to the final depth. The final depth will be adjusted based on the top carve and the existence (or not) of dishing on the top.

Same thing for the Hollowbody, here the cavity opens to the chamber.
I considered several options for the back of the hollow body. I was tempted with carving the back with a shallower version of the top carve, but this opened several issues for the execution of the cavity covers (would need to follow the carve), or a much more complex approach of designing a way for installing the electronics from the pickup cavities....
In the end I opted for the simple approach of a basic flat back with normal covers. There will be time for a more adventurous model...
-
Thanks for the good words. Yes, indeed I try to engineer every aspect of the design on paper (well, the computer screen actually) before cutting wood. Sometime ago, in a different thread, I showed the CAD study of the topo-templates design I needed to achieve the carve I wanted on the offset shape of my design. Some of that work had to be repeated to adapt the templates to the singlecut shape for these builds.
Same thing with things like neck angle/fretboard thickness to attain the desired string action vs. bridge mounting height and regulation range.
Cutting the improvisation to a minimum and working out all these details "on paper", you just need trust the design: you cut the wood according to the blueprints and it will work.
But that's a lot of work to do in advance. I needed to draw reasonably accurate blueprints for all the parts: bridges, tailpieces, inserts, thumbwheels, pickup rings, pots, switches, etc.
You will still need improvisation, but will be mostly limited to fixing accidents, that inevitably do happen.
-
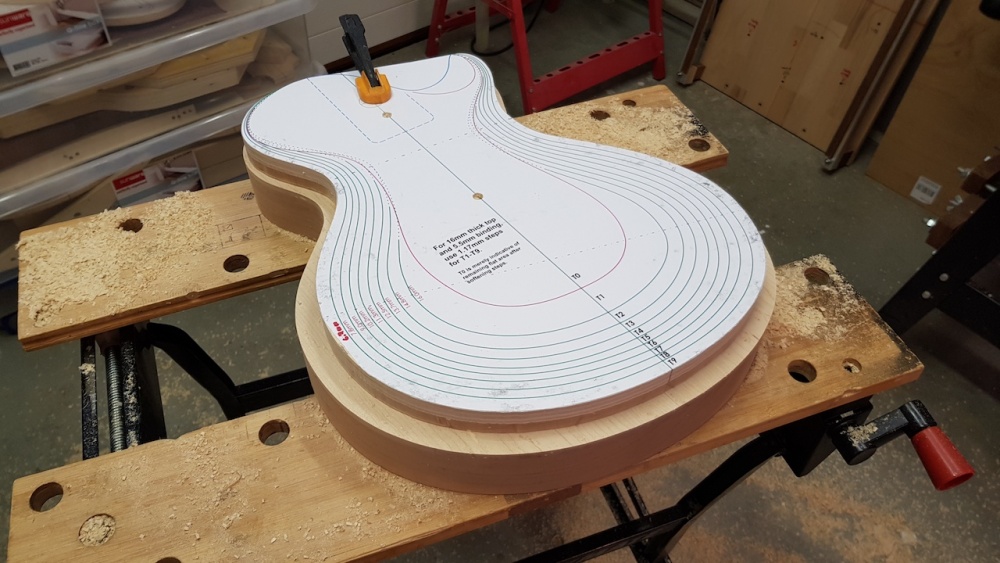
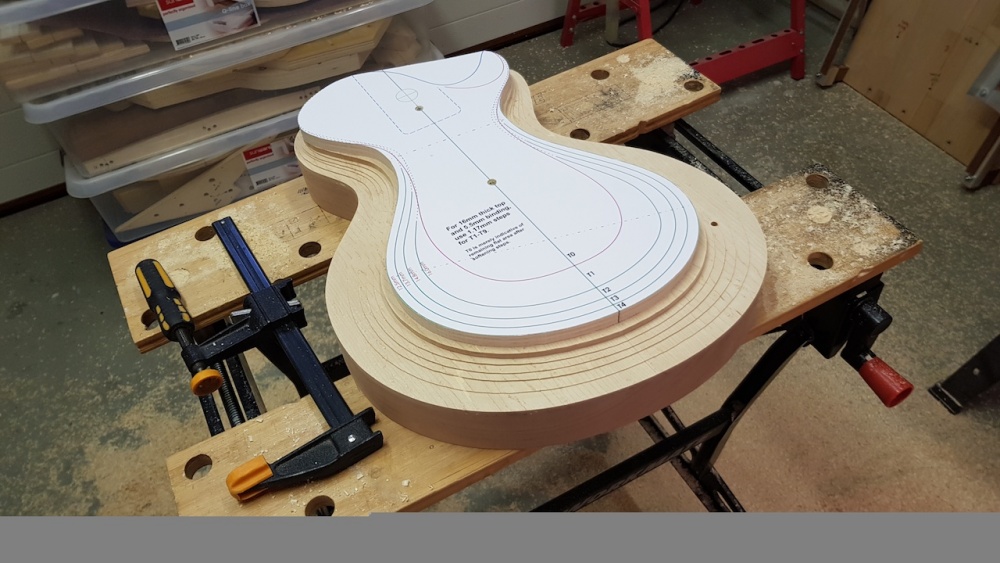
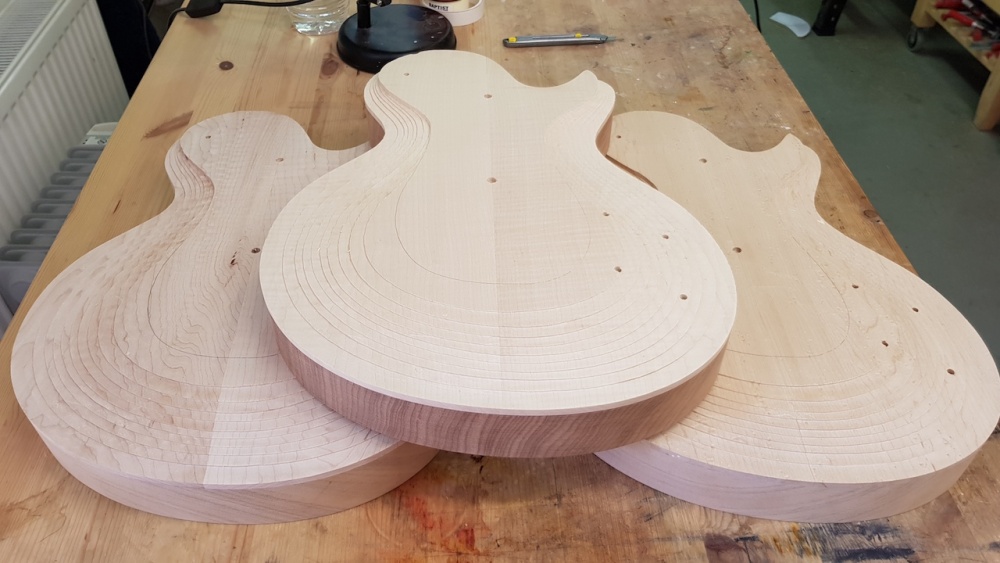
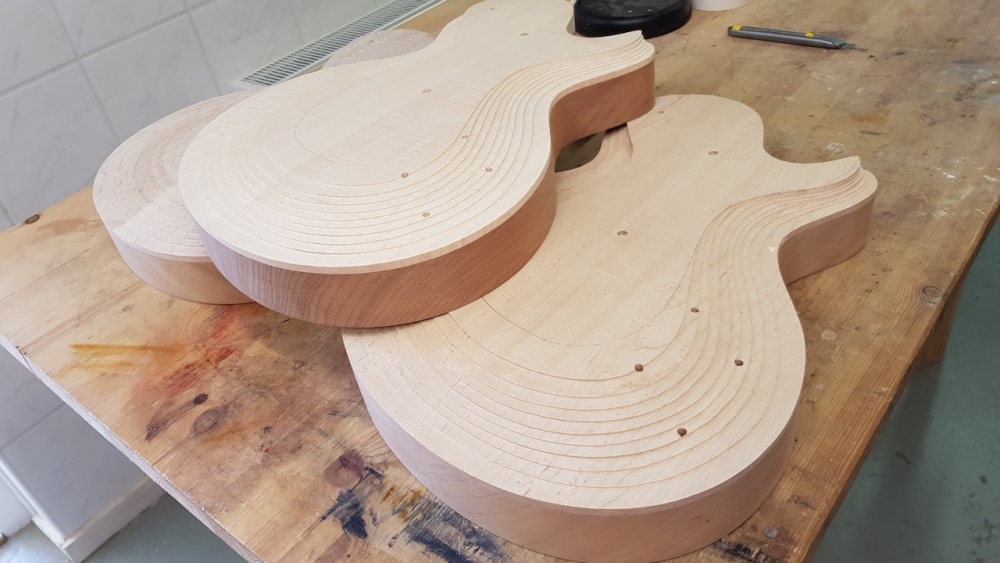
So, a bit of a fast forward now (Sorry, no intermediate pics in the archive, but the process is pretty much like any other maple capped solid body aanyway).
This is the hollow body, already shaped with the top glued on.

This is the FiftyNine
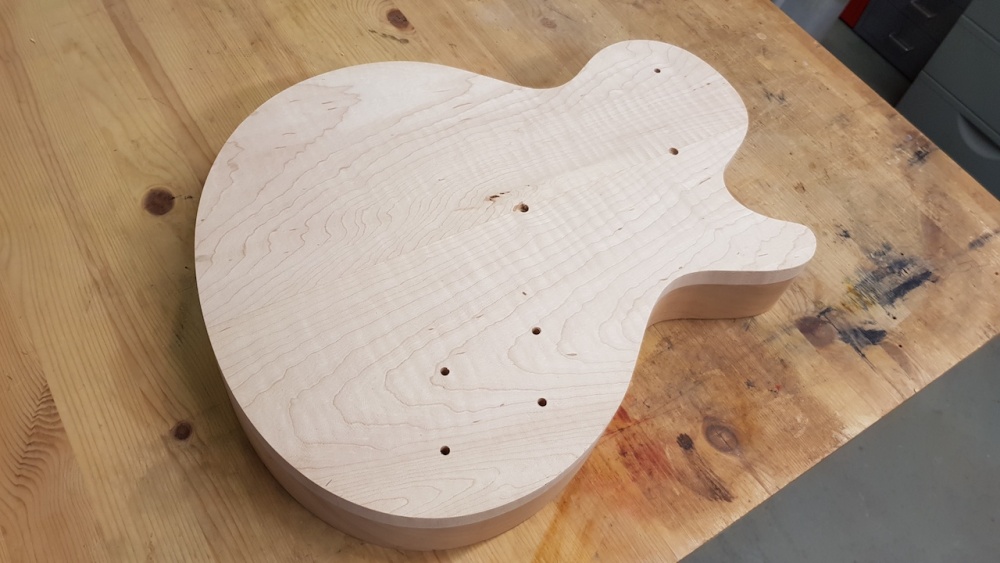
And the FiftySeven

What an interesting birds-eye top on the last one, I hear you say... But the thing was plagued by worm holes, hence, solid color/goldtop.
-
1
-
-
17 hours ago, Prostheta said:
What I would say here is that it might be a good idea to leave your top unattached by the time you carve the top profile, and hence not committed. If you need to dial in anything later, you're going to want to do this from the inside and not through the f-hole. Perhaps dowels or other locating pins will make this easier, plus a few violin rim clamps to hold things in place whilst you work? It looks like you have locating pins in the waste already, so perhaps adding some into the top/body in places like pickup routs, neck pocket, rear bout, bridge post locations, etc. will give you an easier time of things.
That's actually very good advice. I definitely considered it at the time (this happened looooong ago... spoiler: it did work fine). But decided to go the "engineer's way", that is to measure many times, design the templates with alignment in mind, align everything carefully and trust the design....
 Jokes apart, if you're not really confident with the design or if you're working more free-hand, your advice is clearly the only way to go.
In this case the margin of error was low anyway, and I really wanted to prove that the approach works for future designs. Even if there was a one full routing step misalignment (gross template alignment shift), the error in thickness would have been only 1.2mm. In real life with decent alignment, after the steps ridges are evened out, the error in thickness will be a small fraction of that at most.
All carve and outline templates (and inside chamber in this case) have the same two alignment points as they are mounted to the piece. These two points fall, as expected, in the pickup cavity and neck pocket. And every template design is referenced to a common point in the blueprint.
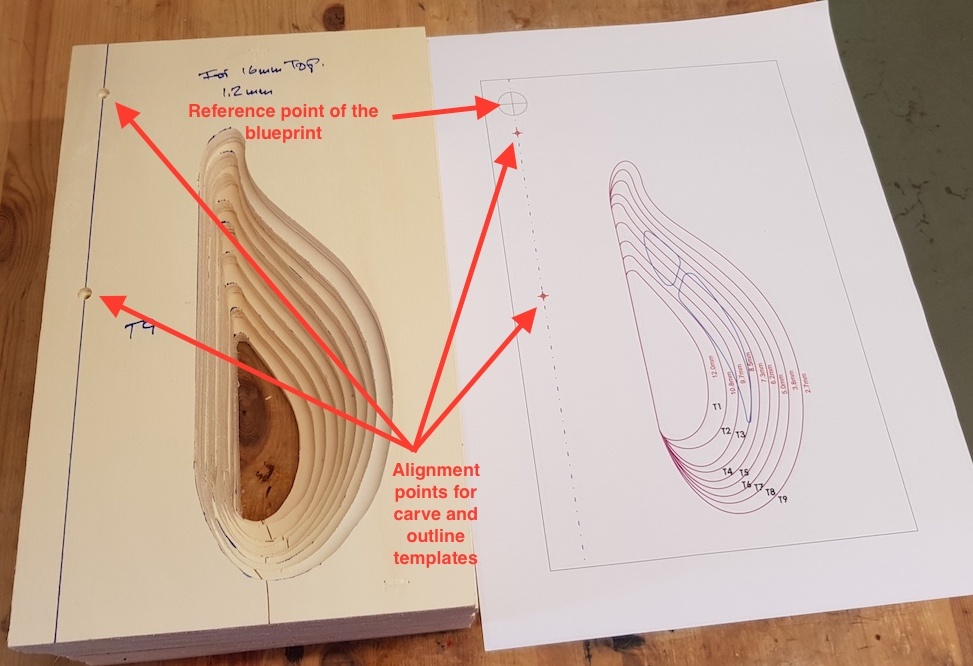
For archtop carving I see very often used the method of drilling with a depth stop at different points. I believe that this template method can yield more accurate results with less fine-tuning afterwards. After all, it is how you would approach it were you using a CNC.
-
1
-
-
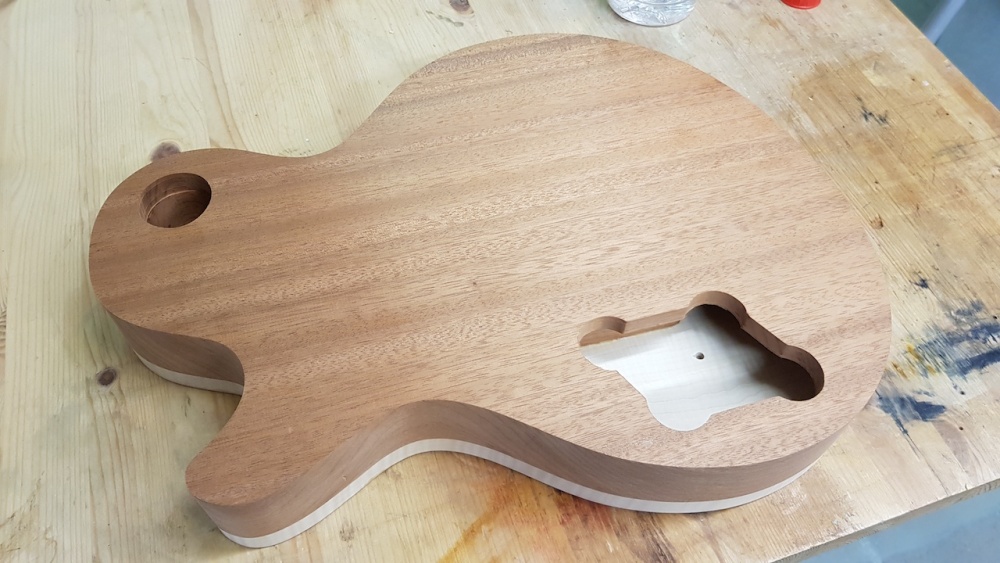
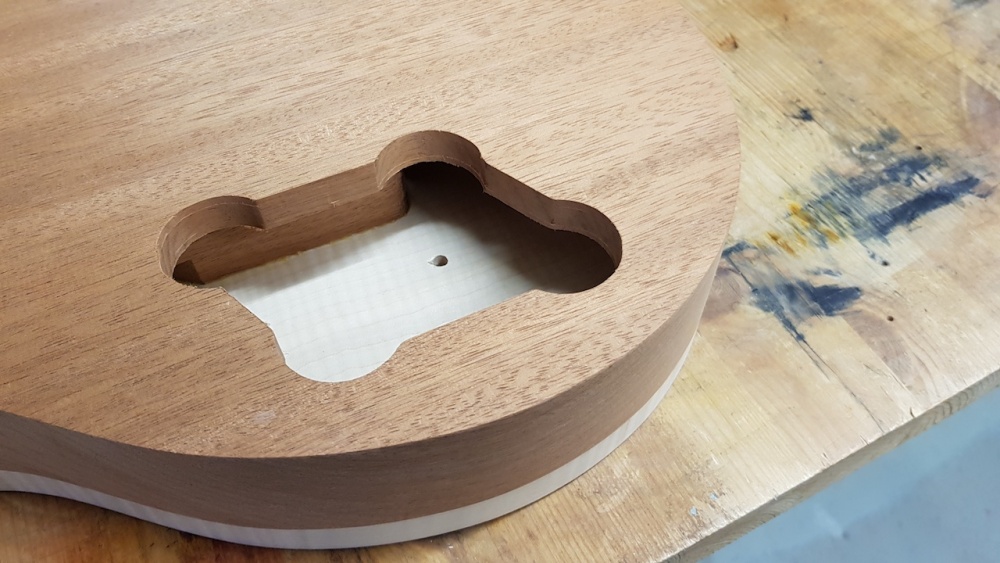
The wire channel routed on the backs.
Note the "standard" size of the blanks.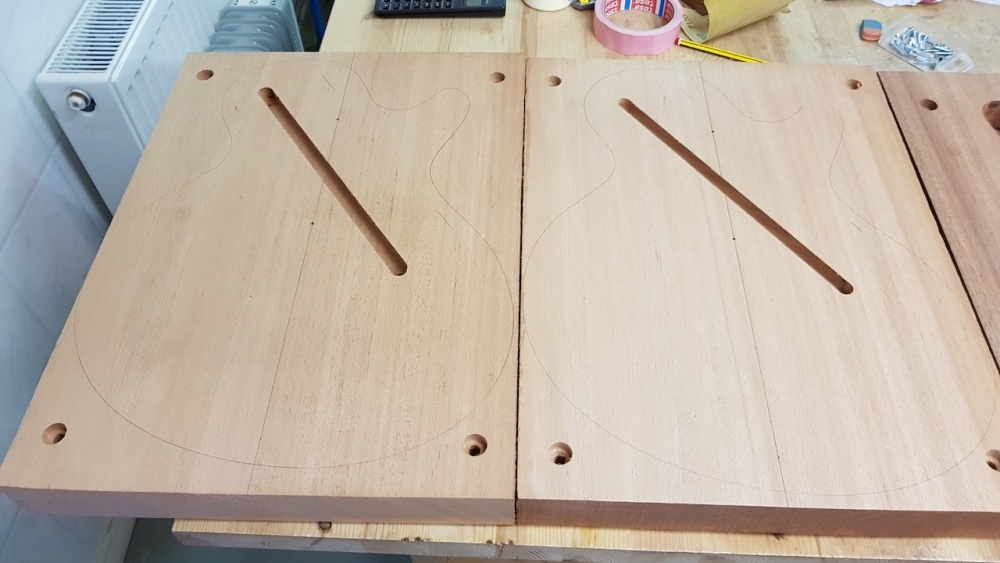
And the big chamber for the hollowbody, keeping a solid center block from neck to tailpiece.
The hollowing was done mostly with forstner bits in a heavy swiss-cheese manner, and then evened out with the router and a template. The base of the router had to be widened with a flat piece of wood to make it sit stable between the edges and the centerblock for such a wide routing area. The back is 8mm thick in the chamber, if the router falls-off the edge while you're working on this it can easily make a disaster.
Also the soundhole area is slightly deeper, this was to remove the marks of the forstner bits tips, as this area will be visible through the sound hole. It was also sanded to 320 grit for a nice appearance.

-
1
-


Blackish.........sort of.
in In Progress and Finished Work
Posted
This is just amazing ! Your finishing is top notch (and very tasteful) !
That was an incredible save you did there. Those micro bubbles of the nitro can be a pain !
I also have concrete floor in the garage and every time I'm moving a guitar in and out of the spraying booth I hold my breath in fear.... So far I have been extremely lucky.
Congratulations, it's looking seriously good !