


jmrentis
-
Posts
1,987 -
Joined
-
Last visited
Content Type
Profiles
News and Information
Tutorials
Product Reviews
Supplier Listings
Articles
Guitar Of The Month
Links and Resources
Forums
Gallery
Downloads
Posts posted by jmrentis
-
-
Yea, stuff like that you'll always see first. I have some errors I see constantly, but most others wouldn't and they drive me nuts. I know this might be a bit out there, but you could also do a small inlay of the owner choice with either pearl or contrasting woods after you have done the plug, that way its plugged and strong, yet the joint/plug will be covered completely. I know its a strange spot, but if the owner did like a certain idea you could also do it on either side in the same spot so it looks even. Although I bet your plug will turn out decent enough. Best of luck fixing it and great work on all the other rigs, very nice work. J
-
Wow what a beautiful guitar!!! Lovin' it all the way around, the finish is very nice, I really like the design, and those woods are just gorgeous. Very well done and glad to have you aboard and look forward to seeing your future work. J
-
Are we trying to see if a simple sandpaper cutting thread can go on for a couple pages ?

'cause I'm running out of ideas.
How about wrapping razor wire around one of your car's wheels and backing over the sandpaper laying on your drive-way ?
Hey, I'm up to the challenge if you are!! Alright a new one huh, how about using a pizza cutter to score the sandpaper before using your karate chop to sever the pieces.
-
I would most definitely add tape to the board. I have been broke, but am planning on buy the long diamond file from SM as I hung around and questioned a local repair shop for a good while and not only did they agree they were decent files, but they actually had the set and used them themselves. Anyhow, I had ended up using a small triangle file not just recently to crown frets on a cheapy ibanez I own. It actually went well, but took freakin' ages to do. Basically, when you level you end up with a small flat spot on the frets right and this is what you want to be your new crown, so you shave down the corners of that flat spot basically, leaving the middle untouched since this is the part thats level all the way down the neck. When you level you'll see the sanding marks across the top of that flat piece, just make sure you leave a little strip of that when your crowning, I check often by holding it at an angle in the light so I can clearly see those scratches of the flat part. I'd try to keep the file perfectly vertical and grind down the corners of that flat section and stop before you would end up grinding the very top of the fret. Thats at least the idea. I'm sure those who have done this hundreds of times like soap would have loads better info.
Again, definitely use tape, not only does it prevent scratches, but it prevents all kinds of metal shavings and dust from mucking up the fretboard. If the bottom of that file is really sharp like cutting your tape, I'd probably run it over some smooth sandpaper to take any burrs off. Best of luck and wait for some better info
J -
Why not just route the lines of the square without routing away the middle, that way it looks like you did an inlay and tells you what fret you're at and you don't have to worry about it looking less than perfect by filling it with glue. I think even if you do it extremely well and find perfectly clear glue to fill the route, you'll end up with shadows that throw off the look quite a bit. Seriously, I'd probably just buy some small straight pieces of black MOP and use them to make a square leaving the center untouched. Just an idea to play with. Best of luck to you. J
-
You can even do it on the bandsaw if you want. I use different block and shapes all the time, so I just flip it over and us a razor blade. However for some sanders I'd probably cut a load on the bandsaw. No biggie. J
-
Maybe for strength purposes as the if the grain is going vertical across the pickup it would be weaker than horizontal, more prone to breakage. Thats my guess anyway. If there is a concern about strength you could always just use a veneer across the top to give you the look you want without any concern. I think I've seen Myka do something of this nature, but I'm not certain. Best of luck to you, nice wooden pup rings always look nice!! J
-
Wow, what a trip, I've never heard of anything like that. Very interesting and that video was pretty neat. J
-
That is one of the drum sanders/thickness sanders I've heard used by several members in this forum and another. And really all the feedback has been really good for that machine, its the one I see most recommended generally.
Here is a link to some planers to see the difference. Basically what was said already covers the difference. Both tools have their uses as stated. I'd really like a drum sander, I think I'd be better served with a sander vs. planer, though truth be told if I had the cash I'd want both, plus a jointer. After walking the show Wood Works on the DIY network, I've seen what a shop should look like, LOL. By the way those were just random links I found googling. J
-
Actually Killemall is right, the ability enter a guitar ends around the 23rd of the month at which time its switches to a poll thread in the "put it to a vote" section and the next months GOTM build thread is opened. So just a couple days left till it closed. I've noticed in generally a significant increase in entries nearly every month. I've seen a lot more newcomers entering, like you mention people very first post will be an entry and I've also seen more established builders entering guitars. Its going to be a good GOTM thats for certain, loads of great builds. Best of luck to all of you! J
-
No worries! I had never watched that movie till just now when you mentioned that and went and found quicktime and downloaded it. I don't know if I never had quicktime on this computer or removed it. I'm glad you brought it up as I actually wanted to see how Ricks guitar was looking. It really looks really nice with that second coat on there, can't wait to see how it ends up. J
-
Mine couldn't read it either! Does you computer bring up three options when you click on it? Like find, save, or cancel? I just hit find and my computer brought up a link to download an Apple "QuickTime" application, which will allow me to play it. So if you computer doesn't bring that up, you should be able to find it pretty easy by searching for QuickTime movie player, I believe. I think that'd work, let me know if you do try it. J
BTW- If you like the program your computer uses to play audio files and such, make sure you unclick the setting that changes your computers default to iTunes program.
-
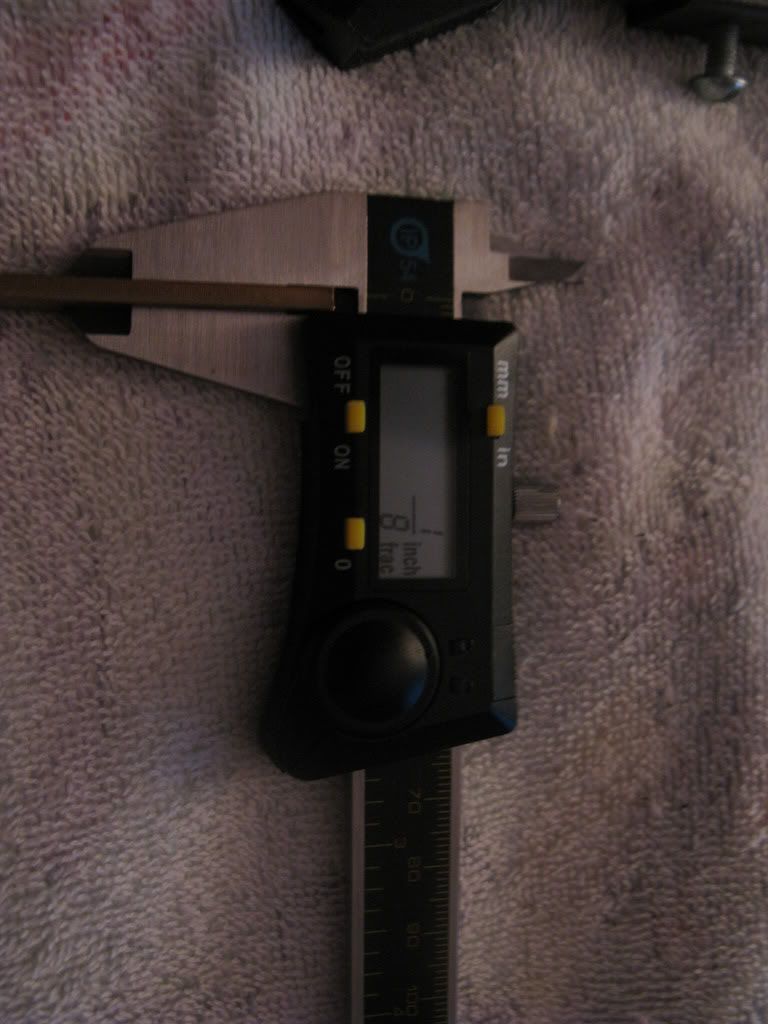
Mine never goes completely "off". If I zero it and turn it off, then open up the jaws and turn it on, it displays the correct measurement which means it's constantly "monitoring" the displacement of the jaws. It doesn't turn itself on when I move it however.
Thats what it is, can't believe it didn't cross my mind. Mine works the same way, it doesn't turn on when I move it, but if I move it while off, it will still accurately tell the measurement. Thats why my battery died on me while in storage. Soaps right they never really go all the way off, just remove the batts save on having to replace them all the time. I don't know if all are easy to remove, thankfully just a twist will do the style I ended up with. J
-
You've got to be kidding me.....
.....you mean to tell me that in all the years that this forum has been going, NO ONE has grabbed the name "guitar_player" yet?!?!?!
Doesn't seem possible does it? -
LOL
Thats crazy the numbers come back up when you move it. Mine will stay off no problem, I just can't figure why the battery was gone when I pulled it out unless it was pulling juice while it was off or I somehow left in on as I packed it away. Oh well, we'll see how this batt goes. I was glad I got one though, the manual one I had was tough to read correctly, I used it more to transfer measurements than anything else. I still want some nice rules though, like those nice Starrett ones, not too mention the 18" straight edge. J
-
Another thing : If you don't want to be buying new batteries often, take the battery out after every use (yes, PITA, but will save you enough $$ to justify doing it)
Interesting! I had no idea, but now that you mention it, I will definitely do so. Reason being when I pulled out mine to measure those stewmac cauls it had been sitting in its case completely off, yet the battery had gone dead and prior to storing it I had barely used it. Thankfully as that one it came with an extra battery in the case so I replaced it, but I think now I will take out the battery. The one I have is super easy to remove the battery, just a twist and thats it, definitely worth doing. Thanks for the heads up! J
-
Very nice Jon, glad to see you around!!! That project came out very nice, bridge is very cool, woods are excellent, and love the black strings on there. I was experimenting a bit with different finishes and tried something that I liked and might fit here, not 100% done though yet with the experiment. Anyhow, I had done a bit with a good amount of coats of walnut oil or danish oil, I'll have to go look, anyhow, it looked great, but didn't offer the depth I wanted and recently I started testing with Tru-oil and I decided to try adding some to that piece since the other oil never built up at all. Well, it looked great once I added even one later of Tru-Oil and now a couple more coats in looks even better. Still I want to make sure the adhesion is permanent, if not a barriar coat of shellac would be in order. Either way it might be worth considering here, it really was nice looking. Anyhow, great stuff as per usual Jon and hope to see you around a bit more. Jason
-
I ended up getting the one that LMI sells and it works great. Cheaper than the Stewmac one I believe as well. For those who don't have the access or desire to make one, the fret benders are a good alternative. J
-
Ok thanks. I'm so unfamiliar with metric measurements, that I didn't realize those were more right on the money.
Yeah, I never know what to use anymore, so generally I just use what is referenced. Say some site or person suggest 2mm, then I'll use mm, if its in fractions, I'll use fractions, and so on. I never know what to use and am not entirely familiar with metric either, I completely forgot that my caliper did decimal conversions as well, which I'm glad to remember as it will be useful surely. I have a web page that'll do loads of conversions for me in a click, so when lost I generally refer to that. I think it was a member here who pointed it, one of the bookmarks I use quite often. Can't recall who posted it, my first thought was Jon, but I really can't recall.
-
Jason, does that caliper have a decimal option ? I'm wondering if it's just rounding off to the 1/8".
In other words, are those cauls right on the .125" mark ?
Hell, I wouldn't be surprised if StewMac gets brass stock in slighty different thicknesses.
I should have guessed 3/16" is thicker that what they're selling, because the ones I make are 3/16" and I always thought they looked thicker than what I saw in StewMac ads.
I checked a couple times and it comes in at .1230". I could probably check the others to check for variances, but probably won't bother unless anyone is curious or needs it done. I should have add the decimals for each measurement, I added the mm instead, which I did to show that the fractions weren't exact just as you thought to ask about. J
-
I have just a digi caliper. I obviously zero'd it. I got 1/8" thick by 2 & 29/64" long by 13/32" tall. So thats 62.50mm long by 3.13mm thick, by 10.50mm tall.
Another measurement I got was how deep the pocket in the arbor is itself and measured out at 5/16" or around 8mm deep.
I took pics of it for whatever reason. Hope that helps a little bit. By the way this was a 12" radius caul. I have the set so if you would rather have me measure the height off of another caul with less radius let me know, I just had the 12" in at the time I grabbed it. With having the depth of the pocket in the arbor I figure that'd be more important anyway. With the radius piece in place it sticks out less than 2mm in the center of the arbor, actually about 1.5mm. Also the brass radius insert is actually just shy of being as long as the arbor. The arbor itself is 2 1/2" or about 62.57mm or so. Best of luck and let us know how they turn out. J
-
Yeah, Matts bevels do come out nice and clean. As for the scale, i think its just an optical illusion as Matts not going mess that up. I don't know the scale length, it does *look* short, so maybe its a 24fret 25" scale. Also, that is 7 string hardware on there which is bigger obviously than 6, so it kinda throws off the scale of everything when looking at. Using one humbucker as well looks different slightly and he places it off the bridge a bit. So I think its just optical illusion.
I'm glad to see you back and at it Matt! Shortly after your trip to be an apprentice of sorts you kinda phased slowly out of here. Its cool to see your work and designs back in action! Nice work and keep 'em coming. J
-
Agreed on the strat, its just beautiful! I don't know that I've seen a flame paint job I've liked more. The green and purple go extremely well together, especially when broken up with that skull. I had a slight chuckle when at a glance it looked like the skull was wearing a pickguard as an eye patch. For some reason that skull and eye patch remind me of a game I've been playing recently on PS3, one of my favorites of all time.
I had one question, I am confused with the jack? Is it a normal jack, just upside down or ? It would just seem the cord would get the way being that close to the bridge unless you used strictly right angle type cords or something. I just don't know that I've noticed a jack like that, though I'm sure I have seen one at some point.
Anyhow, just an excellent project, as PSW mentioned, it would be nice to have had the back plate match the project, but all in all very well done paint job there. I'd love to see anymore pics you have of that thing, especially some progress pics, I'm totally interested in how you were able to bring those flames to life, man oh man do I wish I had some kinda artistic ability, lol. The other project looks great as well and I look forward to seeing future finishes. J
-
Yeah, that was the only problem about the bookmatching I could think of is getting it lined up perfectly, it'd be tough as can be no doubt. Its look amazing so far. Epoxy can be messy and a PITA, but it can work well for leveling. Did you try it on top or sides and back? With the bubinga I have it doesn't seem to need any type of leveling or grain filling and I would imagine using epoxy on it would be a trying experience. On my Zebrawood though, man oh man, even just one good grain fill made it feel worlds smoother and will make finishing it so much easier. I'll probably try some Zpoxy sometime in the future as people rave about it for grainfilling, but I just used my West systems and it worked fine. I've tried hardware store epoxies in the past and will never do so again, they were a royal pain, smelled terrible and didn't even harden all that well, not to mention they were so thick applying the stuff was miserable. As always can't wait to see how it turns out, it already looks amazing. Best of luck. J

The Fretboards/ Fingerboards Thread
in Solidbody Guitar and Bass Chat
Posted · Edited by jmrentis
I knew I had seen an inlay like that before and now seeing your post that is where I remember the idea from. I really liked those inlays a lot when you posted your guitar, I thought the idea was very cool and looks great. Honestly, I had no idea you actually went as far as to miter the corners but shows the worksmanship you put in because up close there would be an obviously different in a lap joint and miter in my eyes. I know that took forever to do. It took me a little bit just to make one "v" style block inlay with a small v shaped abalone piece between two white MOP pieces and my binding on my guitar took me even longer. It was just laminated thick plastic, but getting 7 different miter joints of different angles to fit was tough, plus the binding was a .040 white outside with a .020/.020/.020 white/black/white so I had to make sure each of those .020" lines matched up exactly at the miters, I soon obtained a great respect for builders who do miters, LOL, seriously.
For that style of inlay you did, I think I'd make myself a jig to use to create a perfect 45degree angle, probably a cutting and then sanding jig, it'd make it go faster I think that trying to puzzle them together and sharing by eye and hand.
I think your new idea is a good one though, going with thinner pieces and possibly another type of material, one that is easier to use, especially if want a thinner channel. I think you could get really creative and do square outlines that resemble a binding w/ purfling, by using two materials one super thin like an abalone style with a thicker white MOP. I think that would look interesting on certain guitars.
Anyhow, I look forward to see all these ideas put to use, honestly if they were never used I'd probably jump on those ideas in a minute, I really like them a lot. Please, plenty of pics people ; ) J