


Skyjerk
-
Posts
213 -
Joined
-
Last visited
-
Days Won
13
Content Type
Profiles
News and Information
Tutorials
Product Reviews
Supplier Listings
Articles
Guitar Of The Month
Links and Resources
Forums
Gallery
Downloads
Posts posted by Skyjerk
-
-
On 5/27/2019 at 4:53 PM, ScottR said:
Seal coat and dam. I actually put a coat of water based sanding sealer over this to see if it would protect the dye.

I'm thinking it didn't help. It looks like the poly changed the blue to bronze again.. I''l have to ask @Skyjerk if he's ever run across this.
What exactly happened?
-
Have these competitions been discontinued? There's been no movement here since the poll closed, nor a February GOTM thread started...
-
The stuff stinks and is sticky as hell, but it's awesome. Easily creates the perfect surface on the most porous wood.
your tele body looks great

-
 1
1
-
-
1 hour ago, Prostheta said:
Sorry guys - going to post this one right away. Living without a permanent desktop computer, so routines have become a bit up in the air. January/February should see a bit more of a return to normality at this end. My fault entirely!
Congrats on your second GOTM bagging Chris! Hoping to try and snag your second GOTY?
Thank you
one can always hope, but the competition is pretty stiff. Just glad for the chance to compete
-
Hello? Is this thing on?
-
Thought this thing closed automatically after a week
-
1
-
-
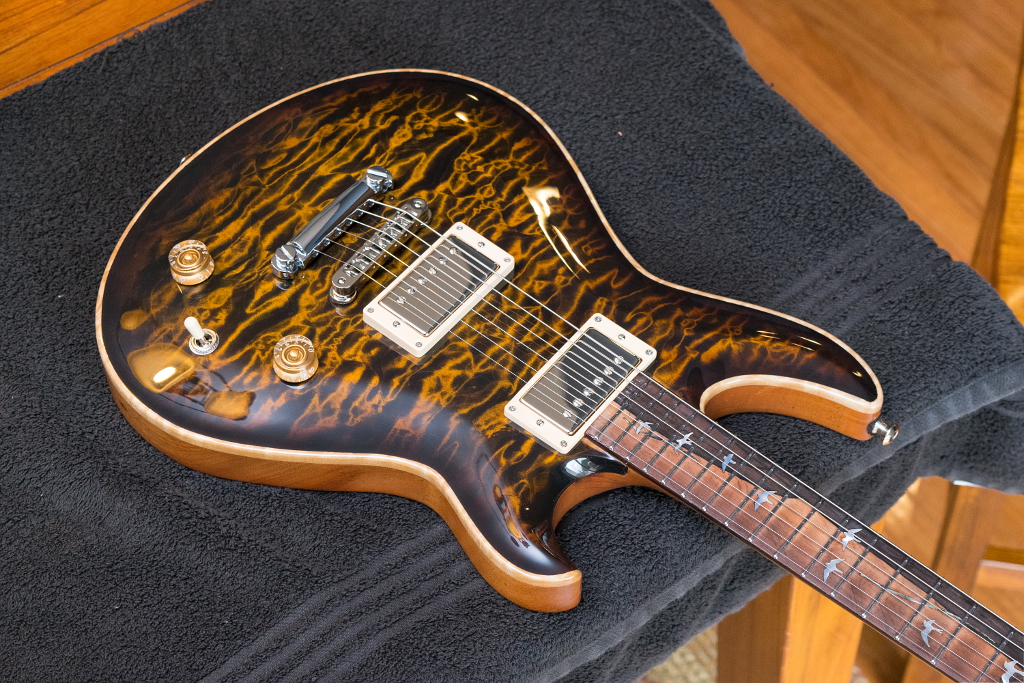
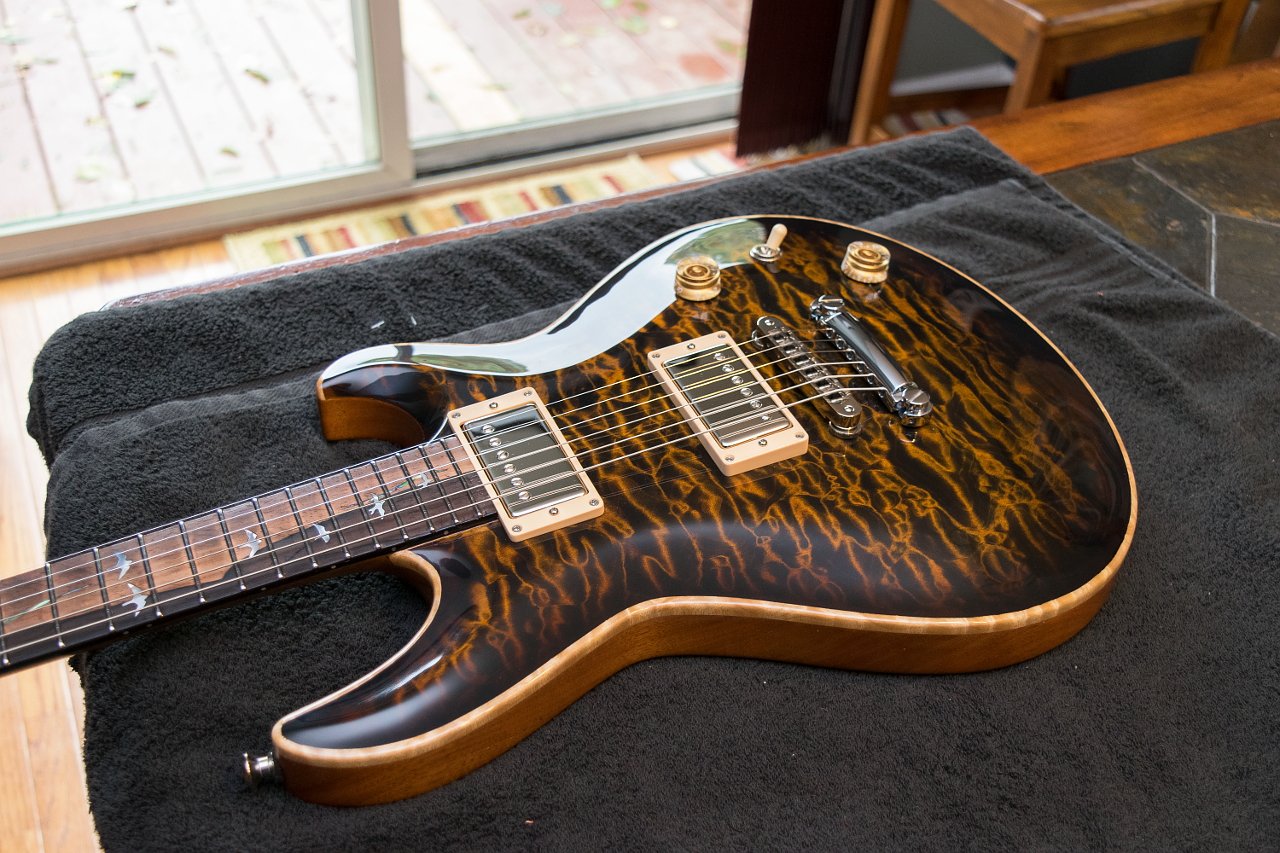
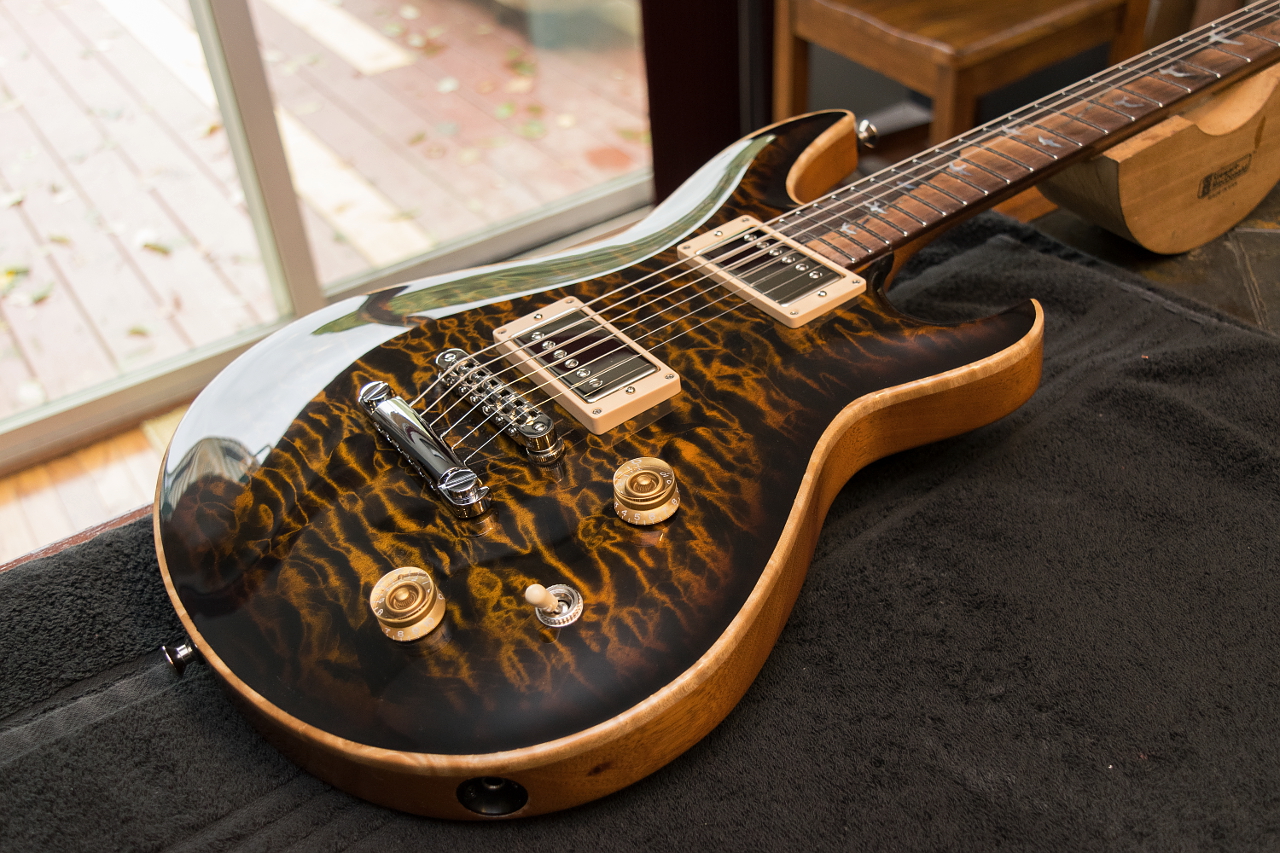
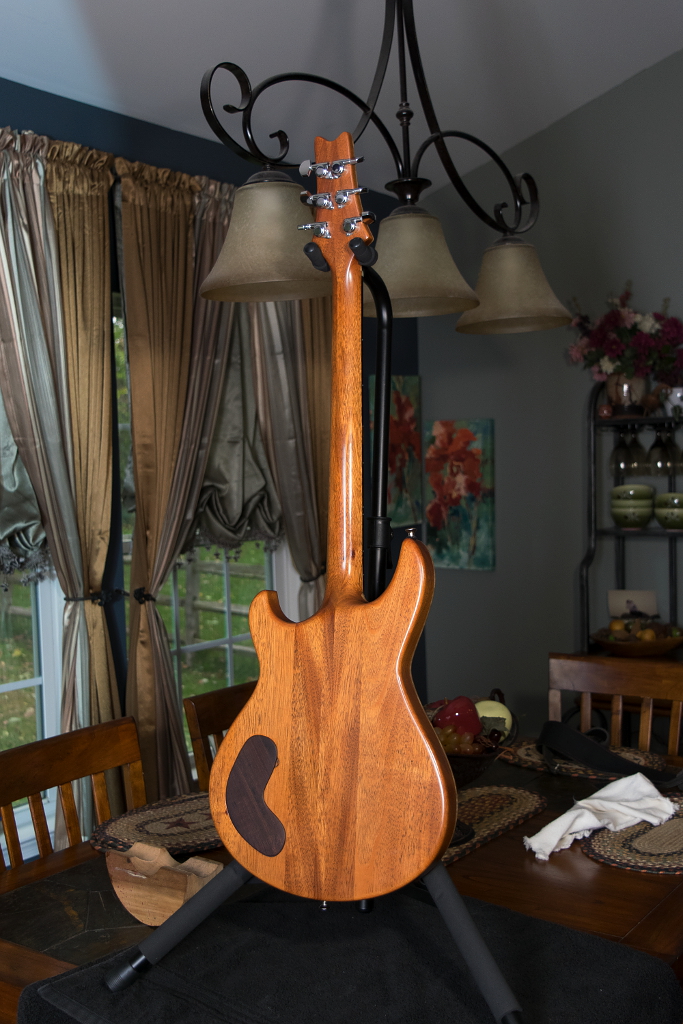
The Root Beer Float
")
OK, its a stupid name, but I dont have a better one yet and my band mate threw that name out as soon as I brought it to rehearsal 2 weeks ago. The colors do have that vibe, especially in lower light settings. In brighter light (like most of these pix) its more orange looking
Model: 22 Magnum
Scale length: 25"
Radius: 12"
Construction: neck-through-body, 3-piece laminate neck, carbon fiber reinforcement
Body and neck: Bolivian mahogany (Swietenia macrophylla)
Top and matching headstock: book-matched, quilted big leaf maple
Binding: natural (faux binding)
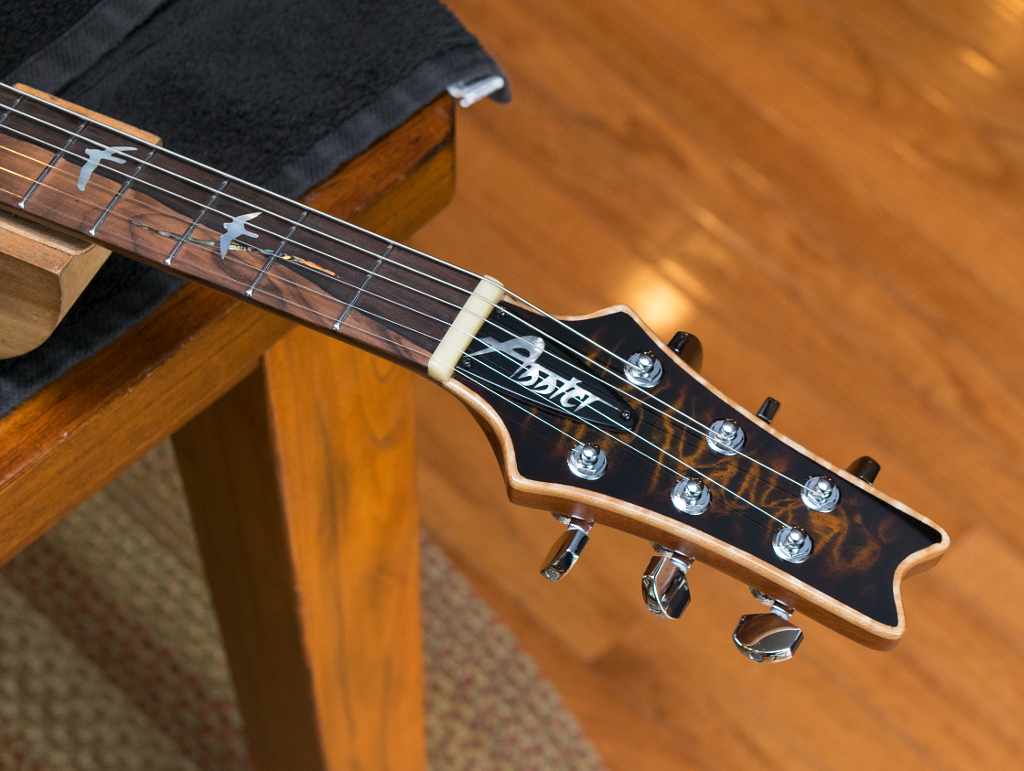
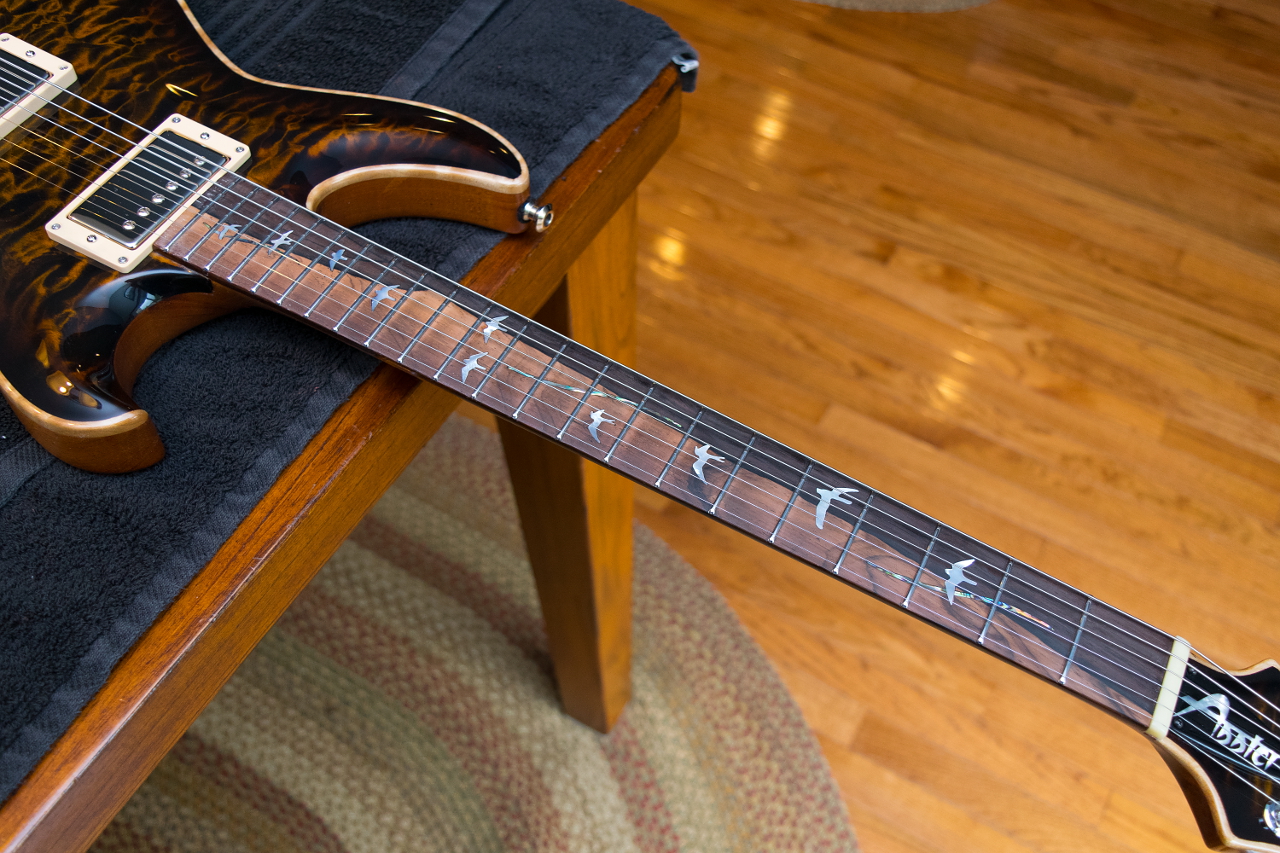
Fretboard: Brazilian Rosewood
Truss rod cover: ebony with MOP inlay logo
Inlays: mother-of-pearl and abalone
Frets: medium jumbo stainless steel
Nut: unbleached bone
Pickups: Seymour Duncan JB bridge and 59 neck
Tuners: Schaller locking 3x3
Bridge and tailpiece: Tonepros
Control cavity cover: Indian Rosewood with magnetic fasteners
Finish: Nitrocellulose lacquer
Guts: CTS 500k pots and Sprague "orange drop" .047 cap
HERE is the build thread


-
2
-
-
I was the token vote for the bloody hand
It just looks like Tim Burton to me and I had to vote for it
At first I was like "What the...?" then as I looked closer I saw how much work went into this and how original it is.
-
1
-
 1
1
-
-
- Popular Post
- Popular Post
On 10/31/2018 at 10:26 AM, ScottR said:I'd like to see that thing in direct sunlight.
SR
couple outside shots...


-
5
-
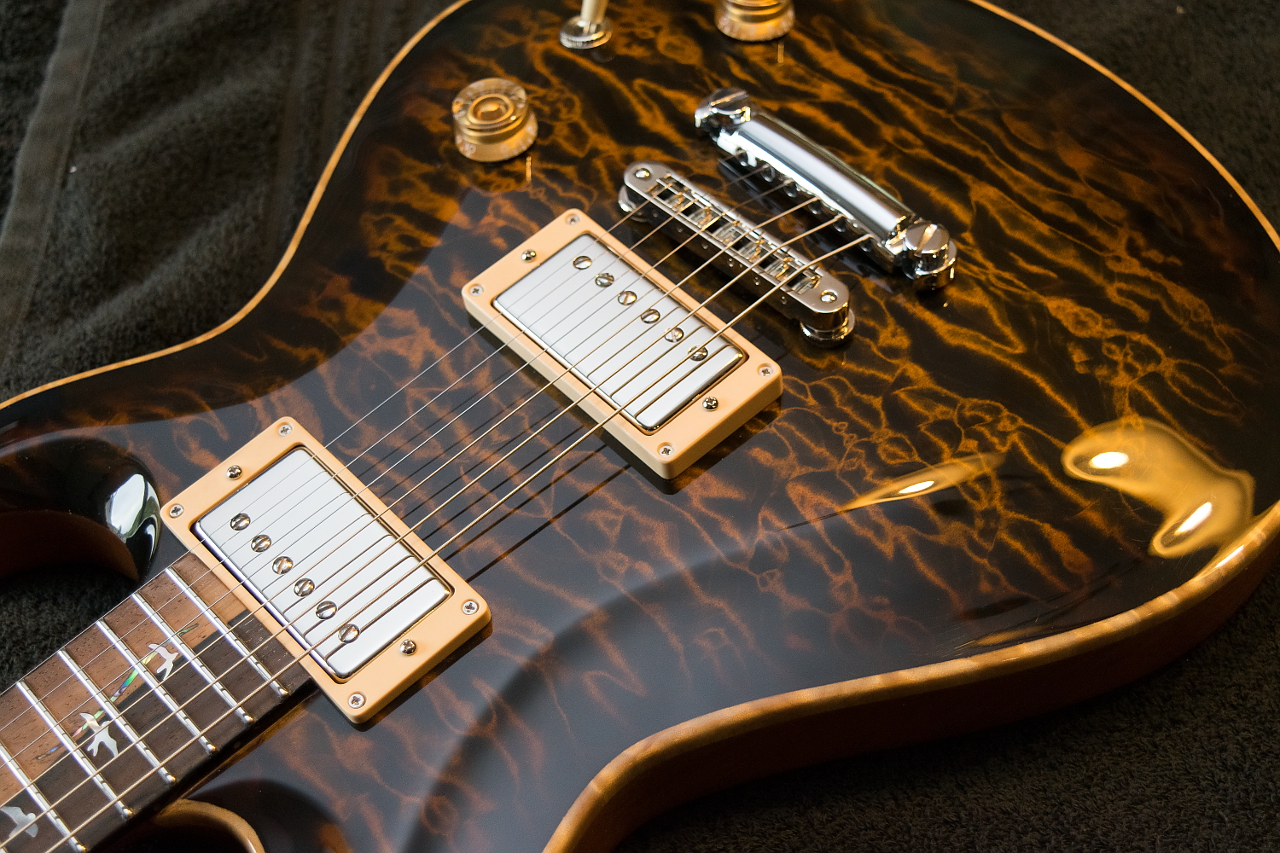
1 hour ago, ScottR said:
Sometimes these sacrifices must be made for the greater good. In this case, that killer tiger eye look you got.
SR
Exactly
In my experience, the value of having a lot of movement in the figure is so you can sit there with it in your hands turning it back and forth and saying "whoa! thats totally cool!"
From a practical perspective, having some eye popping figure that maybe doesnt move quite as much while going "Whoa" is better because, for one thing, still photo's dont move at all regardless, and people standing more than 4 feet away watching you play arent going to see any movement either.
In both cases they will see that eye popping figure and contrast and possibly be amazed and awed even though they wont see movement.
Dont get me wrong, I like that movement. A lot. But its not the only consideration when building a guitar that may hopefully gain you some attention as a builder
-
1
-
-
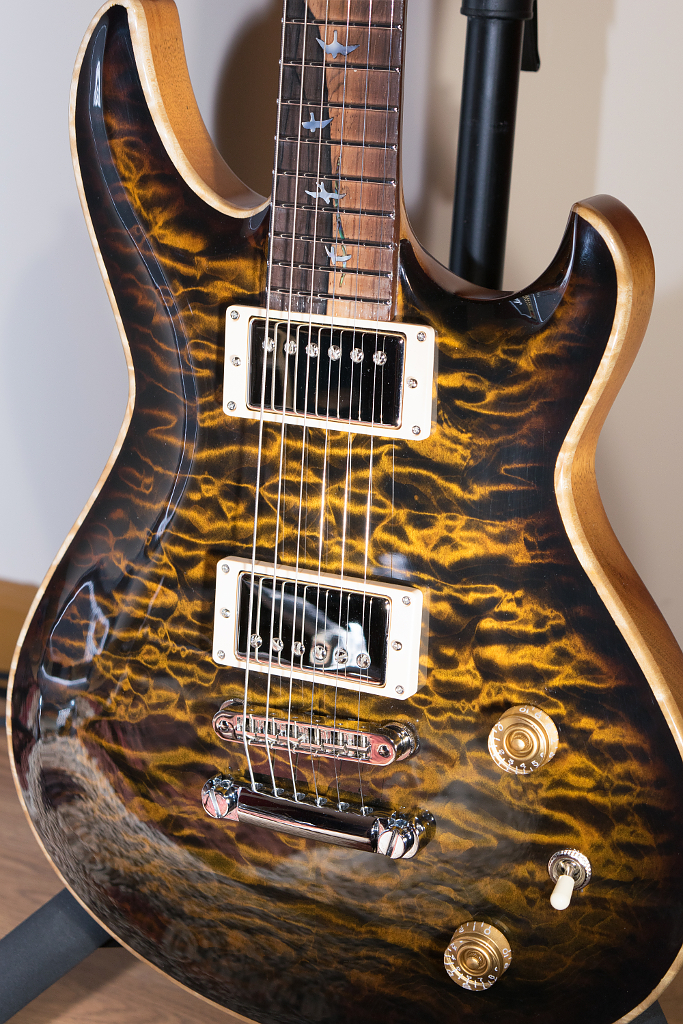
4 hours ago, ScottR said:
Do you still get good movement in the quilt, or does leaving that much black in it kill some of it?
SR
Its definitely more muted, but not killed
-
1
-
-
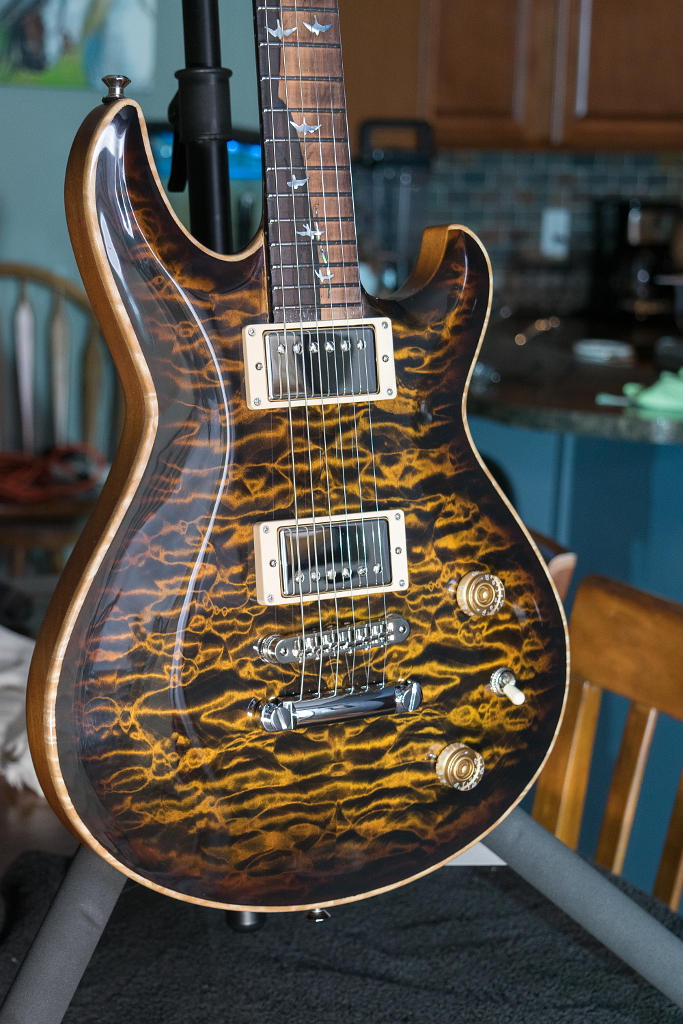
12 hours ago, ScottR said:
I'd like to see that thing in direct sunlight.
SR
Im waiting for the weekend to get some of those exact pix
it was cloudy all last weekend, and the sun is too low and too red when I get home from work.
-
1 hour ago, Randy Wiggins said:
I voted for the acoustic
You voted for a guitar thats competing with your own entry?
You're allowed to vote for you own entry I believe
-
OK, well here we go!
No pix of the rest of the process. I had a lot of work wrapping this guitar up over the weekend and stopping to take pix was going to take more time than I wanted, plus its boring
You will all be familiar with these steps, though.
I wet sanded the top to 1000 grit, and then a run on the buffing wheel with medium compound, following by the other buff with fine compound. Finished it off with Novus #2 fine scratch remover. I still need to do a swirl remover but I'll do that once I actually buy some
Anyhoo, a recap on the specs:
Model: 22 Magnum (unnamed as of yet)
Scale length: 25"
Radius: 12"
Construction: neck-through-body, 3-piece laminate neck, carbon fiber reinforcement
Body and neck: Bolivian mahogany (Swietenia macrophylla)
Top and matching headstock: book-matched, quilted big leaf maple
Binding: natural (faux binding)
Fretboard: Brazilian Rosewood
Truss rod cover: ebony with MOP inlay logo
Inlays: mother-of-pearl and abalone
Frets: medium jumbo stainless steel
Nut: unbleached bone
Pickups: Seymour Duncan JB bridge and 59 neck
Tuners: Schaller locking 3x3
Bridge and tailpiece: Tonepros
Control cavity cover: Indian Rosewood with magnetic fasteners
Finish: Nitrocellulose lacquer
Guts: CTS 500k pots and Sprague "orange drop" .047 cap
A lot of these pix seem to make it appear more orange than it really looks. The lighting isnt ideal.


-
4
-
-
Ok well I did my fret work last night.
After dressing the fret ends, leveled with a leveling beam (400 grit paper)I crowned using a stewmac Z file. Really good product. Did the job fast and perfectly
Folllwing that I polished stating at 320, then 400, 600, 1500, 2000, and then 0000 steel wool
So I completed the steel wool on every fret, and then used my dremel with a small buffing wheel and green jewelers rouge (compound) and got the shine I was looking for.
The usual start

Used this fret end dressing file I got from Crimson Guitars. Good results. My technique needs some. polishing too, though
Finally sprung for the ubiquitous purple sharpie. Now I know why they are so common in the fret tutorials I've seen. I'd used black till now and the purple is just easier to see.

My fret ends look way nicer than my previous builds. Still learning, but the overall polish and smoothness is superior to previous fret jobs
This baby is gonna have some smooth bending


Today is a down day. The last two years has apparently caused me to start grinding my teeth and clenching my jaw in my sleep. So hard that I've chipped several teeth and fractured the root on one of my molars, which of course developed an abscess.
Had the thing extracted this AM and now I'm enjoying the complete and utter lack of pain relief provided by that Wonder product called Tylenol.That said, tomorrow I'm going to sand and buff the top and headstock, and Saturday will see this build completed
-
1
-
-
One week to go till I can sand and buff and assemble. It's killing me....
-
1 hour ago, mistermikev said:
full disclosure: I'm afraid of that feeling you get on a roller coaster!
Skydiving doesn't feel like that. Not even a little. That stomach sinking, "falling" sensation you get on roller coasters is caused by changing directions and acceleration simultaneously. Cresting a hill, you (and your "innards") are going up and you are decelerating, drop off the other side and you're going down and accelerating propelled by the car you are held into. Your innards want to keep going up because of inertia. The car and gravity want your innards to go down. Its the struggle between the opposing forces that cause those sensations
In skydiving theres no abrupt change of direction or acceleration. When you exit the aircraft youre already going 90-100 MPH forward, You then transition to downward movement in an arc (we call this arc "the hill") as your forward motion gradually becomes downward. You only accelerate by about 10-20 MPH more and thats over the space of about 10 seconds pulled only by gravity. You dont even notice that. try accelerating in your car to 20 MPH over 10 seconds and tell me if you feel anything. I'll bet not
I have gotten that feeling slightly when jumping from a hot air balloon and a helicopter, but this is because you are essentially motionless at the start. You go from 0 - 120 MPH in 8 or 9 seconds, but even then its in one direction and only accelerating at the speed gravity pulls you (9.7536 m / s2) so that feeling is barely noticeable. You tend to be more focused on other things at the time
Anyhoo, its a pretty safe sport if you practice it safely. Ive been doing it 29 years. Tore a muscle in my leg once, but healed up in a few weeks. Tore my right rotator cuff (minor) only 2 weeks ago from what amounts to the least graceful landing I've ever had. It'll heal. So two minor injuries in 29 years. Not a bad safety record
-
1
-
-
interesting build.
It'll turn out well. The omen is that my very first parachute was called a "Cloud Delta" and it always got me safely to the ground
-
1
-
-
Sweet.
Theres something about that shape that reminds me of something, only I have no idea what. Not a guitar, but something.
I like it
Neck-through always a winner in my book, too
")
-
- Popular Post
- Popular Post
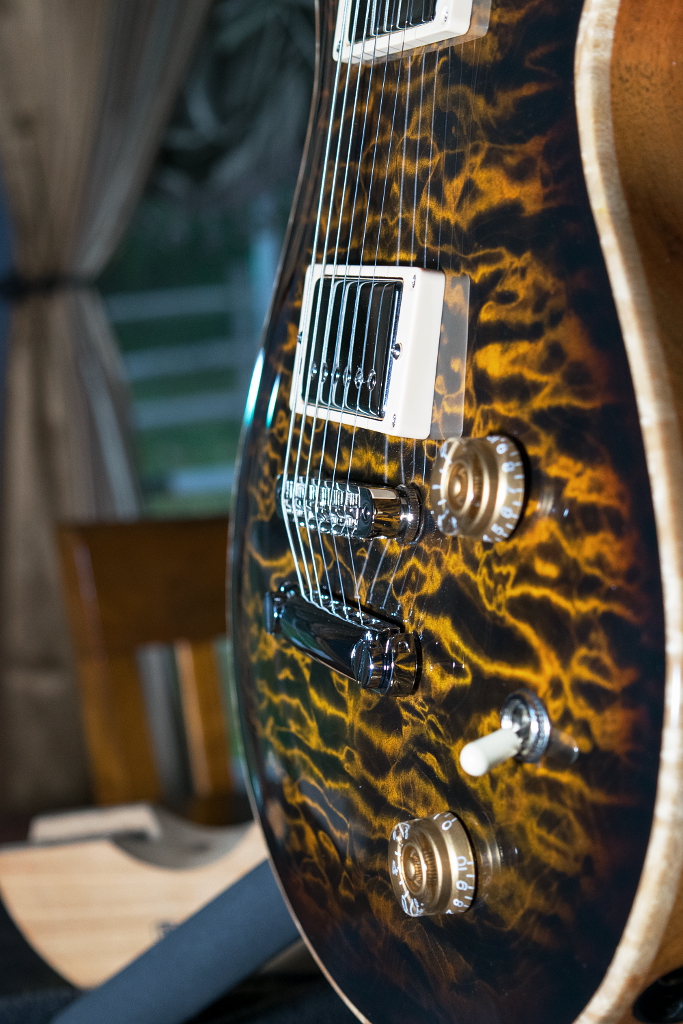
So, final update till I sand, buff, and assemble this baby.
The top of the body and top of the headstock are good to go until final sanding and buffing since they will be a high gloss. They will get wet sanded and buffed out after a few more weeks of hardening, but as previously indicated, I decided I wanted a satin finish for the back, sides, neck, and the sides and back of the headstock
Yesterday I dry sanded the entire back, sides, and neck with 600 grit until it was perfectly flat and smooth. I took some serious time with this because after shooting the satin lacquer those areas are done. No sanding or buffing those areas so they have to be absolutely perfect before you shoot, and you also have to be perfect with your spraying.
The finish needs to be evenly applied and perfectly with NO SAGS, GAPS, or RUNS or you have to let it dry, re-sand the area, and re-shoot.
anyhoo, I had some anxiety about it because I've only done satin before on a couple Strat necks which are a lot smaller BUT now I'm on the other side and it turned out perfect. Exactly what I hoped.
So the good news for me is that in a few weeks all I need to wet sand and buff is the top of the body and headstock, and those are pretty damn flat already, so I should be able to make short work of those areas.
Ignore the cover not sitting flat. I made that to tight tolerances, and the lacquer shrunk the recess just enough to keep it from dropping in. The lacquer will shrink a bit more over the next few weeks and will hopefully drop right in at that point, but if I have to do a bit of light sanding to the edge of the cover thats no big deal. Its unfinished so it'll be about 3 minutes worth of work to fit it.


-
5
-
1
-
6 minutes ago, ILL-GREEN said:
Thank you Skyjerk! Nice to meet helpful people.
I am using Varathane Masters clear gloss and its viscosity is like maple syrup. It reads that if used to spray, to add thinner, so I guess it would be alright. I managed to get 600, 1000, 2000 and 3000 grit at my local Auto Zone which surprised me that its available here, so happy I can begin my road to a nice mirror shine

Do not use just any generic paint or lacquer thinner. Some will work for your product and some will ruin it
Again, read the manufacturers instructions on what thinner to use for their product.
-
1
-
-
8 hours ago, ILL-GREEN said:
I am using polyurethane clear gloss to stack up the layers with a brush (I definitely need an air spray system) but I didn't know there can be a top coat. I thought buffering it with wax was the final layering to the top. I'm a newb at this and have some carpentry background, I've built speaker cabs and special furniture like armoires (people that record at home with kids love those). I usually just stain and seal them.
So do you think it would be best to dry sand to smooth the poly first and then add another coat of polyurethane to soak into the sanding? Then add a top coat?
I live in Puerto Rico at the moment and specialty material is extremely hard to get here. I had to mix natural stain in Testor model paints to get colors I desired because the Home Depot here carries only the usual browns and reds.
What would be a good alternative to the nitro?
And sorry for the questions but a huge mega thank you.
By "top coat" I simply mean whatever you use as your final finish. In the case of this guitar I used aniline dyes for color on the wood, then simtec sanding sealer to seal it in, followed by toner in the form of sprayed on nitro tinted with medium brown, and finally just clear nitro. So the simtec is my sealer, the tinted nitro is my base coat, and the clear nitro is my top coat.
I'm not very familiar with polyurethane coatings, but I believe they can (should) be wet sanded just like nitro, to remove orange peel, ripples, scratches, etc. I'm about 99% sure that you would not be able to shoot nitro on top of poly even if you had access to it. Different coatings can react badly with each other, or just not adhere well to each other and end up delaminating.
If its not a catalyzed coating like 2K, (im assuming yours is wipe on or brush on) you should be able to apply more after wet sanding it, however it may be too viscous to settle out flat and leave brush marks, etc.
I thin my final coat significantly so that it flows out nice and flat, I dont know if your product can be thinned or what it should be thinned with.
You should be able to get all that information, if not from the label, then from google searches or contact the manufacturer, or look on their website.
If your poly is thick enough to sand flat without sanding through to the wood, you probably dont actually need anything else. I cant say if 7 coats is thick enough yet or not. Its hard to say without knowing anything about your particular product.
In my case I used 6 coats of Mohawk nitro. When I was using Behlen nitro I did 10 or 12 coats because Mohawk has a higher content of solids than Behlen, and builds faster and so requires less coats to achieve the same thickness.
I've seen people achieve awesome finishes with brushed on poly, so you are probably going to be fine. Just do some research in places like this and other guitar building forums and ask questions about your specific product. I can almost guarantee there's people out there that can speak with authority about your particular type of coating and give you good advice.
-
2
-
-
4 hours ago, ILL-GREEN said:
Awesome technique with the varnish!
I piled on like 7 coats so far on my Les Paul and was kinda irked by its ridgid surface. I thought it will smooth out in the waxing stage but a little voice in my head says "sand it down with an ultra fine grit". I guess he is right.
What are you using for a top coat?
i used nitrocellulose lacquer, sprayed on with Iwata HVLP gun. Mohawk piano lacquer is my go-to producT. given that a sprayed top coat with any significant build will have some degree of orange peel that will need to be wet sanded flat once it's fully hardened. You can save yourself significant wet sanding by fully leveling it before you shoot your final coat like I described above.
in a month I will wet sand the whole surface until it's perfectly smooth, starting at 800 grit. I will then repeat the entire process with 1200 grit until all the scratches from the 800 are completely gone.
Following that i will buff it on my buffer with medium compound, and then again with fine compound, and finish with swirl remover. At that point it will be glass smooth and have a hard, mirror finish.
generally, people that don't have a buffer will continue up through finer and finer grits with the wet sanding going as high as 2500 or even 3000 grit.
Thats pretty much SOP with gloss nitro. It's never done with shooting the finish as the final step unless it's a satin finish.
In my case, I'll be dry sanding the sides and back flat this weekend with 800 and shooting satin clear. For those areas that will in fact be the final step, but it has to be perfect
-
1 hour ago, komodo said:
OMG this whole build is just off the hook. Everything is executed so beautifully.
Thank you very much
i’m very happy with the way it’s turning out.
The big challenge now is simply dealing with the wait while the lacquer hardens


Getting the most depth and movement out of figured woods.
in Inlays and Finishing Chat
Posted
thats wierd. Sounds like maybe some reaction between the dye and the coating. What kind of stain/dye did you use?