


jofes
-
Posts
24 -
Joined
-
Last visited
Content Type
Profiles
News and Information
Tutorials
Product Reviews
Supplier Listings
Articles
Guitar Of The Month
Links and Resources
Forums
Gallery
Downloads
Posts posted by jofes
-
-
High mountain tonewoods (run by Shane Nefer) usually has photos of the process. Fryovanni (on this forum) might be able to explain it a little better than me. As far as I understand, you cut out a section that is of the length you want, then take wedges and using a HUGE hammer hammer them in. This will cause the wood to NATURALLY fracture along the correct runout free lines. First step I'd guess would be to fracture the thing into two semi-circles. Then, you use the same method to split off more "wedges" from each of these halves. You should end up with a bunch of "bolts" that from the end grain view look like slices of pie. Then, you trim off the point and the bark/edge and resaw this "bolt" into a billet (which will be the first product of your efforts that will have parallel faces). From these billets you can then resaw your tops like normal.
As for the sled, Fryovanni did a photo tutorial on it awhile back, check his profile, I think it was his most recent thread, so you can read it there.
Chris
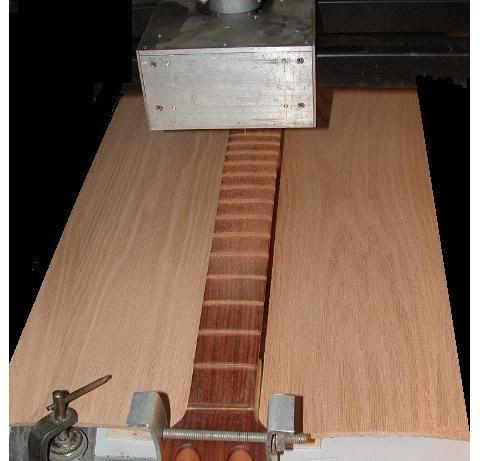
Thanks Chris, I looked at Fryovanni's post. Read it back in August, excellent. His method is real close to how I did it. Except I used a chain saw to square up the billit. The horizontal band saw worked very well. I made 5 real clear book cut sets. And a bunch of sawdust. The rest of the blanks are air drying now. I will be cutting some Honduras Mahogany sides later this week and post pictures then. Jofes.
-
There's more areas than what you pictured that are quartersawn... technically ALL areas are if you cut them right. Also... I don't know if I would have cut it how you did... spruce should be hand split, not sawn like hardwoods (like you had done). Without hand splitting you won't be able to control/know the amount of runout (there are two types, one you can see by how many grain lines run off the edges, the other you can't see, you have to simply cut it right). This second runout is important for acoustic tops... you should have talked to someone before cutting it how you did. Runout will affect the stiffness, and thus quality of your tops.
Chris
Verhoevenc, thanks for the heads up. Excuse my clumsiness. I only cut up a small amount of the tree, 24" in length. Then I split off a quarter of that piece. That is the piece that I sliced up. Can you explain how it should be done. I have more than 4 feet left.
Jofes.
-
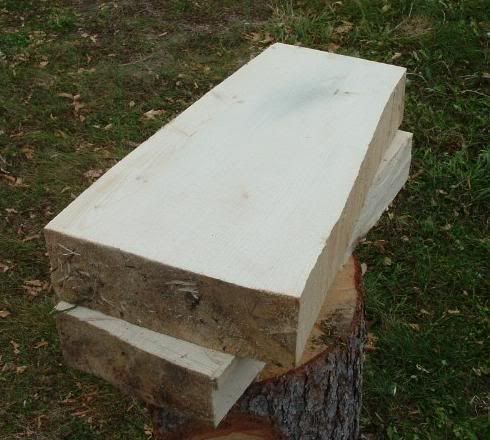
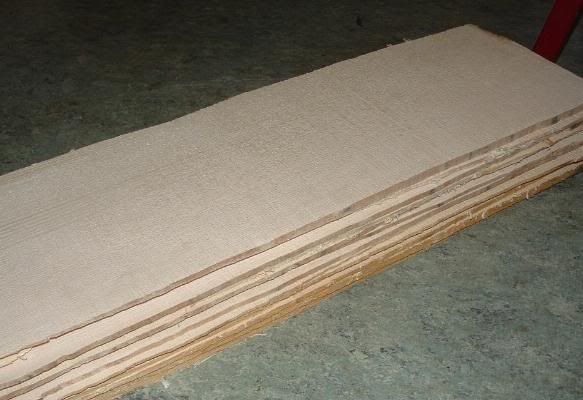
This old spruce was in the way of progress, so I asked the owner if I could have the lower 6 feet to make a guitar with. He was pleased to give it me because he was not real happy removing it. I counted the rings and it is over 100 years old.
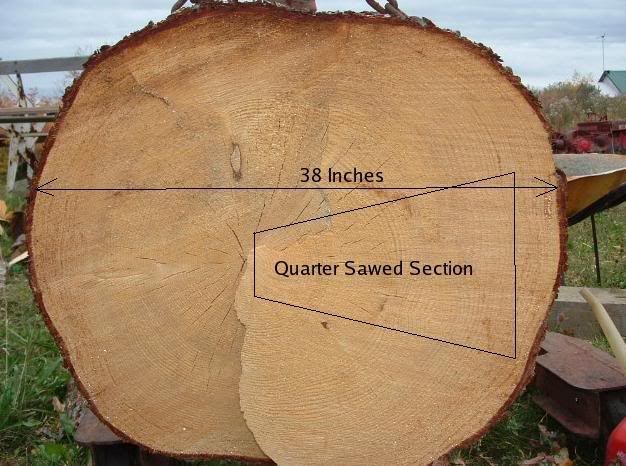
I cut it down to size with a chainsaw and then took the quarter sawed blanks to a friend. He has a horizontal band saw and he cut it up for me.
http://i171.photobucket.com/albums/u284/jo...photos/No2a.jpg
http://i171.photobucket.com/albums/u284/jo...photos/No3a.jpg
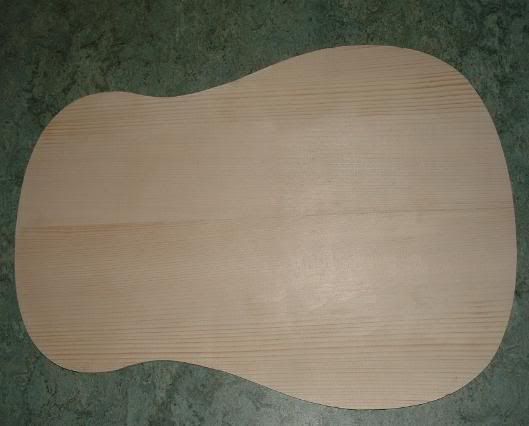
This is the first sound board made with book saw blanks. I think it is going to be a good one.
http://i171.photobucket.com/albums/u284/jo...photos/No4a.jpg
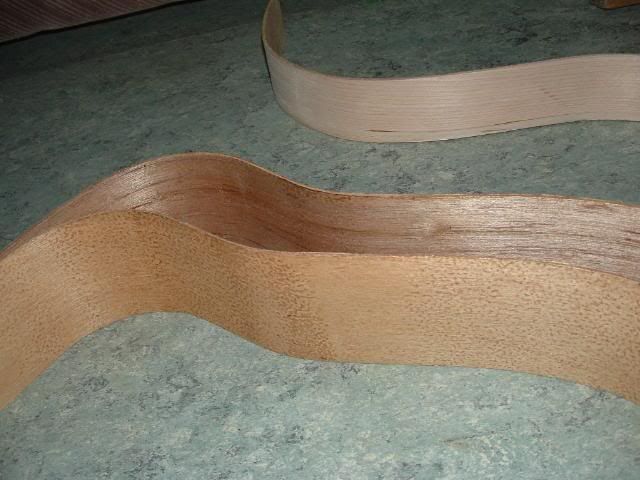
This piece of wood is what the sides, neck and back will be made with.
http://i171.photobucket.com/albums/u284/jo...photos/No5a.jpg
Jofes.
-
A good kick in the butt that will get me to post some of my new build.
Just quarter sawed some spruce for a soundboard yesterday. Part of my new 12 string.
I will get a couple of pics on line this week. Jofes.
-
Thought I might get this started. Watch the progress as it goes along.
Body is finally bent, and neckblock and kerf are just on the way. I had to set up my dish sanding dealie/Go-bar press tonight. Looks like the setup will work, Ill post it tomorrow. Basicly, to sand the sides in the dish to radious you rock it back and forth, - I added a simple top and back anchor so the rocking is consistant. It also allows me to push the center of the dish back a couple inches accuratly.
Got the neck top cut also, and wow, I was quarter-saw cutting my maple binding, trim and it flexes alot without even cracking! Nice and strait also.


GoodWood, I will have to follow this one. Just bought a nice peice of mahogany for my next Acoustic. I will probably start in the fall. What scale length are you using? Jofes.
-
Turned on the cnc machine and cut the fret slots into the rosewood fingerboard. Setup always takes a long time.
The cut worked out very well so it is on to the next step. Jofes
Sorry I'm a little late to the party, I use a CNC for metal work so I am familiar with the whole setup thing, Someday I will get that CNC router but for now its just a small mill.
I just wonder why you cut the frets after you glued on the neck, (I see a headstock attached) would seem simpler if you just made up a jig for cutting a blank board long before its been shaped and glued. If the machine screws up then you only mess up the board not the whole neck. If I am wrong about your setup never mind ignore me.
Woodenspoke
Woodenspoke, Sorry I took so long to reply. I took over a month off to build the guitar, stopped everything else in my life, now I am paying for it.
I did lots of test fingerboards on plywood and a lot of measuring. The cnc cut the nut position and all of the fret points were from that cut. The notation is wonderful. The next guitar that I am going to build will have the entire neck cut on the cnc. Thanks for the input. Jofes.
-
Acousticraft, have you ever tried the Martin Folk strings. Low E to G are nylon and steel the B and E are steel. I was going to put them on instead, but the nylons worked out. Jofes.Why Sparrow, does she fly? No just kidding a nice job.Ive got a book matched Cedar top sitting in the loft in my garage with a couple of weights keeping it flat. I must build a nylon string classical one day although I really prefer the richer sound of a steel string personally.
-
Played for a couple of hours last night.
I need to ask if anyone else has experienced the high of a first strum on a guitar built by their own hands.
I call her Sparrow2007:
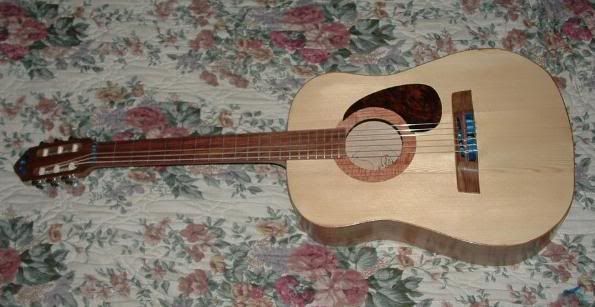
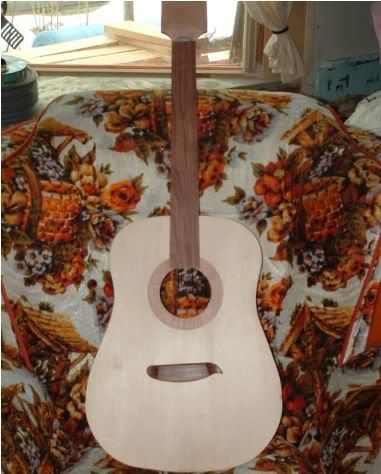
The neck is bolted on and the action is remarkable. The sound is sweet and mellow, just what I was wanting to obtain.
I put on a set of D'Addario nylons. The neck radius profile is 14". The final weight is just over 4 pounds.
Here is another front view link of the front rosewood neck mounting saddle. http://i171.photobucket.com/albums/u284/jo...s/frontview.jpg
I want to thank Project Guitar for letting me post here, Jofes.
-
Jaden, the cutter is a 1mm rotary blade in a die grinder. I built the cnc machine years ago and have made adjustable clamps to hold the neck square and flat. Thanks for the input. Jofeswhats that cutter that you have on your CNC ? -
Turned on the cnc machine and cut the fret slots into the rosewood fingerboard. Setup always takes a long time.
The cut worked out very well so it is on to the next step. Jofes
-
Chris, this is my first acoustic and the neck is a bolt on. I have a cnc machine and have programmed the scale length into the unit. The neck mounting hardware is also on the cnc. I will be fretting the fingerboard tonight and will post the progress. Thanks for the interest. Jofes.The "pearlesence" that www.masecraftsupply.com carries is the same stuff, and you can get it in sheets, big and small. Cool work, I like it, but I gotta ask... is that fretboard already attached to the neck? And if so, why haven't you already slotted it?Chris
-
prs man, I live in Alberta Canada and found the material at Lee Valley. They are called pen blanks and come in about 8 colours. I really like the blue. Jofes.that looks great where can I find some acrylic acetate -
I have been working on the inlay to the head of my acoustic guitar. Here is a close up picture of the head.
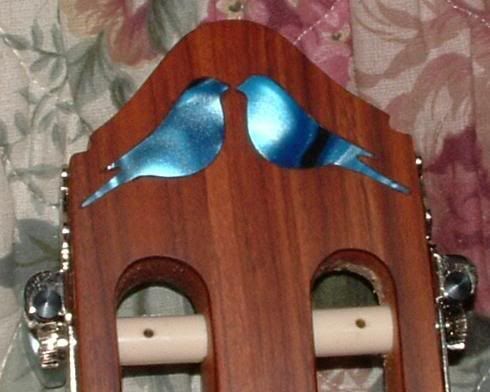
The material I used is an acrylic acetate. It is .25" thick. The material was easy to work with, but has a pungent odour when cut. The honduras rosewood covering the one piece cherry neck is .125" thick. The birds were set into the head and then sanded flush. 180 rough sand then a 320.
http://i171.photobucket.com/albums/u284/jo...photos/Neck.jpg
Jofes.
-
GoodWood, yes similar to the lightbulb setup except I used an old dryer element. Jofes.Thats very cool. What exactly is the blanket part? I dont get how this went together...???? Dont burn the house down!!
GoodWood, the inside of the bender is all metal and it has a overheat switch. The blanket traditional hand made quilt. A gift from my sister. Thanks for the interest. Jofes.
No I meant the heating blanket. Is this set up like a light bulb box?
-
Thats very cool. What exactly is the blanket part? I dont get how this went together...???? Dont burn the house down!!
GoodWood, the inside of the bender is all metal and it has a overheat switch. The blanket traditional hand made quilt. A gift from my sister. Thanks for the interest. Jofes.
-
Just wanted to share an idea for clamping and glueing the sides of an acoustic guitar. There are 46 clamps around the outside of this unit. They can be relocated to fit different sizes of bodies.
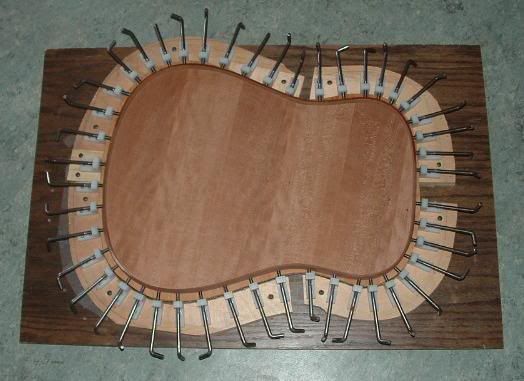
Has anyone else made one similar? Jofes.
-
I searched the board and came up with some designs for Side Benders. This is my unit that took about two days to build. It is temperature controlled. I used the hardware from an old cloths dryer. The element and ceramic insulators are well suited for the job.
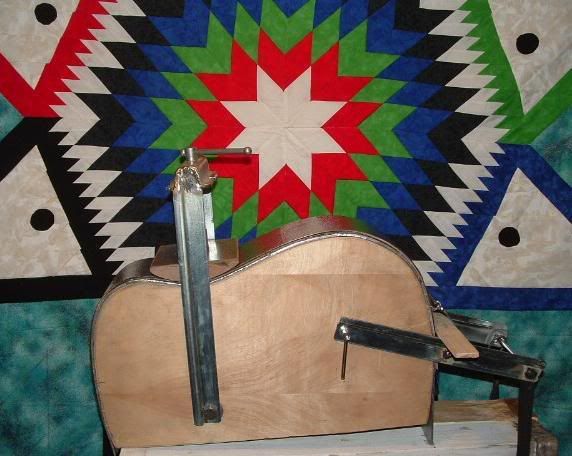
I used a heater control from an old electric radiant heater. The unit heats up very quickly and makes excellent side bends. The top is 1/16" aluminum and there are also two thin stainless steel sheets to squeeze the wood blank. The waist tightener is raised and then moved out of the way. The top stainless sheet can be then lifted and the blank added. The second arm is put in a vertical position and the pin is installed. The arm has a roller that follows the contour of the body. I slowly roll the side down and clip the bungy cord on to the handle. This supplies the spring force to the top sheet. Last I slowly tighten the waist clamp. Half an hour to cool and one side.
http://i171.photobucket.com/albums/u284/jo...hotos/sides.jpg
Here are some Mahogany and Spruce test bends. Thanks too all who helped, could not have done it without this web site. Oh yea it is very hot!!! I have to wear gloves. Having fun Jofes.
-
I am building a side bender and need some advice on the temperature that different woods need. Also things to look out for when you bend the sides. I am starting with some mahogany and cherry wood. Thanks Jofes.
Here is just what you are looking for-LINK
Peace,Rich
Thank you Rich, this is exactly what I was looking for. Jofes.
-
I am building a side bender and need some advice on the temperature that different woods need. Also things to look out for when you bend the sides. I am starting with some mahogany and cherry wood. Thanks Jofes.
-
Glass fretboard? Cool idea, bet it feels real fast! How'd you fret without chipping it? Radius it? etc. etc. Bet it sounds glassy too
Chris
Chris, each piece of glass was cut to length and sanded. There is a fiber mat between the glass frets and neck. This held the epoxy. The glass and fret wire was then set into the mat. A leveling bar was then placed on top of the fret wires. After the epoxy set up the frets were very level. A maple edge trim was then added. The first three frets now have a hairline crack between D and G, probably caused by the truss rod. There is no radius on the fret glass. The bridge has rolling adjusters. I have learned to put a spot of instant glue under them after they are set. Breaking strings and I was searching for the adjuster. Thanks for your interest. Jofes.
-
This is one of my first electric guitars. The front and back are fiber glass. The neck is hickory. The sides are made of maple. And the fret board is glass. Scaled to 25". It has a Martin style truss rod.

I have played it for twenty years, the action is getting hard to play. The back has to be removed and some repair needs to be made. So I am building another before I start the repairs. Jofes.
-
Hi Jofes,
What sort of acoustic are you planning, and what woods are you going to use?
Here is a picture of the start.
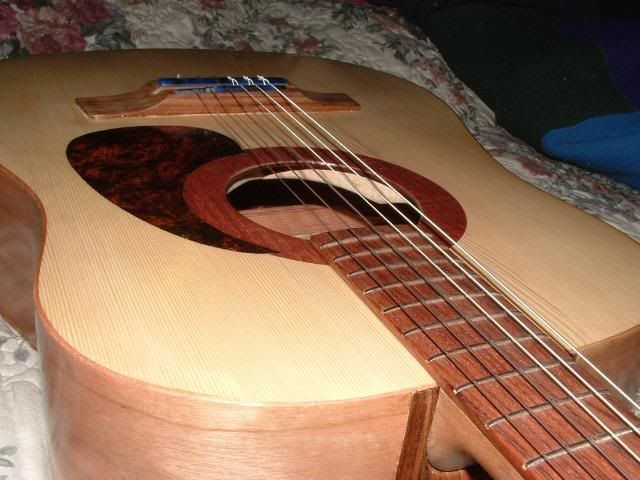
I am using Honduras Rosewood for the fret board and bridge, Spruce for the top with a Sapele inlay soundhole. The neck is made from Cherry. Jofes.
-
Hello, My name is Jofes and I have decided to build an Acoustic Guitar. For this first one I am going to use wood that I have had on a shelf for ever. I will post some pictures as it progress.

My First Twelve String
in Acoustic and Hollowbody Guitar Chat
Posted
Thanks Rich, I have been discussing with Chris how I should have started the job. I split what was left from my first saw cuts over the 24" length It was almost 2" ~ 8 %. Soooo
  , I am going to reverse brace it and make a solice out of it. I have lots of wood left and will try again after splitting the billits off this time.