


ctelep
-
Posts
17 -
Joined
-
Last visited
Content Type
Profiles
News and Information
Tutorials
Product Reviews
Supplier Listings
Articles
Guitar Of The Month
Links and Resources
Forums
Gallery
Downloads
Posts posted by ctelep
-
-
Thanks Mattia, should I let it cure and then proceed sanding and wet sanding, or does that come first?
-
No garage?
If letting it cure in the house is your only option, I'd crank the fan and live (an extra 10 years) with the bubbles.
Yeah, move it away from the fan a bit and see what happens. Alot of finishing is like that (try it and see what happens).
The room actually has two windows, so I moved the fan into the other window and kept the booth in tact.
NO BUBBLES!
Solved.
When do you know enough lacquer is enough? 12 coats?
-
So that's good, it's the fan.

Hopefully I don't gas myself too bad.
Maybe I'll move the guitar about 4 feet from the fan, that way the air flow shouldn't be too big of a deal. It is, of course, taking the air out of the room.
-
Unbelievable. The bubbles only pop out on the side of the guitar closest to the fan.
I guess I'm going to leave the fan off for the last two coats.
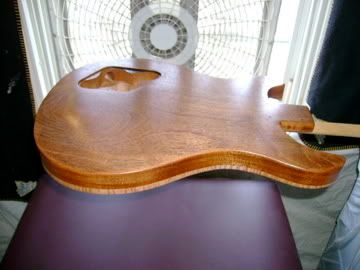
It's ready to buff...
-
sand/ wet sand with 400 gril and spray more coats and your grain will fill in
Yep.
Well, I just did #9 and the bubbles are back.
What happens if the build is ready for buffing and the bubbles still show? Will they buff out at all?
As a side note, I built this guitar to be played well, not looked at. It just happens that the guitar looks great too. I'm not going to be depressed if there are burps in the finish, because it's really going to sound great and will still look great too...i.e.no one is ever buying this guitar. Maybe I'll give it to my kid someday, maybe.
-
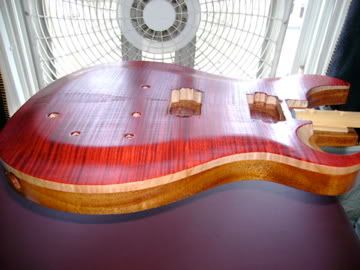
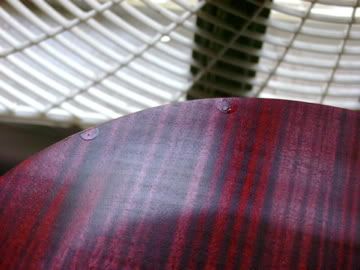
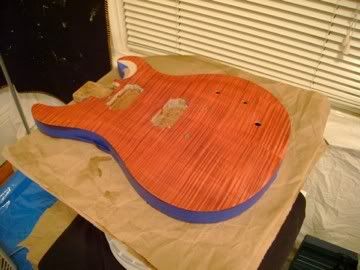
Another finding:
The pictures were taken after coat #6. I sanded, sprayed # 7, and just sprayed #8 and it appears that they are filling in. Hopefully they'll just go away with more sanding and spraying!
-
Am I right that you're not getting the bubbles on the maple?
I would think that eventually the pores will get filled with lacquer, but it could take you many many coats. Rattle can lacquer has more thinner in it than regular lacquer, so it generally goes on thinner...and if you shoot a real thick wet coat, the evaporation of the solvent can also cause bubbling (but then I'd expect bubbles on the maple as well).
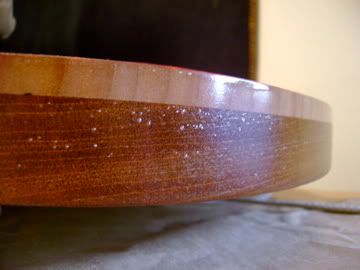
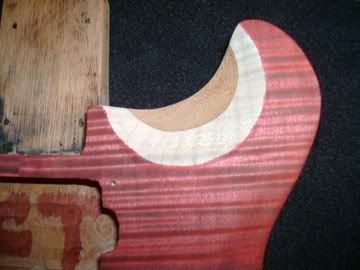
There are some bubbles on the maple, but it is definitely a different cause.. a run built up witha few bubbles. The bubbles on the mahogany are almost uniform in that they pretty much cover the entire side wall of the guitar.
That being said, the back is coating beautifully, and the maple top looks unreal.
Should I sand the sides (or entire body) before each new coat? If so, does that mean I'm down to one coat per day?
Thanks for your help Erik.
-
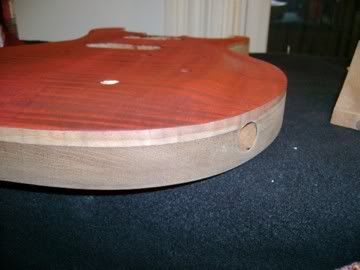
On the sides of the body, I don't see any bubbles on the maple (is this correct? or just a photo effect?). This would lead me to suspect that you didn't seal the grain on the mahogany and that you have some air coming out from the endgrain pores.
...if that is mahogany.
It is mahog. I did seal it, but it didn't really seem to take on the edges b/c of the grain. That's probably what it is.
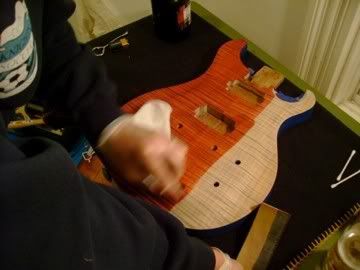
As an update, I just scuff sanded with 400 grit and wiped clean with Naptha. Then I sprayed coat #7 and they almost immediately came back.
Can I continue to sand them off and expect them to come back every time? What effect would the buffing have?
I don't want a bubbly guitar
Hopefully it's a correctable problem -
Thanks for the info.
Do you think the finish is beyond repair?
-
I'm close to finishing #1. Many more to come.
Can anyone help me troubleshoot the best way to get rid of...
1. Two large drops of lacquer?
2. Multiple tiny bubbles that have very little weight to them. For some reason, these are only on the sides of the body.
So far, I've sprayed 6 total coats of Stewmac's aerosol nitro. The first was a light dusting, the last 5 were progressively wetter. I have done no sanding, only clean wipe downs to move dust etc...
I think I have about 4-6 coats left to put on, which brings me to another question: When do you know you've done enough lacquering to cure and buff?
Thanks very much,
CT
-
Beautiful guitar. I actually just finished coloring the guitar. I did it with a mix of Stewmac's Cherry Red and red Mahogany. I am very pleased with the color, and can hardly wait to put the clear coats on the magnify the color!
-
black might be too heavy for the red, maybe try a dark red or brown instead of black, sand off then red over. Post a pic of the finish you want & someone might have a suggestion of how to achieve it.
http://membres.lycos.fr/journel/blackcherry8.jpg
Does this one have black underneath?
-
black might be too heavy for the red, maybe try a dark red or brown instead of black, sand off then red over. Post a pic of the finish you want & someone might have a suggestion of how to achieve it.
Here is the color I'm shooting for.
http://www.prsguitars.com/csc/color/images/blch_hbtwo.jpg
It has black underneath the red, doesn't it?
-
black might be too heavy for the red, maybe try a dark red or brown instead of black, sand off then red over. Post a pic of the finish you want & someone might have a suggestion of how to achieve it.
Unfortunately, my scrap is taken, and the black is on the guitar. I've went to 150, then 180, then 220, and finished with 300. It actually looks pretty good. The red that I have overtop of the black gives a reddish brown. I'm actually kind of please with it.
Does anyone have recommendations for a streakless finish when applied by hand?
It's alcohol, and the mix is right to the "T" as recommended.
Thanks
-
Hey,
I have nice bookmatched maple, and I wiped on Black dye, and now it's not really sanding off. It just sort of stays there.... Should I go back to 120 or 150 grit?
Also, I want it to be a nice red mahogany when finished (similar to a lot of Les Paul Studios out there), but the red does not look right on top of the black-dyed scrap pieces I practiced with.
I'm certainly not going to jump the gun and stain it until I know, but I'm so close!!!
Any takers?
-
Hey there, I'm a long time browser, first time poster.
-----------------------
I have just completed full construction and sanding of a bolt on PRS style guitar. I spent a good deal of money on nice flamed maple, and a good deal of time whittling it into a good looking guitar.
Now I'm hoping someone can critique my finishing schedule...
1. Mask entire guitar with exception to maple faux binding to be. I'll spray 4 sealer coats, and wait a while before removing the masking.
2. Use Stewmac waterbase colortone grain filler to fill all mahogany, until sanded and uniform. Neck and body (still separate).
3. Use Stewmac Dye (diluted in alcohol) and hand apply color directly to unsealed, un- filled maple cap.
4. Seal entire guitar guitar with Stewmac rattle can sanding sealer. 4-6coats, 2-3 per day. Allow 1 week to cure.
5. Finish guitar with Stewmac rattle can lacquer. 2-3 coats per day, sanding after 8 coats are on. Total of 10 coats?
6. Sand and wet sand.
7. Buff with medium Stewmac compound
8. Buff with fine Stewmac compound
9. Assemble, and get action set.
10. Play loudly.
---------------------------
Am I missing any critical steps, or overlooking any significan points of interest? I'm especially interested in the spray can schedule. How many coats per day, how long in between spraying, and also when to (and not to) sand.
Thanks a million, hopefully I'm on the right track.
Cheer <clink>
Charles

How Is The Rust-oleum Lacquer?
in Inlays and Finishing Chat
Posted
I used the black stuff and it was allright. My only problem with it was Stewmac's clear lacquer did not adhere to it. Therefore, I give it a thumbs down.
The way I see it, it's better to spend a little bit of money on something you put so much time and effort into. Saving a few dolalrs and getting something that doesn't work too well, for me, was not worth it!