


black_labb
-
Posts
231 -
Joined
-
Last visited
Content Type
Profiles
News and Information
Tutorials
Product Reviews
Supplier Listings
Articles
Guitar Of The Month
Links and Resources
Forums
Gallery
Downloads
Posts posted by black_labb
-
-
soldering extra wire onto the leads is the way to do it, it should be fine. you should be able to measure a resistance between the 2 wires coming from the pickup (probably between 4kohms and 12kohms, but im not sure what laces are, think their on the lower side of things)
make sure the soldering iron is nice and hot before you solder something to the back of the pot. i had trouble with that the first time too. it helps to use a bit of finer sand paper (180 grit would be good, or something around there) where your going to solder it. let the soldering iron get nice and hot then put a dab of solder to the tip (helps to spread the heat). then put it to the pot, and add bits of solder to it until it is flowing along the pot, as opposed to just sticking to the soldering iron tip. once it is add some until you have a nice amount there. then tin the tip of the wire, remelt the solder on the pot and add the wire to it. make sure it is properly sticking to the pot, and not balling up around the tip of the soldering iron before you take the soldering iron off.
-
love the look of that, the inlay is great, and the neck looks wonderful. is that wenge or rosewood with the maple? the headstock looks great with the contrast between the light and dark woods. body looks good too. what did you end up using for the string on the kite?
-
thought i should make a thread to see what people think of my build that i just finished. ill paste the writeup from the gotm entry writeup, as i spent way too long writing that to write it again. feel free to skip the writeup, as it goes into alot of detail.
oddly, i wired all the electronics up, but couldnt find the cap for the tone pot. i soldered the rest up and left that connection free. the pot actually still works as a tone control even though none of the connections go to ground, it just adds some resistance from the 1m pot. it gets plenty of control (probably has 3/4 of the travel that a tone pot with an actual cap would do). my theory is that the pot has some (a huge amount considering it shouldnt be there) capacitance between the resistance within it and the pot casing (which i have grounded). adjusting the wiper determines how much of the resistance the signal travels through, which changes the capacitance. im going to leave it like it is as it has plenty of difference between the brightest and mellowest.
The body is a 2 piece American walnut body. I got the piece discounted as it had a knot and was not the full thickness in many parts of the board. It wasn’t a big deal for guitar building as I ensured the knot was where a cutout was. Also meant I couldn’t put the join along the middle point. There is a small elbow cut on the front and tummy cut on the rear, similar to a strat but not as much.
The neck is a laminate of rock maple (quarter sawn) with a wenge centre. Using the quarter sawn wood meant I could get the neck fairly thin. I wanted a thinner feeling neck as opposed to my last build, which was a bit fatter feeling. the maple ended up having a bit of figure to it which is a nice surprise.
The fretboard is striped ebony with mother of pearl inlays (I couldn’t believe how long simple block inlays can take, i think its worth it though).
The headstock was a scarf joint with walnut veneers i made from offcuts of the walnut body wood.
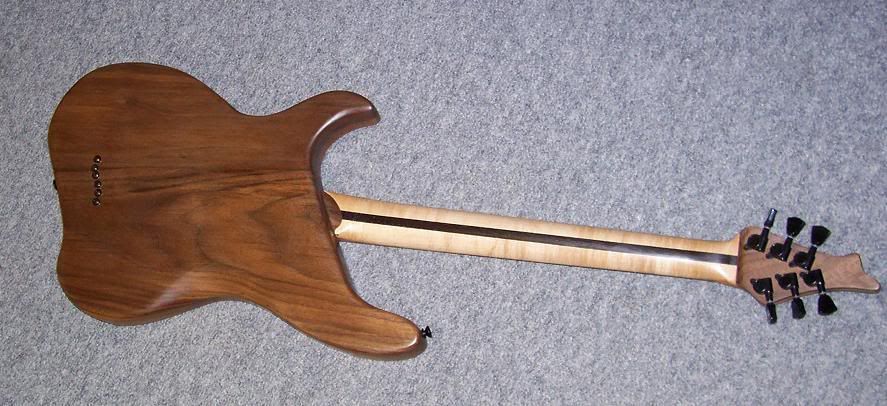
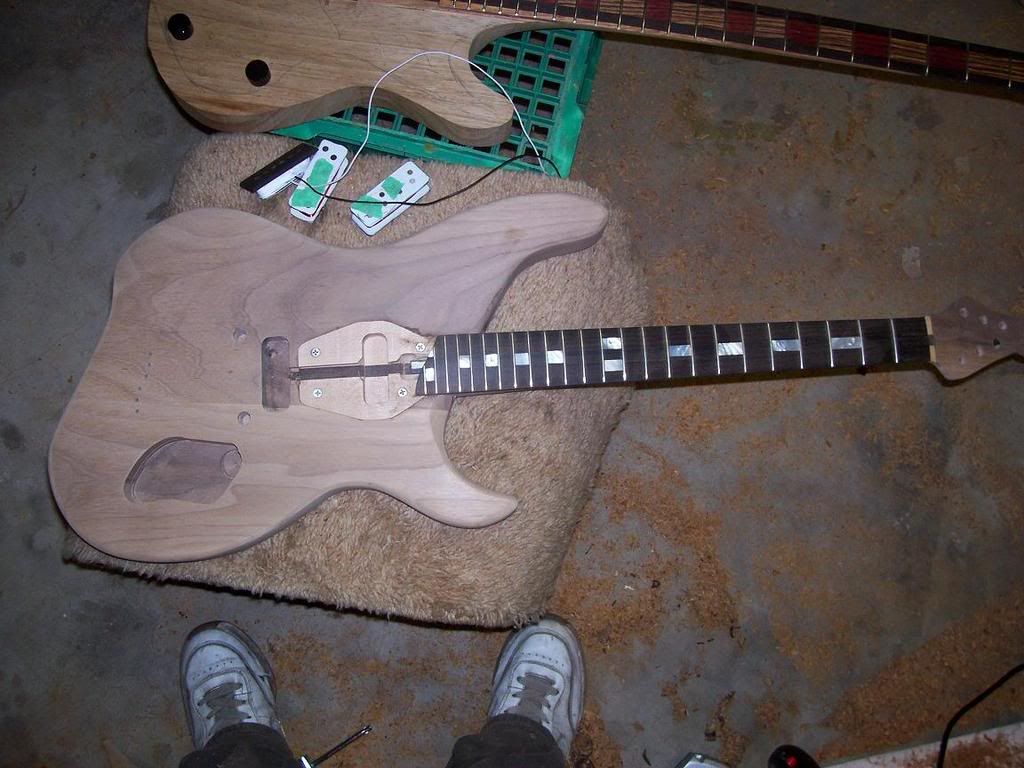
The neck joint was originally going to be a bolt on, but with the bolts coming from above (hidden by a pickguard) into the body, with another 2 coming from the back of the body into the part of the neck behind the fretboard. The neck pocket was made the weird shape I had to ensure there was plenty of strength and leverage for the neck, so that I could avoid the neck pocket sticking out from the body. This way I could get better upper fret access, and having the points of the neck further apart to get a wider stance and a more efficient grip on the neck. After making the neck pocket and seeing how tight it was, I thought about gluing the neck in to avoid seeing the last 2 neck screws, and improve the mechanical connection. I ended up keeping 2 screws in as they were hidden anyway, and i could only get one clamp to hold the neck in place. i am extremely happy with the design, as the shape of the necks end means it is held from all sides but up. i actually got it stuck in there a number of times and spent a while getting it out each time.
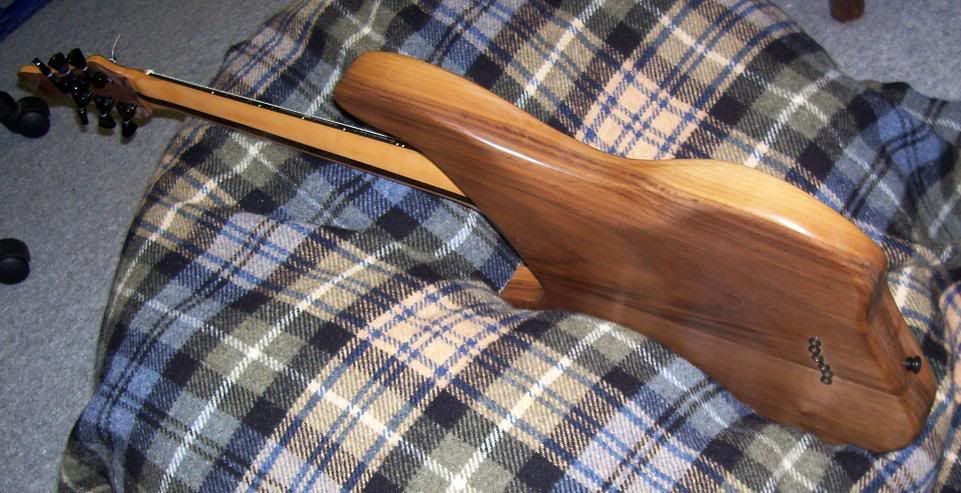
Regarding the shape , it was originally going to have a butt similar to a fender, but i accidentally cut too deep when trimming some of the template with the router (was feeling too lazy to sand) and thought it might look good with the cutaway in the back, matching the angle of the front. I’m happy with the way it worked out.
The hardware I bought on ebay, as I don’t have too much money being a university student. The bridge is a roller tunomatic with ferrules as opposed to a tailpiece. The tuners are the same as many around with a somewhat unique shape that I quite like for this build. I made the pickguard from a blank piece of material. I made the truss rod from 10mmx10mm U channel aluminium and a ¼” rod. It is adjustable from the heel under the pickguard, to give it a cleaner look. I have barely had to adjust the truss rod, probably due to the quarter sawn neck wood and ebony fretboard. Having such a big rod and u section probably means it gives a lot of support itself.
Regarding the Electronics
I made the pickup bobbins (from offcuts of wenge) and wound the pickups myself. I was looking for the look of a p90 (or any larger single coil) but kept the actual size of the coil fairly tall and thin, and in reality they are pretty similar to strat pickups. I used 5mm alnico 5 rod magnets (same as fender single coils) on the neck, and used some 6.5mm alnico rod magnets for the bridge. I wound the coil 8200/ 6.05 kOhms (neck) and 8500/ 7.4 kOhms (bridge) times to get fairly bright pickups as I was intending on putting a switch in to put the pickups in series and didn’t want that setting ending up too boomy, and could always use that setting to get more output and a fatter sound. (Putting 2 singlecoils in series makes a humbucker pickup, when they are out of phase electrically and magnetically, which I did). I also added a switch to invert the phase, to get out of phase sounds as well. There are 3 switches, the black switch is the same pickup switch you find on a Gibson (neck/parallel/bridge). The mini switch is the series/parallel (single coil/humbucker if you like). This switch bypasses the pickup select switch, as it must use both pickups. The third switch is a push-pull on the volume knob (closest to the bridge), which inverts the phase to give a thinner, hollow sound.
The finish of the guitar is Danish oil with some beeswax rubbed in. I love the feel of the finish on the neck, it so smooth and along with the fairly thin neck makes for a fast playing guitar with great upper fret access.
I’m very impressed with the sounds I can get from the guitar. It is quite versatile due to the different electrical options. The humbucking mode gives a thick sound, where the single coil modes are a nice fender tone. The bridge pickup seems to add more mids to the tone of a bridge single coil, due to the larger magnets. The out of phase sounds are actually pretty useful when used in humbucking mode, but the parallel out of phase sound is a bit useless as it has lower output compared to the rest. I have just finished my second amplifier build (based loosely on the normal channel of an ac15) and it sounds great through it, ill do a little recording when I wont annoy anyone too much (the only cab I have is a 4x12 which carries sound a little too well for home use, especially when trying to crank an amp to its sweet spot)
only downside is the weight, its unchambered and 50mm thick with some of the heaviest woods commonly used. i dont mind, but its the first thing people comment about it when they put it over their shoulder.
Thanks guys
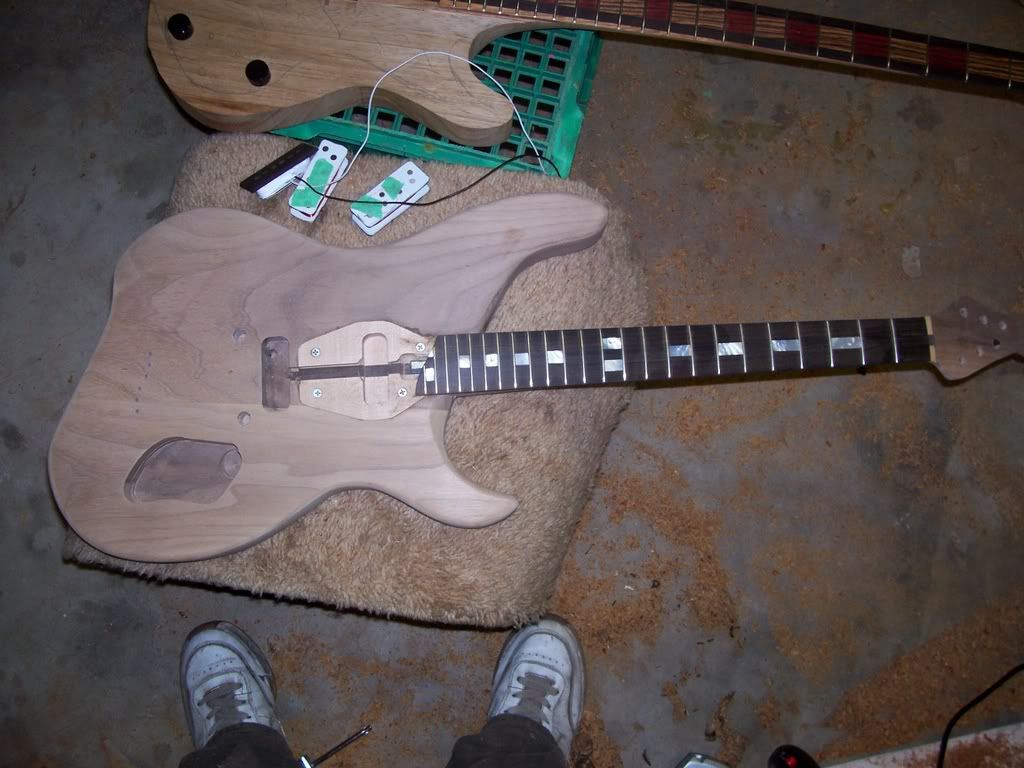
here are some photos, the last is there to show how the neck tennon is shaped.
-
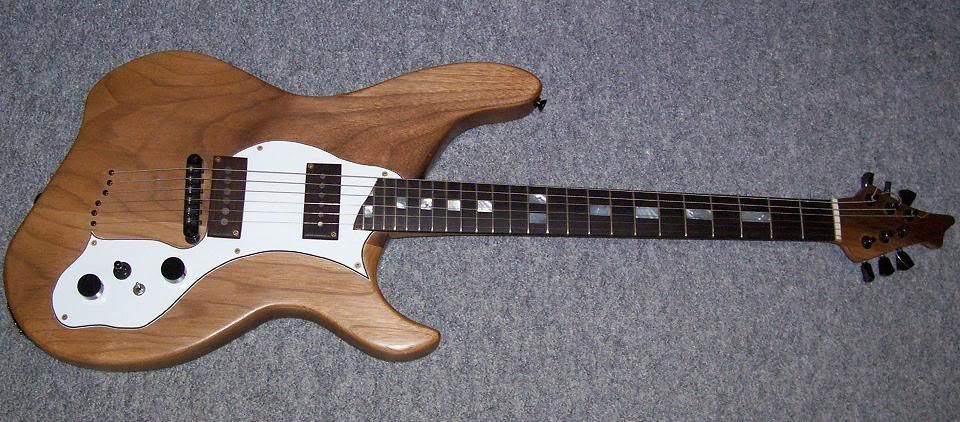
I call it the Offset Nut
Hi guys, this is my first complete build (I did a build a while ago with a neck I bought, and haven’t been able to stop). Sorry if the writing is quite long, but there are some unique things that I thought some people would like to know about.
It was started a long time ago, but I stopped halfway to work on a bass for my girlfriend as we got a band together and had trouble finding a bassist that worked well with the band, so I decided to make her a bass and tech her to play. The bass is structurally finished, but hasn’t been properly finished or have all the electronics (just the bridge pickup and a mess of wires that will go to the right point when the parts all are in there.
Enough about the bass, heres my offset walnut guitar
The body is a 2 piece American walnut body. I got the piece discounted as it had a knot and was not the full thickness in many parts of the board. It wasn’t a big deal for guitar building as I ensured the knot was where a cutout was. Also meant I couldn’t put the join along the middle point. There is a small elbow cut on the front and tummy cut on the rear, similar to a strat but not as much.
The neck is a laminate of rock maple (quarter sawn) with a wenge centre. Using the quarter sawn wood meant I could get the neck fairly thin. I wanted a thinner feeling neck as opposed to my last build, which was a bit fatter feeling. the maple ended up having a bit of figure to it which is a nice surprise.
The fretboard is striped ebony with mother of pearl inlays (I couldn’t believe how long simple block inlays can take, i think its worth it though).
The headstock was a scarf joint with walnut veneers i made from offcuts of the walnut body wood.
The neck joint was originally going to be a bolt on, but with the bolts coming from above (hidden by a pickguard) into the body, with another 2 coming from the back of the body into the part of the neck behind the fretboard. The neck pocket was made the weird shape I had to ensure there was plenty of strength and leverage for the neck, so that I could avoid the neck pocket sticking out from the body. This way I could get better upper fret access, and having the points of the neck further apart to get a wider stance and a more efficient grip on the neck. After making the neck pocket and seeing how tight it was, I thought about gluing the neck in to avoid seeing the last 2 neck screws, and improve the mechanical connection. I ended up keeping 2 screws in as they were hidden anyway, and i could only get one clamp to hold the neck in place. i am extremely happy with the design, as the shape of the necks end means it is held from all sides but up. i actually got it stuck in there a number of times and spent a while getting it out each time.
Regarding the shape , it was originally going to have a butt similar to a fender, but i accidentally cut too deep when trimming some of the template with the router (was feeling too lazy to sand) and thought it might look good with the cutaway in the back, matching the angle of the front. I’m happy with the way it worked out.
The hardware I bought on ebay, as I don’t have too much money being a university student. The bridge is a roller tunomatic with ferrules as opposed to a tailpiece. The tuners are the same as many around with a somewhat unique shape that I quite like for this build. I made the pickguard from a blank piece of material. I made the truss rod from 10mmx10mm U channel aluminium and a ¼” rod. It is adjustable from the heel under the pickguard, to give it a cleaner look. I have barely had to adjust the truss rod, probably due to the quarter sawn neck wood and ebony fretboard. Having such a big rod and u section probably means it gives a lot of support itself.
Regarding the Electronics
I made the pickup bobbins (from offcuts of wenge) and wound the pickups myself. I was looking for the look of a p90 (or any larger single coil) but kept the actual size of the coil fairly tall and thin, and in reality they are pretty similar to strat pickups. I used 5mm alnico 5 rod magnets (same as fender single coils) on the neck, and used some 6.5mm alnico rod magnets for the bridge. I wound the coil 8200/ 6.05 kOhms (neck) and 8500/ 7.4 kOhms (bridge) times to get fairly bright pickups as I was intending on putting a switch in to put the pickups in series and didn’t want that setting ending up too boomy, and could always use that setting to get more output and a fatter sound. (Putting 2 singlecoils in series makes a humbucker pickup, when they are out of phase electrically and magnetically, which I did). I also added a switch to invert the phase, to get out of phase sounds as well. There are 3 switches, the black switch is the same pickup switch you find on a Gibson (neck/parallel/bridge). The mini switch is the series/parallel (single coil/humbucker if you like). This switch bypasses the pickup select switch, as it must use both pickups. The third switch is a push-pull on the volume knob (closest to the bridge), which inverts the phase to give a thinner, hollow sound.
The finish of the guitar is Danish oil with some beeswax rubbed in. I love the feel of the finish on the neck, it so smooth and along with the fairly thin neck makes for a fast playing guitar with great upper fret access.
I’m very impressed with the sounds I can get from the guitar. It is quite versatile due to the different electrical options. The humbucking mode gives a thick sound, where the single coil modes are a nice fender tone. The bridge pickup seems to add more mids to the tone of a bridge single coil, due to the larger magnets. The out of phase sounds are actually pretty useful when used in humbucking mode, but the parallel out of phase sound is a bit useless as it has lower output compared to the rest. I have just finished my second amplifier build (based loosely on the normal channel of an ac15) and it sounds great through it, ill do a little recording when I wont annoy anyone too much (the only cab I have is a 4x12 which carries sound a little too well for home use, especially when trying to crank an amp to its sweet spot)
only downside is the weight, its unchambered and 50mm thick with some of the heaviest woods commonly used. i dont mind, but its the first thing people comment about it when they put it over their shoulder.
Thanks guys
Love the other builds, a lot of talent shining through this month.
here are some photos, the last is there to show how the neck tennon is shaped.
-
nice looking, nice timbers too. the waist looks a bit thin (doesnt seem to go in eough on the bottom oart of the guitar, where your leg would be). very nice anway
-
any timber will work, some will sound better than others. if its a bolt on give something cheap a try and you may like it, if you dont start saving up for when you do have the money, snd then you will have more experience and wont botch the other piece. i dont think you will find any traditional "tonewoods" at home depot, but i live in australia so i have no idea what they do have.
-
that lower part (the part below the glue line) looks just like black walnut, but it would be fairly heavy it it was. could they have glued a piece of not walnut to walnut and stained it to look like walnut (colourwise) to make it match (maybe something happened to the other half in its previous life).
-
i dont think there is anything of the type. if you try to explain it we could maybe help.
what about using a plastic tube instead of metal? might be able to find a pvc/other insulator tube thats aproximately the size of the inner diameter of the metal tube and hammer it in/glue it in/put tape around it until its a tight fit then put it in.
edit: you could also try to melt wax into it, but i dont know if that would be very reliable.
-
you could put one post in and put the bridge into it and see if the strings line up with the bridge located by that bushing, then try the other to see if either of them have a suitable location.
-
black labb-- that's a frankenstein of a guitar all right! Looks like you used more than glue to hold the odd-shaped "tenon" in place.

But that raises an interesting question-- assuming you could do it in an attractive way, or cover with a pickguard, is there any good reason to not bolt the neck "down" into a body instead of from the back? The right hardware, some well-chosen countersinking... the wood equation could be made relatively the same, as far as I can imagine.
Greg
there is a bit of walnut dust where the 2 join, but it is a very tight join. its just the surface where its not so tight.
edit: you probably meant the screws, was a bit worried the glue wouldnt hold and put some screws as extra protection as they wouldnt be seen wither way.
-
I just want to play devil's advocate for the bolt-on real quick.
This is a the neck joint on a Dingwall Afterburner II bass:

The neck joins the body at the 24th fret. It's got really good upper fret access, and it looks good, too. That's what I mean when I say a lot of people haven't seen a really slick bolt-on joint before.
Hey, that IS really slick!
If you really want to stick with a V body . . . you can always push the fretboard out a little further so it is only the last one or two frets that are still on the body, if any at all.Would there be anything wrong with a bolt-on 24-fret neck that was extended a bit out and attached to a King-V body at the 22nd or 24th fret with a really deep-set neck for neck stability and a setup like the Dingwall bass? Something in Mahogany, maybe Basswood or Alder, and slightly hotter (but not ridiculously hot) pickups? That sounds like it could be at least fun to try. I think the bolt-on might have a nice snappy attack for the music I am intending this planned guitar for.
Mainly just throwing that out there to see if there are any inherent flaws in my rough planning.
-Cheers
ive done a similar thing with the build im just about to finish. my "tennon" fits around the neck pup and is then glued in. was originally going to make it a bolt on with some bolts coming from the top and some from the botttom, but ended up gluing it as it was a very nice fit and i didnt want the screws coming in from the bottom. the whole unit is covered in a pickguard to cover the odd tennon.
it wasnt made for metal or upper register acess, but it deffinately would work well for it. ill be posting finished photos of the build in the next few days once i wind the bridge pup and wire all the electronics up.
-
a neck through will be able to get you the best upper fret access as you dont need a tennon there.
An Ibanez Jem has the best upper register access of any guitar I've ever played... and its a bolt on.
As for the best "Shredder Guitar"... That's a stupid question. Design the guitar based on YOUR preferences, not other people's.
Personally, I'll shred on any of my guitars (Jem, Les Paul, Strat, Godin, Various Customs).
not disagreeing with you, but a neck through designed to have great upper register accss will be able to get better acess easily as you dont need the room for the screws.
-
a neck through will be able to get you the best upper fret access as you dont need a tennon there.
-
the nut material only changes the sound of the open string, and usually open strings arent too bright as they are the lowest notes you can play on the string in question. the use of a graphtech nut might work a bit better, but brass will be fine and wont make anything brighter other than open chords.
-
what do the guys with more experience in this forum than i think of the idea i put forward about a yearly comp with multiple categories. how many categories would you guys think would be suitable
possible categories could be
tele
V
strat (inc suerstrat)
metal (something that looks metal)
original (not that some metal designs arent original, just the voting would be based on the voters style preference)
bass
LP
novelty section (they can be usable, but this section refers to instruments with a particular theme, im thinking of something like the shovel bass a few months back)
acoustic
the issue i can see in the categories is where to stop (ie well you did a category for a lp, what about prs single cuts, do they fit in ect.) maybe a gibsonish category to cover more things. i dont know how far it would go, but i think its a good idea.
-
what about a yearly competition, like tele of the year, fancy wooded guitar of the year, cigarbox guitar of th year, best original shape ect.
that way it wouldnt be specifically for the comp, anyone who had finished a guitar that fit a category throughout the year could enter the comp.
-
hmm, keep in mind that i already have a 4 string which is virtually finished, but being used by my girlfriend. as much as she has it, it is still mine. when we do move out which may be in the nearish future, it wont matter that its at hers as it will be at mine, so im not really sure.
im thinking that i would rather do a 6 than a 5, as it seems to me most people who play 5's only play the 5th string because they want to play low with their metal band. i know that is a gross generalisation, as i know there are plenty of good bass players that play 5 strings, but it seems most are not being used to their potential in most cases, maybe its just the bands ive personally seen.
ill keep thinking and make a decision once ive finished on mycurrent projects
-
ive just about finished making a bass to teach my girlfriend to play. ive strung it up and put the bridge pup in and some rudimentary controls and its gone well, but ive decided i want a bass for myself. i bought some timber and glued up a bubinga-maple-bubinga-maple-bubinga neck through blank for the instrument, but im unsure how many strings i want on it. after getting the timber i realised that i had enough with the 3 bubinga strips (they were around 22mm wide each) and thought maybe i should not use the maple, but i wanted the strips on there as well to get the right effect (its a 1 piece design for the neck, as the neck wood is the fretboard and the truss rod is put in from the back, which gives the fretboard a stripey surface).
the bass was going to be a 4 string, as i dont really see too much of a need for a 5th string, but not using it makes me feel a bit wasteful.
do you think id benefit from making a 5 string? im also considering a 6 string, but ill see if i have enough wood.
most bassists i see myself trying to play like play 4 strings ( dave sims of the jesus lizard, rob wright of nomeansno are probably my 2 favorite, but im mainly a guitarist).
for 5/6 string
i already have a 4 string bass (its at my girlfriends place as shes learning on it, but its mine none the less)
5 or 6 strings would expand my options
id feel less like im wasting timber
against 5/6 string
i dont really want to play a 5 string,
makes the neck bigger
i dont feel id use the low b
it would make the instrument heavier (in the neck mainly),
make it a bit harder to play and mean more cost in making (not much, but a bit extra for hardware and bits and pieces)
if i dont like it i might not play it as much as id want to
what do you guys think i should make, i seem to be getting into playing bass, but i dont know how many strings i should do it.
-
could always put it into the control cavity and use something to secure it, or even its own compartment within the cavity, with a sponge or similar underneath it pushing it against the cover so it doesnt rattle around.
-
do your balls hang low
do they wobble to and fro
can you tie them in a knot
can you tie them in a bow
can you...
listen to the others, they have better advice
-
looking great, that horn looks much better from that angle too.
-
looks great, upper horn looks a bit close to the neck, can your thumb fit through the gap comfortably? was it hard to sand once the wings were glued on, or is it just the angle making it look so close.
i really like the look of it, what pup coniguration will you be putting in there?
-
Better yet,buy some inserts for the neck and drill them out larger,then you will have a better connection anyway.
http://www.lmii.com/CartTwo/thirdproducts....On+Neck+Inserts
I purposely didn't suggest that because he stated that he wished to keep the current, original fender screws.
he can always get new bolts that have a countersunk heads to fit the fender plate, which would save any mods on the body. my local hardware store has somehting similar to these, might be a good idea to check out a local hardware store for an easy fix, may make a stronger joint with no possibility of stripping the threads. the plugs should work well also.
-
His original post specifies that he wants dual-action.
forgive me for making assumptions, but there are very few situations where dual action has any advantages over traditional truss rods. most people just want them bacause they weel more freedom is good. not that there is anything wrong with dual action rods, but people shouldnt get stuck up about getting dual action as single action does what a truss rod does, when was the last time anyone used the other direction on a dual action? most people want fairly thin necks, or atleast thin enough that the string tension will put atleast a small bow in the neck, thats why truss rods were originally used.
i know you know most of that, but were deducing that he wants a truss rod that isnt being shipped from america, and ignoring that he wants a dual action, as we feel it is pointless.
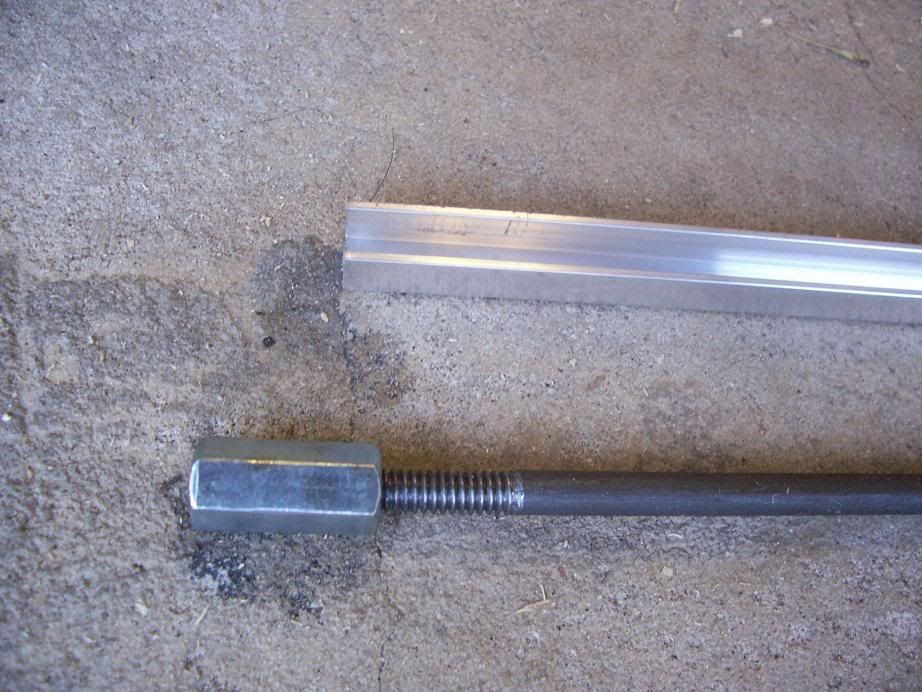
here are a couple of pics from a truss rod that i put into a bass/ guitar (made 2 the same, cant remember which it is) it is a rod aluminium u section (10mm by 10mm, with a 7mmx8.5mm inside), with a 1/4" rod ( i threaded it, but you could just as easily get a fully threaded rod) the end is a piece of steel stock which is also 10mm by 10mm so that is held in place within the neck. This piece was stopped from rotating using grub screws going into drillholes within the rod, but im sure there are much easier ways. i put some thin brass sheet either side of it to ensure it wouldnt rotate but thats only because my slot was a bit loose. the other end has a coupling nut (just a long nut, you could use another type of nut, but these are easy to get, and worked well for a heel adjustment) for adjustment. i put the rod in the u section and put a washer between the u secion and the nut(could just as well use a spacer of some sort, depending on how the system sits inside the neck). works well, and is cheap and easy to make.
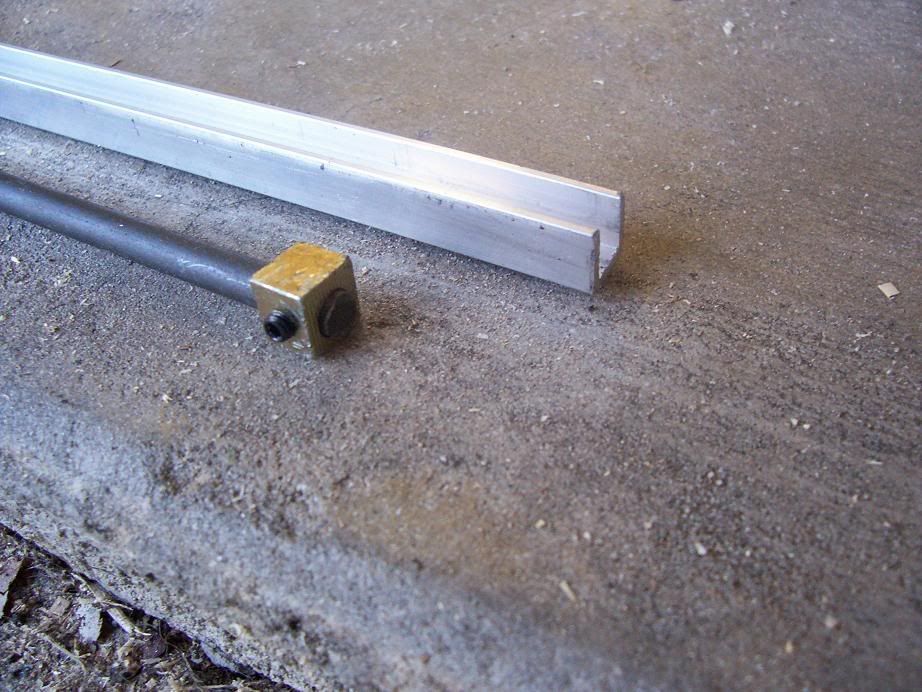
http://img.photobucket.com/albums/v643/bla...dadjustment.jpg

My Current Projects
in In Progress and Finished Work
Posted
love the look of that grain under the blue stain. should look great once finished.