


black_labb
-
Posts
231 -
Joined
-
Last visited
Content Type
Profiles
News and Information
Tutorials
Product Reviews
Supplier Listings
Articles
Guitar Of The Month
Links and Resources
Forums
Gallery
Downloads
Posts posted by black_labb
-
-
why not make your own from some aluminium u channel and a threaded rod. just have to fix one end so it doesnt spin, and then get a nut that is suitable to tighten.
-
the maple and walnut is quite a popular mix, so it should work well. there are plenty of other mixes though. what about maple and bubinga?
regarding the vol tone and balance pots, i was going to do this on my bass (but a preamp boost control instead of tone), but ive decided to just put 2 vol pots, works the same as the balance pot. saves having to get the special pots. i wanted to have a 1meg pots which werent available in the balance pots.
im also in australia, and didnt really want to order from stewmac (only place i could find with the pots) unless i was going to get some other things with it.
-
Out of curiousity, has anyone ever heard of, or used Ash as a neck wood?
All my research has shown that it's more for bodies.
Reason I ask is that I have a chunk of Ash and Mahogany and I'm tossing around the idea of what to use for which.
Thanks all!
My advise is to use a wood that you choose to use, don't use a wood just because. Go to your local wood dealer. You can pick up a piece of hard maple or cherry, Walnut, Sapele for $10 or less, Mahogany(Genuine), Limba, Padauk, Bubinga for maybe $15 or less. Birdsey, Curly Hard Maple,Pau Ferro, Cocobolo, EIR all can be had in the $30 or less range. Neck wood is cheap in comparison to most every other aspect of a build. Choose the wood you WANT to use.
If Ash is your first choice, use it.
Peace,Rich
i completely agree with that. ive nearly finished a bass (its being played, but i will finish the sanding, level the frets and put the neck pup in +additional wiring, then oil it). the bass is a neckthrough with a one piece neck design (has the truss rod put in from behind, using the neck woods for a fretboard). the body is a new guinea rosewood (cheap wood, but some local acoustic builders have been using it for necks with great results). i also used the ng rosewood for the outside laminates on the neck. i used a 24mm piece of zebrano for the centre of the neck with 10mm pieces of wenge either side of that. even though they were expensive woods, the build was cheaper than all the rest, but because the neck woods are so central to the design it looks great (their on the front and back). granted this design displays the neck woods more thank most, but it shows that the neck woods are cheap compared to the body. besides, the neck wood gives more of the tone to the instrument than the body.
-
id also reccomend starting small (or just less complicated, the effects are going to be hard), there is alot that can go wrong, be overlooked or become unfeasable for a diy build. effecte will most likely be needed to be transistors, which will need a much lower voltage source than tubes, which means either a second transformer or a hard to find transformer with 25v taps (or somehting around that) as well as 350v taps, and the heater taps. you could do a solidstate amp, but theyre complicated and you would deffinately want to do a printed circuit board for it. not many people do solidstate amps as their complicated and there is nothing you can really improve over the current designs without fully understanding it all, which will take a while.
has anyone told you that half the percieved volume of a 100w amp is 10w. essentially to get half the percieved volume of an amp you divide it by 10 (or to double the percieved volume, you multiply by 10). the percieved volume also has to do with the speakers, which is why cheap combos dont sound too loud.
if you want all the effects id say just get pedals and build a simple tube amp. maybe with a simple cascading gain stage so you can get some dirt from it at any volumes.
no offence, but i dont see this project amounting to anything atm. you seem to think that making an amp is just soldering connections from parts. it seems simple, but theres alot more to it. id suggest learning a bit about preamps, and then getting a weber kits (or any other one) and tweaking/change the preamp on one of their kits to get what you want. when do you need a 100w amp by the way? whens the last time youve played a stadium gig without a powerful PA. (has anyone in the last 20 years?). all you need from an amp to play a gig is for it to be able to play with the drummer reasonably, which can be achieved with a 15 watt amp easily, and it will usually sound better than a 100w amp playing at that volume.
i must say that bass amps will benefit from the high wattage, but not guitar amps.
-
the bass neck will have 2 extra pieces and be longer
-
if you get one height you should be able to get the others via trig
-
alterntively you could have the bottom plate and the back block in separate parts, and hold them together with a screw that goes through both, when you tighten it they would hold together. makes for an extremely easily made bridge assuming sourcing the correct size blocks isnt hard. you could even luperglue them together if you felt it was nessisary. if your looking for a cheap option its much more economical than having a block of brass machined unless you know someone with access to a mill.
If the two plates were screwed together you would either need a thick block to accommodate some strong bolts, or risk the string tension breaking smaller bolts.
In the end it may be cheaper and easier for someone to do 5 minutes of milling.
the idae was to screw the 2 pieces to the timber of the body
-
ive heard that jarrah is actually a very warm sounding wood, warm to the extent that it sounds boomy. may not be a bad option, but dont think that it will sound like ebony.
qld maple is a good body wood, as is silky oak as well as a variety of other timbers.
there is an australian instrument makers forum here
if your interested. there have been some recent discussions in some threads about australian timbers if you want to see what others oppinions are.
what subject are you doing the guitar for? i finished my hsc 2 years ago (im at uni now studying engineering). was it design and technology or industrial technology: woodworking? i did design and technology and enjoyed it quite a bit, also did industrial technology but in the multimedia area.
-
--------------------------------------------------------------------------------
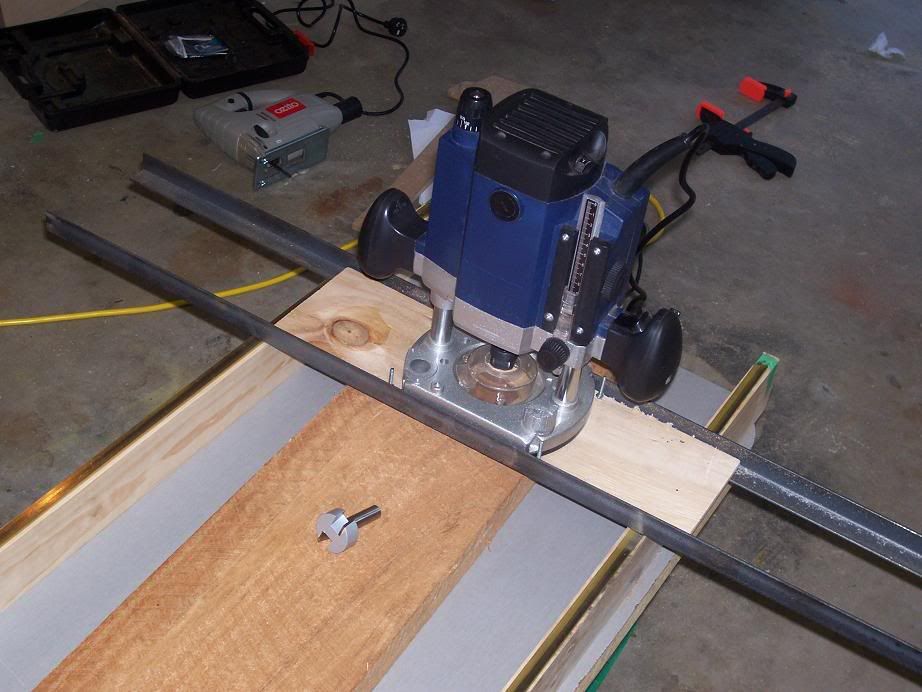
i made a thicknessing jig a while ago so i could do virtually everything myself for guitarbuilding (i dont have a bandsaw, but i borrow one from a butcher shop i work at on saturdays for some things every once in a while).
the jig consists of some rails on the edges of a piece of chipboard (was a cutout from the kitchen sink) i made the rails by screwing some pine there and then topping them off with a brass strip (had it laying around). the router is then mounted on some rails.
the router is mounted on some L shaped steel extrusions from bunnings, and a piece of plywood where the router goes (with a hole cut for the router bit to pass through). these are all bolted together to make a solid connection, which is then passed over the wood that is between the rails.
this is a handy tool as it works well for
- thicknessing
- putting angles on things (neck pocket jigs, scarf joints) by proping the workpiece up at the right angle (found using trigenometry) before thicknessing it
- making veneers
- making the recessed headstock on a fender style headstock
- preparing a butt joint
it is even more useful when you consider that you can choose what you want to thickness, for example thicknessing a body of a neckthrough instrument after the wings have been glued on. this way you can make sure that the wings are flush with the centrebit without trying to plane with a piece sticking up from the neck. or leaving a straight edge where you want to have the fretboard on the headstock of a guitar (ie fenderstyle neck)
i know there are plenty of tools that do some of these things but its a great tool for me, someone who doesnt want to spend alot of money on the many tools to make a guitar and would rather work with the bare essentials. i keep finding new uses for it too.
heres the jig, with some qld maple underneath it

heres it from above, with the dado bit i use for this
http://img.photobucket.com/albums/v643/bla...hicknesser2.jpg
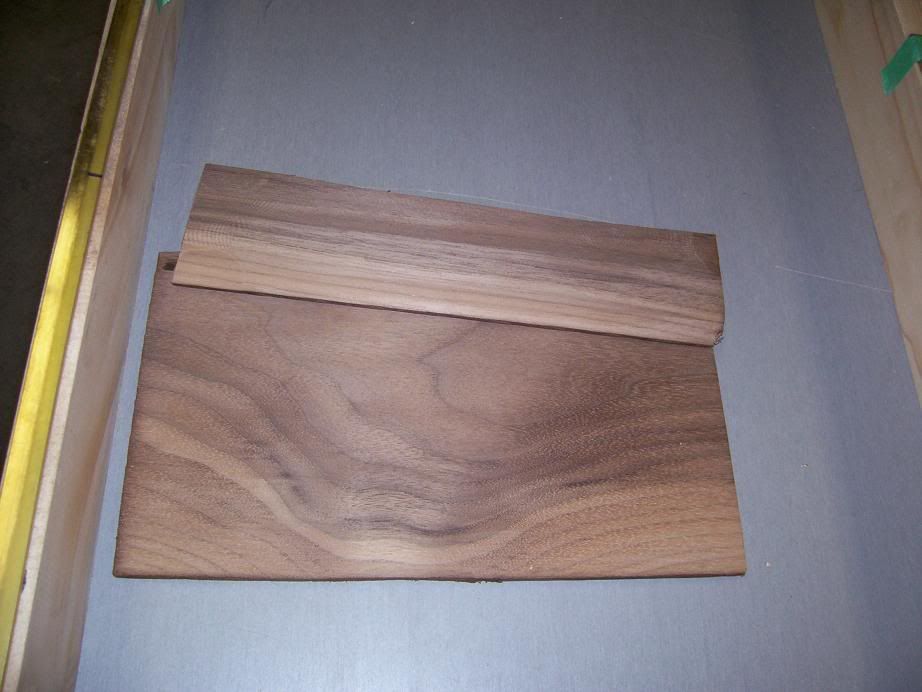
heres a some walnut (body offcut) i thicknessed into sizes for the headstock veneers (no sure if i should call it a veneer, the thicker is 4mm or so thick)
http://img.photobucket.com/albums/v643/bla...mallveneers.jpg
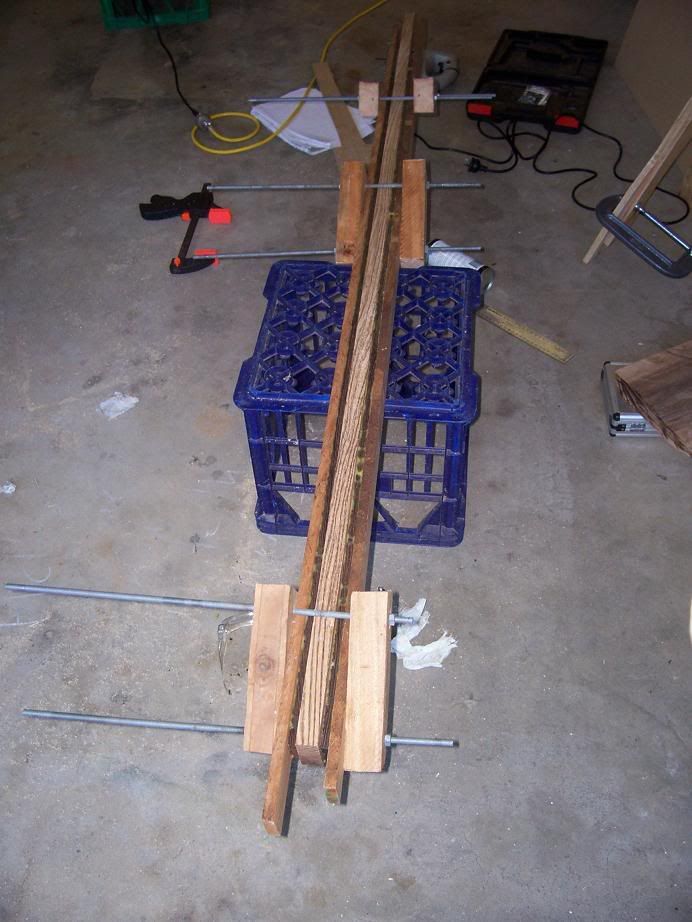
also thought id post the clamps i made, there just threaded rod and a bit of pine that i tighten up with a spanner
http://img.photobucket.com/albums/v643/bla...ssneckclamp.jpg
i had 3 other clamps on the neck if you were worried thats all i had for such a long piece.
-
ive been using some feeler gauges to cut nut slots. for the big slots (low strings and bass strings) i put some sandpaper over it and measure the width with some vernier calipers to get the right width. i file teeth into the feeler gauges for the smaller strings on a guitar. works well imo
-
larger angles create more pressure on the nut, this can make the nut wear quicker, and it also reduces tuning stability, as there is more friction at the nut, letting there be a greater difference in tension between either sides of the nut. people say it increases sustain by having the extra pressure. basically it is a compromise between the tuning stability and sustain. strength isnt too much of an issue if you do a scarf joint, assuming you dont go crazy with the angle. if the wood grains are closer to paralell between the 2 pieces of the scarf joint it should glue better than grain that is closer to perpendicular.
-
ok, ive strung it up (not finished or with electronics at this stage) but it sounds great acoustically, the crack is holding up fine, cant even see it. i tensioned the strings well past standard tuning (electric tuner mistake) so it is plenty strong. ill make a topic when its finished.
-
Personally I'd repair this with thick CA or Epoxy, although titebond will do.
Also: learn from this. Drill with a press if at all possible, and if not, at least clamp (firmly!) a backing board to your headstock and THEN drill holes. Prevent blow-outs and other assorted nasties. A nice, new forstner is actually the ideal drill bit for drillig tuner holes...
its fixed and you wouldnt even know its there. i used a hand drill mounted into a drill stand i borrowed from my girlfriends dad. the bass is ultimately for her to learn and play on. the tuner holes needed to be 17/32"/ 13.5mm. this is a very odd size, as most drill sets stop at 13mm/1/2". i had to go to an engineers shop to get the size (cost more than my drill set of 1.5-13mm with half mm intervals, which was a decent set from a machine shop but on special because of the broken case). to find the size in a forstner bit would be hell. the holes are drilled now and look very clean. i dont have access to a drill press as im quite minimal with the tools i do so many things by making jigs for my router.
thanks for the help
-
alterntively you could have the bottom plate and the back block in separate parts, and hold them together with a screw that goes through both, when you tighten it they would hold together. makes for an extremely easily made bridge assuming sourcing the correct size blocks isnt hard. you could even luperglue them together if you felt it was nessisary. if your looking for a cheap option its much more economical than having a block of brass machined unless you know someone with access to a mill.
-
if you decided to glue it you would want to use epoxy or similar, pva/woodglues dont glue butt joins well, atleast not well enough for a neck like that. id also think that it would effect the sound a fair bit having a noncontinuous fretboard.
-
flood the crack with titebond and clamp it!
that should do the trick.
I don't think you need to split it off the part that is still connected.
thanks for the help, i decided to do exactly that with the reasoning that if it didnt work properly it wouldnt change what i needed to do for a second option.
-
i need some advice for the best way to fix a crack through the headstock that happened when i was drilling the tuner hole. the drill hand drill had a drill stand that was clamped to the neck, and when it was through the hole the drill hit the edge of the bench which made it pull away from the bass, cracking it along the headstock as you can see in the photos. would you guys suggest flooding the crack with titebond and then clamping heavily, or would that not make a sufficient join for a spot where there is a reasonable amount of pull from the strings.
if you think i should glue it back together, would you suggest i fully split it off, so that i can get the glue into all of the little cracks, or would you suggest that i do my best to push the tightbond into the crack, but leave it connected to ensure that it is in the exact same place.
here are some photos

http://img.photobucket.com/albums/v643/black_labb/crack1.jpg
thanks for the help, the worst thing is the bass is literally done, other than some sanding, the nut, the tuner holes and the pup covers.
-
granted ours look somewhat fancy you can definitely tell they were done by some dude in his dorm room as something to do to kill time between his engineering courses (thats a lie, i dont have time, i dont even know how i can build guitars and amps and still keep my grades at a reasonable level).
that sounds so much like me the only reason i know it wasnt was the part about keeping my grades up, ive been slacking since i got into this hobby.
-
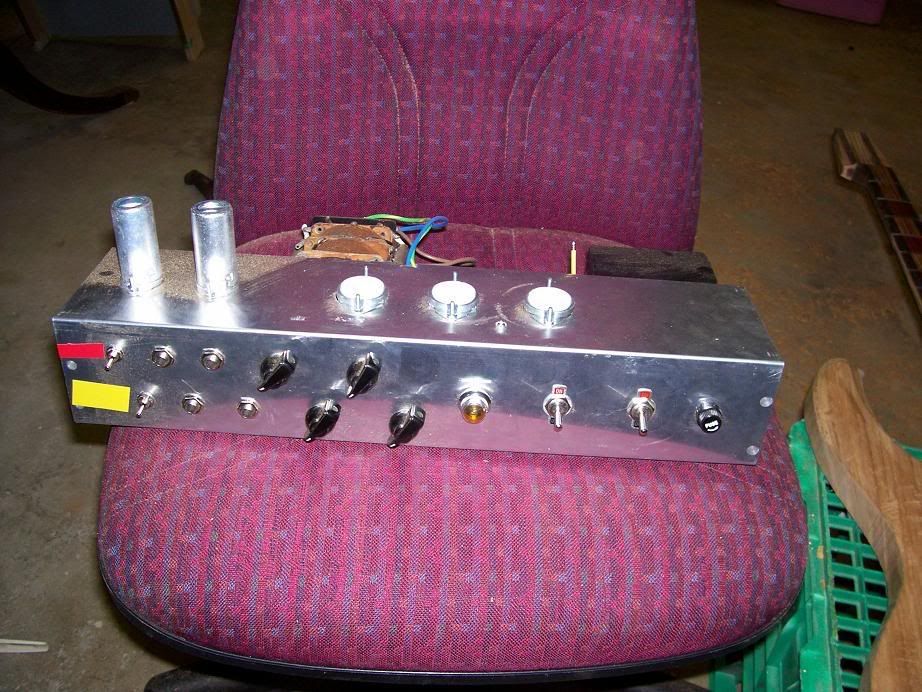
heres my amp in progress. its a 5e3 (tweed deluxe) with a few mods. the differences being a 12ax7 instead of the 12ay7. the triodes are separately biased using a cathode resistor, one being a 1500 ohms, and one being a 1800. the idea being the 1k5 would give more grunt than the tweed with the 12ay7, and having the 1k8 on the other channel will give it more of a traditional tweed tone but still with the 12ax7. i also used an on-off-on switch on each channel to change between bypass caps on the cathode bias of the preamp triodes so that i can use a traditional tweed 25uf (a bass/low mid boost) , no bypass cap or a .68 for a treble/high mid boost. these are on each of the channels so i can always jumper the 2 channels to get a different sound.
i will be making a faceplate from something. im thinking maybe pickguard material, or maybe even some wood veneer. its going into a head im making from pine. not sure what i will be finishing the head with though. all the wiring except the connection to the mains is finished though.
-
looks good, i always liked the look of that guitar. keep posting progress.
am i correct in saying you are getting flamed maple and then putting rosewood caps over the top and bottom of it? if you are id suggest saving the flame maple for a situation where you can actually see the grain.
-
i would imagine neodynum being too strong, and effecting the sustain and tone of the guitar. are you familiar with "wolf tones" which are when the neck pup on a strat or similar puped guitar are adjusted too close to the neck, it starts to effect the strings vibration. id imagine neodynum magnets of that size would be too strong and create much more prominent wolf tones and loss of sustain. they might be somewhat usable for a bridge pup in a bass, but even then, it might be too strong. for magnets used in the pickup themselves you would want alnice (alnico 5 is pretty standard, but others have been used as well to get different sounds)
you can also use ceramic magnets and have magnetised polepieces like sb mentioned.
try stewmac or allparts for alnico rod magnets, or maybe a magnet shop of somesort could get what you need. im in australia and have found a pretty good place, but i dont think that would help you too much.
on a different note, i was surprised when i saw that you come from sherbrooke, i used to live in hatley/ north hatley until i moved to australia 8 years ago, i am going back for christmas to see family. just funny to see people who lived near you on the other side of the world
-
back to the physics part, you could easily explain the physics of the set neck deeper into the body by showing a longer distance of contact, relating it to moments. winding pickups doesnt take too long once you are set up, but the setup could take a bit, depending what you are going to use.
-
i put a cove bit into the router with a 1/2" bearing above the blades (its a 1/2" cove bit with a 1/4" shank) and drilled some holes into some plywood, one being larger and one being smaller. they were used as templates and just ran the smaller cove bit around the template and then across the centre a number of times to get the centre as flat as i could. this meant i was less likely to get tearout (a smaller bit) it had a flat bottom (after a bit of sanding) and looked great. also means you can tailor the size of the recess. you could even make a oddly shaped cavity. could work as a type of body inlay and stain the inside or something.
i may post some photos at some stage.
-
Xanthus - Standard two-point physics... placing more mass below the line created by the two suspension points increases the stability of the entire structure. With a straight-pull 6-in-line headstock, longer scale, and a wider/deeper neck than a standard Explorer, I'm gonna need all the help I can get. My Epi Explorer headstock dives like it's it's job, and if it wasn't for that nice back point to rest my arm on it would be very fatiguing to play.
that stability is about the guitar being balanced in a way so it wont want to twist (ie the bass side spinning around to where the treble side should be) when people look for stability in a guitar they look for a guitar that is balanced so that the headsock doent drop when you let go of the neck. the main issue being that supporting a drooping neck while playing can be quite tiring.
Neck Advice For Thru-neck Bass Build
in Solidbody Guitar and Bass Chat
Posted
i agree, ignore the nodes, as diffeeren frets give different harmonic content. just think that the closer to the bridge, the more harmonic content there will be, giving a treblier sound, but also less fundamental, and closer to the middle of the string will give you more fundamental and less harmonic content. i just put mine where it seems suitable for the design, wether its guitar or bass. the bass i made i looked at a photo of a jazz bass, and got an aproximate ration, not to get the right node, just so i didnt make the bridge too thin or the neck too boomy. on my guitar i put the neck after the truss rod adjustment ( at the heel end, so the neck pup is a ways away from the bridge) im not looking for the cleanest sound in the world, so it should work well for me.