


Blackdog
-
Posts
717 -
Joined
-
Last visited
-
Days Won
6
Content Type
Profiles
News and Information
Tutorials
Product Reviews
Supplier Listings
Articles
Guitar Of The Month
Links and Resources
Forums
Gallery
Downloads
Posts posted by Blackdog
-
-
OK, almost there....
I think that today's will be the final coats for the korina SC.
I'm really disappointed with the korina piece I'm using for the body.
When I was choosing the pieces for the build I had two korina blanks. One was a 1-piece blank and the other was a 2-piece. I ended up choosing the 2-pc because it was significantly lighter.
But the thing is so soft that you can dent it just by looking at it with intent !! It scratches so easily too. I have spent a lot of time sanding and re-sanding until everything was finish worthy...
And to make maters worse, in the middle of the blank it has some darker streaks that appear on the sides, the cutaway and the belly-cut in the form of darker, blackish pores. It makes it look dirty. The back is spotless, though.
The neck korina was always a bit darker, and the blank had a huge darker area. But with the carving in place that dark section is almost completely gone. There's still a spot on the back of the neck about mid-way, but it will be just a character mark...
I like mahogany so much better !!!!
Anyway, I'm really looking forward to finishing this one. With all the hardware on and as a playable instrument, everything will be forgotten hopefully...
-
Thank you guys !!
Your nice comments are much appreciated.
@WalkOnPartInTheWar: My wife takes the (good) pictures. She says thanks !
I believe photobucket compresses and reduces the size of the picture on upload. I don't have any other means of hosting, but if you pm me an email address I can send it to you.
-
Maikkeli, impressive inlay work !! Really classy.
And also very impressed with the gilding results, both your's and WeZV's examples are amazing.
Specially like your idea of a "real" goldtop LP, hope you don't mind if I do something like that for myself...
Really inspiring work, guys.
-
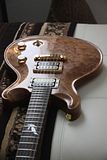
This is a guitar that a friend of mine commissioned me to build. He wanted essentially the same as the Sapeli topped guitar I built in 2009, but with simpler cosmetic appointments.
This were his specifications:
Solid Honduras Mahogany body (1 piece), 36mm thick.
(almost)Bookmatched, blistered Sapeli top, 18mm thick.
One piece mahogany neck. HotRod and CF reinforcements.
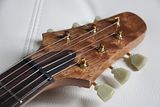
Macassar fretboard, bound in IRW with a thin maple prufling. 24 frets, 25" scale. GraphTech nut. There's a maple accent between the fretboard and the neck.
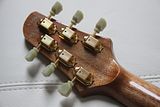
Figured Sapeli headstock overlay with recessed macassar TRC.
Vintage style locking tuners.
ABM aluminum wraparound bridge with Tonepros locking posts.
Pickups are still TBC, but is was assembled with Zhangbucker pickups: Woodbucker'24 alnico 4 at the neck and SweetHeat w/thick alnico 2 at the bridge, 3-way toggle, master volume, master tone w/P-P coiltap.
Gold Hardware.
Final Weight: 3.7Kg (8.2 lbs)
The complete guitar was finished in natural. The finish is glossy nitro.
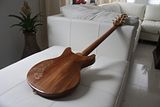
The customer is coming next friday to pick it up. I'm very satisfied with the end results, let's hope he will be too.
Thanks for looking.
-
There has been some progress on these two.
The singlecut is being sprayed right now, and the Sapeli DC has been finished.
Here are some pictures of the Sapeli Sisters. My original one from 2009, with the top inlay and the figured woods all around, and the new one with a simpler look.
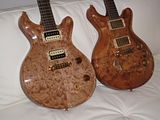
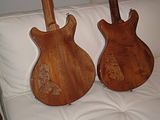

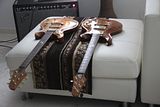
In these side-by-side pictures it can be seen that there were a few design modifications introduced, apart from the obvious control layout and cosmetic details.
Even though I never had a problem with the neck stability in mine, being the new one a commission I decided to make a slightly bigger heel and the fingerboard extends a bit longer into the body, which increases the gluing surface a bit. This can hardly be noticed when playing, anyway.
I will open another thread with some more finished pictures.
...and I'll go and continue with the singlecut finishing...
-
Thanks for the replies.
I will look into getting some lacquer thinner, and the rest will be elbow grease...
-
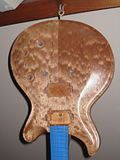
Update time: The finishing stages have now started.
We stain with water based StewMac concentrated colors, so the grain of the top was raised with a damp rag and sanded down to 320grit three times (until no more grain raised), and the top was fine sanded to 400. Then conveniently degreased with naphta.
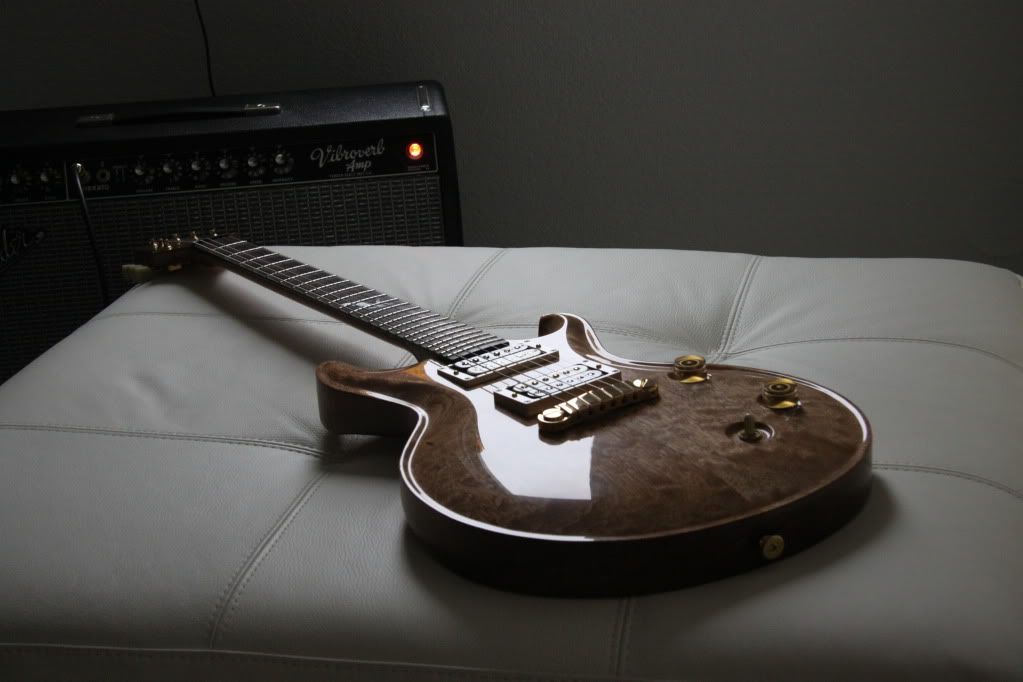
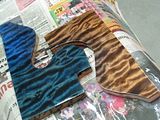
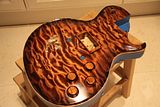
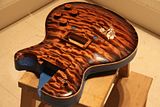
We did some color tests, the blue and greeninsh-blue were quite nice, but I thought they flattened the quilt too much. We opted for the black-copper, which incidentally is the same color of the previous Korina SC22 I built last year.
The faux binding was sealed with nitro sanding sealer. I learned this masking and sealing trick from some other forum member whose name I can't recall right now. The masking is a pain, but it produces the cleanest faux-bindings.
The first stain was pure black. It was washed off on the spot with a some clean cotton cloth and water as much as possible.
The black was sanded off when dry, avoiding the edges to keep the sealing intact and to keep all the black stain there. Then a second staining with black was applied to the edges and blended towards the center, to create the burst effect.
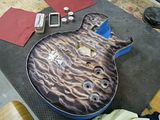
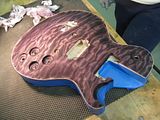
After it was completely dry the third stain, the copper color, was applied to the whole surface. Left to dry overnight and a couple of nitro clear coats were applied for sealing. I'm liking the results a lot, the color looks a lot deeper on this wide quilt than on the tight flame of the previous one. The burst effect is much nicer and smoother on this one too, we're fine tuning the procedure. Obviously, the same double staining (sans the burst) was applied to the maple knobs, HB ring and P90 cover, as seen in the following pic.
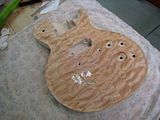
Next step was the (very messy) application of the pore filler to the back and the neck.
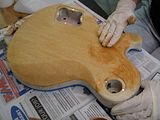
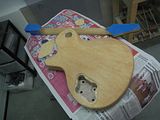
Now I'll have to sand all that stuff off and seal the back and neck with a coat or two of lacquer before setting the neck in the body. Looking forward to starting the "official" finish spraying on this one…
Thanks for watching.
-
Hi all.
For a Gibson ES335 rebuild I will be working on I need to completely remove the finish of the existing neck.
This is a one piece mahogany neck with a slightly thick cherry nitro. I will likely finish the rebuilt guitar in natural, so I need to remove the finish of the neck as cleanly as possible.
Is there an "intelligent" way of getting this done ?? I mean other than (or in addition to) just sanding for hours...
Help and suggestions are appreciated.
-
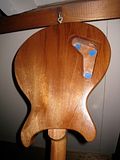
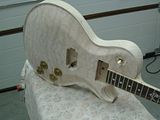
With the Sapeli DC24 curing it was time to resume the Korina SC22 build.
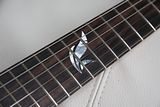
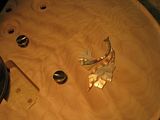
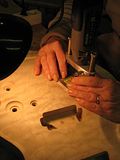
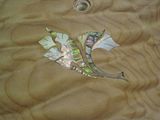
This one is a build for myself, and sports a pearl inlay on the top.
The pieces were cut from white and gold MOP, green rippled abalone and rippled awabi.
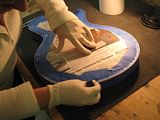
These are glued in place for scribing. We use a thick nitro based nail lacquer as the glue, as it is tough enough to withstand the lateral forces of the xacto knife for scribing and it is then easily softened with acetone.
The pictures show the final product with a wet top for contrast.

Now we are working on the masking of the top and sides, just exposing what will be the maple faux-binding. We seal this with nitro sanding sealer before staining the top.
The colour tests have also started with a couple of maple off-cuts from the top. This will be interesting, fror the little I've seen so far the quilt of this top will be amazing !!
-
I gave priority to the Sapeli DC24 as it is a commission. The guitar has a simple nitro natural finish over the pore filled mahogany, but it proved a bit more problematic than I expected.
The pore filling didn't go all too well. Apparently it shrank quite a bit and the pores kept popping back under the lacquer.
It took a few iterations of level sanding between lacquer sprays to get to a potentially flat finish (that is not too thick). Now it is happily curing. Hopefully it will be sanded/polished and assembled by the end of this month.
For the Korina SC22 we will apply the pore filler in two steps to try to minimise this problem: Apply, let it dry overnight, apply again, let it dry overnight, final sand.
I may also rub a coat of nitro sanding sealer on the guitar before commencing the nitro spraying.
-
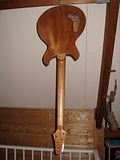
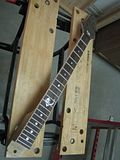
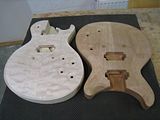
The woodwork of these babies has been finished.
t has been a very successful experience so far, as I could carry the two builds together pretty well.
The final fretwork was done, the carving of the necks and tops finished. The hardware was fit-tested and the proper alignment of the neck and bridge verified as I usually do.
This was the status of both builds by the end of the year:

And this is where the two builds started separate paths...
-
That´s a good idea...Last year there were some suggestions and having stickies dealing with different subjects was one of them (mine, ahem). I hope others post their favorite build threads, as I know I have mine somewhere with that intention.
What are yours, so far? Might get the ball rolling!
As far as builders to search threads on, off the top of my head...WezV, RAD, Avengers63, Blackdog...mhhh...Guitarnut (I wonder where he´s gone to!)
Wow !! I'm truly honored !!
So nice of you, José Luis, to remember me specially when I'm not posting so often lately. Being in such stellar company makes me very happy.
So many great and inspirational builders in these pages. I think it is a great idea to collect the best documented build threads. I would guess that almost every possible technique has been cover by one builder or another. Ranging from simple hand-tools problem solving all the way to CNC solutions. I have personally learned so much from this forum's builders (actually mostly all I know about guitar building !!), and a place with the collected works will be most helpful for the new members.
Truth be told I may not be posting a lot, but still reading and learning a lot !! I'm very grateful to this forum and it's members.
-
I'd second the proposal of shortening the block.
If you need to remove that little it's probably easier on the spring side of the block, and would probably be safer if you do it with a flat file.
-
Thanks, Drak, for your honest and mind opening reply.
You're indeed right, all I have is a neck (just removed it from the centre block, BTW). So I will design a new guitar around the neck.
Since it's going to bear the Gibson badge on the headstock I want to keep it Gibson-themed at least. This neck joins the body at the 19th fret, so it would be suitable for an SG, a 336 type or a 335 type.
Not interested in an SG at this stage. A 336 style would be tempting, as these are built just like I intend to build mine. I could even do a full replica if I were so inclined… But considering I also have the case I think I will build a 335 style, but built along the lines of the 336: hollowed mahogany body and solid carved top. You're also right in that I don't need to follow any of the designed-to-be-cheaply-mass-produced ES335 design constraints.
Considering the size, the main consideration will indeed be weight. I've done some modelling to help me get weight estimations.
Unfortunately the only honduras mahogany blank I have that is thick and wide enough for this project is horribly heavy. Even with the light redwood top a full centre block version of this guitar would end up close to 11 lbs. A fully hollow version (solid block under bridge and tailpiece only) would be an "almost" manageable 9.5 lbs.
However I found that I have a mahogany billet (probably khaya) that's nicely flamed and significantly lighter. I can resaw a nice bookmatched set and use it for the back (just like I will do with the separate top). Now since I will only need the middle-piece for the rims and center-block I can make it out of a two piece blank of much lighter sipo… All considered, the same hollow design will go down to 8.3 lbs for the completed guitar, and that would be really sweet. I know it will not sound like a 335, but with all that chambering inside, at least I hope it will not sound just like a mahogany solidbody either.
Now my question: I will be carving the top and potentially the back on the inside too. This will leave the thickness at around 3-4mm (1/8-5/32") at several places. I don't think these are quarter sawn pieces, could that thickness be a problem ?? I have some red cedar (also very light, very straight grained and quartered) that I could use for the top instead of redwood, but the nicely flamed redwood would definitely look more interesting...
Structurally, the rims and center-block should handle most of the load, and the rims will be 15 mm (5/8") wide all around. So, does it look like a viable design to you ??
This is the design of the hollow chambers as I plan to build it:

Thanks again.
-
I used to own a Gibson LP Classic. These came with the kluson type tuners stock, very light. The neck on these was also very thin.
The guitar definitely had a very poor sustain. I was trying to sell it when I heard about the added mass trick.
I changed the tuners to Grover Rotomatics, which are significantly heavier, and it really was like night and day !
The guitar became a lot mpre resonant and the sustain proved dramatically.
Not very scientific, I would not generalize, but in that particular case the difference was really amazing.
-
Happy New Year guys !!
I've got a nice and interesting project: I came into the possession of a badly damaged Gibson ES335. The guitar had sustained severe damage to the top, the back and the rims in a couple of places. It needed major reconstruction.
After carefully discarding the damaged parts the only pieces that could be rescued were the neck and the maple centre block, which are essentially undamaged (and of course all the original hardware and case).
The idea is to reconstruct the body, but I will be doing it using the "chambered solid-body" approach: The back will be carved mahogany and the top will be carved redwood.
I'm currently considering a couple of alternatives, the first would be making the center block integral to the back as part of the chambering, maybe shorten it a bit to keep he weight under control. Something like this:

However, I was thinking that a good deal of the 335 timbre comes from the neck set into the solid maple center block, so I was also considering the following alternatives of separate maple blocks (in blue in the drawing) inside the hollowed mahogany back:


For this I could re-use the original center block (after some reshaping) or most likely build a new one.
The maple block may also help to keep the weight down a bit, but of course, the build becomes a little more complex. This construction will be the closest to the original 335 recipe with the carved solid woods replacing the pressed laminates for the "shell".
What do you guys think, is it worth it to pursue the more complex solution of a separate center block ??
TIA
-
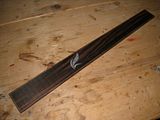
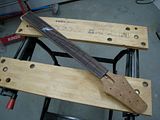
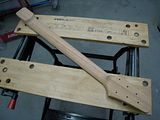
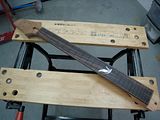
Long overdue update to this thread.
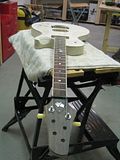
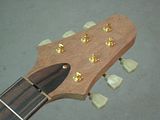
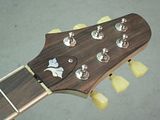
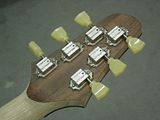
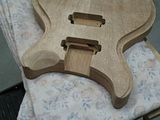
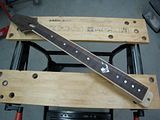
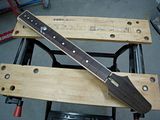
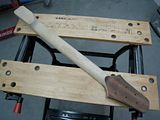
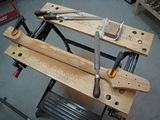
Quite a lot has been done to these builds. The necks are pretty much finished, fretted and levelled, fine fretwork still to be done. The TRCs and their recesses are routed on the headstocks.
The pictures show the necks with the tuners being fit-tested: Gotoh Kluson styled, locking, and TonePros Kluson Deluxe.


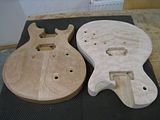
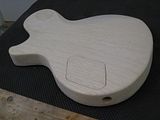
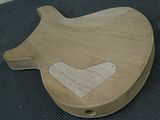
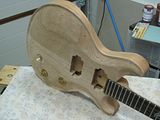
The bodies have the tops angled and neck pockets routed. The pickup cavities are also in place. Finally the back countour and treble horn scoop have been carved.
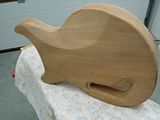
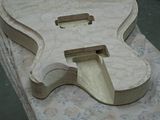

Now I have to start with the top carve on both.
Thanks for reading.
-
Wow !! Long time no post !!!
I better catch up with this build thread before I get banned from the GOTM competition !!!

Jokes apart, I've been busy with these two. Fortunately I have been able to carry both builds along so far.
I have routed the ledges of the tops on both guitars, and angled the top of the Sapeli DC. The Korina SC has a dual slope top angle, so I haven't done that one yet.
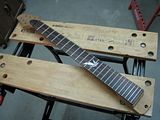
But I have indeed done a lot more on the fretboards and necks. Both necks are carved, volute and heel included. Fingerboards inlaid, bound, attached and radiused to 12" by now (the pictures show the necks before radiusing).
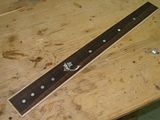

Remaining work on the necks: finesse carving, these are just in the ballpark but I intend to do an asymetric profile on mine, just for kicks. I will do a compound radius on both, so I'll go to about 10" at the headstock and blend it into 12" towards the bridge. Then I will be ready to fret both necks.
Then I'll route the first angle on the SC top and I will be ready to cut the templates and route the neck pockets.
Thanks for watching !!
-
Are those inlaid, or fully through the whole blank? I ask cause if it's all the way through the blank... that could present some issues.
Also, Untitled_Project, search for Russ Garehan's "rising sun" tank top build. He does something similar to this and gives a decent idea of how it will look like when finished... provided I'm right about what's going on here...
Chris
Hi Chris,
I think the slots go only some millimeters into the surface. Could be cool !!
-
I never liked the FB and now I want one !!
cheers blackdog - cant beat that for a compliment
Truth be told, my only experience with a FB dates back to the early 90s when I got to try one of those Gibson FB fives of the time for a full weekend. I remember that it was clearly neck heavy and the way it hung on the strap made reaching the first frets a bit of a stretch, it felt like a 24 fretter in some way. I also remember that the sustain was quite good but it had a very noticeable metallic ringing to it, and at the time I was told that it was intrinsic of the neck through design.
Even though I have a different view of guitars now that I have built some (still don't like the Corvus), it is pretty much based on those impressions that I have never attempted to build a neck through yet... Maybe time to reconsider.
-
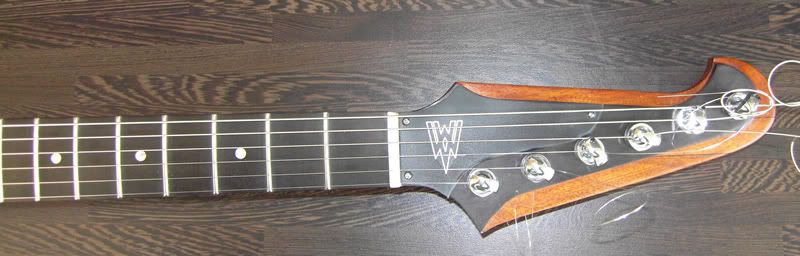
just about done with this

needs a new plate as there are some patches of discolouration on this - it would look good if it was a bit more even, but sadly its not... this is the practice run with a rub-on firebird decal
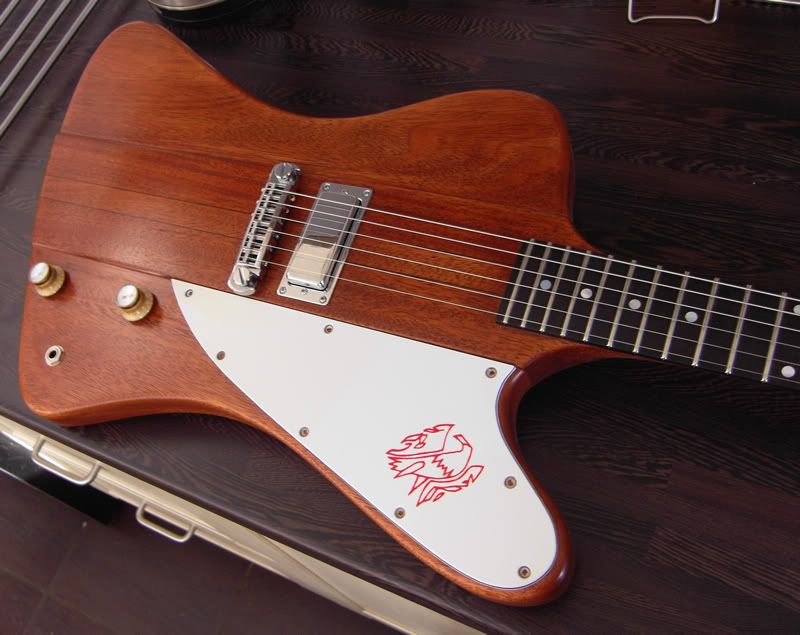
truss rod cover just needs a trim on the bottom edge
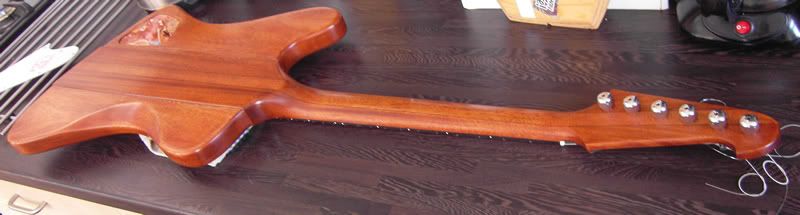
and it needs a backplate and strap buttons
Man, this is a real beauty !!
Simplicity itself, and still so tasty.
I never liked the FB and now I want one !!
-
WOW !!!! Simply spectacular !!!!
What is it with the single minihumbucker thing ?? With this one and WezV Firebird, a new trend of stripped-down, boutique, connoisseur guitars ??
I have always found the concept of a single, bridge pickup, unappealing to me and now I can't help it but love these two things !!
You have built an amazing instrument, congratulations !!
-
i dont think that would be a problem slant at the nut - still within the realms of possibly more comfortable than a normal nut
my 25-26.5" has a nut with more angle than that and is still my favorite guitar. i think you need to think of a G and B chord and how possible that is.... quite likely still more so than a normal guitar
you are losing the playability advantages of mutliscale at the top end - but you are still getting the tonal advantages of longer strings without any playability loss over a normal guitar
Thanks again, Wez.
You really make a couple of interesting points.
I was thinking so far in terms of how much more UNcomfortable (or cumbersome) would it be to play such a fanned fret guitar. In my rather conservative mindset I was never considering the possibility of it being MORE comfortable. At least to my playing style.
When you suggested to think of a G and B chords you lost me a bit. If I think of an open G chord, it actually may seem that the slanted frets would be more natural for the hand position. But if I think of a barre B major (or any barre chord in the first couple of frets), my index finger tends to curl in exactly the opposite direction: that doesn't look more comfortable. What were you meaning, can you please elaborate on this ??
You also mention my loss of playability advantages at the upper frets (I presume because I have the perp that far up), what are those advantages you're referring to ??
I'm still on the fence about this change in the project, I see too many compromises, so I may save the complete fan-fret thing for the next project after these two. So I can really design the guitar around the fanned-frets and not the other way around... Still, your valuable contributions to my education in this matter are greatly appreciated.
-
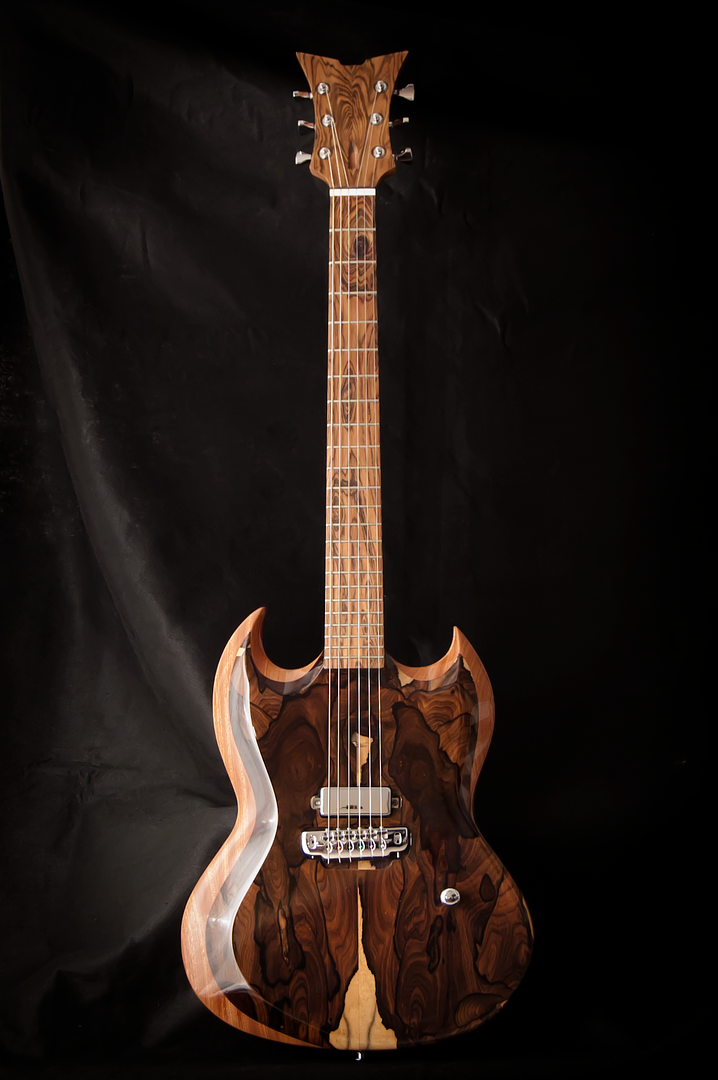
Hi Chris !!
Man, that's a beauty, nice inlay !! Love the color of the top too !!
It looks somewhat similar to the color I just put on my refinished 2nd build.
The RW neck looks fantastic, I tend to prefer bare rosewood necks (that's the PRS influence), but RW looks amazing under a finish. Did you stained it to match the color of the top somehow ?? It looks really red...


The Sapeli Topped Doublecut Is Finished.
in In Progress and Finished Work
Posted
Thanks again, guys.
@Drak: A VibroClone indeed. I built it last year. I don't believe much in "vintage electronics", but I do have a "real" 64 Princeton, though...