


Blackdog
-
Posts
717 -
Joined
-
Last visited
-
Days Won
6
Content Type
Profiles
News and Information
Tutorials
Product Reviews
Supplier Listings
Articles
Guitar Of The Month
Links and Resources
Forums
Gallery
Downloads
Posts posted by Blackdog
-
-
That staple pup is wild looking. I'm looking forward to hearing you opinion of how it sounds. It is surrounded by pure beauty....that's a hell of a home you've built for that pup.
SR
Thanks Scott,
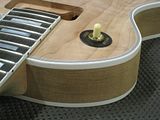
The Staple is quite unusual, as it never became mainstream like the ubiquitous buckers and P90s you can only find one version of it. It is what it is, but that is a good thing. It has the responsiveness of a P90 but it is a lot louder. Which is a good thing, because you have to keep it low, or the magnetic pull of the individual magnets will start dampening the strings. While a good P90 sounds raunchier, this one is a lot cleaner and more sophisticated. Somewhat HI-FI sounding in comparison.
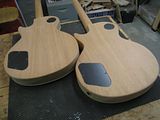
I have one of these in a LP Custom 54 reissue (all mahogany, no maple top), and on this new guitar the sound is very close to that other guitar. I sank the bridge posts past the redwood top and a good 10mm into the mahogany back. And the sound character of the guitar is pretty much the same as the all-mahogany one.
-
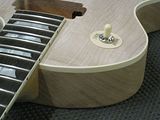
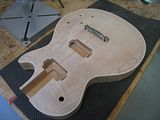
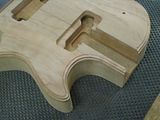
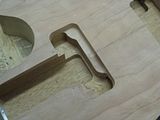
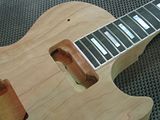
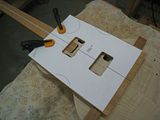
The final adjustment of the switch cavity is a bit trickier. First the complete cavity floor is routed just until no mahogany remains. Then a 3/4" - 19mm forstner is used to create the seating for the switch. This is done at a slight angle to more or less match the angle of the top carve where the switch is. Done in this way the switch ends up angled, following the carve, as it was on the old ones.
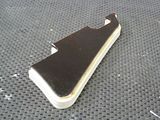
Using the templates I made from the tracings, the correctly shaped control covers for the Standards were cut from simple black pickguard material.
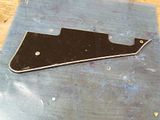
From then beginning I had the idea to make a proper bound pickguard for the Custom. Only on the LP Custom did Gibson use the cheap multi-ply, beveled plastic one. For all the other Custom-grade instruments (the ES-355, the L-5, etc.) they used a tortoise guard with real multy-ply binding. I had to make the pickguard anyway, because of the mixed pickup configuration.
From the tracings of the vintage guards I made the template (adapted for the pickups configuration), and cut the tortoise plastic accounting for the binding width. I bound the guard in the usual way, then scraped flush and polished.

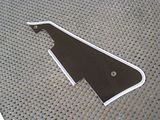
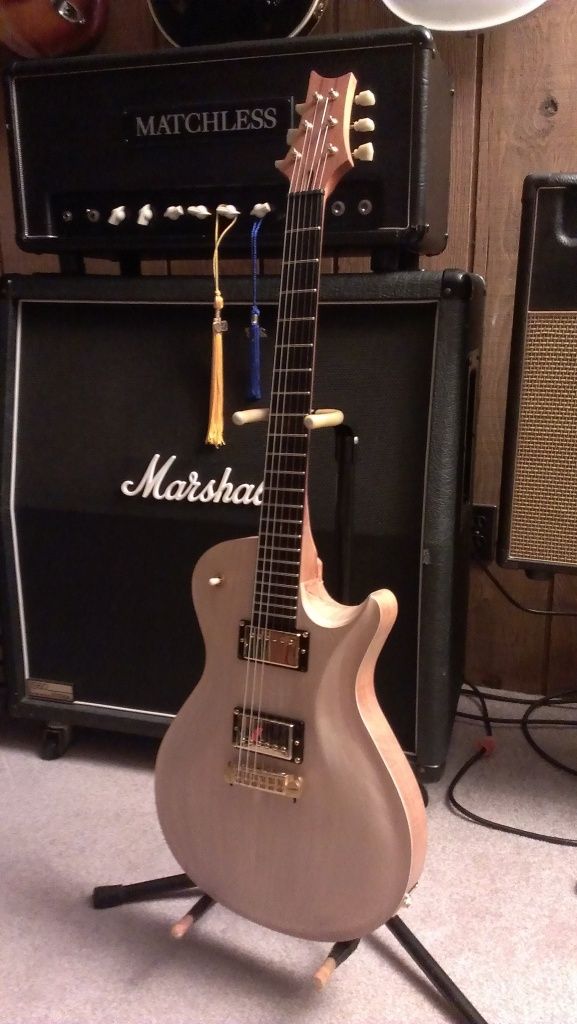
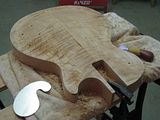
Mockup of the Custom with the finished pickguard:
Edit: BTW, two of these are already finished. I do have some pictures, but we don't want to spoil the suspense do we ?

-
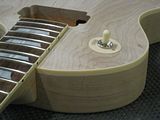
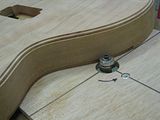
Then it was time to drill the control holes to their final size. These are drilled vertically, but since the inside of the cavity is at an angle roughly following the carve of the top, with just a little slack in the holes the pots will mount following the carve too.
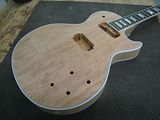

And the tailpiece bushings were installed (including the ground wire, of course).
And the same story with the Standard.

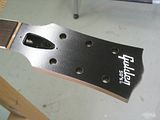
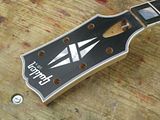
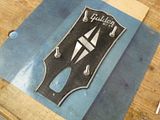
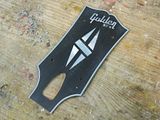
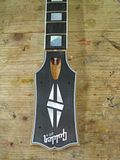
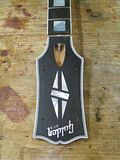
The headstock overlay of the Standard was thinly sprayed black, just enough to cover well. Then the pearl logo was scraped clean with a razor blade (lousy task), and then sealed with a couple coats of clear lacquer.
The same steps were done on the second Standard (that has the consistent tendency to lag behind...)
In the meantime, the necks were finely shaped and most of the fretwork was done. I like to leave just the eventual minor corrections and final polishing for after finishing.
-
Making your own 6 ply purfling? Dang Louis, that is incredible attention to detail.....almost borderline OCD! Verrrrrrrrrry nice work.
SR
Hold on ! You mean you can BUY that already made ?!
And NOW you tell me ??

-
 1
1
-
-
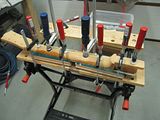
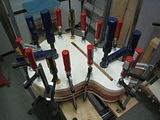
Then the usual routine of pre-bending and gluing with the acetone based glue. The purfling was applied first, then the ouside binding.
After scraping everything flush and sanding I had the LPC binding sorted out. If I have to do it again I will not laminate all the thin B/W strips together at once, I'll do it just in pairs. It is a lot more work, as it means it has to be applied in three different operations, but with the very sharp radius of the LP horn the layers appear a bit compressed after bending the rather thick 6-ply material. Anyway, I didn't consider it to be bad enough to do it again.
Now it was a good time to route the cavity covers' recesses. This guitar was routed for the standard Gibson-made covers, the two Standards were routed for the vintage correct ones (they look pretty much the same, but are not identical).
-
Even though is not the exact chronological order, let's continue the tour with the Custom.
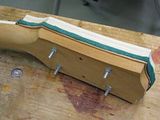
Body binding time.
The binding on the LPC is similar to the one I did for the ES-355, 7-ply top and 5-ply back. The complete sandwich of layers is 4.5mm thick on the top and 3.5mm thick on the back. With the ES355, for the safety of the top to sides joint, it was necessary to treat the thin black/white layers as a purfling (2mm deep) and only the outside 1.5mm thick white strip as a full depth binding. For the fully solid LP this is not an issue, but nonetheless I decided to do it like on the 355.
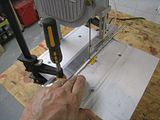
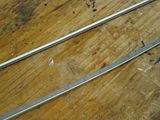
The 0.5mm each black/white strips were laminated together to form the 4-ply and 6-ply pieces that would be the purfling. These were sawed in half with the handy water-cooled bandsaw.
The chosen approach meant that the top had to be run twice through the binding channel jig to create the stepped channel.
The back was done in a similar way, but being flat it was done with the basic table router setup (no donut).

-
Photo tour continued...
A little more Custom action.
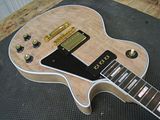
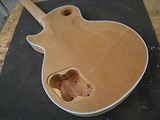
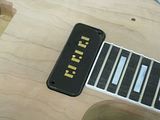
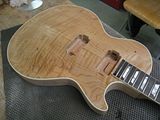
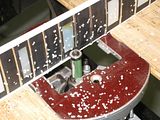
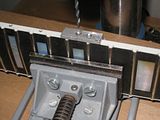
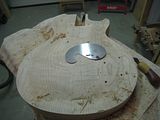
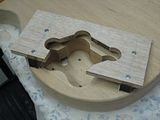
I bought the Alnico V, staple pickup from the Seymour Duncan Custom Shop. I waited for it to arrive before making any template for the cavity.
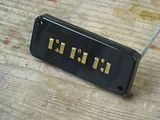
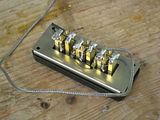
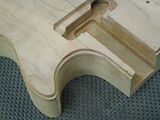
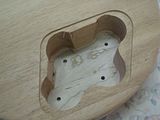
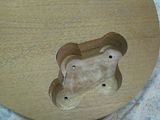
This is a very complicated pickup design, with the long rectangular magnets that can be independently adjusted for height, protruding at the back. The body of the pickup is intended to be screwed down to the body, so the only adjustment possible are the polepieces/magnets. The cavity needs to be pretty deep for the magnet arrangement to fit. It's usually a pretty loud pickup that needs to be kept farther away from the strings than a P90 or HB.
I made my own cavity design based on some pictures of real 50s LP Custom cavities, and the cavity in Gibson's reissue so as to remove as little wood as possible.
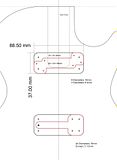
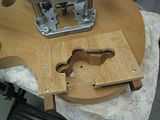
Made the two templates and routed the body in two steps, as usual.
The neck now had the fretboard glued on, so it was not possible to route the cavity with the neck in place. The tenon had to be adjusted to fit the cavity in a separate operation.
-
That headstock is just plain sexy. I dont know how else to say it. Great job on the binding man. seriously. I still think this and your other thread on the les paul/355 should be pinned. So much great info and specs, and pics. Thanks again for sharing and taking the time. Do you use the same donut for binding for the les pauls that you did with the 355? Ken at upnorthstrings sent me either an email or something written with the donut specs on it when I bought plates from him a few years back- I seemed to have misplaced it though.
Thanks ! You're too kind !
I will post some more pictures tomorrow, but let me answer your question:
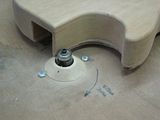
It is indeed the same donut I use with the ES guitars.
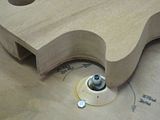
The belly of the ES plates I got from Ken is 1/2", and the donut has that height. When the body is sitting on it's belly and leveled, the edges are at 1/2" above the table. So I let the body rest on its belly and ride the edge on top of the donut. This stabilizes the piece in one axis. My hands holding the piece as I feed the edge into the router bit stabilize the piece in the other axis.
As you can see I taped a piece of thin plastic on the top of the belly to avoid scratches and to make it glide easily on top of the table.

The LP on the other hand has a shallower belly, 7/16". I simply tape a piece of 1/16" veneer on the belly of the LPs to make up for the difference and I can route the binding channel using the same donut. There's a little hump in the LP cutaway that it's a bit tricky, but it's still perfectly doable with this setup.
In the picture you can see the piece of mahogany veneer under the piece of plastic.
(Edited to add the pictures)
-
Great craftsmanship as always Luis, very nice work.
I know it's been forever ago but thanks for the tips on top carving. You really helped out a lot.
Just need to choose a color now and sand and sand and.
I thought I had a thread on this one, need to finish her up.
Bill
Thanks, Bill, for the nice words.
That singlecut of yours looks great !
I see you still have some sanding to do, but that carving is looking really sweet already !
Glad I could be of help !
-
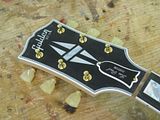
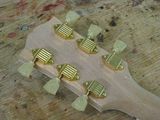
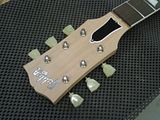
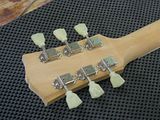
To finish up the headstock, the tuner holes got enlarged.
And once again, the tuners fit test.
-
The tour continues with a bit of Custom action.
Glued the fretboard to the neck with hide glue in the usual way and started to work on the headstock overlay.
Since the Custom was not meant to be a replica of any specific model I opted for the fiber overlay instead of the holly. Not much of a difference anyway.
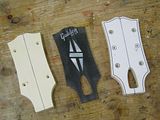
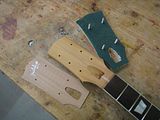
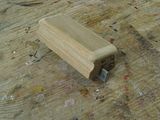
I used the headstock template to rough cut the outline of the overlay, route the TR access cavity and drill the tuner pilot holes. Then I used the second template in the picture to cut the final outline of the overlay, which is smaller than the full headstock by the width of the binding to be applied.
I mounted the headplate in the simple setup shown to glue the multi-ply binding. Since the overlay is fiber I had to use CA to glue the binding. I used some leftover binding pieces I had from my previous ES-355 build.
When finished I scraped it flush and sanded it. The outer white binding was applied after gluing the overlay to the headstock.
Once again I used the padded headstock template as a pressing caul for gluing the overlay to the headstock. Once in place I proceeded to apply the external white binding in the usual way, with the acetone glue.
-
Photo tour continued:
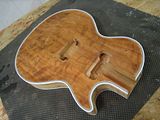
With the cutaway adjusted to the neck side it was body binding time for this one.
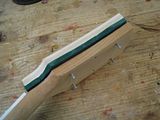
I use the StewMac binding bit and this doughnut setup to produce a binding channel that follows the top.
The binding material was pre-bent first using a hot-air gun and taped to the body to cool down. For this Standard I used Royalite binding material. This is the vintage correct one (pretty expensive stuff), and the color is off-white/ivory and not pinkish cream like the StewMac binding. For the second Standard I used the StewMac material.
I glued the binding with a glue made of acetone and dissolved binding shavings.
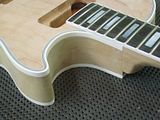
And the binding was scraped flush with the top and sides, and everything sanded smooth.
After this I finished the neck carving (mostly fine shaping of the heel), and beveled the fret ends. The binding on the fretboard is pretty thin (1mm), so the bevel removes a good deal of the fret-end "nibs", leaving just a hint of them. This is how it was with the old ones, the modern Gibsons use significantly thicker binding and the "nibs" are much more apparent. The top was wet on the following pictures.
-
Yup, i think that's it.
Overall, i think that spanish cedar is light anyways, which makes it even harder to differentiate
I've read that at least some of the very first Les Paul Goldtops (1952) had spanish cedar bodies. Supposedly, this was determined by the smell of the exposed wood when decades later the neck was removed to be reset at a steeper angle.
I can only guess, but at the very beginning they must have felt that the new guitar (their first solidbody ever) was horribly heavy. That could have been a reason to use cedar in those early ones. Later on they standardised on mahogany (though sometimes they also used Khaya).
-
Continued.
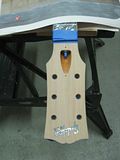
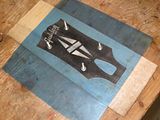
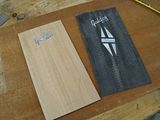
Time to apply the first headstock overlay.
This time I got the overlays already inlaid with my logo. The Standard one is 1/16" thick holly wood.
The overlay was aligned and centered to the headstock template. The TR access cavity was routed, 4 of the tuner pilot holes were drilled and the general outline was rough cut.
I added some neoprene padding and 4 screws to the headstock overlay to use it as a pressing caul and glued the overlay to the headstock.
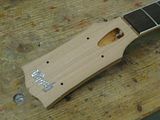
With the robosander I adjusted the overlay flush with the headstock. The curves towards the nut had to be done manually, with a fine rasp and sandpaper. At this time the open book shape of the top of the headstock was also adjusted.

Time to enlarge the tuner holes. 9.5mm on the front for the pressed-in bushings, 7mm on the back for the tuner shaft.
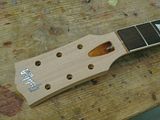
And a little fit-test for the tuners and TR cover.
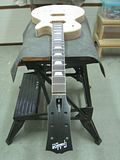
Now that the neck width had been adjusted to the fretboard width, the cutaway area of the body was adjusted with the robosander to be flush with the neck.
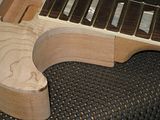
This was the first one to start to look like a guitar.
-
The binding on the fretboards was applied next.
I used CA glue, slightly proud of the back of the fretboard and also covering well the fret ends.
The excess binding on the back of the fretboard was simply scraped to level. The bulk of excess on the top was trimmed with a flush cut router bit.
The remaining of the excess was scraped off with a razor blade and adjusted around the frets with small files.
The side dots are plastic tortoise punched from a thick pick, and the holes were drilled using this simple guiding bracket.
The bound fret ends were later beveled, but that was after gluing to the neck.

At this stage two of the necks had been rough carved, the cedar Custom neck and the mahogany Standard neck. I did not enjoy carving the cedar neck, so I kept postponing the carving of the second one for quite a while...
The first of the fretboards got glued to its neck using hide glue. With hide glue you have to work fast, so I used a couple of very small pins (small nails cut to lenght) to aling the fretboard to the neck and ensure a quick and accurate positioning. I also pre-heated the pieces a bit to extend the open time a bit more. A couple of padded radiused blocks were used as cauls on the fretboard side.
This is the Mahogany Standard neck. Once the glue dried a more detailed carving of the neck took place, aslo adjusting the sides of the neck to the sides of the fretboard.
-
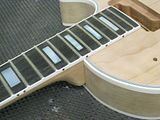
Continued…
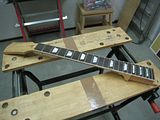
The MOP inlays were set using epoxy mixed with ebony sawdust. After the epoxy set the board was radiused, levelling the inlays in the same operation.
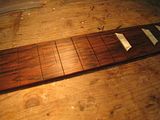
With the board radiused it was slotted to the proper depth and now following the radius.
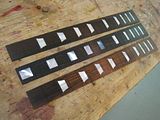
The three boards were now inlaid, radiused and slotted. In all three cases the slotting template I used was the 24.75" scale, Rule of 18 spacing.
At this stage the boards' sides could be tapered. This was done on the table router, using a straight edge as a guide, taking into account the thickness of the binding that was going to be used in each case: 1mm cream for the Standards, 1.5mm white for the Custom.
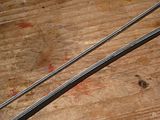
Time for fretting. The wire is just slightly over-radiused and a small amount of fish glue was put into the slots before pressing the frets in.
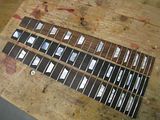
The fret ends were filed flush with the fertboard sides using a 90* file. As you can see there's pretty much no void under the fret tangs.
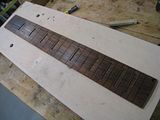
And the three boards were now ready for the binding.
-
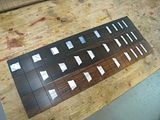
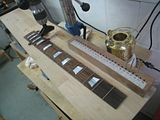
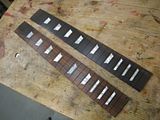
The photo tour now continues with the fretboards.
The boards had already been thicknessed and were 60mm wide, which is the proper width to fit my slotting jig.
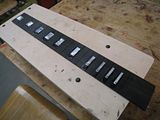
The two Standard boards got the vintage correct cellulose acetate trapezoid inlays. These are glued into routes that follow the radius of the board. This means that the boards had to be radiused before inlaying the trapezoids.
The Custom board got the real MOP block inlays, which must be inlaid in a flat bottomed route, This means that the board had to be radiused after inlaying the markers.
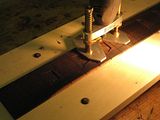
I also wanted to saw the slots following the radius of the board to avoid unnecessary voids under the fret tangs.
I radiused the rosewood boards first, then, using the basic method of the radiused blocks and sandpaper.
With the boards radiused I slotted them to the appropriate depth for the fret tang.
The ebony board remained flat and I just sawed some pilot slots to guide me in the positioning of the inlays.
First step in the inlaying procedure is to temporarily glue the pieces on the fretboard. I used a drop of acetone for the plastic inlays, just along the centerline, and a drop or two of cellulose sanding sealer on the MOP inlays.

With the inlays properly positioned I scribed around the outlines with a very sharp knife.
Then with the dremel and the SM router base I made the cavities for the inlays. Used a 1/8" dremel bit for fast wood removal, and the SM small bits for the adjustment of the edges to the scribed lines.
The plastic inlays were set using CA glue and pressed in with the radiused blocks while the glue set. They were level sanded using the radiused block again. Any gaps left around the inlays were filled with a drop of CA mixed with rosewood sawdust.
The two Standard boards were run again through the slotting jig just to clean the slots and account for any depth lost during the level sanding of the inlays. And the boards were polished.
-
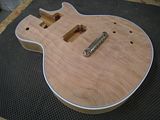
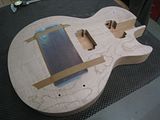
With the neck mortise routed and the neck in place the true centerline was determined. This is the centerline that needs to be used as reference for all all the hardware. Fortunately it was not off by much.
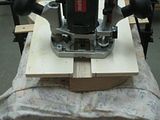
Pickup cavity routing was done in two steps, with two complementary templates, but always following the neck plane. One template is for the legs which have the same depth of the neck mortise. The other is for the pickup body itself, and both pickups have the same depth with respect to the template/neck plane. This results in cavities that are slightly slanted (about 3*) with respect to the pick plane.
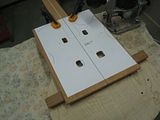
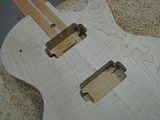
For the Custom I only routed the bridge humbucker cavity because I had not yet received the Staple pickup at the time.
-
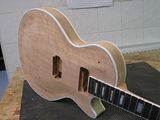
A few more pictures.
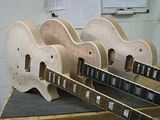
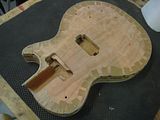
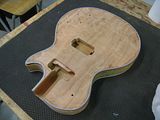
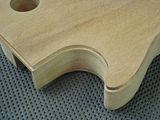
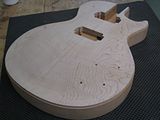
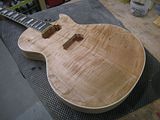
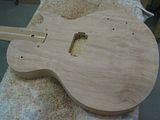
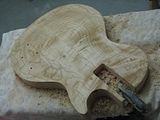
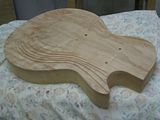
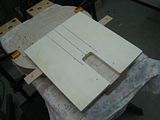
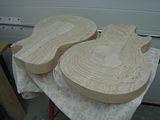
Time for top carving. The first weapon I used was the sander. I used it to soften the ridges of the topographical routing.
After that, the cabinet scrapers and the good old 80 and 60 sandpaper with a cork block were the tools that worked best for me.
The carving took, as usual, many sessions. The first couple of sessions got me in the ballpark, but it took many more hours with the scrapers and the sandpaper to adjust the fine details and get the carve I wanted. Here the second Standard and the Custom.
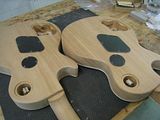
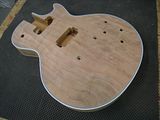
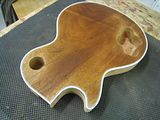
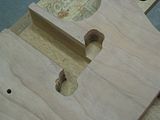
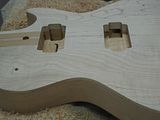
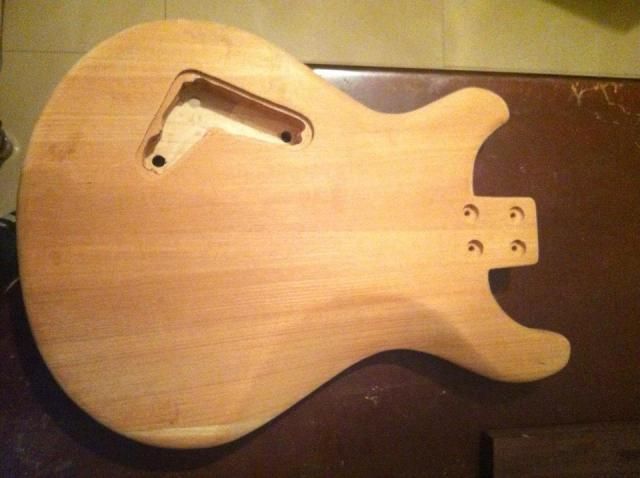
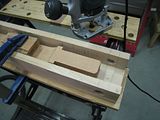
With the top carve in place it was time to adjust the control cavity accordingly. The original routing left some 3mm of mahogany and was flat bottomed. To allow the use of normal pots the bottom was routed using a slanted template and a very long straight cut router bit.
The switch cavity also needed more work, but at this stage I just deepened it to leave just about 1/16" of mahogany. Later on the final seating surface to the switch is generated using a 19mm forstner and slightly at an angle, to copy the angle of the top in that area.
-
Hairy spanish cedar it's not uncommon. It might look wonderful, but once you start working with it, it'll get all fuzzy.
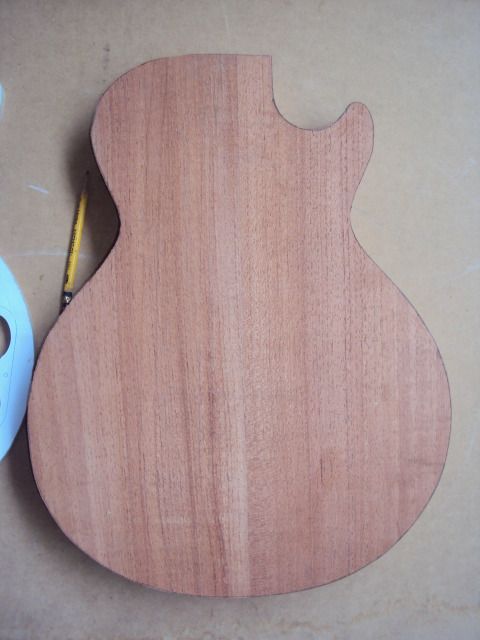
Then i have also worked with spanish cedar that will fool you and you'd think it's mahogany if it wasn't for the smell. Not to hijack your thread, but this is how mine looks like:
This one looks great , right? It's hairy spanish cedar:
This is the les Paul i'm building, not hairy at all. It is also harder:
Interesting indeed.
I think it probably boils down to lighter-softer: hairier and heavier-harder: less hairy.
At least that has been my experience with Korina/Limba as well...
Last year I was in Madrid and went to visit José Ramirez shop (world renown classical guitar builders), and talking with the guy tending the shop about guitar building he was so kind of showing me some work in progress. I remember checking a half carved neck blank and it was pretty hairy.
Anyway, after it's been sanded and the finish is there it's fine. We'll have to hear how well it sounds, though.
-
A few more of the build pictures.
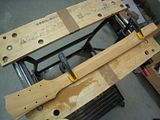
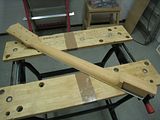
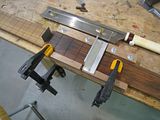
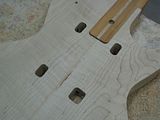
Next step was to route the neck and pickup planes on the tops.
The neck plane is routed first, as it was mentioned before it is 4.3*. The pickup plane starts at the end of the fretboard and extends to the bridge position, where the top keeps it's full 5/8" thickness. I route this angle empirically and results in something around 1.2*.

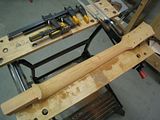
The last operation on the tenons was to adjust the thickness. It should be 1.5" (38.1mm), the tenon has a square section.
Using the actual tenons to ensure a good fit I made the mortise template. The mortise was routed following the neck angle.
The depth of the mortise has to be precise, so that the top of the neck sits flush with the top of the body.
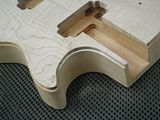
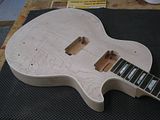
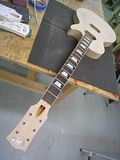
And the necks could now be matched to the bodies.
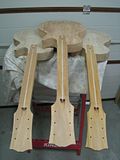

If you look closely you'll probably notice that the treble side of the necks do not flow seamlessly into the bodies cutaway area. The distance of the cutaway edge to the centerline is is the only critical dimension in the LP body outline, so it was purposely cut slightly oversized. The necks tapers are also just slightly oversized. These dimensions got adjusted for a perfectly flush matching when the fretboards were already attached to the necks.
-
It is just like mahogany except with a wonderful smell.
I have worked a lot with spanish cedar, and only lesser quality stuff is hairy.
Hi Eddie,
Interesting info. This is my first time with spanish cedar. I will have to start looking for better quality pieces then.
Thanks for your kind words !
-
Let's continue with the tour.
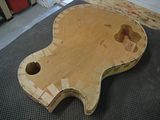
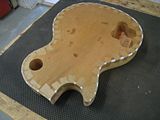
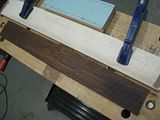
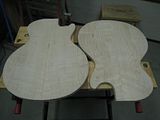
Preparing the maple tops required some work. They were too thick, had cupped and even one side was thicker than the other.
After planing down to 5/8" I joined them using hide glue and rough cut the outline.
The redwood top was easier because it was already planed to the right thickness and was perfectly flat.
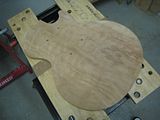
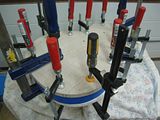
After that, the usual gluing to the backs, using UF glue. This glue dries harder than Titebond. It is very water resistant (another used option was PF glue, which is pretty much waterproof). They have a much longer open time than hide, so Gibson used them for those junctions that involved large areas but would not likely require any future disassembly: lamination of the tops.
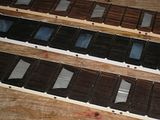
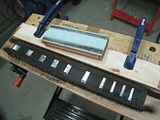
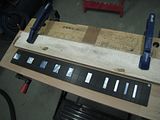
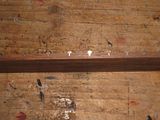
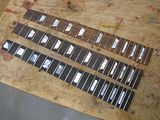
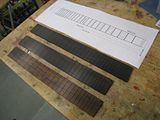
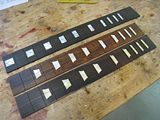
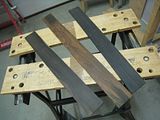
During the drying times I got the three fretboards ready for processing. A chocolate dark Brazilian, a lighter and more figured brazilian and the classic ebony. The thickness of the three is 5.3mm according to vintage specs.
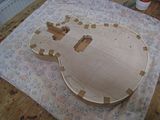
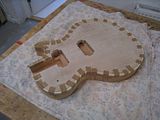
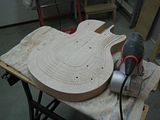
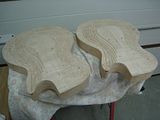
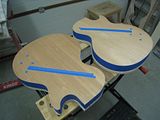
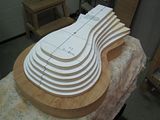
The carving process for the tops starts with the topographical routing using a set of templates. The steps are all 1/16" high, leaving 3/16" of maple at the bottom. This method is really practical and promotes a reasonably consistent carve from one guitar to the next. I am already working on a similar set of templates for use with my own designs.
-
thanks for the corrected link Blackdog. I forgot in your previous build thread you included the binding specs. (and many thanks for the efforts of your research!)
I am digging that jig for the neck angle. I have seen a somewhat similiar one for a handsaw/flushsaw but not one like this for a router. very cool. as always I am loving these threads you put out.
Welcome and thanks !


Oh No, Not Les Pauls Again....
in In Progress and Finished Work
Posted
Then the preparations for finishing started.
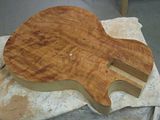
Raising the grain of the maple tops and sanding down, as at this stage I was not sure if I was going to apply the amber base for the sunbursts as a stain directly on the maple. Eventually, after testing on some off-cuts I decided against, and the amber was sprayed. The Custom top was indeed stained, and this is something I wanted to get done before setting the neck, as any glue residue was going to cause trouble with the water-based staining.
The bodies final sanded.
I cut the nut blanks (Graphtech Tusq) and glued them in place. I wanted to have the lacquer covering the sides of the nut as per Gibson practices. The blanks are pretty much shaped, but left a bit high anyway, the final adjustment and shaping came after cutting the string slots.
Then masked the fretboards in preparation for the finishing stages.
Stained the top of the Custom. As usual this is my wife's job.
And set the necks with hot hide glue.