


Myka Guitars
-
Posts
753 -
Joined
-
Last visited
Content Type
Profiles
News and Information
Tutorials
Product Reviews
Supplier Listings
Articles
Guitar Of The Month
Links and Resources
Forums
Gallery
Downloads
Posts posted by Myka Guitars
-
-
I have been finishing up an acoustic guitar doing the final buff and setup both yesterday and today. I didn't have much time for the archtop like I was hoping.
With the little free time I did have to spend on this I put a little work into the bridge. I made it a lot thinner and put some curve into it. I also added a small, simple inlay to cover the screw holes in the ebony saddle. It looks pretty cool.
I will probably fret the neck tomorrow and prepare for routing and setting the neck. I will have the time for some more work so expect some more pictures tomorrow evening.
-
Thanks. I saw your site as well. Your guitars look great. That shell style inlay looks good too. Keep it up.
We are both displaying at the first world guitar congress. I'll make sure to stop by if I can.
Craig.
I will definitely check out you inlay work as well. See you there!
-
steven, here is an archtop tune-o-matic bridge from StewMac. I have used these before on hollow guitars.
-
The origianl guitar that this is based upon is pretty cool actually. I found this page a while ago and it explains what is going on with the wiring. Tiger guitar wiring explanation. The overall design of the guitar is not totally my thing but it is done well and the workmanship is beautiful. Of course I am a big Garcia fan so this guitar has played some great tunes for me in the past. He was also one of the best (unrecognized) fusion guitarists I have ever heard. You won't find the good music on the studio cuts though. You have to find the bootlegs. 1985 was one of the great (heavy) fusion years for him.
-
The stacked pots work by having one of the post controlled by a solid shaft and the second one by a tube surrounding the first shaft. For knobs you have one that is basically a ring that attaches to the tube and allows the solid shaft to come through so you can set the second regular knob on the shaft.
Here is a set of stacked knobs. I hope this visual explains it better than my words do!
-
I'm looking forward to hearing what you think about it, and if it's positive I might even enter it for GOTM.... maybe
Ya think? That is one sweet looking guitar. Enter it today!
I do agree with Setch that if you made the neck it could be designed with the overall guitar in mind. But it is still a really nice guitar. The lines look good, the binding came out great, and the finish looks smooth. I also love the Padauk color with the top color. Nice work!
-
I was reading this thread and started thinking. I really like having separate volume and tone controls for each pickup. It gives you the ability to, for instance, blend a little bite from the bidge pickup into a muddy neck rhythm sound. To do this I was thinking you could use the stacked pots so you wuoldn't have all these control knobs. You would send the output of the rotary switches to the output of the pickups in this schematic. It would give you all the settings in the rotary, a volume, and a tone for each pickup without having to add any more knobs.
Andreas, I missed the rotary schematic before. Thanks for posting it!
-
I think that with a rubbed dye finish you will not be able to get the smooth edge of color like the bass you pictured in the first post. That look is airbrush all the way. You can control the edge more easily with an airbrush. What I find is that the waterbased rubbed on dyes want to bleed irregularly into the wood grain making it hard to get a smooth faded edge. With Morben Guitars approach the wood grain does not complicate things because it is sealed. I haven't yet tried this approach but I bet it is easier to make the edge behave like you want it to.
Either way if you are going to try both techniques on scrap be sure to post the results. I would love to see how the results differ when trying to get a similar effect.
Morben Guitars, nice burst finish in your tutorial. I saw that a while back and I think I will try your technique on the spruce topped semi-hollow I am building. I am thinking of the look you have in step 4. I am building a jazzer and I think this look is perfect for it. Thanks for posting all that info!
-
That neck to body join is TIGHT! I hope I can get mine that close.
I learned a little trick along the way. First make the neck and finish the carve on the body (if it is a carved top). Don't try to cut the pocket exactly as it often ends up a hair too big. When you measure the neck tenon set up your router jig a hair narrower so that the neck will just barely not fit when you are done routing. Then when you are ready to glue the neck in take a sanding block and lightly sand (with 220 grit) the neck tenon until it just fits. Take your time to set things up just right and sand slowly checking as you go. It should take a little pressure to push te neck into the neck pocket. When you glue it work fast as the tight fit will make the glue want to set quicker. Do a dry fit first so you know exactly how your clamps will be set up. Hope this helps.
-
that looks all very nice, but i am curious if you will be able to do any intonation-adjustments with this bridge? i somehow think this will be impossible....
It's not impossible. Like rob says, it will be done that same way as with a fixed saddle acoustic guitar by carving the bone saddle piece under each string with compensation cuts. The saddle for this bridge is 1/4" in width. That is 1/16" more than the compensation offset I need. I will have plenty of room to make the intonation adjustments.
-
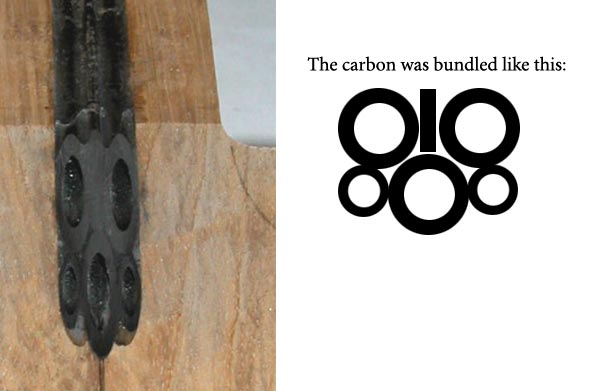
it should be said that stewmac advises AGAINST sanding carbon rods because of the danger of the dust...
The dust is nasty. It not only gets everywhere but it is a very hard splintery material that will probably get lodged into your lungs. Wear your mask whenever you sand anything especially non-organic and synthetic materials. And vacuum it up as soon as you are done.
-
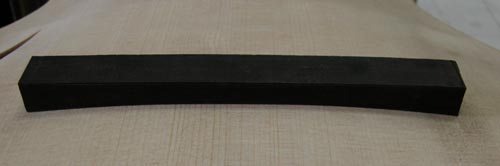
but shouldnt the top ebony piece have some curvature to it so its not so 'stacked' or blocky looking?
It does look rather blocky at this point doesn't it? It's like leaving a neck uncarved!
The bridge has been prepared larger than necessary. I used 1/2" stock and left it big so it is easier to work with. Now that the bridge is functional I can trim and carve it until it looks right. I will be adding some curve to the base and top pieces by the time I am finished with it.
-
hmm, im not understanding the scarf joint completely
The scarf joint is done with the wood before the carbon tubes are glued in. The carbon is then made long so that it runs out the end of the headstock. It is then sanded to the headstock angle.
I would want to insert a truss rod even if I used the carbon fiber rods.Me too. I would never leave out the truss rod unless the client wanted it that way. And even then only if they understood what they are getting into. The guitar I built was an experiment. It worked when I was done building it but I have no idea how it will hold up in 10 or 20 years. There simply is not enough necks built this way to draw a valid conclusion. Beacsue of the experimental nature of the technique I will not guarantee any non-adjustable necks.
I would go with a combination of truss rod and carbon reinforcement for added stability. It is the standard way I build my necks necks. If anything I'll leave out the carbon.
-
The is guitar Guitar #006 was a very cool project. You can read about it on my website. The neck was extremely stiff but it did flex just enough for a touch of relief along the neck. I didn't like the idea of the neck not being adjustable but the customer wanted it to be as light as possible and a truss rod would not work due to the weight.
I dug up a few pics of the neck in progress:
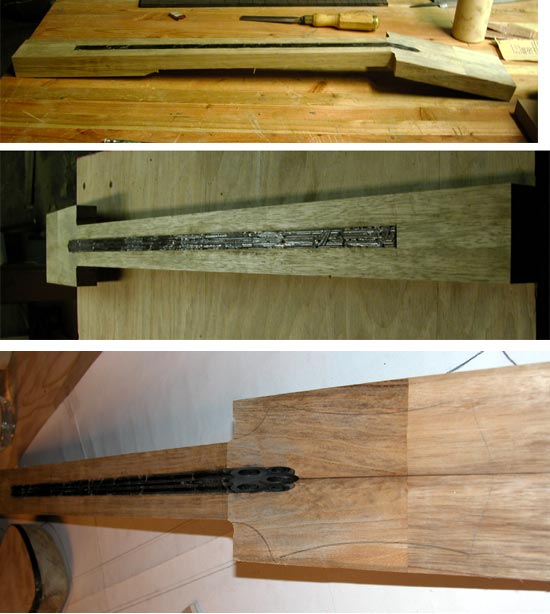
The amazing this about this guitar was that it was loud acoustically. All the sound emanated from the neck! It was quite the cool experiment and amazingly I was paid to undertake it. You just can't beat clients like that.
-
Next the thumbscrew holes are drilled and installed. I set the depth of the drill so it does not go through the bottom of the bridge base piece.
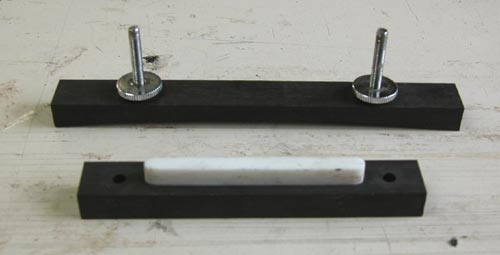
The bridge is now ready for final shaping and carving.
I will be carving some shape into the bridge and possibly adding some inlaid ornamentation. I also will be making the bridge more narrow and some other tweaks. The rest of the work is mostly cosmetic but this should get you a workable bridge. I will hold off and do the carving of the bone saddle when the guitar is ready for strings.
Enjoy!~
-
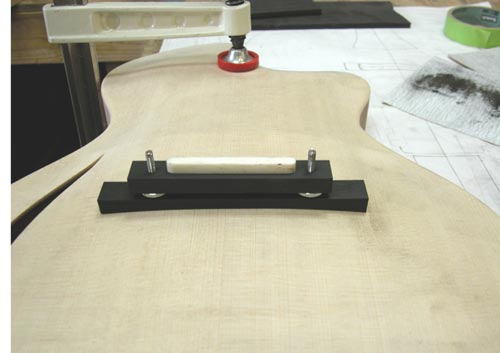
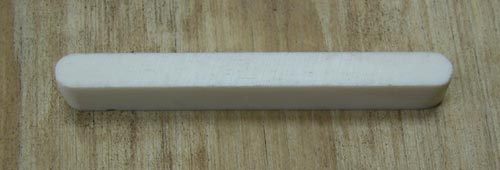
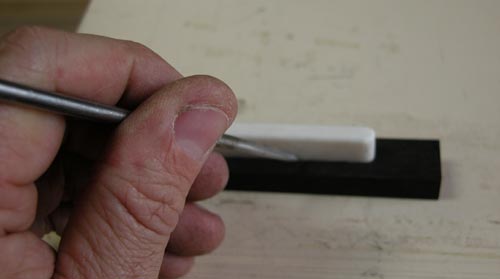
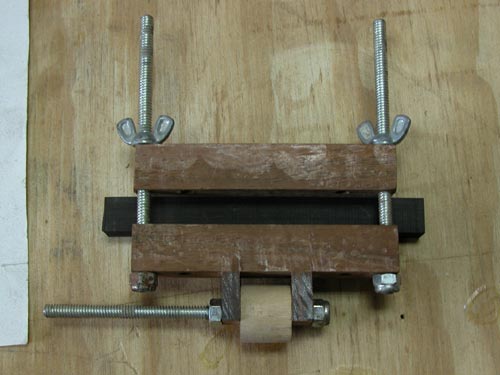
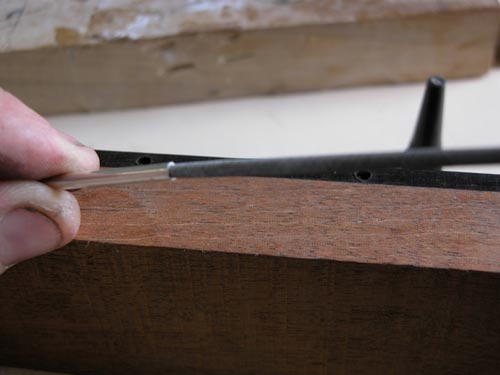
Next the saddle is made and fit into the top portion of the bridge. The bone saddle is made from a piece of 1/4" bone. I like to use the thick stuff. This way I can make a straight saddle and still have room for the compensation cuts.
The outline of the bone is scribed onto the ebony piece with an awl. Then chalk is rubbed into the outline to give us a line to work with.
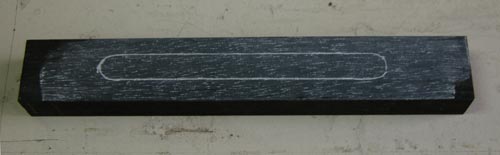
The ebony is taped to the table and 2 rails hold the router to height. The outline is routed to 3/16".
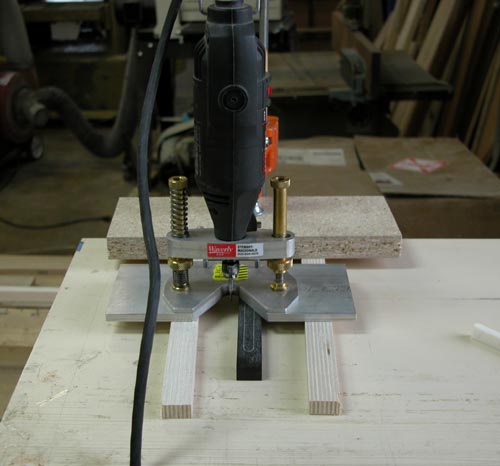
You may not notice fro the picture but ther is a little slop in the cut. This is OK. I learned a cool trick for making the airtight saddle fit.
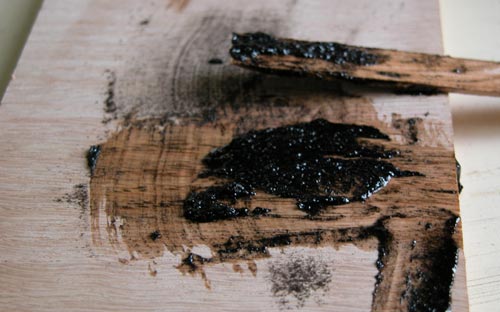
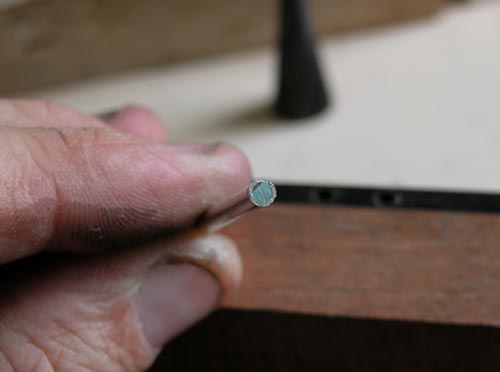
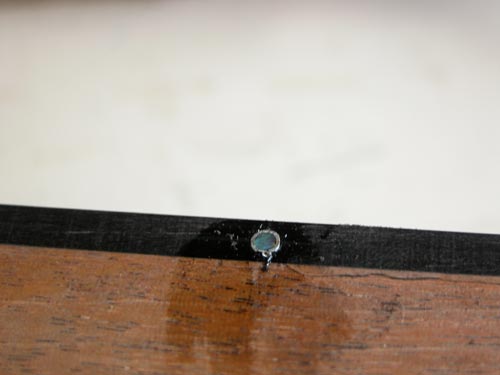
First a mixture of epoxy and ebony wood dust is prepared. After wetting the slot with just epoxy the mixture is pressed into the slot.
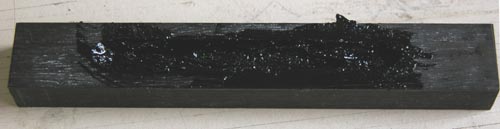
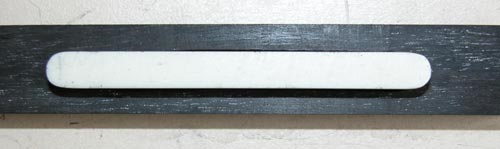
The bone saddle is waxed heavily and pressed into the slot and clamped until cured.
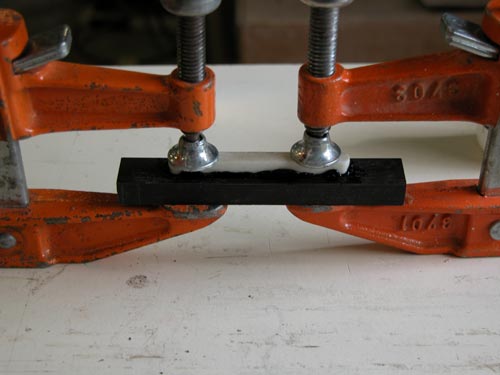
After it is cured clamp just the saddle in a vise and hit the ebony with a small hammer to realease it.
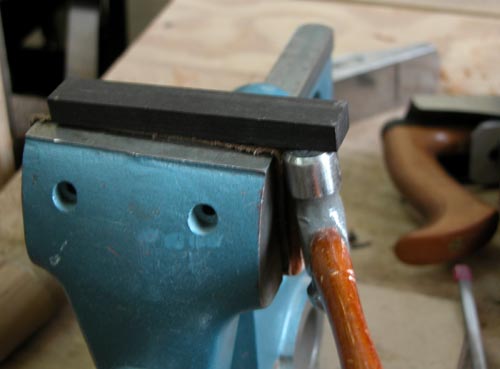
Another perfect fit! Works great on acoustic guitar bridges too.

-
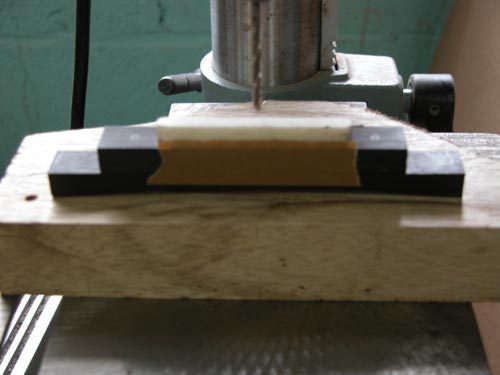
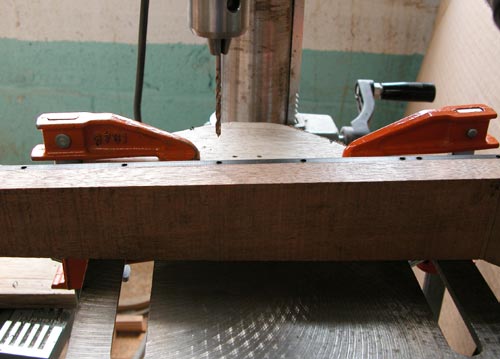
Today I prepared an adjustable bridge and took a ton of pictures. This bridge will be ebony with a bone saddle. I think the bone will provide a nice acoustic tone. The adjustablility will be via thumbscrews available from StewMac. This post is pretty image intensive so I will put it into a few posts.
First step is to prepare the bridge base:
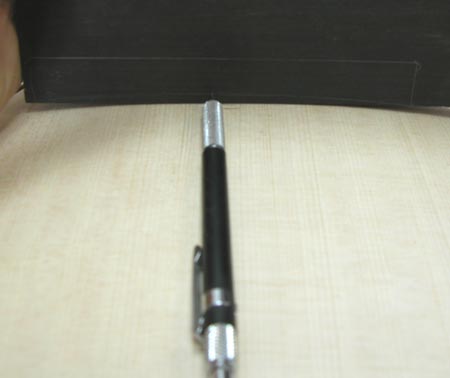
The bridge blank is scribed along the arched top with a pencil. It is then cut on a bandsaw and filed to shape.
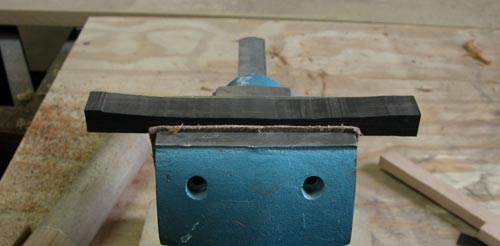
I made this jig from the Benedetto book to sand the bridge bottom on the arched top.
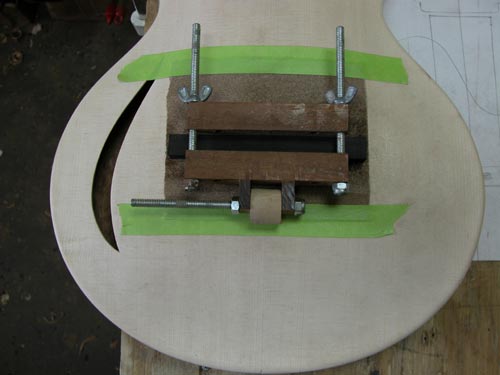
I makes for a perfect fit. This will be done again when the guitar has finish on it to make sure it is still perfect.
-
Thanks guys! This forum is a very cool place to be and I am also very glad to be here. All of you are very supportive of each other and of me. I just got here and I already feel very welcome. Thank you!
-
I actually got the idea for the neck joint from Harry Fleishman. I took a class from him about 2 years ago. He is a wild man with some very cool ideas. His bolt on necks have 3 adjustable set screws that allow you to change the angle of the neck without having to carve or sand anything. He also builds some wicked electric basses.
-
What about using brass, copper, silver, or whatever metal rods? You just drill a hole, cut the material to length and glue them in. Simply sand or file flush and you are done. This soldering technique sounds like more trouble than it's worth. And why tin and lead inlays when there are much nicer metals that will take a polish and really shine? I use brass, copper, and silver all the time. It looks great and takes about 10 minutes to do a fingerboard.
Just my $0.02.
~David
-
is the LMI rod square or is there something covering it in the slot?
The LMI truss rod is sqaure on the top. It is a 1/4" X 1/8" piece of bar stock on top with 1/4" and 1/4" square threaded blocks about 3/4" long at each end. Then there is a 3/16" rod connecting the threaded ends. You are seeing the bar stock from the top of the neck.
On the ebony fingerboard; did you get a little tear-out when using the router?What I do is hold or tape the inlay into place on the board. Then I scribe the inlay perimenter onto the ebony with an exacto blade to slice the wood fibers. This way it doesn't tear out (even with a semi-dull bit). After I slice around the perimeter I remove the inlay and rub white chalk dust into the etched wood to show the lines. I follow that with the router.
-
but i want to be able to see how its done..
I have a set neck design that I use. It is basically like they say; a neck that has a tenon that extends into the pickup cavity. It is 1-1/4" tall at the heel (not including fingerboard height) and is glued in prior to routing.
Here is a pic of the finished joint on a DC guitar:

I built a simple neck jig for this process. The pics are from this same guitar. Check it here: neck routing jig
~David
-
Are there any easy ways to route for this angle.. like pre-made jigs or something?
LaFeeVerte, it isn't that difficult to route the neck angle. I made a pretty simple jig for this. Here is a web page I put up for it: Neck Route Jig
You can also make a template for the neck pocket and shim it to the right anlge by clamping it to the body. Then route it with a bearing template bit.
Although it is a valid method I just don't like the look of the recessed bridges. It looks like the bridge was not made for the guitar and was an afterthought. Just my opinion. Hope this post helps.
~David
-
The glue I use is Titebond. It must be the flash on the camera. It makes it look greenish or something.
Also the headstock might be long, I don't know. It's a design I came up with. It has room for tuners and there is enough space for an inlay. It may look long because it is pretty narrow. Much more so than a Gibson. This makes the strings pull a little straighter across the nut.
Today I completed the dragonfly inlay. The Paua wings are a little more intense in real light. The flash washed it out. Here is a pic:
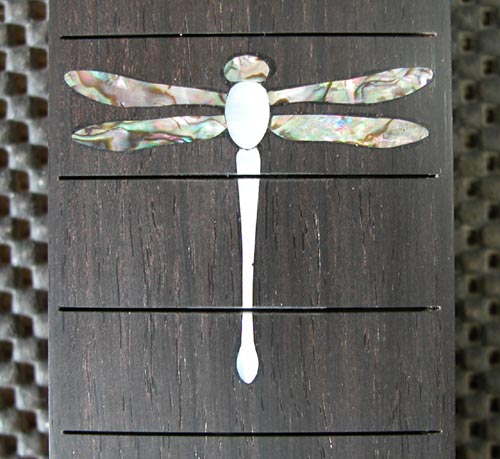
I also put in side dot markers. For the dots I used a Paua shell dot (2.5 mm) surrounded by silver tubing. It results in a nicely framed dot. It's a subtle feature but it adds some class to a guitar. You can use brass, copper, etc. I have one guitar where I used brass rod inserted into copper tubing for a nice look.
First thing is to drill the holes. The tubing is 1/8" diameter.
Then the tubing is cleaned out with a round file to make sure the dot fits into it. Check your measurements and you may be able to skip this step. The tubing is standard and the dots are metric so I had to fix it this way.
Then the dots are pressed into the tube. You may need to tap them in with a small hammer. They should fit snug.

After the dot is in place the tubing gets cut to length. The measurement is the thickness of whatever dot material you are using. These are about 1/16".
The dots are then glued into place with super glue and ready to sand flush.
Next step is to fret the neck and shape it. I hope to have time to get a lot done in the next couple days. We'll see how it goes.
~David
Wood Binding Help
in Solidbody Guitar and Bass Chat
Posted
This binding will be tough because of the many pieces all glued together. Most glues will soften with heat so it is not suprising that you are having trouble. What I have used is a heating pipe with a backer piece. If you can cut the backer to the same curve then you can push the binding into the curve with the pipe. I don't like to dry bend so I use more than a spritz but I also don't soak the wood. When the wood gets dry I wipe on more with a slightly wet rag. Otherwise I end up cracking the wood. The tight horns on the Strat shape will be tough to do without breaking.
I would suggest using a heated pipe or the fox bender. The beauty of the fox bender is that it is designed for use with the wood sandwiched between two pieces of stainless steel sheeting. This backs up the wood on both sides so the fibers have no where to go if they want to break. Sometimes they will break but they are forced to the same curve and are easily glued back together.
All of my binding experience is with solid pieces of wood. I have been able to get rosewood and ebony to bend around ridiculously tight curves using a backer piece.
Hope this helps.
~David