


Myka Guitars
-
Posts
753 -
Joined
-
Last visited
Content Type
Profiles
News and Information
Tutorials
Product Reviews
Supplier Listings
Articles
Guitar Of The Month
Links and Resources
Forums
Gallery
Downloads
Posts posted by Myka Guitars
-
-
Cool stuff Russ. I am happy to see you getting that acoustic started. Do you remember that 335-ish guitar I built a while back? It had flamed maple sides as well. I went through a set trying to bend it without cracking until I started soaking the maple for about 30 minutes before bending. Then it worked great. The cocobolo should bend like plastic.
Have you drawn out the bracing yet? I am just getting back to work on an acoustic that I started last year but had to abandon it in the winter because my furnace was drying the place out. So I am just now figuring the bracing out. I decided to try a laminate with a .020" piece of CF between two 3/32" pieces of spruce for the x-brace. It makes for a very rigid brace. I am hoping to minimize top deflection when under string tension. I will just use spruce for the rest of the bracing. I'll let you know how it goes.
Nice car project too. One of the people in the building takes older 30s-40s style roadsters and coupes and fits them with a completely updated drivetrain, suspension, and interiors. Pretty awesome stuff, although nothing like what you are doing with the carbon fiber panels, etc. Nice work.
~David
-
Russ, so far the dust collection system works great. It basically is a straight run from the turbine to the hose. I used 4" drainage pipe which is way cheaper than anything else I found. I have a blast gate at each split and then one at each machine. This way I can attempt to minimize any loss of suction. I was resawing some wood and sanding it yesterday and that worked perfectly. I also tried sanding it with another gate open and that also worked well. Compared to the smaller, portable system I had in my NY space this system captures almost everything. There is a little residual dust but that is to be expected (unless it's a Festool machine!). I am not sure I would have done anything differently at this point. If anything comes up I'll let you know.
Rich, I can't wait to see some of that spruce. I just found some 11' boards of quartersawn Honduran at one of the local places. We can certainly do some treasure hunting while you are in town. There are a couple places nearby that have some good stuff, plus I got number of a guy out in the foothills that supposedly has some great stuff all the time. I'll let you know what I find out.
Thanks all for the comments. It really is a great shop, and very spacious. Now I just need to get back to building guitars. On that note...
Adios!
~David
-
After 3 weeks of tearing down my old shop, packing it up, and driving across the country, and then setting up a new shop I am finally working this week on some guitars instead of shop building. It has been a long 4 weeks building out this new space. It started as a pretty empty old shop/breakroom in an old factory building in Georgetown, WA just south of downtown Seattle. I ripped out a wall, painted the all the walls and beams, put in a new electrical panel and ran all the circuits, built in new benches (the space is 20' X 40' and I built a nice bank of benches along the back 20' wall to be my work center), set up a nice dust collection system, and finally organized most of my stash of wood and templates. The space is huge for me at 800 sqft. At the end of the month I am taking over another 400 sqft for a spray booth and office area (separate rooms, of course). The best part about this space are the high ceilings and big windows. There is so much natural light here it is amazing. After emerging from a long WNY winter spent in a basement shop this is such an inspiring place to be working in. I am totally excited and looking forward to the next phase of my work.
Here are some before and after pictures: New Shop
I really can't wait to get back in full swing. I have some awesome projects on the horizon and a few new ideas that I have been developing for a couple of years. This is looking to be the most productiv year yet. I will certainly keep everyone posted now that I am back online in the shop again (a month without direct internet access is harder that I thought).
Anyway, I thought you all might like to see some pics of the new place. Enjoy!
~David
-
so does this guitar have acoustic pickups in it aswell
i was tempted to try this on my hollow body does it sound good??
Sure does. I really like the PUTW pickups on these hollowbodies. I use an undersaddle pickup and another soundboard pickup and wire them together through the preamp. Simple and sounds great. These pickups are very transparent with a warm, organic tone.
This will be my last post for a bit. I will catch up with you all when I get setup in Seattle. I will post some pics of the new shop then.
Take care!
~David
-
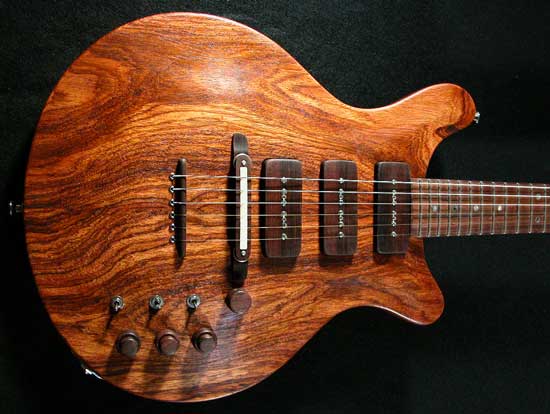
The next one is made by a good friend of mine Eric Zimmerman. He used all of my templates and made this amazing guitar for himself. It has another wicked flamed Claro Walnut top on it along with a cocobolo neck that has some great figuring throughout. The binding is snakewood and the fingerboard is Brazilian rosewood. Simple master volume, master tone, and a 3-way. This guitar smokes!
Here is a pic:
For more pics click here.
I am now finishing up the last few things before I pack up the few tools left in the shop. Then I hit the road for a few to visit some friends and make my way across the country to Seattle. See you on the West Coast!
~David
-
I just finished up the last guitar to be made in my Orchard Park shop. The next ones will be out of the new Seattle, WA location. This one is a Dragonfly Supreme model with some absolutely wicked flamed Claro Walnut. It features a pickup system from Pickup The World and an 18 volt preamp. I decided to do a burst on the back of this one and I like it. I may start doing this on more of these. The details are all ebony and Amboyna burl. The tuning keys are Waverly with ebony buttons covered in Amboyna veneer for a very cool look. The electronics are standard Dragonfly with a master volume and tone, and a series/single/parallel knob for each pickup. Very configurable for a lot of great tones. I put flat wound strings on this one from Thomastik-Infeld. If you have not tried them you should. These are the best flatwounds I have every played. They have all the range of roundwounds with a smoother, quieter sound.
Here is a pic:
For more pictures click here.
~David
-
I am certain that with some patience and careful work you could pull this off. If you are unsure of the approach I highly recommend getting some scrap wood and testing out these ideas you have before you commit to it on the guitar. This way you can develop the techniques without the stress. And because it is scrap you will be more likely to try some of the more radical ideas to see if they will work.
I think if the etching work was deep enough you could use the red dust and epoxy mixture with success. Just try it first and see how it looks.
~David
-
Looks really nice. I love your idea for the soundholes. I also like your chamber shapes! This will be a nice guitar when you are done.
If it were me I would keep the back natural and roundover and tummy cut it. Although the flamed maple on the back would look sweet I love the way the sapele looks. Now if you had a matching piece of sycamore I might try that. I am sure it will look great whatever you decide.
~David
-
GregP, thanks. Using the specific capacitors has been a great way to diversify the tones.
billiousfrog, I know what you mean. I really like the darker wood aesthetically. But tonally I prefer a lighter body wood and a heavier neck, just like it is built. This seems to produce the best results for me when using a rosewood neck. Now what really would have been cool would be to use ebony for the fingerboard, pickup covers, bridge, and knobs. The contrast would have been beautiful.
Thanks Godin. I have been talking with a new friend who does photography and he has given me some great advice on lighting and camera settings. In my new space I will be setting up a nice booth with proper backdrop and lighting. I will post pictures of it when I get it all complete (in a few weeks). For now all I can suggest is to get some good photo bulbs like these photo bulbs. The color is great with these but the drawback is that they only last 3 hours. I may try something else in the new space by using diffusion screens and less direct lighting. A full spectrum photo bulb is a must to really bring out the colors.
A question....why locking tuners with a fixed bridge?Good question. It was a client request. There really isn't a need for a locking tuner on a fixed bridge at all. I think Sperzel's reputation is a good one but the benefits of using them is often taken out of context. Still, they are a lightweight tuner and that can work for you if you need that quality. The Waverly's would have been my choice.
~David
-
Fortunately I'll be in Santa Cruz this summer and Fred Carlson says he'll tell me a bit about what's going on in the acoustic realm.
DFW, this sounds like a great time to me. Fred is an amazing luthier and an endless source of inspiration for me. I am sure you will have a good time and Santa Cruz is a beautiful place to be.
Personally I like the ideas you and Russ have been evolving on this thread. I am also working on something with sympathetic strings although it is only conceptual at this point. I think that one of the better ways to get the symps to move is to have them anchored to the bridge somehow to take advantage of its rotational movement. I have also thought about an extension off the bottom of the bridge that only needs to be maybe 1/2' to 3/4" long, just enough to amplify this movement. This way it is directly coupled with the top string movement and the additional leverage just might provide enough mechanical energy to make it work.
Sometime in July I will start prototyping my ideas. I'll keep everyone informed on what I find out.
~David
-
I also agree that instrument is of a simpler, more pure beauty. This is the fun and challenge of having a diverse client base. I am sent in all sorts of directions. It keeps things interesting for me. The last thing I would ever want to do is the same thing over and over again. I really enjoy the challenges of doing truly custom work. Sometimes I get to build wild eye candy guitars and sometimes I get to build something elegantly simple. The Blue Dragonfly was a challenge on another level and involved balancing out many seemingly incompatible elements. It is fun to work on projects like that. This one however was an an exploration of natural, organic wood tones. I am pretty happy to have the variety of work to do. Each one is new and fresh.
travismoore, the inlays on the fingerboard were done by taking standard abalone dots and fitting them into a slice of a sterling silver tube. I did a tutorial at one point that illustrates this. Click here and read the next few steps to see how I do these.
For the headstock inlay I cut out a piece of abalone with jeweler's saw. I then fit it into a piece of sheet silver, again with a jeweler's saw (and files to clean it up). I then carefully cut around the perimeter to leave a thin line of silver to frame the logo. It fits the inlays on the fingerboard perfectly. I may use it again too since I like the new look.
~David
-
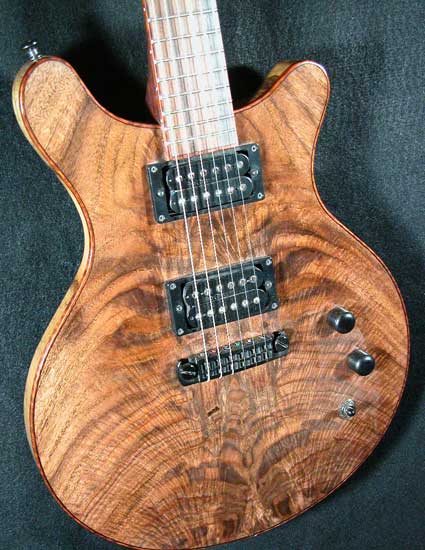
Ok, this one is pretty simple. There was really only one requirement for this guitar and that was that everything possible was to be made with Madagascar rosewood. About 4 years ago I acquired a piece of flatsawn Madagascar rosewood that was pretty light for rosewood and it just rang like a bell. My client called and asked if I had any of this wood and so this project began. The body is made from this lighter weight wood while the neck, bridge, pickup covers, knobs, etc are made from a darker and slightly more dense (but perfectly quartersawn) piece of rosewood. The result is a chambered electric that is about 7-8 lbs that resonates and sustains endlessly. The tones form this guitar are amazing. Thanks to this incredible wood and the work of Jason Lollar who provided the pickups the voice is quite articulate, as you can imagine, and the deep lows and sparkling highs that Madagascar is known for shines through wonderfully.
The electronics are pretty simple but very cool. Each pickup has a stacked volume and tone with an on/off switch. This runs onto a master volume. That's it but it is so versatile. The 3 main volumes are wired so that they decouple when any volume is turned down just a touch so you can blend the neck wide open with a low end bridge tone. This is great fun through an equally articulate tube amp. The bridge pickup was wound pretty hot and you can get some serious high gain tones with clarity and definition. The bridge capacitor is an orange drop .022. For the neck and middle I used the RS Hovland caps .022 in the middle and .015 in the neck. The Hovland are very nive and transparent while the orange drop adds a nice edginess to the bridge. It works really nicely. P90s are great pickups and with this wood combination they blow me away. I haven't been this excited about a guitar in a while. While it is not for everyone I loved it and enjoyed the unique tones it has to offer. Maybe USPS will lose for a week or so. Yeah, that's it!
This one stands in contrast to the Blue Dragonfly which was an exercise in detail and color. This guitar is all about the wood. The design is simple and without embellishment. It really is little more than tonewood. The finish is Tru-Oil with one coat on the neck and 4 coats on the body. It feels and smells like rosewood. Very cool project and for a great guy in Nashville.
Here is a pic:
For more pictures click here.
For process pictures click here.
~David
-
Welcome back to the Emerald City. So where in town are you setting up shop? I'm not accustomed to the concept of someone moving to Seattle to set up a business. Outmigration has been the standard response to the high cost of living and traffic.
Thanks! I am looking forward to getting back to the area. The main reason I am moving is to be with my girlfriend Kim who is in school in Seattle. Even with that motivation I still really love the city and the area in general. I lived in Seattle for nearly 8 years and have missed it ever since. As far as cost of living goes I think the benefits of living in an area like Seattle with its vibrant economy outweigh any of the financial reasons to live elsewhere. There is so much creative work there to tap into and I already have friends asking me if I need any work (I used to build custom furniture and may do some of that again with the larger shop space).
I am moving the shop to a building in Georgetown. I managed to find this space on Craigslist and it will be a very creative building with quite a few artists and craftspeople working there. I am looking forward to collaborating with some of the metalworkers so I can start offering my own hardware designs. Once everyone moves in and gets settled we will be participating in the Georgetown art walks. That will be a fun time and a good way to get back into the community again.
Traffic shouldn't be too much of an issue. I will be living in West Seattle with my girlfriend near Alki so my commute is only going to be about a 10 minute drive or bike ride. Considering my hours are of my choosing I can avoid the traffic easily (I hope!).
~David
-
marksound, your wife is one cool lady!
Hitone, I veneered the top using a vacuum bag system and glued it using Titebond wood glue. I used a roller so the glue would not get too thick and seep through. Something to think about when doing this is that because the top is carved and has a sort of done-like quality the center seam was not perfectly straight. I had to trim about 1/32" at the ends of the join to make it work without a split in the seam in the middle of the top. It was a fair bit of trial and error doing dry runs in the vacuum press until I got it right. Tedious work indeed but well worth the effort.
I have another idea in the works with figured rosewood veneer (beeswing Bolivian rosewood!). The sides will be bent rosewood like an acoustic with a thinner back and a rosewood neck. I have an incredible lightweight piece of Madagascar rosewood that weighs less than my lightest mahogany and sounds incredible. Perfect for a hollowbody neck I think. I will start building this one in a few months.
The blue burst was done with an airbrush I picked at an art store. I have an Iwata system with a siphon feed, dual action airbrush. The tint was lacquer and some of StewMac's alcohol soluble aniline dye. I mixed it in the thinner first and then added lacquer in a 1:1 ratio with the thinner. It sprayed transparently so that I had to go over it a few times to get the intensity of color. After a couple sprayed bursts like this I am starting to like the technique quite a bit.
billiousfrog, that's a cool observation about the gas flame. I didn't think of that.
Thanks again for the comments. I really appreciate it!
~David
-
Patience, suicidecustom. They are coming up in the next couple days. Just hold on a bit longer....
Thanks to everyone for the comments. I really had fun with this one and I am happy that you are all enjoying it. I can see a series of these coming out in different color schemes. Just might have to do that one of these days.
Godin, I am moving back to the Pacific Northwest to Seattle, WA. I will be expanding the shop to about 800sqft (more than double what I have now). It will be pretty nice to have some room to spread out a bit. I am tired of always having work around the hot water tank

Back to the shop so I can finish these up and start packing.
Later,
~David
-
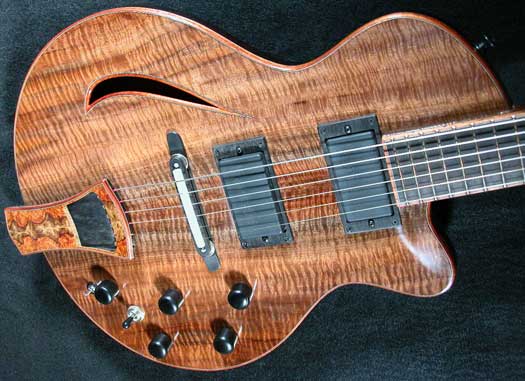
Hey all. I just finished up a pretty unique project that I wanted to share with you. It has become known as 'The Blue Dragonfly' and was a very intense and creative collaboration with a client of mine. We really had fun with this one and the result is a pretty darn cool guitar. The construction is fairly standard Dragonfly stuff with the addition of a veneered top over solid carved spruce and a wicked cocobolo back. Tonally it is very much like the standard Dragonflies with some added sparkle and shimmer in the high end most likely due to the rosewood back (which is still 3/8" thick). Oh, and it has soft maple sides. I wired this one differently as well with a volume and tone for each pickup and a series/parallel push/pull switch in each tone. This works very nicely for a wide range of tones. This one is on it's way to New Zealand this afternoon (sniff...).
Here is a pic:

For some more images click here.
To see some process pictures click here.
This one is the first of a few to come out of the laboratory over the next couple of days. These represent an end of an era and will be the last Myka guitars built in NY (at least for now). I have another very unique guitar coming up to help commemorate the event (I know, I know. I am just moving the shop). I'll post it when it is done.
Enjoy!~
~David
-
How about just adjusting the truss rod?
~David
-
I second Mattia, it really depends on what you are drilling. Here is a really nice chart that covers drill speeds for wood and metal:
~David
-
There definitely IS a price line that you cross where the guitars don't play / sound any better, but they look prettier!
I do see what you mean though but there are two things that I think need to be pointed out:
1. The price line is relative to the brand/maker
2. Tone is 100% subjective
What is considered expensive is also quite relative. You can spend more than the price of a few guitars for a set of air dried Brazilian rosewood from the 50s (if you can find it). But does it sound better? Who knows? I have a client that owns some very nice old Brazilan/Adirondack acoustics (a pre-war Martin and a couple handcrafted instruments). Well, he prefers his Cherry/Adirondack guitar (with a cherry neck). Go figure.
Of course with a factory guitar you really have to find one that has what you want tonally because each one is usually not matched for wood tone vs. overall desired tone or carved differently to make up for the inherent inconsistencies of the wood itself. It is just as likely to find a low end gem as a high end one when you are running the racks.
~David
-
adamcr, It appears that everyone who has added to this thread has already given you their advice. Since your approach was different you may be the only one on this thread to have to deal with your specific problems with wax and tung oil. If anyone had done the same thing they surely would have mentioned their solution.
I will repeat what others have said: it seems to me that you did not let the tung oil dry completely before applying the wax and allowed it to build up in the pores of the wood. Since it was not dry (as evidenced by the seeping oil) the wax most likely impeded the drying further.
I think what you need to do is remove the oil and wax that you already applied and to start over. I do not know how to remove tung oil so you may need to contact the manufacturer for suggestions (tell them about the wax too). A solvent is most likely going to be the thing to use but I have no idea which one to suggest.
I strongly suggest NOT using steel wool to clean out undried tung oil from the pores in the wood. This will leave all sorts of steel wool dust in the pores and they will stick there like glue. Not a pretty sight.
To give you an idea of what the process and schedule might look like for a decent tung oil finish I will detail what a good friend of mine who uses Tung Oil all the time does. The process is something like this:
1 Apply a very thin coat (do not get so much oil on the applicator so that it is dripping wet)
2. Let it sit for a few minutes
3. Wipe off the excess with a rag
4. Let it dry for up to 24 hours per application.
Do this for 10-14 days until you have the build up you want. It is quite durable if each coat is left to dry completely. I have never known anyone to use wax unless the Tung Oil was just used as a sealer coat (2-3 applications).
adamcr, maybe you can tell us what your process and timeline was. I hope at this point you see the value of testing everything on scrap wood before you commit it to your guitars. This way you work out the details beforehand and then apply a decent finish on your instrument. You would have saved yourself a lot of headaches.
Good luck and let us know how it turns out.
~David
-
Or you can choose not to fill the grain and just Tru-Oil it. I have an Andrew Olson custom that is done this way on the entire guitar and I love it. I don't mind seeing the grain and actually prefer it most times. Check it out.
~David
-
A little bandsaw like that will work fine if you take it slow. Just let the saw do the work. I have a Delta 10" that I used for the first 3 years of my business to cut bodies, necks, pretty much everything. Keep an extra blade or two on hand especially with rock hard maple. You may go through them with wood that hard.
For what it's worth I recently cut a piece of 2-1/4" rosewood on a scroll saw. I think Drak uses one of these all the time. They cut very smoothly but also very slowly at that thickness.
~David
-
So your taking off the top?
To paraphrase your question: Am I removing wood off from the perimeter of the soundboard to feather the edges? Yes, the wood is feathered after the body is completely glued together. This is only way to know how it will affect the response because until the sound box is built it is all speculative. I should also mention that I only treat the perimeter of the lower bout. I don't bother with the upper bout at all as I don't see the need nor do I hear an effect when I tried it (once).
I have to ask that you please be careful and very methodical when doing this procedure. I took a class where I learned this technique and one of the students sanded through his cedar top during this process (another good reason why I use a block plane). Go slow and don't remove more than is necessary for strength. This is a subtle improvement and it is not worth risking the integrity of the soundboard to achieve it.
And to add more to the discussion of bracing check out this approach: I-rib piano bracing.
I also came up with this picture of a similar idea:

Here is the rest of the article.
Interesting stuff.
~David
-
Ok, say your top is 1.10 Carpathian Spruce, how much would you" feather the edges" for more response? And from what point from the edge? Im thinking 1.5 Inches average, but how much do you knock it down? Kinkead doesnt say.
The way I do this is to build the guitar full thickness. Once the body is complete then tap from the center out to the edge. You should hear a point where the tapping has less of an effect on the top. This is usually 1.5-2.5 inches from the edge in my experience. As you remove material the active area moves towards the edge. I stop when I bring the active area close to 1 inch. You can go further but it does weaken the edge so keep an eye on it. You can use the binding as a gauge so you don't go too far. To make it easier to take an even amount all the way around I use a sharp block plane set to take a very fine slice. This also requires less sanding to clean up after you are done.
I have heard of using an orbital sander for this but I do not recommend it as you can go way too far with it. If you do use one you may want to try a higher grit so you can go more slowly.
~David

New Shop
in Tools and Shop Chat
Posted
None of the Grizzly tools are mine, they belong to my shopmate, so they are new to me. After setting them up this week and using them for a while I will repeat what has been told to me about cheaper tools: "You get what you pay for."
Of the 3 Grizzly tools in the shop the drill press is the worst in terms of fit and adjusment. The shaft that holds the spinning drillhead is a little too big so it moves around. The adjustment is a v-groove machined into the shaft and a set screw which either produces a very tight movement, or it catches when slightly loose, but in all instances the shaft likes to move at the beginning and the end of its movement making it pretty useless for precision work. My Delta 12" bench drill is a more precision tool that the Grizzly by far. I will eventually purchase a nicer drill press to replace this one. As nice as it is to have it the tool just is not worth dealing with for me.
To be fair the jointer, with the spiral cutterhead, works great. It can take a 1/64" pass and make a dead flat surface. The trouble with it is that the fence has a bow and a twist. This makes it useless for jointing perpendicular to a previously jointed edge.
The bandsaw is actually pretty nice (for a bandsaw that means the wheels spin true and are aligned with each other, the blade guides do the rest). It had to be a lot to get the fence perfectly square to the table which I found to be highly annoying since the fence has no adjustment whatsover and the bracket had to be shimmed to make it work. Alo the moveale arm that holds the upper blade guide did not drop straight up and down but moved towards the fence amking your cuts thinner as the guide was lower. So I mean the bandsaw was nice only after adjusting everything which took a few hours until it was dialed in (this reminds me of a handplane thread a while back). Once it was heavily tweaked it worked fine. With the upgraded guide bearings and some time setting it all up right it cuts very well and can confidently be used as a resaw. I would probably have gotten the 17" or 18" personally but still the 14" has 10" of resaw capacity, which is plenty for most things.
I would highly recommend testing any Grizzly tools before you buy them. It seems that quality is something that exists within their product rangebut it is not consistently found. But what can you really expect from these prices? I personally would not look at prices as the final determining factor when you are investing in tools. Find something that works well because you'll have it a long time.
~David