


mynamesucks
-
Posts
149 -
Joined
-
Last visited
Content Type
Profiles
News and Information
Tutorials
Product Reviews
Supplier Listings
Articles
Guitar Of The Month
Links and Resources
Forums
Gallery
Downloads
Posts posted by mynamesucks
-
-
I thought I would add a little update to this, I ended up opting for superglue as some of the central cracks were so tight there was no chance in hell of getting titebond in there. There was also no way i was going to use hide glue as i cant justify purchasing all the related equipment. I will try an write this as a mini guide in the hope it will be of use to someone in a similar predicament. The glue i used was your average titebond superglue liquid, nothing special.
I Started off by removing the finnish around the scar to get easier access to it and closer asess the damage as part of the finish still covered the crack. Im afraid i forget to take photos of this part but its pretty self explanitory. I then knocked up some rather crude shaped clamping cauls with padding to apply even pressure across the neck and avoid putting pressure on the frets.
After setting up the clamps and cauls for quick and easy clamping, I blew any excess dust of the neck and wiped down with lotoxane to degrease any exposed areas. Using the hypodermic I pierced the top of the tube and drew a fair amount into the syringe. I would avoid using a needle smaller than a 25 gauge as the glue starts to get tacky and make squirting it difficult. It is easiest to get the glue in by prizing the cracks apart with sufficient force and using the aid of gravity. I would have taken some pics here but due to the time superglue sets it wasnt on my list of priorities. After it was all clamped up i wiped away excess superglue between neck and fretboard.
The next stage is to refinish, I started with 180 grit on a foam sanding block with the aid of a small scraper for quick removal of the finish, there was about 1.5mm of clear/sealer to remove to bloom the wood with the finish.
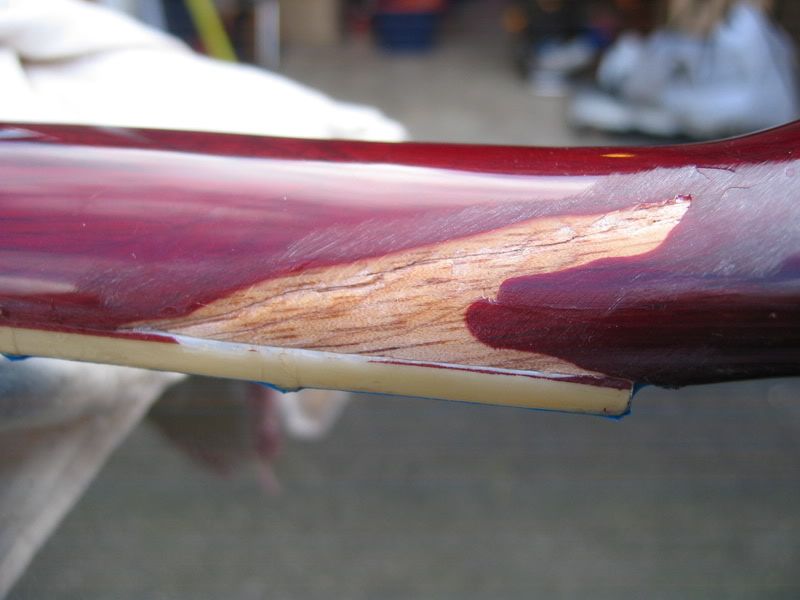
A picture of the glued fracture, looks okay, a bit manky but i cant really see how it can be avoided:
I then moved up to 320 sanding out all the scuffs, i find it best to sand different gris at right angles so you know the previous is removed. I then began to brush on very thin coats of sealer to start building up the finish again.
A Closeup of the crack, notice the part near the fret board where the wood splintered, how could i fill this effectively?
http://i2.photobucket.com/albums/y43/simon...ir/IMG_3849.jpg
Gallery of some progress pics here:
http://s2.photobucket.com/albums/y43/simonpiemon/repair/
The rest of the finish will be by the guys dad as i dont have any laquer tint which is a bit annoying, However he will do a faster and in most probablilty better job.
Cheers, Si
-
That lower horn looks sweet, I love guitars which combine hard edges and smooth contours. Top work mate!
-
Gold foil is extremely fragile and wold wear out very fast if on the fret board,one way i can think of is to stick it to a piece of gold foil to the bottom of a piece of acrylic or similar and then inlay it with the gold leaf in the bottom of the route.
-
You need to redo the photos in the guitar of the month thread, they really dont do it justice like some of the photos in here do of the headstock etc, give the beaty some natural light! Good luck on your entry, its an excellent piece of work.
-
He just wants it playable and is willing to wait as he said it would more than likely just sit there if i didnt do anything to it. It is an electric, a vintage LP. Yeah the scarf join is fine, the crack is about 3/4ths of an inch above it.
Ive got hold of a 25G hypodermic needle (.5mm) and syringes, so I will strip back the finish in a few days when i get some spare time and give glueing it up a go with some clamps ill make.
Cheers for the advice so far guys, keep it coming.
-
A friend has asked me to have a look at his guitar for him, his mum knocked it over i believe leading to rather severe damage where the headstock joins the neck. I see this as being repairable and im fairly confident i do it. Before im flamed, he understands the risk that his guitar may get even more damaged by myself, he also knows that a rapair from a custom shop will cost more than what the guitar was worth (circa £100/ 200$) ive offered to do this for free.
So anyway, the best way to repair this? Here are some pics of the damage:

http://i2.photobucket.com/albums/y43/simon...on/IMG_3842.jpg
http://i2.photobucket.com/albums/y43/simon...on/IMG_3845.jpg
The fracture is above the neck/headstock scarf and by looking at it is going at least 2/3rds of the way through the neck, now my main concern is the fretboard, it is still intact looking at it from the front but i have a feeling it may make the repair rather tricky.
So in my eyes the options are, completely break the crack and re glue the two parts back to each other with titebond, clamps et al, but I am not too sure whether the fretboard will lie true.
The other options are to out the crack and insert a new bit of neck, this will require taking the fret board off no?
The last being if all goes tits up, make a new headstock and join it to the neck where the original scarf was.
EDIT: After de stringing the beast, and looking at the fracture properly, im now wondering how best to break the two halves? by putting pressure on wither the top or bottom, it looks like i am going to end up completely lifting the fretboard, at worse, snapping it.
Thanks in advance for opinions, suggestions and comments.
Sheers, Si
-
lol it was pretty wet, i had a feeling it was that too but it took atleast 2 days before it started swelling from the wetsand.
-
My body is made of maple.
i suppose the primer could of seeped into the wood, i thought the primer acted as a primer and a sealer, maybe ive got it wrong. i have done a wetsand on the primet and it went through but no where near the patch its lifting, its happened on the back aswell. it seems its doing it on the edges of the routes where its not so smooth.
what would be the best course of action? rub it all back with 240? then seal it? i dont know really.
-
well i feel gutted

ive been putting a few coats of nitro primer on my guitar (dont worry its not figured or anything) and when i look at it this morning it has peeled away around the trem cavity, the paint hasnt broken but you can see the wood.
i remember reading with maple you dont need to seal it - so i didnt, all i did was sand it to 400, is 400 grit too much?
so the question remains is it rectifiable or am i going to have to sand the whole top down and the back to be on the safe side and re prime it?
-
I now know im never going to use rustins stuff again
Nothing wrong with Rustin's products, you just have to know what is compatable with what. and how to treat the products. Above all else, always test on scrap.
The following are all Rustin's finishes:


I know you had a deadline to meet, which is always difficult, but had you tested on scrap first, you would have avoided a stripback and refinish, and had the finish you really wanted.
Oh BTW - nice job on the inlays, they look very sharp!
righto, you have completely proved me wrong, i know i should of tested on scrap, i wasnt thinking clearyl, panic was starting to set in, i shouldnt of assumed it would be compatible maybe it was the 'added sanding aid for when dry' who knows. ive deffinately learnt a valuable lesson!
personally i thought the inlays look a bit dodge, perhaps im being yper critical of myself, i have lots more to learn, and learn i have complating this!
Setch, i would love to one day see some of your works in person, maybe when i learn to drive in a few months
. i really like the little dremel router base you made on your site, very inventive. most probably more sturdy than the dremel router base i purchased! -
WOW thanks for the great feedback, it has put a huge grin across my face
 . the finish will definately be redone, in my opinion it totally ruins the guitar.
I now know im never going to use rustins stuff again, the stuff left over would go down the drain if it wouldnt block it up
i know i mentioned it being my first inlay other than dots, so here are a few pics.

the rest of the inlay pics i have taken.
http://i2.photobucket.com/albums/y43/simon...on/115_1569.jpg
http://i2.photobucket.com/albums/y43/simon...on/115_1568.jpg
http://i2.photobucket.com/albums/y43/simon...on/115_1565.jpg
Thankyou again for the great comments, does anyone think it is guitar of the month worthy? i was originally planning on entering it but the finish has put me off.
here is a picture of the neck join dry fitted, for some reason it really didnt want to move in closer to the body to fill the gap but i could pick it up and shake it and it wouldnt budge so i was reasonably happy if not a bit apprehensive. rushing things sucks!
http://i2.photobucket.com/albums/y43/simon...on/115_1563.jpg
I agree it is a very curvacious SG but i do like it that way, it spices it up a bit, the tummy contours are also longer which in my opinion makes it more comfortable seating.
Thanks again for the great comments for the 3rd time or so but you have made me very smiley
EDIT: yes it is a 24.75 inch scale, uncles choice
i would of gone 25.5 if it was mine. -
im really digging the smooth lines and clean work, i like the 12 fret inlays i have the two outers ones on my acoustic
cant wait to see this thing done. -
This is my GCSE project which is in for tomorrow
im reasonably happy with it,its far from finished to my satisfaction though but it has to be handed in. The guitar is built to my uncles spec as he will be eventually buying it off me for the cost of the parts.A very longstory with the finish, its almost heart breaking
. it was all going well untill i ran out of shellac so my dad went and got me some more from a shop. he bought back rustins sanding sealer shellac, i thought great! should be compatible with the bottle i had before. so i load up my spraygun and shoot it on, it looks alright with only a little bit of orange peel, leave it for two hours and put another coat on. i put it in the conservatory in the warmth and 2 hours later it completely covered in bubbles ! :'(i leave it to dry so i can sand them out but on sanding it back i find its ruined the previous coats.
Panicing as i only have 3 days before its gotta be handed in i rub most of the bubbles out but by this time ive gone through and it looks quite disasterous. i ended up using filler on the bubbles and spraying it with a spray can i found in my garage just so i can hand it in. it looks ok but i can do so much better.
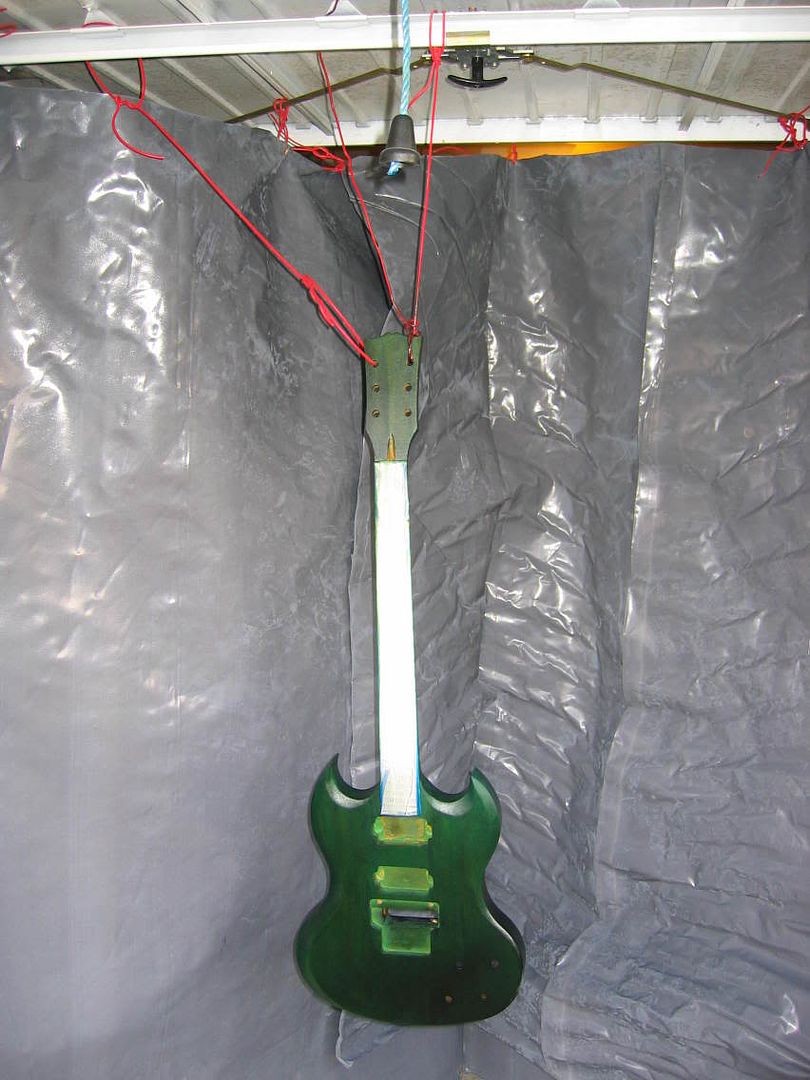
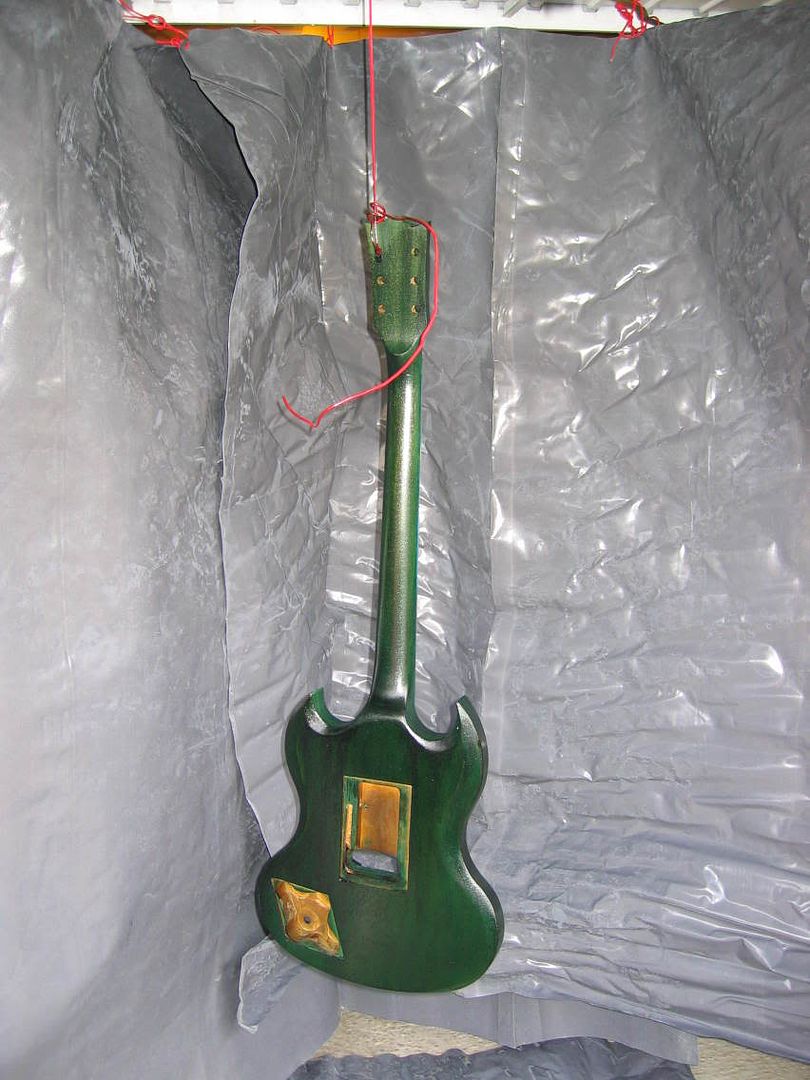
well here is the semi finished product.

the finish looks ok but flash brings out the ugliness!
http://i2.photobucket.com/albums/y43/simon...on/116_1613.jpg
here is what the green finish was before rustins ruined it
http://i2.photobucket.com/albums/y43/simon...on/115_1583.jpg
http://i2.photobucket.com/albums/y43/simon...on/115_1579.jpg
and what it would of lokoed like if i finished it staying green with the hardware http://i2.photobucket.com/albums/y43/simon...on/115_1585.jpg
i think the metallic paint has given it a distinct metal feel
-
im pretty sure wd music does saddles like that, i think they are made of titanium, may be expensive check out there site though
-
halfords go up to 1500
-
that looks sh## hot! you could just call it the daemon?
-
i have made templates in the past using my schools laser cutter. it was a pig to put the files into 2d design though. 2d design is actually the worst cad programme ever.
-
if that works, i will hunt you down and kiss you
-
cheers for the links, i gave rustins a look but they were pretty poor. mylands look like they might have jsut the thing.
on another note my mum suggested green ink, lo and behold it actually looks good, and the colour is a near match, i now need to see if permanent inks are suitable.
-
After about two hours of searching this forum and the internet im literally at my wits end
im building an SG from mahogany and i want to finish it very similar to this

i presume this is mahogany by looking at the grain pattern.
My fist question to you would be how can i replicate this finish? it looks to me as if its had a black/walnut grain filler and then stained green, im not to sure.
secondly, where in gods name can i get the stain dye whatever i need in the uk? the only stains ive found are the wrong colour or are a two in one waterbased wax finish which isnt what i want as i want to clear it. ordering from the states is out of the question as i need it by the end of the week
i thank you very very much if you can help me with this as i am at a bit of a loss, the only other thing i can think of is mixing blue and yellow.
-
The only experience ive had with truss rods is the alluminium U case one from david at luthierssupplies. its only 10mm high and wide, its made my neck very strong too as i epoxied it in.
-
or you can post more to become a forum regular
and wolfcoast by any chance is the floyd made by a company called Takeuchi? if it you would honestly be better to take it back get a refund or store credit, id spend the extra bit and get a decent floyd or a decent liscenced copy, assuming it is takeuchi as it is a pile of sh** i have one and i do not rate it to high but im stuck with it as i bought it along time ago, the bar got stuck in it, so i took it all apart, the nut that goes round the bar is all loose and wobbly- its like a sort of rivet, on the saddles the i noticed the underside bit which stops the hardened steel block from falling through is starting to snap of. maybe its just mine but if i were you and its made by takeuchi i would check it, bear in mind mine has never been put on a guitar.
sorry if ive gone slightly of topic. good luck with your guitar
-
oooh get fluffy material and cover it in that, it will look so cool. do it in red or green, you could put eyes on it aswell! the little googley ones you can get!
-
did he pay you for the job? If so, take some of the money and buy some nippers to cut the strings with.
Sorry, uncut strings are a HUUUGE pet peeve of mine
well, i have got some string nippers
i hate uncut strings too (bad eye experience ) you can even see the red snipe nosed cutters in the bottom left of the pic he is supposed to be giving me £20 but he has only payed me 1 pound its quiet pathetic.if you are intrested there is only 2 guns on the floor, the bit with the scope on it comes out of the sniper rifle under the guitar, has a huge barrel to go on it. the pistol in the box is my m9, they are only bb guns so nothing to worry about.
and my room has since been tidied.
EDIT: for those who are intrested to see more pics (not many of you probably
) here are some pics of the guitar at a gig last night:http://i2.photobucket.com/albums/y43/simon...IrstSest020.jpg
back of neck : clicky
tha back, dunno why im posting this but hey :rargen
si


 . the finish will definately be redone, in my opinion it totally ruins the guitar.
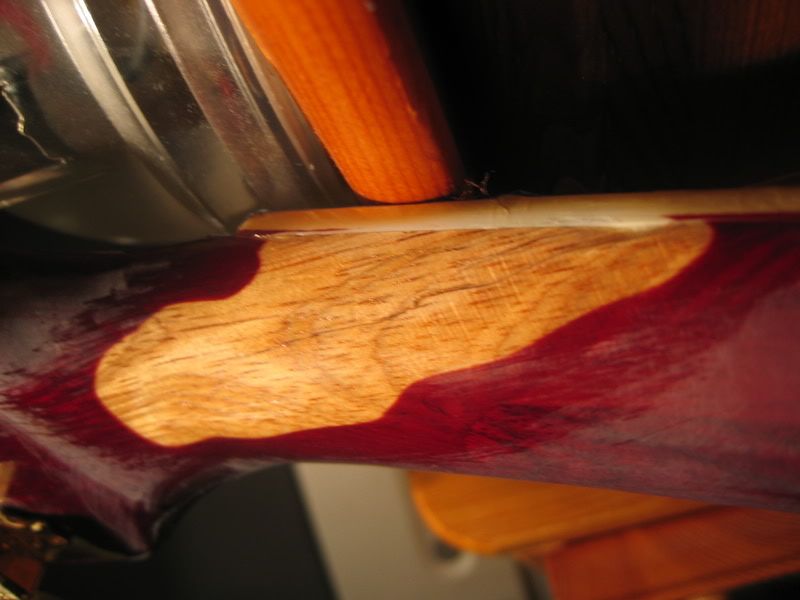
Finishing! Crackling
in Solidbody Guitar and Bass Chat
Posted
You could try this if you havent found a suitable product http://www.dickblick.com/zz014/21/?wmcp=go...01421-1010-8939