


mynamesucks
-
Posts
149 -
Joined
-
Last visited
Content Type
Profiles
News and Information
Tutorials
Product Reviews
Supplier Listings
Articles
Guitar Of The Month
Links and Resources
Forums
Gallery
Downloads
Posts posted by mynamesucks
-
-
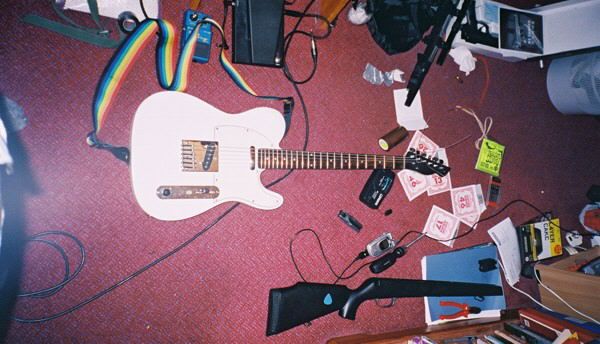
here is a pic of a telecasteri repaired for a mate, it was only a squier and to get it repaired by a pro would of cost him more than the guitar was worth, so he gave it to me to fix

the headstock had split down the tuning peg holes and had completely fractured so i had to plane it off and glue on a wing. the neck bolts had torn out alot of the wood and split it, so i glued on the broken bit with titebond, sanded it down. i then plugged the holes with 10mm maple dowl. then the holes were re drilled.
the body had a huge crack down it so i dribled a bit of CA down it. my friend decided he wanted it white 3 days before the gig he wanted it done by. so he gave me 2 cans of paint to paint it
i was like er ok.the paintjob came out alright on the front, the back was a pile of sh** i wanted to do it again but he wanted it for the gig and loved it anyway

here is a crappy pic, please ignore the assorted junk on my floor
pic of the headstock can be found here headstock re designed
-
I'm working on a Kleain-esque body shape and I've found why they're headstockless. No way it would balance with a plank full of tuners up there.
So I'm going to be building a headstockless guitar. Woohoo. The problem is I can't use a tremolo. The body shape precludes it so I need another solution but I have no idea where to look for this sort of thing.
Little help here?
the only thing i can think of is a steinberger trem or a flloyd rose speed loader, but you dont want a trem. hmm. how about a t.o.m with tuners behind it?
-
already done that lol, did for a floyd it was a truly dishartening f**kup, i just bought stewmac templates
then i plugged up the post holes routed out a block of maple and glued it in the hole, then re routed it all, with the trem recess you cant tell i screwed it up. but seriously, i didnt read up properly on where to put the hole so it was half an inch too far forward, it was tempting to throw away the body and start afresh but i thought id learn from the mistake. and i definately have -
*fills pants* holly mother of god its magical!
-
cheers for the good comments
im going to give the nut ago this weekend and route for the rear trem and contrall panels, then its onto final sanding me thinks, im going to paint it white -
i second that too
-
I won't even be using a bandsaw. I'll be improvising with a plethora of hand tools and the odd jigsaw or two.
i made my neck by hand
it gives you a good feeling, i did sort of cheat on the fretboard with a preslotted one. you should be fine when cutting the scarf joint as long as you use a sharp saw and take it slowly trying to keep to the line as to avoid having to plane more of. most importantly, sharpen every tool before you use it for the first time, if theyve been sitting in a draw many a year like mine had they will be as blunt as a spork you get out of the canteen . a sharp tool will make it all that much more easier and enjoyable. -
im going to be using my schools CAD software and laser cutter to be making me some tomplates
-
You already routed the bridge cavity and yet you´re scared to plce the nut??? you already did the hardest thing!!! if you really donñt wanna screw up with a lucking nut ( I wouldn't) I'd use a graphite nut and use locking tuners....
lol, its gonna be a locking nut, ive already got it along with the floyd, schallers and everything else etc etc, actually it should be easy thinking about it it was a pre slotted board with the nut slot on it. if i crew up the depth i can just use shims
so do you like the guitar?
-
ok im sort of embarrased about showing you my guitar, not because i think little of it i think its pretty good.
the thing is i started it when i was 13, and well im now 16
i had most of waht you can see done at 13 but when it came to doing the precise parts i slowed down. I have really little to do as you can see but im scared. it sounds stupid but im really scared of placing the nut, im so cluse to finishing it and if i **** it up ill cry forever.
well here it is:
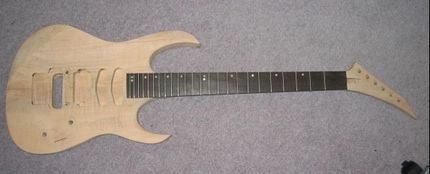
could you post comment on it please?
thanks x
-
it looks like you should be able to buff them out with a reasonably fine compound.
-
that is too cool for school, awsome work man
-
swish, that is really nifty and that top looks s**t hot, how did you bind it?
-
that looks awsome
,that maple looks damned nice, i want one, what did u do withh the back of the headstock? -
where you hinting something there anekretia?
-
when i cut my body i used a jig saw it took a long time but going slowly you can get it pretty square and then sand the edges square. my advice to you would be if u use a jig saw take the edges 3 to 5mm away from the line and sand with some 80 grit to get it on the line.
If you decide to use a router and template which will get the job done faster and will produce very god results. rough cut with the jig saw and then create a temlate of the body shape to the best of your ability then route it with a tob bearing bit. A good bit i have is a trend c121 bit (search c121 here to see it) if you have a 1 3/4" thick body blank you can just about do the hole thick ness with a safe amount of the shank in the colletif it still doesnt go the whole way through you can use a bottom bearing bit and turn the work over and remove the rest following the partially routed shape
i hope that helps you
si
-
that must have been one hell ova feelingwhen something like that happens to you. jeremy that is a great way to say thankyou
. -
heh heh
anywho that guitar is looking very cool. have you strung it up yet? that thing will be a total beast. nice ideas.
-
wow that looks very funky. nice desighn
-
you could try flicking paint or thining down some paint and blowing it into the shape of the wanted splatter using a straw or use an airbrush.
hope the ideas help.
-
yeah, buy your own it was the best 15 pounds i spent.
-
wow i really dig the bigsby on the tele i think that will look awsome on yours.
-
wow i think it looks very cool raw. and finished.
-
i dont know about the pickup place ment but here is a grest router tutorial.
http://www.accesswave.ca/~derekn/routertutorial/index.htm
hope that heps you out


I Finally Did It!
in In Progress and Finished Work
Posted
wow that is insane, it looks like golden wood! good work. what does she sound like?