


govtmule
-
Posts
238 -
Joined
-
Last visited
Content Type
Profiles
News and Information
Tutorials
Product Reviews
Supplier Listings
Articles
Guitar Of The Month
Links and Resources
Forums
Gallery
Downloads
Posts posted by govtmule
-
-
All necks fretted and fret ends nipped and filed flush

-
Those look great ! Would love to see a build thread if you have the time...
-
Absolutely love it.
-
Awesome.....great job !!
-
Thanks for the heads up demonx. I would have thought these things would be more useful.
-
I'm going to an auction this Saturday and I see that this "sign maker" is one of the advertised items:

My experience with these auctions so far is that these more specialized things go pretty cheap. Is anyone interested in trying to work out a trade if I can get this thing at a good price ? I'd be interested in pickups, lumber, tools, just about anything.
Give me a shout if you're interested.
Steve
-
Awesome job Osorio ! How do those P-Rails sound ?
-
It's kind of an experiment to see if I can iron out a process that I can repeat. The wood was a free score from a local mill so I'm not out much. Hopefully they turn out alright.
-
I say go for the jazzmaster-style pickguard. a little hand touch can't hurt, and to be completely honest, i don't think that the one you have now looks all that good.
Thanks for the input Charlie.
-
Thanks for the input SR...Progress has been super slow lately. I'm trying to start a side business that has been taking most of my free time.
I had another pickguard design that I liked a lot better. It wrapped around the neck pocket on the bass side and followed the lines of the body a lot like a Jazzmaster's pickguard. It would require some hand finishing to complete the 90 degree inside corner and the goal with this batch is to produce a guitar and a process that is easily and quickly repeatable. I'm trying to remove bottlenecks.
-
Finally, a little more progress.
I cut and beveled all the pickguards. Here's a quick mockup to show the direction I'm going.

I noticed after taking the picture that the pickguard was misaligned. It actually will sit a bit higher on the body, more towards the bass side, than this picture shows.
-
I like B the best as a body shape but I think that C goes better with the headstock shape.
-
I'm curious, why the glaze coat ?
Thanks,
Steve
-
If you want to give some dental bits a shot and didn't have any luck with your own dentist shoot me a PM and I'll hook you up with some.
Steve
-
Yep, makes sense. I'd like to have a guide template similar to Ryan's that would keep me from accidentally routing too far into the heel or headstock. But with using this bit the template will obviously need to be underneath the face down neck. Then to get the bearing to ride on the template and not the neck, the bit will take too deep a cut I bet.
You mention that you cleaned up a few details at the heel and volute with paper. Did you just eyeball the entry and exit points of your routes and then clean up the heel and headstock transitions with paper ?
-
Do you have any pictures of your procedure ? I planned to do this with some large roundover bits that I got at an auction but after looking at them closer they were a smaller radius that I would have liked to use. I wanted to do something similar to what Ryan Martin at Becker Guitars is doing. here :
-
Did this one get finished? Like the looks of where it was going. You last question was the knob placement. I would of dropped them lower like you siggested on doing and doing the side input via a tele.

It did get "finished" but in a hurry because I wanted to move on to other projects. I finished it with black rattle can nitro without pore filling and it shows. Finish is pretty rough. I actually play this guitar quite a bit because I really like how the neck feels. And this is my first Alder body and I have to say that I really like the sound of it acoustically. When not plugged in the guitar actually rings pretty loud and long.
The pickguard experiment was a failure though. I cut it free hand and formed the edge bevel freehand with a razor.....not the way I would suggest doing it and the results are crappy....obviously.
-
All neck pockets routed and necks mounted. Next step is to finalize the pickguard design and route for the pickups and electronics.


-
Looking great !
-
Love the neck jig. Everything seems to be coming along nicely. Do you find any changes in your approach due to building 6 at a time over just one?
SR
Thanks, the jig is a pig and a half. I used 2 pieces of 2' X 3' 3/4" MDF for the base...it weighs a bit too much.
As far as my approach goes, the big difference has been prior planning. Each night that I know I'm going to get some shop time I plan ahead what I'm going to try and get done. Partly because I want to maximize progress but mostly because once I have a tool or jig setup I do all six guitars. If I screw something up....it's times six.
I should have been doing this all along.
Repeating the same process six times has really not added as much additional time as I thought it would. If you can build one guitar from start to finish in 2 months it will definitely not take you 12 months to build six. Most of the time dedicated to a build, for me anyway, has proven to be in planning and setup.
I have really tried to build processes and jigs with this build that I can re-use in all of my future builds regardless of design.
-
I've used Guitar Parts Site. They are quite honestly the worst guitar parts supplier I've ever dealt with. I was ordering an Ibanez mono bridge, and it said they had one in stock. Weeks later I had nothing more than a confirmation email saying they'd taken my money. You can log into their site and check your order status. Within 24 hours of my order it said it was in final processing, and the order couldn't be changed. It just sat in final processing forever. I tried calling over and over, at different times of the day. I sent several emails that were flat out ignored. Finally I sent them a threatening email, and whadayaknow? The part shipped and I got a response.
I'm generally a pretty nice guy, but it is my pleasure to trash these guys in a public forum.
Thanks a lot for the heads up.
-
I routed the first neck pocket with the new jig. I'm satisfied with the results pretty much.
Here's why the corners of the tenon are chopped off haphazardly. The original neck tenon is squared off and the neck pocket has radiused corners of course. I didn't square off the end of the pocket or radius the corners of the tenon because I planned the length of the tenon so that it falls in the bridge pickup cavity location. Most of it will be routed away. And in order to get the tenon to slide in the pocket I have to clip the corners. Since it will be routed away, I just sanded them off until the neck slipped into place.

Awkward camera angle, sorry. Starting to look like a guitar though.

-
Finished my neck pocket jig...


-
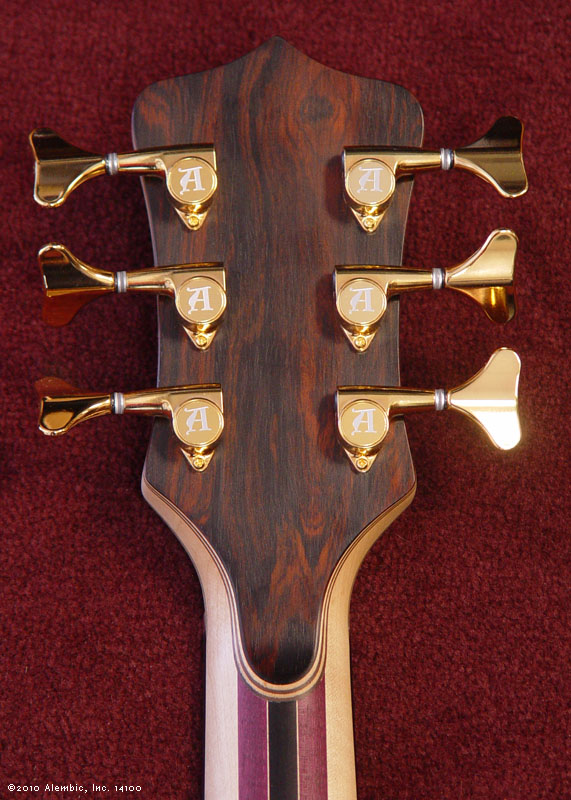
You can do it for looks ala alembic,
http://www3.alembic.com/img/inst/14100_pegheadbackL.jpg
But also a good reason to do it is so that you can scarf the headstock (and there for use a thinner neck),
When you do the following type of scarf joint headstock, it leaves a visible glue line right across the headstock,

By gluing veneer on both sides you hide that glue line and makes the whole headstock stronger.
Gotcha....thanks Neil.

Bare Bones Billy-Bo
in In Progress and Finished Work
Posted
First set neck build....obviously inspired by the Billy-Bo. I’ve been working on this one off and on for quite a while. I’ve changed my mind on the pickups, controls, tailpiece, and finish multiple times so I guess I won’t say anything about that since it’s likely to change before I finish J
It’ll will have a Wilkinson roller bridge, ebony fretboard, open backed Sperzel Trim-Lok tuners, and a zero fret.
Raw Sipo body
Glued up and drum sanded