


govtmule
-
Posts
238 -
Joined
-
Last visited
Content Type
Profiles
News and Information
Tutorials
Product Reviews
Supplier Listings
Articles
Guitar Of The Month
Links and Resources
Forums
Gallery
Downloads
Posts posted by govtmule
-
-
Laminated necks also look great

This is the main reason I do it.
I agree that it looks pretty cool. But I also see some people putting headstock faceplates and/or back straps on laminated necks. Covering up the laminations ? Some structural reason ?
-
sounds like you have all the answers already, that is pretty much it.
its stronger, more resistant to warping and it allows the use of a greater variety of wood
for 1-piece necks i insist they are either flat sawn or quartersawn - i am not so bothered for multi-piece necks as long as they are balanced
so i would be happy with (A) 'rift/quartered/opposite rift' where the end grain looks like this \\\\\lllll/////.
but i would not be happy with (
'rift/quartered/rift' where the end grain looks like this \\\\llll\\\\to get from B to A you just need to flip one of those outer pieces around
here is a real life example
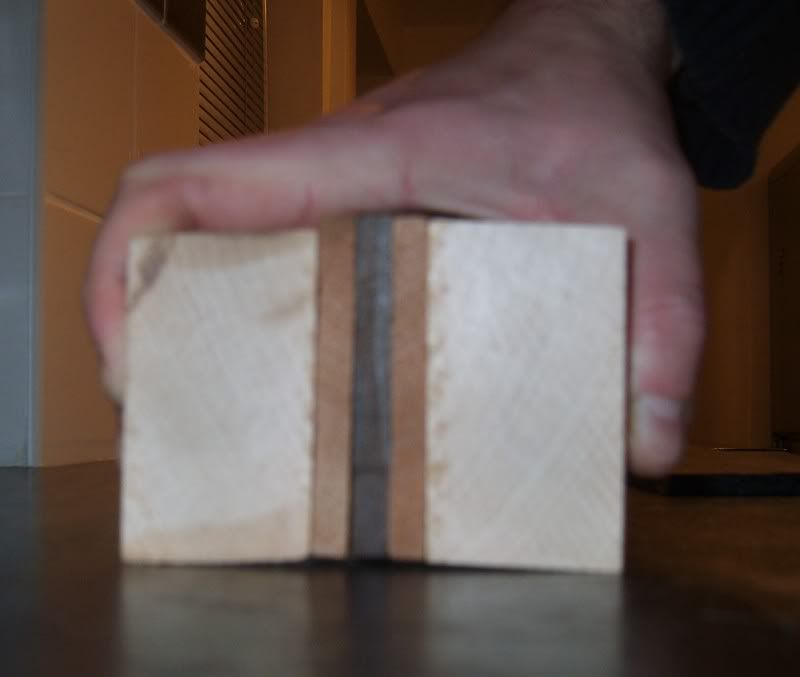
you can see maple and mahogany grain is symmetrical on each side - the wenge in the middle it flatsawn. So i have used rift sawn wood in a way that overcomes its issues. wood that would normally be useless for guitar necks has become usable again
Awesome, thanks for the insight Wez !
-
I'm curious what your main reason is for laminating neck blanks.
Is it to fight wood movement by aligning grain orientation in opposite, or at least different, directions ? Or is it to promote strength by attempting to have the grain running as perpendicular as possible to the fretboard..."quartered".
Seems as though Fender is okay with flat sawn slab necks so my guess is that it's more for stability but I'm curious why you may do it ?
I have some 1" slabs of mahogany, wenge, and maple that I'd like to use for necks and looking at the grain direction I can rip more usable strips by just planning for opposing grain direction versus only using the quartered strips. Should I be shooting for mostly quartered ?
Thanks,
Steve
-
I use something similar to this. Can't find the exact match. Mine is better quality but u get the point...
http://guitarpartsresource.com/images/large/EP-4366-028.jpg
Yes that is the obvious answer
and I have several. I also have short straight gibson style 3-ways. I was looking for something more efficient. Anyone ever use a blend pot to switch pups?
I setup my first build that way. Two HB's, a blend pot for switching, and a master volume. Works great when you have the time to turn the knob. I could see though if you were playing a tune and needed to immediately flip from one pup to the other that it would be cumbersome.
-
I appreciate all of the positive sentiments for this project. Any of you fathers, especially my fellow divorced fathers, will understand that the quality time spent sharing what I love with wonder-girl is worth infinitely more than whatever wood/hardware goes into it. Memories and bonding time just don't have a price tag.
John,
This is an awesome project regardless of the final outcome. Any time spent with the ones that you love is well worth the effort or cost.
A few years ago I posted a whiny message complaining about lack of shop time now that my wife and I had a little one in the house. You were one of the first to respond to me with the simple straight forward message of "wake up dumbass and appreciate the time with the family and grab all that you can now". Paraphrasing of course but the message was understood
-
Boards sanded to 12" radius.


-
Side dots installed:

And nuts tacked in for alignment:

-
I came up with a simple way to drill consistently spaced side dots. A chunk of aluminum angle iron and a spring clamp.
Just clamp it in place, drill the hole, and then move it to the next fret to be marked. It's not revolutionary but it produced a lot better results than my old method of eye-balling a brad point drill bit into a center punched hole.
I drilled a few different holes to use for different spacing. Just thought I'd share in case it helps out another noob like me.


-
Fretboards glued on and trimmed up. Drilled tuner holes. Side dots drilled for.

-
i would like some opinions from you guys if you don't mind.I was going to use all chrome hardware for this one,but I am having second thoughts.With all of the black accents I am thinking of switching to black hardware...
Thoughts?
Blackity black....
-
And rough cut the necks. Ready for cleanup on the router table.


-
Made some progress in the last few days.
Used my fret slotting jig:

To cut the slots on the five remaining fretboards:

-
local custom car audio shops. a buddy of mine uses plexi all the time in installs.
Cool, I'll give that a shot tomorrow. I've struck out so far.
-
How are these projects going? I am a little lost on the woods used, what type of wood is that grey stock? I really like that stuff, I bet it would really pop with an oil finish.
That's walnut. Ideally I would use an oil finish, that's what I like best, but these are three piece tops that are really nothing too special to look at.
These are coming along fine, thanks for asking. I hit a snag recently with the truss rod access that I had to build a router carriage to correct. I'm trying to find a piece of plexiglass thick enough to use as a router base plate for the carriage.
-
Cool, thanks.
-
Great, thanks for the idea.
-
I'm looking for ideas on where to go dumpster diving or cheap places to get thick acrylic to use for router bases and templates. Any ideas ?
-
I discovered the trick tonight. I wasn't pulling the belt clip far enough ahead before inserting the sanding sheet. Now that I know how to correctly load the paper, there is more tension on the paper so it worked a lot better.
-
this should help a bit more.... its a pdf of the manual for that unit
http://www.cgallery.com/jpthien/ryobi_wds_1600.pdf
Cool....thanks !!
-
Is there any way to true that drum? I'm assuming it's rubber or metal or something, right?
Looks like it's aluminum.
-
not knowing what model you have, i found this in a search
Adjusting the drum to accommodate wide or narrow stock points out the major difference between the Ryobi and the Performax. Instead of a fine adjustment knob, the Ryobi relies on shims (two 0.010-in. shims are provided) to reset the gap between the drum and conveyor at the open end. The table can be shimmed at the open end of the sander and then brought to parallel with the drum. To achieve a wider gap, remove one or two of the shims and retighten the Allen-head screws. To return the drum and table to parallel, the process is reversed.
untill you are used to this specific machine, you might have to go very slow and not take off a lot of material in each pass.... they no longer make it, so there might be a reason for that.... this certainly doesn't mean it is a poor machine in any event
I was taking it very slow and only adjusting the depth wheel once every 3 or 4 passes. I think the key is going to be to stay away from the last inside inch of the drum. In most cases that will be very doable.
-
Okay after having tested the sander on some scrap and on some real material I've had good and bad results.
I took an old scrap that ranged from 1/4" to 5/16" across it's face and the sander took it down to a very uniform 1/8" in short order. Very nice for thinning out fretboard stock.
On the bad side though I took a 16" wide, 2" thick body blank that had slipped a bit during glue up and attempted to square it up and take it down to 1 3/4". I broke two belts and haven't got down to the 1 3/4" mark yet. I may be asking too much of this sander, maybe not. The issue is with the portion of the belt that fits into the right most slot on the drum. It has a tiny bit of slack, even when trying to install the belt very tightly. So that little bit of slack gets hit pretty hard when sanding material that wide. Eventually it started to tear the belt and broke in two cases. Maybe the belts are old too, I don't know. They came with the sander.
Crappy thing is that the belts need to be at least 90" long to fit into both clips so as soon as one tip rips off the entire belt is useless....at least to the drum sander. I haven't priced the pre-cut belts yet but I think I'm going to cut my own from 3" rolls.
Anyone have any advice on keeping the belt tight to avoid tearing up the ends as they go into the slots ?
-
Wood does move, of that you'll get no argument. but "perfectly quartersawn" is not a neccessity. Flatsawn wood has been a proven neck wood for decades now.
Are those dual rod routes in the neck blanks ? That would help with any twisting you may encounter.
Not dual rods but one two way truss rod down the middle and two carbon fiber rods on the outsides running parallel to the truss rod.
My thought is that I can use some more interesting looking wood that may not be ideal grain wise, and fight some of the potential movement with the carbon fiber rods. I haven't been building very long and haven't logged a ton of builds under my belt so I don't have many past examples to see that theory play out over time. I'm attempting to streamline and standardize the building process of this model so if the neck turns out to be crap I hope to be able to swap it out for another relatively easily.
The best laid plans......
-
...then that Mahogany is probably more use propping their doors open for customers.
Funny !!

Any Experience With Either Of These Two Parts Suppliers ?
in Solidbody Guitar and Bass Chat
Posted · Edited by Prostheta
I was surfing around looking for a supplier for Ibanez Gibraltar bridges and ran across these two sites. I have not heard of them before so I'm curious if anyone here has any experience that they can share.
http://www.drumsetc.com
http://www.guitarpartssite.com
Thanks,
Steve
<pros: added links>