


govtmule
-
Posts
238 -
Joined
-
Last visited
Content Type
Profiles
News and Information
Tutorials
Product Reviews
Supplier Listings
Articles
Guitar Of The Month
Links and Resources
Forums
Gallery
Downloads
Posts posted by govtmule
-
-
and I loves me some Hair Metal too, my fellow child of the 80's.

AMEN brotha !
-
Are you feeling dirty yet. C'mon Rfallen angel, open up and say ahhh. You know we all want action tonight... that we don't want nuthin' but a good time. Gimme something to believe in here. Probably can't 'cuz your mama don't dance the unskinny bop. Oh well. I guess every rose has it's thorn.
You sir.....are a fargin icehole
I only hope that you had to hit google or wiki to pull all of those song/album titles out.
Being a card carrying member of the CCSucksandshouldnotbeallowedtotouchanythingwithstrings Club, it scares me a whole lot that I recognized all of your references.....poop.
-
Either way its great to se a forum member go those extra miles for the other members!
I've got so much help from the great people on this forum. It's not much, but hopefully some people can use them.
-
I just got another care package inlay (dental) bits. Anybody want some ?
Shoot me a PM.
Steve
-
Looks great !!
-
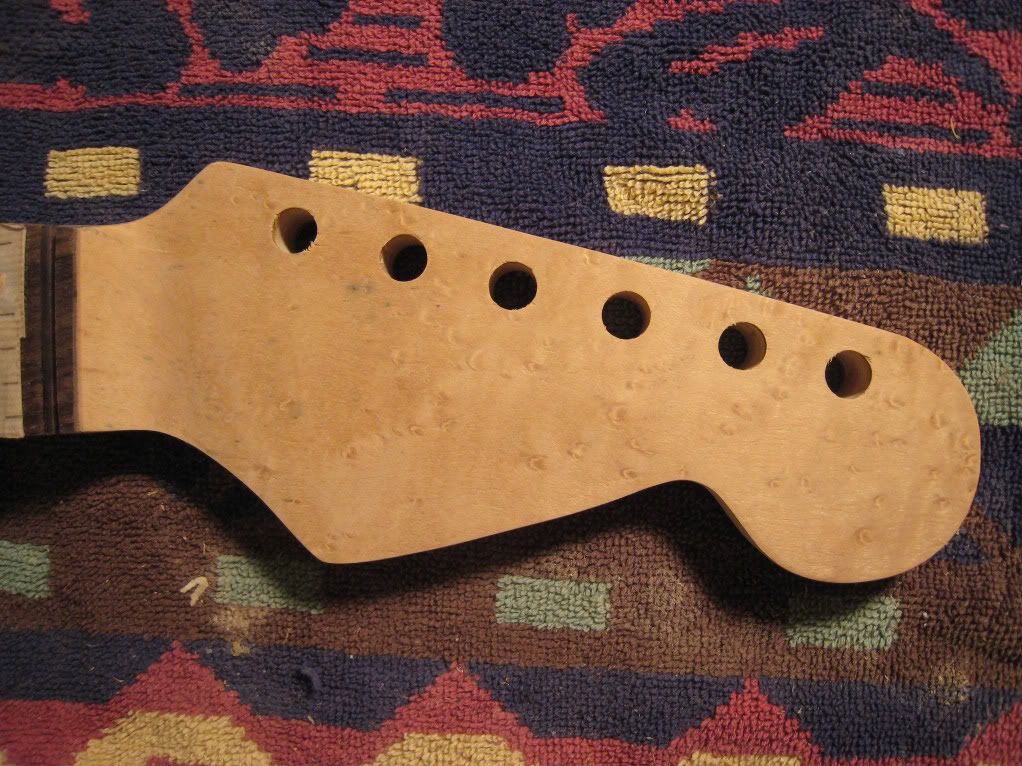
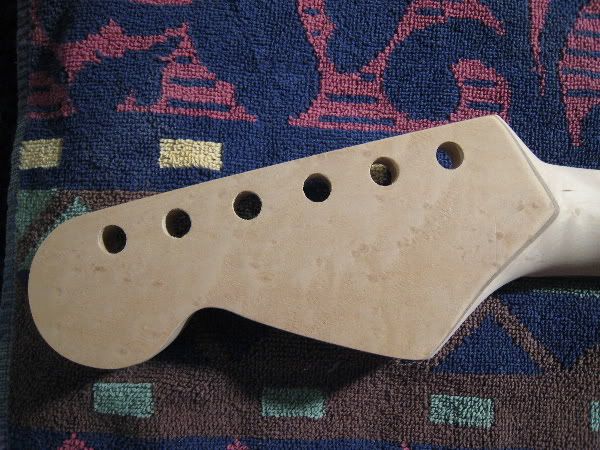
I am seriously trying to finish up one step at a time. But it is hard to resist finishing at least one of these things... so I shaped up the headstock face on this one. Shouldn't need string trees on this one.
Looks good !!
Any pics of your setup to shape the headstock face ? Are you using your Rigid osc. spindle sander ?
Steve
-
Sold.
Thanks,
Steve
-
Sorry I don't have any on hand myself, but don't hesitate to call Andy DePaule at Luthiersupplies.com. Andy is a great guy and will accommodate most anyones order. He sells blanks from his site I believe, but if you just call and tell him what you need, he'll set you up at a great price. So if you have trouble getting ahold of any, just hit up Andy, he'll take care of you no doubt. Best of luck, wish I could help Steve. J
Thanks for the heads-up ! Andy was a great guy to deal with. I think I'm getting exactly what I need from him.
Thanks,
Steve
-
I'm a complete inlay noob but need a piece about 1.5" X 1.5" for my first inlay effort.
I've looked around the internet and see most places sell it by the ounce. My problem is, never having bought pearl blanks, I really don't know how much to expect to get when buying an ounce and even worse, I don't know how big those pieces will be.
So instead of blowing $50 on an ounce of pearl that may or may not give me what I need, I wonder if anyone would be willing to part with 1 or 2 pieces of nice abalone for my first effort.
PM me if interested.
Thanks,
Steve
-
Nicely finished - however there is one quite major flaw - your ToM is straight so your intonation is going to be out on the lower strings. Also judging by the picture I think you're bottom E ferrule is so close that the string will rub on the body of the ToM (could be wrong just looks that way on the pic).
The ToM is actually offset a bit, weird how the picture sure makes it seem like it's straight. Yes, the E ferrules are close to the ToM but they do not cause the string to rest on the body of the ToM.
In terms of the spokewheel truss rod install - how on earth did you get the spoke wheel that far into the body of the neck?This is how I do mine:

Obviously it also removes the need for hole in the last fret.
The hole in the last fret wasn't a fix, I placed the truss rod in that position to split the fret with the spokewheel on purpose. It was an effort to get creative. Using the spokewheel in the place you do makes the most sense and that's what I'll probably do in the future.
Thanks for the comments !
-
Colors are great! The back is SO blonde and the birdseye fretboard looks awesome. No comment about the hole in the fretboard, as the point is pretty moot by now. Good job keeping the Tele original!
Thanks !
-
It's been done for a little while now and I'm finally getting around to posting the final pictures. I learned a lot while making this one, mainly by trying to recover from my mistakes.
Hopefully my guitars will continue to get better but all in all I'm pretty pleased with how it looks and very pleased with how it plays.Final specs:
figured walnut top
maple back
volume/tone with toggle on/off for each pickup
Searcy V-90 pickups
tom bridge w/string through body
birdseye maple neck
birdseye maple fretboard from larry at gallery hardwoods
bone nut

The back:
http://i249.photobucket.com/albums/gg229/g...le/IMG_6579.jpg
Closeup of the birdseye maple fingerboard:
http://i249.photobucket.com/albums/gg229/g...le/IMG_6587.jpg
-
Cool, thanks for the tips !
-
With the extra thickness only being a couple pieces of veneer, you might not have to recess them any further than the washer. With any luck, the recessing won't be that noticeable.
Good idea ! That was my first thought too. To stick with the tuners that I have (gotoh's) and recess just the washer. But I wanted to only recess the washer, no extra around the washer. I couldn't come up with a way to be sure that my forstner bit was centered on a hole that I already drilled.
Now after thinking about it a bit more I think I can get it worked out with a fence and my drill press.
If not.....I'll just add another layer of veneer
....or maybe not. -
It works great over stain. Tru-Oil is polymerized oil, so it'll dry faster than any of the other oils and you can build a finish with it(though 2-4 coats is plenty, if it isn't shiny enough for you after a few coats you can rub it hard with a cloth to raise the sheen). Don't put too much on though, as it's not a hard finish and will get gummy if you build it too much.
I'm by no means a finishing or Tru-Oil expert but this comment confuses me a bit. I'm not arguing, just trying to get more info because I have used Tru-Oil in the past and plan to continue using it and would like to get the best finish that I can with it.
You say that 2-4 coats is plenty and to not use too much because it will get gummy if you build too much ? I've seen multiple threads describe applying 20+ coats before buff out to get a good finish. Do you think that's overkill ?
I've finished two bodies and two necks in Tru-Oil and have stopped after 5-6 coats because I'm impatient and the guitars were for me. I thought that I would go the extra mile and shoot for the 20 coat range if I ever finished a commission in Tru-Oil.
-
you could recess the tuners like this

I really like the way that looks, I may just do that. Thanks Kenny !
-
TK instruments-Sperzel info
This page has a lot of the Sperzel info you'll need. Used to be one of the few places to get those Tuners. Sperzel has its own site now and while it doesn't say you can buy through them, if you call you can. My buddy talked to Bob Sperzel himself and said it was cool to call for tuners.
Yep, I've spent some time going through this site. I see where it says that the max headstock thickness for 6-in-line is .590" (19/32") for the staggered set. But it makes it sound like the only reason this wouldn't work is because the 2 short posts would fall below the mounting nut. So can I use a 6-in-line staggered set and swap out the two short posts for two mediums ?
You need to make sure you get the 6 inline style but non staggered. The 3x3 style tuners will be too big for that style of headstock, but the 6 inline won't be and will work if non-staggered.Exactly. Hopefully I can get a 6-in-line set that is non-staggered. I'm going to call Sperzel.
As for the crack, did it happen because of the curve right there? I had to figure a way around that problem on the back where I had a volute with an ever steeper curve. Made a home made bending pipe and it worked perfect, doesn't crack.I made a curved clamping caul and since it wasn't dead on, I clamped some thick foam between the veneer and the caul. That worked great to push the veneer down to make good contact everywhere. The crack started in the excess veneer sticking out above the nut when the veneer started to dry out. The piece warped and the crack snuck down into the glued part. Maybe the foam kept me from getting enough clamping pressure to keep it from moving.
I don't know about that green stuff, where did you get the wood? Was it like that before you did anything with it? I know there can be mineral stains or if left moist it can discolor or get fungus, I don't know. It doesn't seem extremely noticeable or anything. Looks loads better than it did. Nice work. JI got the wood from a guy on eBay. The front piece is from the same piece of veneer as the back piece. The back turned out okay after glue up with no green spots. The only difference between the two sides was that I misted the front veneers with water to bend them into the radius near the nut. I glued it up when it was still damp, maybe I should have waited until it dried.
BTW I just got off the phone with Roger from Sperzel and he said that Sperzel tuners in general (or at least the 6-in-line) sets have enough threads to mount on headstocks up to 3/4" thick. BUT the post lengths won't allow for headstocks that thick. He said that there is an "extra long" post that I can request that will clear the face of the headstock but he's afraid that it will be too long and I'll need to use string trees on all 6 strings to keep them seated in the nut. It would be nice (for me) if there was a post size in between this "extra long" one and the longest in the staggered set. Or maybe I should just make my damn headstock right the first time !!
-
Well, the front didn't turn out as well as the back but it turned out okay I think.
There's some weird green spots in the maple and a smallish crack near the nut on the bass side.
Now my tuners are too small !! The headstock is 11/16" thick now with the veneers. Can I make Sperzels work on this ? I saw that Sperzels should handle headstocks 11/16" thick but I'm not sure if I need to get all long shafts or some mediums from the staggered set. Any advice out there ?
Thanks,
Steve
-
Hey govtmule could you post up a pic of some? I think i have an idea of what they look like but im not entirely sure. Thanks mate!
Chad.
Sure, no problem. Here's a few of the ones that I have. They range from 1" to 1.5" long and from 1/16" to 3/32" shafts. Some are fluted cutters, like the two on the left, and some are diamond tip grinders, like the two on the right.
I'm getting them from my orthodontist AND my dentist now.

-
Well the fix is coming along okay. I've got the two layers of veneer glued onto the back of the headstock, sanded them to shape, and redrilled the tuner holes.
The birdseye veneer is obviously a different shade than the birdseye the neck is made from but I think it looks pretty decent with the contrasting shades, especially with the walnut slab in between them.
Any opinions ?
I think I'm going to have time to glue the walnut veneer on the face of the headstock tonight. I'm nervous to glue on the curved part of the headstock. Hopefully I can get good clamping pressure on that awkward position.
-
sweet well is it that easy to just go to the dentist and ask for them? cause i might try that tomorrow haha.
Yep, that's what I did. My guy said that he just sterilizes them and throws them away so if I could get use out of them that he'd save them for me. Sometimes he remembers, sometimes not.
-
if there is still more. id like to get more i seemed to of misplaced mine. im sure i can find it. but im willing to pay for more if you want
Sorry, I gave away a ton of them and only kept a few for myself. I have my first inlay project coming up soon so I need to keep the ones I have.
I'll hit my dentist up again and if he can give me another batch of them then I'll post another message.
-
Sounds like the shielding is connecting to hot some how, a multimeter connected from the hot jack to the shielding would help to see that. Likely this is being connected when you squeeze everything back in. Pics might help.
I figured this part out last night. The shieding was actually coming into contact with the PUP braided shielding cable when I tucked the wires back into the cavity. I cut away some of the shielding tape from around the hole that the PUP wire comes through and this corrected the problem. I'm guessing that this contact was creating a ground loop, correct ?
For the switching, you have "lifted" the pickups (disconnected the hot) but a better way would be to have the pickups when off shorted to ground. This means changing your switching about so the pickup goes to the middle connection, the hot off one side, and the ground to the other.Sorry for the confusion.....I screwed up my little diagram. I actually already do have the PUP going to the middle and the hot off of one side to the pot. I am however, missing the ground coming off of the other side but it seems to be working fine without it.
With bare shielding cable as on some vintage pickups (like my FWRHB) I solder a wire to the shield and then cover it all up with PVC tape so it can't short on anything. It may well be worth covering the internal shielding with such tape to stop electrical connection with wires or switch contacts when pushing things into the cavity.I was worried about that too so I tried to cover all of the exposed shielding cable with heat shrink tubing. The only parts left exposed were right where the wires came into the cavity....which is where the short, or ground loop, or whatever was occuring.
Thanks a lot for your help Pete. I'll add the ground wire from the switches and I think it should be good to go then.
-
There are a bunch of problems with this wiring diagram...and a few of the procedures. A little late for me tonight to explain it all and more in my typical problem. In the meantime...it may be that you have wired the jack back to front...easy to do...so if you could check that or reverse this and see what happens that might help (although it may not be the explanation...checking the ground to hot with a multimeter is a better way).
The other problems relate to the switching...this is a very noisy implementation of lifting the pickup instead of shorting them, and you have the switching power...but it means a complete rewire of them...but I'll be back later...
pete
Any help would be much appreciated Pete.
I did try and swap the jack wiring and got no sound at all after that so I must have at least the jack wired correct.

Project Super Destroyer
in In Progress and Finished Work
Posted
Turned out fantastic !! LOVE the color !!
I'm a big Paul Gilbert and Racer X fan. I've got to add something like this now to my list of guitars that I'd like to build. Considering my blistering rate of 1 per year I should get to it by 2025.