


toddler68
-
Posts
345 -
Joined
-
Last visited
-
Days Won
3
Content Type
Profiles
News and Information
Tutorials
Product Reviews
Supplier Listings
Articles
Guitar Of The Month
Links and Resources
Forums
Gallery
Downloads
Posts posted by toddler68
-
-
... see that bad boy nice and wet...she'll look beautiful.
Are you saying my guitar has gender confusion issues!?

-
Holy cow, man! That carve really worked well! Congrats on a great guitar; looks like a cross between a Les Paul, PRS, and Parker Fly!
This whole thing just keeps getting sweeeter!

Yeah, if I had to choose my influences those 3 guitars would be it.
On a side note, didn't you have a Number of the Beast avatar before?
-
I was going to scream when I saw that you were free handing that router on the edges... too much drama to have that router wonder about and mess that top up! I'm glad it turn out great, how about a wet shot of the top already carved!!!!
Believe me, next time I will rout the channel while the top is still flat! I have learned my lesson. But with that little fixture I found it to be so much more controllable moving the guitar under the fixed router instead of the other way around. Like an inverted router table. I think I might even consider making a more finished and stable version in the future. But for now, scrap particle board and a 2X4 did the trick. I know the resulting channel looked a little ragged but the fine side of a 4-in-one file smoothed it right up. And since I was sanding back down to the flat anyway, I didn't even necessarily need to do that.
I will say that I only had one desklamp on and it was clear across the room so I was practically in the dark. But it really accentuates the shadows and I could tell immediately where my high/low spots were. Anyway, just a tip.
As for a wet pic of the carve, I will bust out the mineral spirits tonight. Expect a pic tomorrow.
-
how have you done the carving on the cutaways? the edge is quite sharp.... I like it a lot, and you really inspire me to build a guitar, laminated neck thru WITHOUT top
I used the random orbit on the whole thing. Just some $30 Black & Decker job from Home Despot! The plate on it is rubber-like so I just increased the pressure and angle (until the plate was almost perpendicular to the top) in the waist area and very light in the horn area - so it kind of feathers out. I also used 100 grit which is pretty forgiving - not so aggressive that I had to be REALLY careful, but enough that it didn't take me all night to bring the surface down. In fact, I nicked the fretboard (which really should have been protected anyway
) and the bridge bushings during the process and didn't really do much damage at all. Also, an unexpected side effect of this method was that I got a small recurve all around the edge which looks quite nice. Let me reiterate: I, toddler68 do solemnly swear that my next guitar (if in fact it is a laminated neck-thru with cap) will feature capped wings only: the laminations will be visible from both sides of the body! So help me Dog.
Maybe I'll even go so far as to run a lamination or two through the fretboard! -
I got a great start on my top carving this week. Thanks to Gigabyte for the orbital sander recommendation. It worked quite well and only took about an hour.
Because I already tried to carve by hand, I didn't have a square edge to route a rebate around the perimeter of the guitar. So, I had to cob together a fixture to hold my router above the table and run the guitar under it (carefully of course).
You can probably see a couple dings where I wasn't so careful. I decided to go to sleep soon thereafter to avoid any more 'mistakes'.
Here's the fixture:

Closeup of the fixture and the rebate:
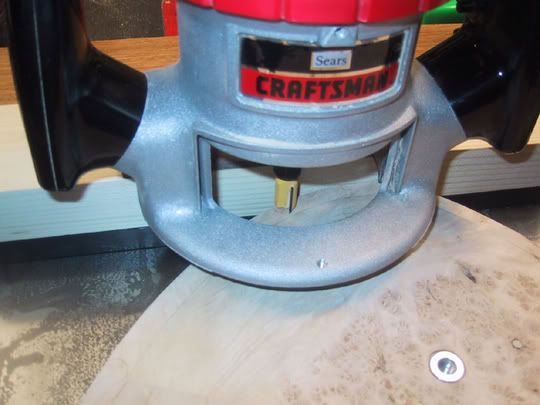
Resulting partial rebate:

After about an hour with 100 grit on the random orbit:


I am quite pleased!
-
Yeah, I'd love to see a tutorial or at least some plans.
-
Hey gigabyte, what did you use to get those knob recesses? Someone posted a thread in 'Solidbody guitar and bass' wanting to know the best way to do this. Here's the thread:
-
Another option is to make a template for the holes you want to drill using a piece of maple or other hardwood on the drill press. This guaruntees the holes are square and aligned properly, then mount this piece of wood to your Tele body with clamps and drill the holes with your hand drill.
I have tried this method and it works quite well.
-
do you know about a finish yet? definitely something transpeant , but what color, or are you going with an oil finish? hmmmmm, so many choices and it's not even mine, its pretty just thinking about all the possibilities **goes off mumbling something about red bursts and dyes**
Yeah, I discussed this on another thread. I think I'm going with something in the amber/orange range - possibly a light burst. I was thinking about tung oil, but now I'm leaning towards shellac. I've also seen something called urethane oil that Woodcraft sells. Looks interesting. Here's the link: Urethane oil
Here's also an example of the look I'm after:

-
@toddler68
how thick did you do the bubinga, maple and padouk laminates??? i want to build a 7 piece neck myself and i'm not sure about the thickness. thanks for your help.
It's actually maple, paduak and walnut. The paduak and walnut were about 1/4 inch thick and the thin maple in between were just under 1/8 inch. I'd probably go a little thinner on the walnut next time, just to add a little more interest.
-
Thank you for the pics. I am in the process of doing a similar carve. You have given my random orbit sander a new lease on life! Man, how thick is that top, like 3/4 inch? Very nice.
Way to go on the pickup routing - livin' on the edge. Excellent work! -
I have seen him selling some seriously wicked birdseye on eBay over the past few months. Simply outstanding.
-
No new progress but for the sake of chronology, I am reposting this in my original thread:
Here is my progress so far. It's not much, but I'm to the point that I want some opinions about the maple cap.
I routed the electronics cavity.

The cap glued on. It's 1/2 inch thick and I did a shallow transition - like an Ibanez S and left a 3/16 inch natural binding. The problem is that it doesn't seem to show the carve at all. It's not outrageous or anything, but I wondered how I might accentuate it. Any suggestions?

Top wet

-
looks like a bearded man's face
It's Father Time meets geriatric alien.
-
Nice progress, one tip for next time... do a search of your threads and post the progress on the original thread, that way the new people that are here can see all the hard work you have put into that guitar, ...and we can look at the beautiful neck that you just covered once again! ...just kiddin' nice job!
Can I ask one of the moderators to move it and just append my previous thread?
-
Most carved tops I've seen come to crests at high points along the horns (PRS, Schecter) or come to a flat edge along the edge (LP), doing an S curve cross-section. Either technique gives a variety in the curve rather than a pure dome-like curve that accents the carving nicely. Yours would look good IMHO with a combination of the two. Even some deep carving in the cutaways (a la PRS) would accent the shape and curves, even/especially if it went through to the mahogany.
Yeah, I've seen some people rout a 'rebate' along the entire edge of the guitar- about 1/2 inch wide or so and then transition from there. I think that's what I'll do. I don't think I'd feel comfortable carving through into the mahogany, though!
-
Here is my progress so far. It's not much, but I'm to the point that I want some opinions about the maple cap. Here's the link to my previous thread.
I routed the electronics cavity.
The cap glued on. It's 1/2 inch thick and I did a shallow transition - like an Ibanez S and left a 3/16 inch natural binding. The problem is that it doesn't seem to show the carve at all. It's not outrageous or anything, but I wondered how I might accentuate it. Any suggestions?
Top wet
-
yea anyone here do a 26 or 27 inch scale guitar? Have though about it... Now that I have a set of calipers... is there that huge of a difference?
I'm doing a 26.5" scale, akin to the Schecter C1EX. Not sure what difference it makes having a longer scale, but I believe you can tune the strings lower. Never too low I always say!
-
I always thought that you could put anything over lacquer, but not the other way around.
-
Thanks for the quick replies. I'm getting ahead of myself as I haven't even routed pickup cavities or bridge holes yet. But this gives me some time to mull it over while I finish these things. After my post, I found a perfect example of how I'd like to finish my project on the LMI homepage: a beautiful job by Mike Doolin.
I'll let you know what I decide. And when I can track down the location of my digital camera I'll post some more pics.
-
I need some advice on my first project. I've got a neck thru (maple-walnut-paduak laminate) with mahogany wings and the whole top capped with a shallow carved burl maple (1/2 inch thick). I've left about 3/16 inch thickness on the edge to serve as a 'natural' binding. I'm not partial to any particular finish, but I'd like to really be able to feel the burl maple top.
So I'm leaning towards Tru Oil. I also don't want to pore fill it (the pores are more like crevasses) because I like the look - and I don't really want to see a bunch of clear filler (epoxy or CA) in the big cracks. I'd also like to keep the edges of the binding almost totally natural while giving the top a very light amber/orange dye or stain, possibly even a mild burst.
Can I achieve this with only Tru Oil and dye or should I think about using a combination of methods? I think I also read that Tru Oil (or maybe it was Tung Oil) shouldn't be used on purpleheart. Why is that? On that note, will my paduak create a problem considering how oily a wood it is?
Thanks in advance.
-
Well I'm a moron. The tree is not walnut (sorry everyone). I'm 17 so I don't exactly know which tree is which around my house and when I asked my mom she misheard what I asked. The tree that fell and almost crushed my neighbours house is an apricot tree. I also have 3 tree limbs of cherry lieing around outside. Can apricot or cherry be used for a guitar neck? Please help and sorry about the error.
I too am a moron
I only skimmed your last reply and didn't realize your tree was not walnut. Oh well, it's good information to have anyway. -
I know here in the states (at least in the midwest) you can get a guy to come out with a portable sawmill and cut up your tree for cheap! My uncle had it done last summer on 2 walnut trees for $125! They cut up the entire trees (more likely just the trunks) into 1 and 2 inch thick lumber as long as 10 feet! I have no idea what kiln drying would cost though - he's air drying his for a few years. Sure, it might be an investment up front, but you would not be sorry in three years when you're drooling over a ton of perfectly dried walnut.
You could even sell some to finance more projects. You might even be able to go in with a couple guys to offset the cost and then split the wood among you. It would be a shame to see it just turn into firewood, or worse - mulch! Check out this website for more info on processing trees for lumber: Trees to lumberI know this doesn't solve your immediate issue - just something to think about.
btw, I used 2 walnut laminates in my thru-neck. Looks great! And I've heard of cherry being used before as well. No idea on apricot, though.
-
wolfcoast, this is exactly how my "dust-free" drywall sander works. I believe the theory is the same for a bong as well!
The vacuum is human-powered of course.


Best Way To Do My First Top Carve?
in Solidbody Guitar and Bass Chat
Posted
I can only recommend the method I used last night. Rout about a 1/2 inch wide channel (at your desired depth) around the perimeter of the guitar (or however much of the perimeter you want). Then round over with 100 grit on a random orbit sander. It was easy as pie - took about an hour. And the results were amazing! Check out the thread: my carve
You'll have to scroll down to the appropriate string of replies, but it's there somewhere - with some pictures too!.