


toddler68
-
Posts
345 -
Joined
-
Last visited
-
Days Won
3
Content Type
Profiles
News and Information
Tutorials
Product Reviews
Supplier Listings
Articles
Guitar Of The Month
Links and Resources
Forums
Gallery
Downloads
Posts posted by toddler68
-
-
Beautiful work.
Do you have much woodworking experience? I'm really impressed with the quality of your carpentry, coupled with a tasty original design - please tell me this isn't your first woodwork, as well as you first guitar!
Wow! Thanks for the compliments. 'Tasty' is perhaps the best compliment I've ever received!
Nope. Not my first woodwork. I have mostly done small projects - TV table, shelves, book cases and things like that and I am a nervous whittler at times. But this is my first guitar. It seems like I work on it in 1 hour increments, after work and in between dinner, wife, kids, etc. I know it's going to take forever, but at least I don't get bored with it.
-
I'm not sure I understand what you mean when you say you scarfed the butt end. I thought the purpose of a scarf joint was to have the headstock angled, but still have the grain continue through the headstock? Why would you need to do a scarf joint at the butt end?

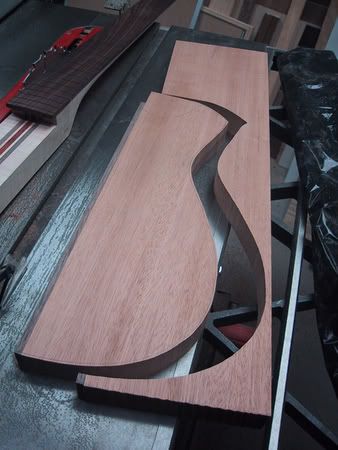
My wood wasn't long enough or wide enough (I can't believe I just said that
 ) to get 2 full profiles out of it, so I had to overlap them. The headstock angle cut off the bottom of the adjacent profile.So the pieces in red were left over and ended up becoming the butt.
 I did this for all the laminates. I don't know if that was the best way to do it, but I remember seeing someone else do it in a similar fashion - it seemed to be the least waste of wood. I hope this makes sense. If not, maybe someone else has a better way of explaining it.

-
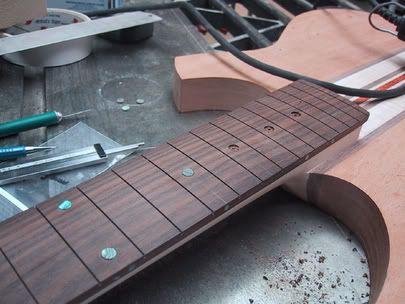
Inlaying the side dots and fret markers:
I was afraid to use power so I used a brad point drill bit by hand until I got blisters.
Used the cordless after that and it went much faster and smoother.
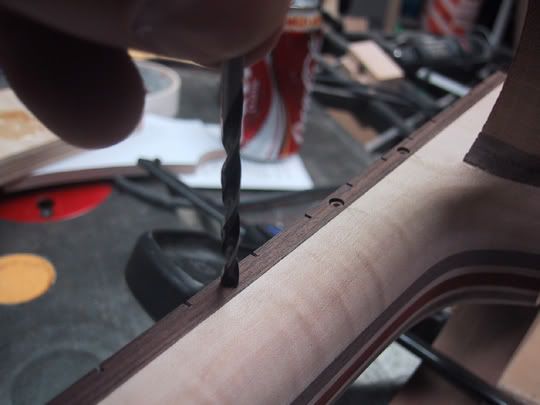
After being epoxied in: I used 2 part.

Drilling the fret markers:
Test fit:

Glued in closeup:

-
Sorry to dig this thread up from the dead, but I had a couple questions as I am about to do precisely what you just did.
First, what was your reason for doing the angled headstock as you did, as opposed to a scarf joint?
Second, how did you know what size to make the volute, or did you just make it extra large and sand/carve it to final shape once the laminates were glued?
Third (and final, for the moment anyway), you mentioned a glue press for the next one. What exactly is this, and how might it help: that is to say, what is the failure mode with gluing one layer at a time that would be eliminated with this glue press?
No, I'm glad you dug it up. I've been meaning to post some progress - just inlaying dots on the fretboard, but still cool.
Anyway, I scarfed the butt end instead of the neck because I thought it would be less noticeable and I didn't want to interrupt the cool tiger grain of the wood which just happened to be heaviest where a neck scarf would be.
Yes, I eyeballed the volute on the large side and carved to final. It's actually not as far up the headstock as my SG and it kind of crowds your hand near the nut, but for my first build I'll take it!
Another member gave me the idea of the glue press. When I remember his name I'll let you know. He emailed me some pics which I have at work and I'll post asap. It's basically a 2X6 screwed to a table with some L-brackets. Put down some wax paper, line up all your laminates at once and clamp them face down and against the 2X6. I guess it distributes the clamping pressure evenly across the length of the piece. I did mine one layer at a time because any more than that and they started sliding around on me. I have nothing but time anyway.
-
...anyone... anyone? (crickets chirping)...
-
you are allowed one image per post if it is on a hosting site...
What does this mean? Am I breaking the rules when I post 8+ pics at a time of my in-progress work? (Warning! I am a lamer when it comes to this posting stuff. I only recently discovered how to get free image hosting. This whole computer thing is just a fad anyway!)
Could someone provide me a link to the full forum rules? Or just a really concise, yet elementary explanation of what "one image per post" means.
-
On that guitar, the insets are simply through the veneer. The mahagony is what I see. Never seen a C-1+ in natural. Mine is dark red, and I can find cracks in the veneer in good light, and the insets are black.
Anyway, on topic....make sure that you match the grain up if you plug. Otherwise it'll look like crap
Yeah, this is the guitar that made me want to build one. I wanted a C-1EX in natural maple but they don't make a production version. Of course, I could spend big $$$ and get a custom but I thought I'd save the money and sink it into building my own.
So, that's just a veneer on there? I've never seen the natural up close (nobody carries them) and I haven't really scrutinized the black cherry and tobacco ones I've seen at Guitar Center. I always assumed it was a solid top. I still think they are righteous guitars, tho!
-
One remedy might be to drill out the holes bigger and insert some contrasting wood. I think that's what they did on this Schecter:

That's what I plan to do on my guitar. I am going to have a maple top with circular Paduak inserts recessed for the knob locations. Just a thought.
-
toddler, got a pic of the top you are using?
Yeah, take a look at my avatar. That is it. Here's the pic I got off eBay - the guy had wet it with some mineral spirits and brought out this great orangey color. In the center if you look real hard, it looks like a moose with a huge afro staring at you.
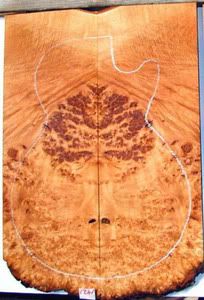
Here's what it looks like dry:

-
OMG, I love how that guitar is shaping up to look
you do know your gonna have to learn a new style of playing to play that thing right? as in...
slapping it behind your neck, turning to the crowds and showing that lovely neck off while you solo like a banshee?
man I wish I could build a sweet neck like that... maybe in a project or 3... when I have the money to invest in a lot more tools and a little work shed, I dont think I could build my own neck right now unfortunatly I gotta go back and forth to workshops to use tools etc... damn I hate being a poor student! lolbut man, keep those pics coming! I love it!
I want it to have baby guitars with my guitar (when its finished) lolLOL!!!
Man, you are too much! Thanks for the compliment, though. Truth be told, I am a hack rhythm player at best. I thought I might be able to build guitars better than I could play them. I'm givin' it a shot and enjoying every minute of it. I encourage you to not be afraid of starting your neck. If you have access to tools, use 'em when you can get 'em. This is the perfect time to learn, while you're in school. But be careful, it is EXTREMELY addictive. -
that looks too good man...it's a shame you're putting a top on tho, it's so beautiful how it is. next time there better be no cap, or at least a cap with the neck lams showing through...too beautiful man.
I will definitely NOT put a cap on the next one. Does that make everybody happy?
-
Nice, keep us posted on the progress. too bad you are putting a cap on it. But it looks great anyway. One question, I plan on doing a 3 piece neck, may be more but it's going to ba a 3 piece for now, I can get the laminate to be flat sawn, since I will be placing it sideways it will have the same effect as quarter sawnright? I think that's the way yours look. Might be wrong though!
I know, I know. I'm getting lots of grief for the cap. Live and learn. Anyway, about your flatsawn/qtrsawn question. I asked about this well before I even cut the first piece of wood. I think the general consensus is that flatsawn laminates turned on end are equivalent to quartersawn. Ideally, you would want ‘A’ instead of ‘B’. Much stronger grain orientation. At least that's the way I interpreted it and eventually did it.
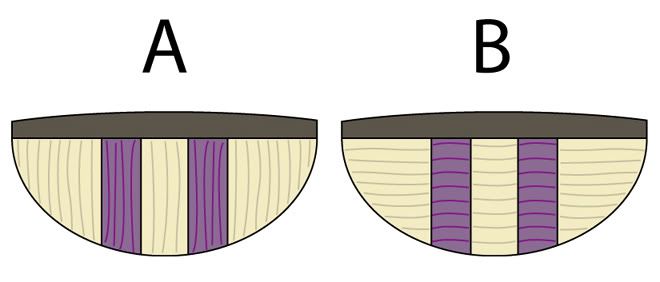
If you want the full discussion, check out this link. grain orientation
That was back when I was still thinking about purple heart!
-
OK. Well it's been a while but I've made a little more progress. Sorry to disappoint but I went with my original design. But I do appreciate the feedback. I do think next time I will make the neck laminates visible from the top as well. Had I seen the previous example, I'd have changed my design.
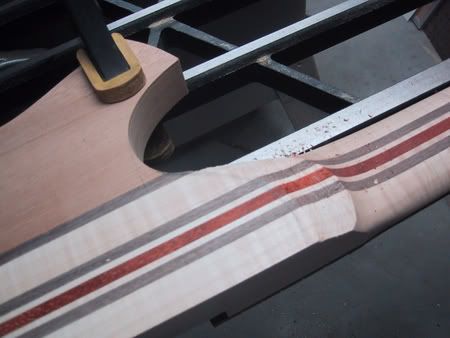
Anyway, I cut the wings out and did a test fit and I indeed had miscalculated the heel shape (I was wood-safe thankfully) So I glued one wing on, roughly reshaped the heel, glued the other wing on and finalized the heel shaping.
Here's the template: All my templates are on 3/8 inch MDF which I scavenged from some furniture packaging. Free stuff is the best I always say. I printed the pattern from CAD on my plotter at work (again, free stuff...) and used super 77 to adhere it to the MDF. Cut it out on a band saw and finished on the drum sander. Sorry I only have a pic of one side.

After I cut out both wings and routed them to the templates, I did a test fit:

One wing glued on:

and starting to fix my heel miscalc.:
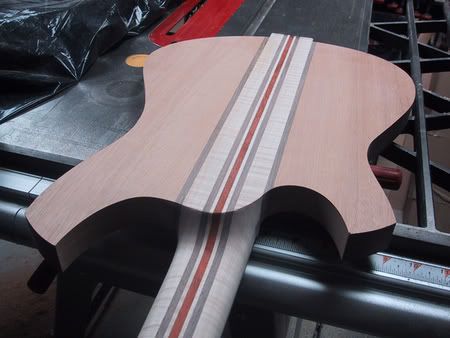
Both wings glued and first pass at shaping/sanding:

Sorry the pics are smaller than usual. I don't know what happened with the camera. I'll try to remedy that for future posts.
-
hmmm...with magnets like that, I bet you could put them through the back of the guitar, and have them pickup the strings, with a good 2 inches of wood between them...Hmmm maybe a pickup-less look.
Mmm. Do I smell a patent?
-
hmm, you have that much left over?
would you be adverse to building a neck and selling it(to me)? maybe, i wont have the time till, next summer to really work on anything hardcore...
Ha! With a wife and 2 small children, I hardly have time to think!
When/if my wife leaves me, I'll contact you. Although, she'll probably end up with all my shop tools in the divorce settlement.
-
Nice looking neck, like isaid before great comination of woods, One question,. Why so muck space between the fret board and the neck,? Are you going to cap that beautiful neck thru... say your not...
I know you already showed that cap, (burl) but I would have just caped the wings and not the neck, It would have looked so sweet, like this I love that look.
I'm afraid so. That's always been the plan anyway. I think it's too late to turn back now - I'd have 1/2 inch to make up for. Don't worry, I don't plan for this to be the only guitar I ever build. I have enough of the same woods to do probably 3 more necks.
-
-
Does anyone else think this is the Official Guitar of the Cleveland Browns? I've gotten that comment from several people I know. Must be because I'm in Ohio.
-
that neck looks GREAT! i love the paduk and the walnut you used. the lightly flamed maple isn't bad either. looks like this thing is gonna turn out killer!
what body shape you goin for?
Thanks! I'm so glad for the positive feedback. It took me long enough to make up my mind on the wood combo so it's gratifying to see that people like it. As for the body style, take a look at page 1 of this thread and you can see the design as well as some critiques.
-
About the heel of the neck: Is that just and approximate position of the heel, and you'll do final shaping when you add the wings, or did you measure it out accurately enough that that's exactly where you need the heel to be?
Just approximate for right now. Once I get the wings on I'll have a better idea where to go from there. Great avatar by the way!
-
Truss rod slot and carbon rod channels routed. I used the double action rod from LMI and 3/8 x 1/8 carbon rods from StewMac:
Truss rod slot taped over and ready for glue:

Glue applied:

Took the tape off and clamped:

After the clamps came off and I tapered the neck:
Initial shaping of neck. I used a spokeshave, Surform and rasps.

More shaping. Full neck:

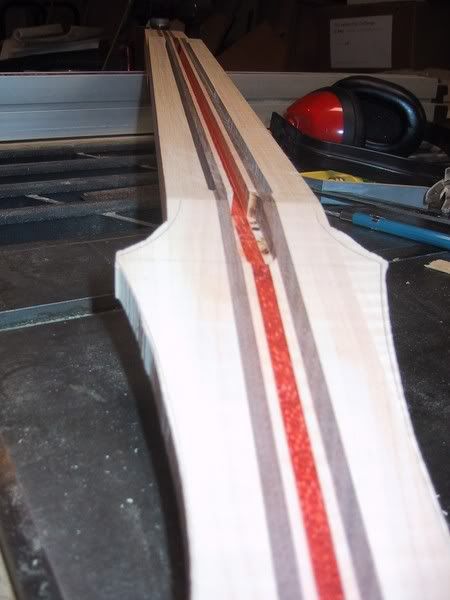
Heel closeup:
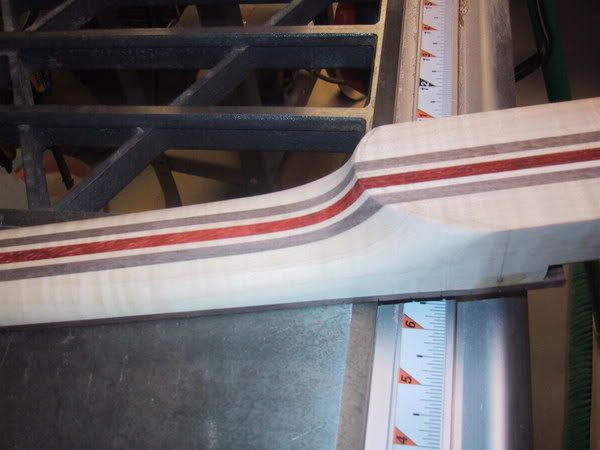
Volute closeup: Sorry about the focus.

Been sanding my brains out for the past couple days. Next up is finalizing my body design and cutting out the wings and gluing them on.
-
Did you cut all the neck laminates seperate? Or clamp em all together and cut em all at once? Looks like you had great success getting em all to line up when gluing. Whats the trick?
I cut them each separately and aligned the fretboard sides on the jointed edge of the wood. I just made sure they all lined up when I glued them up by placing them fretboard side down on a flat surface - my table saw.

I did however, glue on each layer one at a time. Never again. I am going to build a glue press for the next project. Got the idea from daddyray. If I get time, I'll post the pics he gave me.
Did you cut all the neck laminates seperate? Or clamp em all together and cut em all at once? Looks like you had great success getting em all to line up when gluing. Whats the trick?
Oh yeah, and it helps if you have access to an edge sander too! If you screw up, just slap yer neck on that baby and it'll be flat as a pancake in about 10 seconds. I used the one at work to make my errors a little less noticeable. I also used it to joint my wood from the start. Jointers sometimes have trouble with figured wood, especially if the blades aren't sharp. The one I used produced tearout like crazy. So I just remedied it with a little trip on the edge sander.
-
Love the neck, burl and body design. I just have one suggestion on how to make the body (at least to me) more aesthetically pleasing:
The way your horns are cut in a kind of curved manner is nice, but when seeing these two curved "cut lines" my mind tries to join the two lines together - which isn't possible with a single simple (non-S-shaped) line following the curvature of the two "cut lines". This, to me, gives a slight feeling that the horns have been somewhat disjointed (the lower horn looks like it should be further up the neck, or the other way around).
Although your design is really cool, and most likeley very few would think of what I just mentioned, I would personally trim the horns so that both of the cut edges follow the same smooth curve. Here's an example:

Your design on top, where my "mental line" doesn't quite match up with the horns, and below an example where both horns have been cut by the same curve. The cut could probably have been made even better (perhaps with more curvature to the cut line) but I think you get the idea.
Just my 0.02 SEK...
Thanks for the feedback. Yes, I haven't really tweaked the design to my satisfaction, yet. But, you describe the shapes like a designer which is what I am. I think my initial goal was to make a noticeable change in the shape of the horns short of running a perpendicular line across them. I put an arbitrary cut line on the top horn and mirrored it on the bottom one. I actually like the fact that the bottom horn doesn't appear to return but seems more stubby, like it wants to turn down.
This is great constructive criticism. Thanks for the drawings too. You have got me thinking. I will play with the cut lines some more and I suspect I'll end up somewhere between the top and bottom drawings. I'm just glad I finally have something on here for others to comment on.
-
I'm basing the design on a Schecter C1EX. It will be a 26.5 inch scale neck-thru and string thru. Body will be mahogany with a weird burl maple top. Body style is modified C1EX 'strat' with the horns trimmed.
I have no prior guitar-building experience but I really like woodworking. I also did a lot of research on this site before I started cutting any wood. This website rocks!
Here are some recent pics. I have the fretboard glued on now and I'm carving the back of the neck but I don't have pics yet. I'll try to get on the stick and post those soon!
Here's the big block of mahogany I bought off eBay. If I cut it right, I should be able to make 3 bodies out of it, provided I build them the same way as this one.
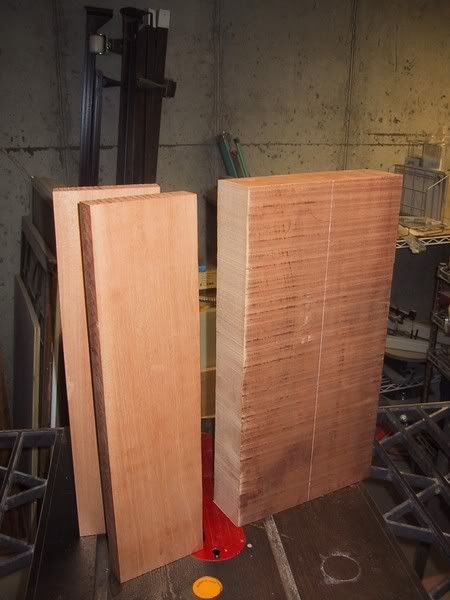
The "brain scan" burl maple top. It spoke to me as soon as I saw it. Disregard the LP outline. That was put on there by Buzzsaw. Also from eBay.
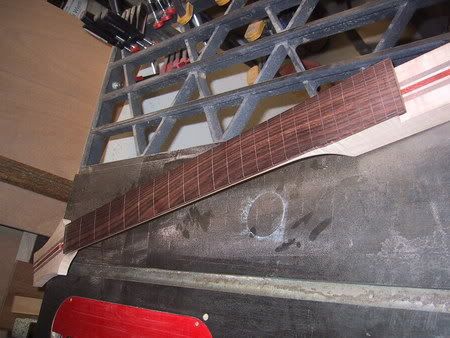
My homemade fret saw miter box made from the stiles of a salvaged cabinet door front. Bought the dovetail saw a few years ago and never used it. It's kind of short but it's the right slot size and it got the job done. I will upgrade before the next project. Fretboard is rosewood. I know I'm probably doing this out of order but I haven't decided how to inlay the fret markers. Will decide soon.

Here's the fretboard being radiused. What a pain that was!

My body style on top. The bottom is an outline of a Schecter C1. What do you think?


 ) to get 2 full profiles out of it, so I had to overlap them. The headstock angle cut off the bottom of the adjacent profile.So the pieces in red were left over and ended up becoming the butt.
Testing... guitar in progress
in In Progress and Finished Work
Posted
Here's the glue press pics I promised, courtesy of daddy ray: