


John Abbett
-
Posts
360 -
Joined
-
Last visited
Content Type
Profiles
News and Information
Tutorials
Product Reviews
Supplier Listings
Articles
Guitar Of The Month
Links and Resources
Forums
Gallery
Downloads
Posts posted by John Abbett
-
-
Bust it out and make another.
-J
-
If you have a pot that doesn't completely kill the sound, but quiets it almost to nothing that means that the connecting trace is a little long. If you open the pot up, and scrape off some of the trace where the the pointer is at 0, it will of course be completely quiet. Of course taking apart a POT and putting it together is not for everyone. I've done it a couple of times, not too difficult.
-John
-
I just got all my binding in. Little tiny strips of binding. This stuff is 0.010 in thickness. It should be interesting putting that on without getting glue all over my fingers!
Next steps is to bind the F-Holes and attach the top. Then the dovetail neck pocket.
Things are moving along.
I'm planning on hitting the inside of this with a light coat of nitro to seal up the inside. With the moisture content of the top all over the place, I thought it would be a good idea to do that so the moisture content changed more slowly. Anyone Screaming "Nooooo" after reading that? My 335's I left unsealed.
-John
-
Project Update.
So, I spoke with the Spruce Vendor. It turns out that the Split wedges ship between 20 and 22 percent moisture content. He said that he is in a rain forest and the wood is stored in an unconditioned building. It would have been good to know that huh!
I let it sit two weeks before I cut into it, but the day I carved it, it was 70 degree's and sunny. No wonder it warped like a potato chip.
I've rehydrated it by putting it in the garage, it's raining outside, so that will bring the moisture content up. I've slowly clamped it back to flat in the building jig. When I unclamp it, it only springs up a quater inch or so. Pretty much flat. I've moved it back to my conditioned shop and will let it aclimate for a while before I glue it to the body. I think I was lucky, no cracks. With shipping the top was about 130 bucks. Having it crack would have been heartbreaking.
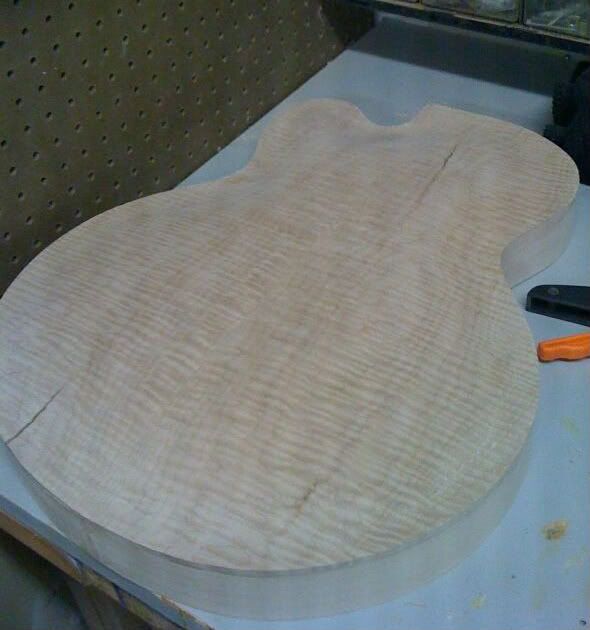
Anyway, here are progress pictures.
Looking like a guitar body.
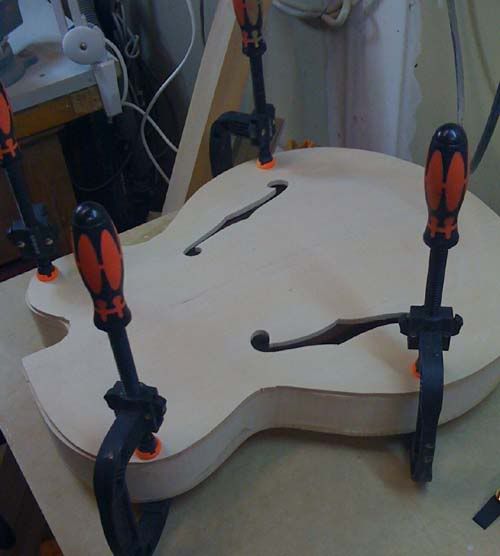
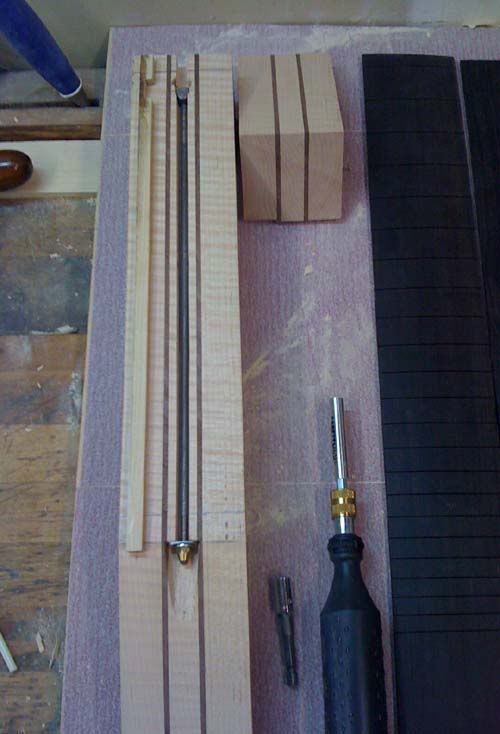
Neck with truss rod. Block in the back is for the extension.
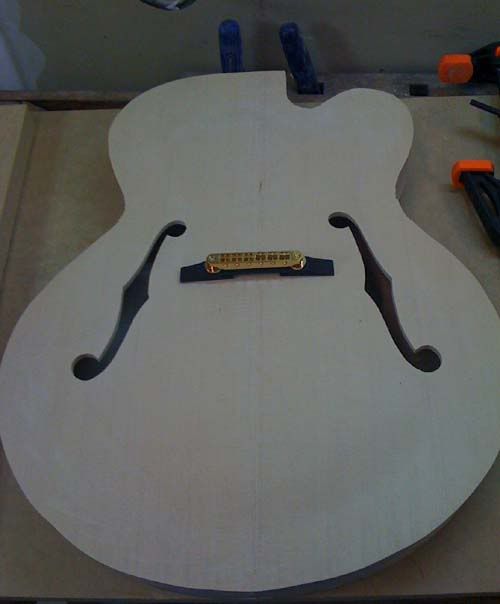
Parallel Bracing

F-Holes
-
Hi all.
Couple of questions.
1. My back is flatsawn curly maple, 1/4 inch thick in the middle, will be thinner (Recurve) toward the edges. Do I need to brace the back? I looked at a couple of hollowbodies, and only the spruce top is braced. Benedetto's book says brace the top, doesn't say anything about the back. He could be assuming that you do the same to the back as the front.. Or assume I know that you don't. The only reason I'm asking, the two guitars I checked have laminate backs mine is solid..
2. My spruce top came in, I opened the box and let them sit in the shop a week, then I pulled them out joined the halves and let them sit for a week and a half to aclimate to the shop. I always to that with new wood.
I carved the top, and left it on the bench overnight, it curled up like a potato chip. 1 1/2 inch off the table on both sides. For quarter sawn wood that is a lot of warp. I thought when you spend 90 bucks on a spruce top plus 50 bucks shipping, it would come in seasoned better then that. I think that is a lot of movement. I didn't check it, I assumed it was seasoned, and that a couple of weeks in the shop would stablilize it. Do the spruce tops that come in come in green and I just didn't realize it?
-John
-
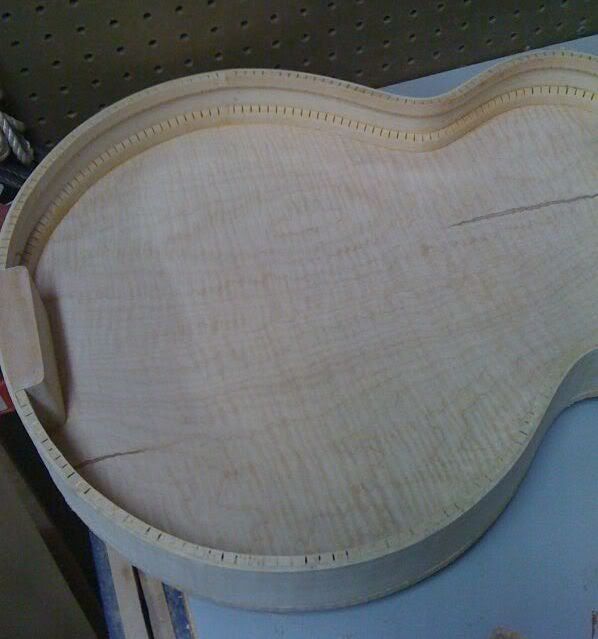
Progress Update.
I finished the back plate and attached it to the rims. It was quite a bit of work to get this right. Took some time.
I used a safe-t-planer to make ledges on the outside face of the plate. Made it go pretty fast, then I used a hand plane to take off the edges and then a random orbit sander with 50 grit disks to finish the rough process. Then I switched to 100 grit to fine tune it. Cleaned it up with 220.
The setup I used to rough out the underside of the top plate is:
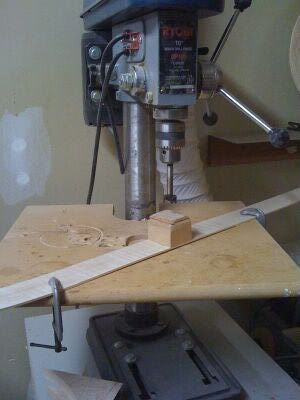
I used cork on top of a block. I modified a forstner bit, ground off the center pin. It worked pretty well. I could hog off a lot of wood, and the block was wide enough that when the pressure from the bit bit into the wood, the wood matched the angle of the top. The only problem I had was that the drill press wasn't deep enough to get to the middle of the wood. So I had to chisel out the center. Cleaned it up with 50 grit sanding disk, and then 220 to smooth it out. Finished thickness is 1/4 inche. It's pretty thick. I will probably take it down a little when I finish sand and prep the edges for binding. All in all pretty good deal. Oh, the inclusions you see, the brown streaks will be hidden in the tabacco burst. One in the top and one near the bottom.
Here are the finished plates.
On to the Spruce top...
-j
-
Are you stirring or shaking the product enough? Is it possible that it's watery?
I don't know what the product is made from.. Just a thought.
-John
-
Maybe I'll do all these ideas.. An all you can eat smoke removal process! It's in a closed box now. I'll get to it this weekend. I'm probably going to take it apart and just clean the heck out of it.
-John
-
It's an Alesis quadraverb. About 30 years old I'd guess. Sounds pretty good. It's got reverb, delay, chorus, flange, phaser, leslie, and can mix 4 effects in a chain in any order. It's old tech, but it sounds really good and was very cheap. It's even got Midi.
But it stinks. I put it in a drawer, shut it up in there and I can still smell it in my practice room.
-john
I have one myself, sounds indeed good. On the left side there is so much space available I couldn't resist building in a preamp.

If you remove the top lid (7 screws) you see an aluminium plate on the right side that serves as heat sink. That one gets really hot. If there is something like a sticker attached to it I can imagine that you're smelling something.
If you remove the heat sink (3 screws) you can check if the print board underneath is clean.
FF
Thanks!
I picked it up really cheap, it has a nice sound to it and it's very easy to use. I'm still working on getting the delay to sound good though. I want a slapback delay and set it for 80-100 ms, but I'm getting a lot of reverb in with the delay. I just need to play with it some I think.
-John
-
Someone mentioned two part epoxy and a hairdryer.. It certainly will thin the epoxy for a short time.. If you do that, be QUICK and mix small batches.
Be careful, I've build a few boats with epoxy, and heat can cause big problems in a hurry. Two part epoxy will flash off if it gets hot. Most of you know this, but for those of you that don't, you don't want to mix a lot at once, and you don't want to let it sit very long. Mix what you want, and use it quick.
When you mix, stir gently but completely. That will reduce bubbles. Because it's thick, it's easy to trap bubbles, stir circular.
You want what you are applying the epoxy to to be cool and warming, not warm and cooling. That's the biggest problem with bubbles. If it's cool and warming, it will pull the epoxy into the guitar/boat/whatever. If it's warm and cooling, it will off gass and put bubbles into your epoxy. I never do epoxy that shows in the evening when the temp drops. Bad things happen. Picture an entire side of a boat with millions of little bubbles in the finish coat. Make you cry.
I mixed up a 4 oz batch in a dixie cup one day, it was about 90 degree's outside. The phone rang, and I ran to answer it. I came back in about 2 minutes and it had flashed off, bubbled up to a 6 inch mushroom that was smoking and the cup was melted.
When we do lots of epoxy, we mix it and then spread it into large flat pans, it doesn't go off as fast because it doesn't build up heat.
Hair dryer will certainly thin it out, but it's going to reduce your working time dramatically.
-John
-
I have a couple sets in chrome.
I'll take a set.
-John
-
It's up for auction locally this week. Thinking about leaving a bid..
http://www.auctionzip.com/cgi-bin/photopan...p;zip=&kwd=
It's toward the bottom.
Any idea which model it is?
-John
-
Well that's not a lot of help! ( Grin )
-j
-
Anyone know of a second source for Steinberger Gearless Tuners? Stu-Mac is out of them for at least a month, and I'm ready for them. I did google search and came up empty.
-John
-
Thanks.
I can just imagine you are playing it, and all of a sudden the trus rod blows out the back of the neck. Would mess up your day.. Like a piston through the engine block, not an easy fix.
-John
-
I bought a two way truss rod from stu-mac, it's nice, but it's a lot wider then I'm used to. I routed a little deep - extra 1/16th.. Anyone have a good recommendation on how much minimum wood under the truss rod so it doesn't blow out when adjusted? The neck is laminate, black walnut and birch. It's a pretty solid neck.
If I follow the plan, I'm going to end up with about 1/8 of an inch, near the nut. I don't think that's enough. I've not trimmed the neck blank to thickness yet, I can add some. Is 1/8 inch enough meat behind a truss rod?
-John
-
There are plans out there to make a speaker load. Basically you make a cigar box type thing with a big resister and heat sink in it. You put in in parallel with your speakers and it simulates a seconds speaker cab. Never Built one. You would have to be comfortable building it, and if you short out your speaker leads you could blow your amps power section..
You could also get a speaker and put it in a wooden box, with carpet inside, seal it up and stick it in a closet. It would reduce the power by dissapating it. I don't know how much, but it would reduce the volume to the other speaker. You would have to consider what ohm speaker to put in, it varies by Amp and how many speakers you have.
The hotplate works, it's got variable amount of volume reduction. It's expensive.
-John
-
Thanks everyone for the sanity check.
I appreciate you taking the time to chime in. Oh, and the diagrams are way above and beyond!
Building guitars is such a cool hobby. It's nice to turn off the world and think about just one thing every now and then.
-John
-
All,
I'm looking to build a Firebird, a neckthrough version. I have this nice birch that I reclamed that's been in my shop for years, I got a large pile of it somewhere and had years of age on it. It's great stuff. It finishes up nice. Doesn't have much figure, but for my application it doesn't matter.
Is there any problems with this wood? It will be a neck through with black walnut stripe in the middle of two 1 1/8 inch Birch strips with black walnut wings.
If you wonder why I don't use maple, the answer is, I have this stuff paid for, I would have to buy Maple. I would like to use what I have if it would work.
Any issues with tendancy to warp or anything else?
-John
-

Some shorter pieces of bocote waiting for a small project.

Some even shorter pieces of cocobolo with some thins waiting for an even smaller project.

And can anyone ID these for me? I got them in a box of cutoffs. They're really dense and heavy. They're a little darker brown than pictured. The grain is really tight, so it sands/polishes up to a pretty nice sheen.
Avengers63,
That looks like black walnut to me. I use quite a bit of it, it grows like crazy here in upstate NY. Nice wood, somewhat difficult to dry.
Makes nice looking and sounding guitars.
-John
-
I had a problem with stu-mac wire, and it wasn't stu-mac wire, it was the board. I had sanded the fingerboard too much because I screwed up inlays and had to do them twice, so the board got sanded twice. I was able to press the frets in fine, but the next day they popped up. The pressure from the fret press crushed the bottom of the slots on the ends and it sprung back, lifting the ends a small amount. Nothing wrong with the wire, it was the installer (ME) that was the problem. I didn't meaure my slots before I crammed the frets in.
They sure looked sweet right after they were pressed in. They looked like crap the next day.
-John
-
Ready for the "All Firebird Band"...
-John
-
That's the link I used. It covers everything. The dimmer I uses was something like 500W. NOT the normal one you buy at the home centers, it's a higher wattage.
You wire the dimmer in line with the hot wire. I think it shows it. I unhooked the switch, and took the two wires and wired them to the dimmer and the grounds togeter. Please note, if you don't know what I'm talking about, ask someone who does wiring. It was pretty obvious to me what to do, but I've done stuff like this in the past. I believe that article takes you step by step.
Here is a quote from the weblink you posted:
Drill out the rivets and remove the plastic cover of the BBQ Lighter (voiding warranty). Carefully remove the wiring and heating element intact. Take about nine inches of insulation off of the cord. Gently (but firmly) reshape the heating element so that it will fit into the pipe snuggly.Do not damage the inner wires of the cord! The idea here is that you are going to put the dimmer (with its black wires) in line with the black wire of the cord. You should also connect the green wires (ground). You don’t need to cut the white wire unless you need to thread the cord into a small electrical box (like I did). Carefully connect the wired using twist caps, and electrical tape over that (If you are unsure of your electrical skills).
The guitar sounds great. It has a great acoustic tone. I can play it to practice in front of the TV without and amp and hear it clearly, not like a full acoustic of course, but much louder then an SG or LP. The amp'd up sound is great. Pickups make a difference..
Here is a couple of pics of the building mold
http://www.flickr.com/photos/15318670@N06/...57603745242624/
http://www.flickr.com/photos/15318670@N06/...57603745242624/
http://www.flickr.com/photos/15318670@N06/...57603745242624/
-
Thanks. The SG is from local walnut, it was from the trunk of a large tree where a huge branch came out. It's basically a large knot. The grain runs circular, and runs right out the horns.
-John

Gakken Mini Guitar Kit
in Solidbody Guitar and Bass Chat
Posted
http://blog.makezine.com/archive/2010/04/h...n_mini_gui.html
This is a link to a plastic guitar kit. Don't see why it wouldn't work. Probably doesn't sound like much, but it would be interesting to hear a sound bite.
-john