


xlr8
-
Posts
155 -
Joined
-
Last visited
Content Type
Profiles
News and Information
Tutorials
Product Reviews
Supplier Listings
Articles
Guitar Of The Month
Links and Resources
Forums
Gallery
Downloads
Posts posted by xlr8
-
-
I recieved the pickups from Tim last week so it was time to check the fitting of the electronics and then on to final sanding and finishing.
The last job before final sanding was to match the contour of the pickup rings to the body, but it starting to look like a guitar now;
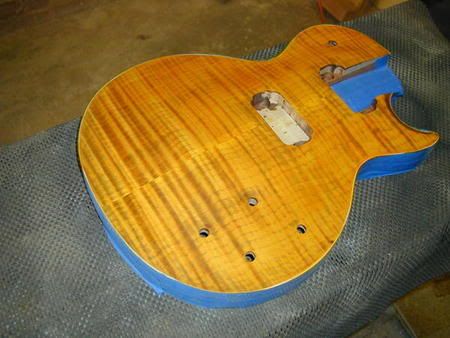
The top was sanded to 400 grit and a brown stain applied;
http://img.photobucket.com/albums/v65/xlr8...in/0d12bf94.jpg
which was then sanded back to within an inch of its life

http://img.photobucket.com/albums/v65/xlr8...in/7417b7ca.jpg
and my honey stain applied
http://img.photobucket.com/albums/v65/xlr8...in/f7ce0983.jpg
I apply three coats of the stain and set it aside to dry thoroughly. Next up will be spray sanding sealer and then shoot a few toner coats. A little airbrushing for a very mild burst and then topcoating. Now obviously all that takes a little while so after the next update - finshing and setting the neck, progress reports will be a little slow.
Neil
-
But is it safe to plunge with? Thats where Im lacking the knowledge...how can I tell if a bit is plunge capable?
You see that bit where is says centre cutting, that means you can plunge with it.
Neil
-
Hey Neil, those are some truly spectacular tops of maple, I only hope I can find some that nice for my project. I was curious as to how much of a top do you prefer for a 1 3/4" solid body? Also would you change anything for a chambered body?
Hi Jason,
It depends on whether you plan on carving the top and if so how deep will the carve be. For a 1 3/4" thick guitar I would normally expect somebody to have a 3/4" cap and a carve of around 1/2" deep but it's up to you.
BTW the wood I am using for a back is purpleheart and it is a very hard and heavy piece at 1 3/4" to start and I am going to chamber it and put a maple cap on it. I was just wondering how thin I should go on the purpleheart. I don't want it too thin because then it would cost me a fortune to find a piece of quilted maple thick enough, but I want to lower the weight as much as possible, chambering will help, but the thinner I go the less weight it will be.In which case I would suggest a 1/2" top with a gentle 1/4" carve which would give you greater leeway when choosing how much to chamber it. Of course chambering doesn't just save weight it alters the tone significantly. To save a lot of work and heartache I suggest it would be good idea to play a few chambered guitars and see if you like the sound of a chambered guitar.
The light weight is necessay for my back, other wise I won't be able to lift it. Thanks for the help on the router question, I never knew that they came in 4 flute bits. Spiral seems to be a great thing as well as carbide, I'm sure it makes for a longer lasting bit, but I'm sure they make up for it in price. I think you said that the 4 flutes cannot plunge, but you could start with a forstner bit then use the 4 flute right? Thanks for the help and great pics, very nice looking bodies! Jason
You could use a forstner bit but that entails two seperate operations, drill + router. By swapping the four flute for a plunge cutting three flute I can stay at the same machine and carry out the tool change in less than a minute.
San Diego huh? nice part of the world. My eldest is studying in El Cajon.
Neil
-
One of our submarines is missing tonight
Seems she ran aground on manoeuvres
One of our submarines
A hungry heart
To regulate their breathing
One more night
the Winter Boys are freezing in their spam time
The Baltic moon
Along the northern seaboard
And down below
The Winter Boys are waiting for the storm
Bye-bye empire, empire bye-bye
Shallow water - channel and tide
And I can trace my history
Down one generation to my home
In one of our submarines
One of our submarines
The red light flicker, sonar weak
Air valves hissing open
Half her pressure blown away
Flounder in the ocean
See the Winter Boys
Drinking heavy water from a stone
Bye-bye empire, empire bye-bye
Shallow water - channel and tide
Bye-bye empire, empire bye-bye
Tired illusion drown in the night
And I can trace my history
Down one generation to my home
In one of our submarines
One of our submarines
One of our submarines
One of our submarines is mis
Thomas Dolby - great track
Back on topic, there is a huge difference in the router bits and techniques required when using a pin router compared to a hand held or table router.
Derek, this is how I do it and it works for me but as Drak sez practising the tecnique on scraps (it won't take long) is the way to go.
1. Bandsaw as close to outline as you dare, Just as David suggests.
2. Use solid carbide spiral end mills - available from any good engineering supply house ( J&L industrial, even grizzly keep them). With a true spiral cutter there is always an edge in contact with the wood rather than the chunk by chunk approach of a conventional router bit. My personal preference when router the perimeter is for a four flute cutter but these generally are not centre cutting so you can't plunge cut with them. I then change to a shorter three flute centre cutting end mill to route the cavities.
here's a four flute

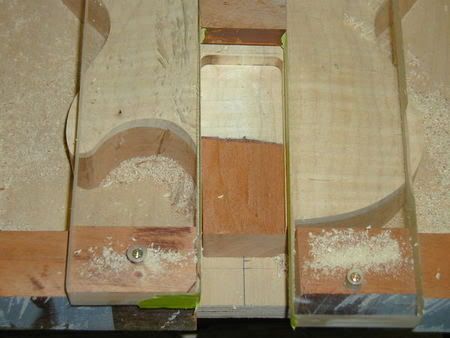
3. I use a 1mm oversize pin first time around and this cleans up the areas where I'm not quite close enough with the bandsaw. I also take this cut in three steps increasing the depth each time around - if the maple top is very thick I may take four cuts.
4. I then replace the pin to one the same size as the cutter, if the body is all mahogany I'll take the final cut in one pass but if there's a lot of maple again I'll make several passes. Also you may want to practise climb cutting (reversing the direction) on the four areas prone to tear out - the tips of the horns and the corresponding positions on the upper and lower bouts.
A pin router is a very powerfull tool, especially a large one such as yours, use it to work with the wood not overpower it.
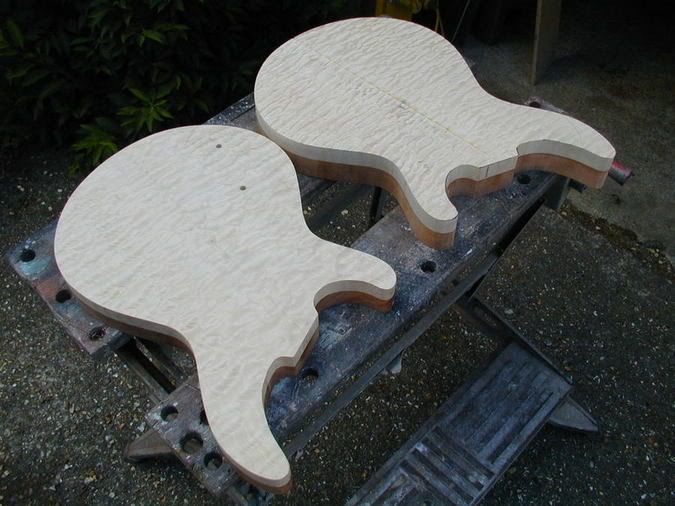
These two are as routed (the upper one still needs final thicknessing) with zero tearout even around the horns and as you can see the tops are both thick and highly quilted.
just my 0.02
Neil
-
-
I probably want to Spend £50 uk ($100)ish its most important job will be to sqaure up body and neck blanks, so i'm looking for something a quite hefty. What size?
Graham,
I have a Lie Neilson no. 7 jointer, their angle block plane and their large scraper plane - all great but expensive. I was looking to add a no.5 ad a no.6 when my wife dragged me to a car boot sale. There were a couple of elderly gentlemen (in their '80s) who were selling all sorts of hand tools including a good selection of hand planes. I bought a couple of fifty(ish) year old Stanley Baileys ( a five and a six) for under £30 ($55). The soles were true and the blades razor sharp. There are bargains to be had if you look around.
Neil
-
I have a 15cfm (free air) compressor with a 200 litre (53 US gallons) tank which I run through a DeVilbiss water separator/filter system. Gun wise I have a couple of DeVilbiss SRI gravity fed guns and a couple of older Badger airbrushes, a 150 and a 200. I still have a Devilbiss JGA pressure feed system from when I used to paint hot rods but that's waaaaay too big to use on guitars.
Neil
-
Thanks for the kind words guys.
No updates at the moment as I'm waiting for the pickups from Tim, (too busy building everybody elses at the mo'), so I can do a final fit before stain and paint.
Neil
-
Looking great Perry
-
Just stunning, great design and superb craftsmanship.
-
Depends on the size of bit you're using, the wood you're cutting and the feed rate. If you're looking to buy a new router then one of the combo kits are ideal. ~If you already have a 1.5hp router then you should be ok providing you take it slow and pay attention to how hard the router is working.
-
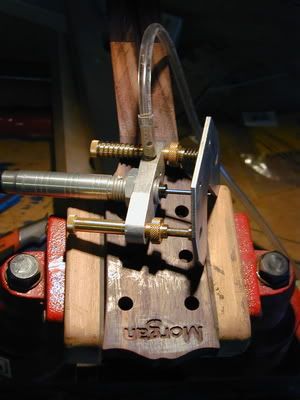
I've used twelve degrees but the beauty of this jig is you can set it to any angle you want without making a new jig.
I read somewhere that twelve is about optimum.
-
But when you click on them they say discontinued.. They would rather you buy their 40 dollar template.
You're quite right, glad I got mine before. There's no doubt stewmac is a great resource but when they do things like that it gets a bit frustrating - wonder why they don't put Fender and Gibson scales on the same rule
-
Still showing on their website no. 3411. I find it so useful - having Fender, Gibson and PRS graduations on one rule.
-
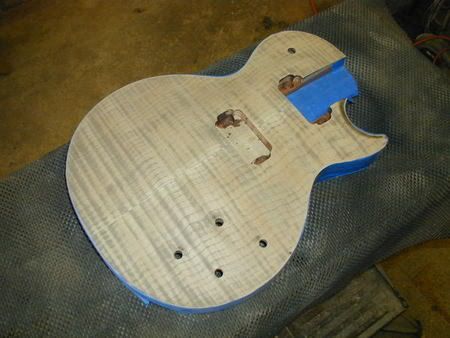
For a first attempt I'm quite pleased with the way they came out;

Obviously this is after some sanding and adding the binding. So flushed with success
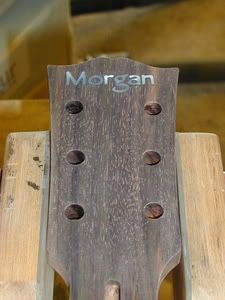
I set about my headstock logo. I still had some vinyl stickers from the Teles so I cut out the individual letters and stuck them on to a mother of pearl blank. Having purchased a jewellers saw, lots of blades and having made my birdsmouth cutting platform I set about cutting out the letters - an hour later I was done blimey that's fiddly work.So now I had my letters I rubbed the white pencil on the headstock once again and scribed around my letters. Time for another go with the mini router ;
http://img.photobucket.com/albums/v65/xlr8...in/695e85bb.jpg
I already had the foredom motor and handpiece from my motorsport days so fortunately all I had to buy was the base. Anyway here you can see the routing finished which was pretty quick compared to cutting the shell. As with the fingerboard I used a black slow drying epoxy to set the letters, however i wished I taken the time to dye some epoxy brown for an invisible finish.
http://img.photobucket.com/albums/v65/xlr8...in/6f74dbb6.jpg
I plan on fretting the board before attaching it to the neck, like wise I'll glue in the neck once the body has been finished rather than mask around the rosewood.
Neil
-
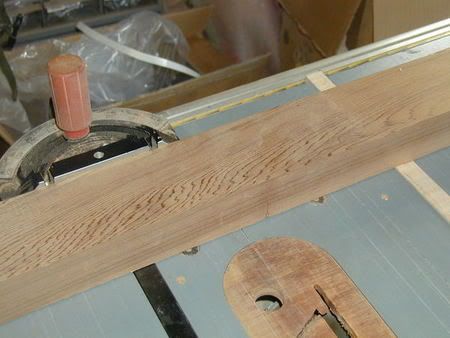
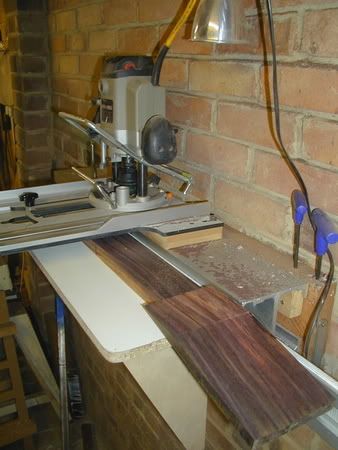
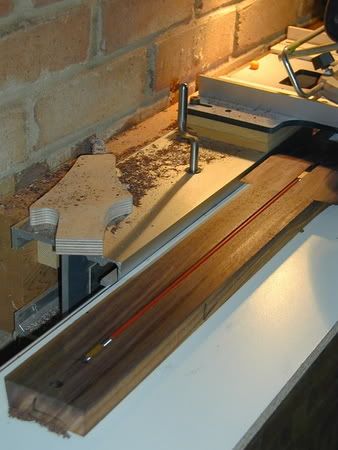
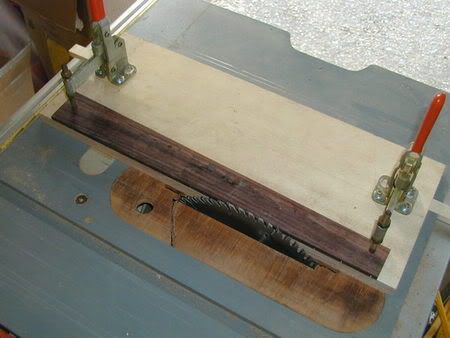
So, on to the fingerboard. If you remember when I thinned the neck blank on the bandsaw I kept the offcut for the fingerboard. The first job was to send it through the planer a couple of times until I had 6mm (1/4") blank. I slot mine on the table saw using stewmacs blade, I use a very simple jig which consists of a 2x4 cedar offcut the saws mitre guide and an offcut of hard maple cut and planed to fit in the other miter slot.
When I built this temporary jig (I will get around to making a better one
) I ran the blade through the cedar at full height which gave me a cut line which would show above the fingerboard. I then use a stewmac fret rule (not the template which locates on a pin) which I tape onto the top of the fingerboard with masking tape. It's then just a matter of lining up the fret graduations with the cut line.To trim the fingerboard taper I use the jig below, it's a fairly common woodworking jig adapted for this purpose.
http://img.photobucket.com/albums/v65/xlr8...in/cdedea1d.jpg
Again I'm using a piece of hard maple to run in the mitre slot, to this I attach a piece of birch ply which is just wider than the gap to the blade, when you run it through the first time it trims the plywood. This is now of course your cutline and all you have to do is line up your desired taper with the edge of the plywood, clamp it in place and cut your fingerboard - very quick and very accurate.
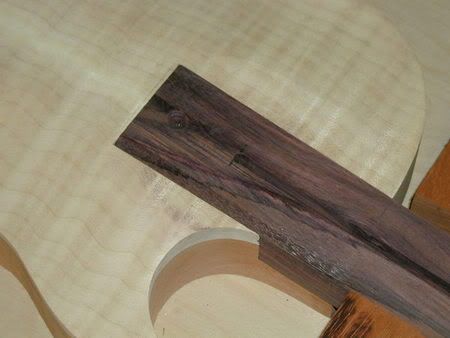
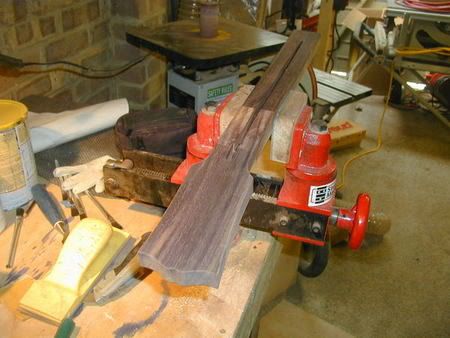
Next job was start the inlay work before radiusing the fingerboard. This was my first go at doing any sort of inlay work so I did a fair bit of research, both here and by reading James. E. Pattersons Pearl Inlay book.
The inlays themselves came pre-cut from stewmac so all I had to do was make a reasonable job of getting them into the fingerboard. I started by lightly rubbing a white watercolour pencil over the wood in the areas to be inlaid. Then carefully marked a longitudinal centreline plus a centreline across area to be inlaid, I should be able to get them on straight after all that - phew.
Each inlay was place in the appropriate position and checked for square, when that looked good I scribed around them using a sharp metal point. This showed up really well against the white pencil. I routed the bulk of the inlay and used a very sharp chisel to clean up the edges.
http://img.photobucket.com/albums/v65/xlr8...in/1c52b279.jpg
-
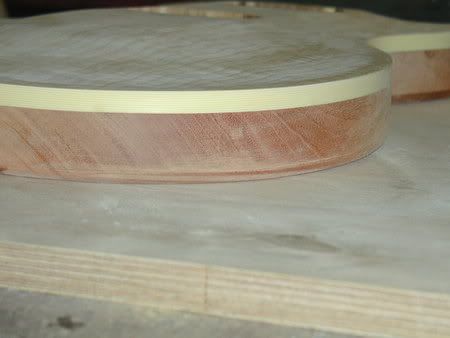
I had a couple of questions about your binding. How far did you sand the top before you put the binding on, i.e. 320 grit , 400 grit? What height is your ivroid binding? Did you use the 3/8 tall binding, or did you have to use the 3/4 so the binding would be tall enough in the cutaway?
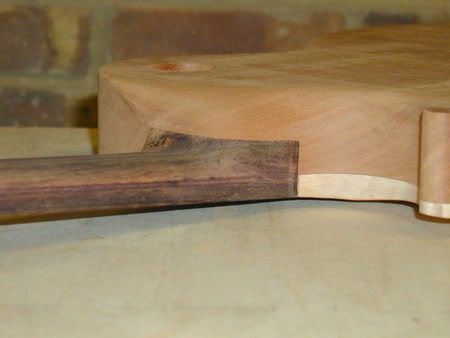
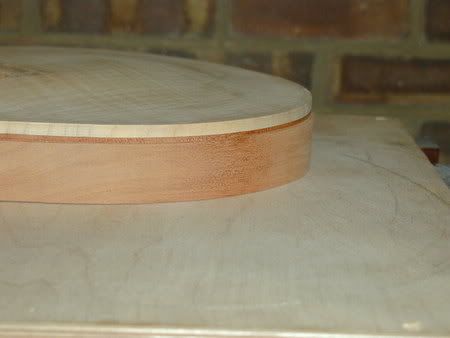
The top was sanded back to 220 grit. I routed the channel so the binding was just below the top allowing a little extra fine tuning. In the pic below you can see how much I left and how it allows me to do a little extra carving with the fingerplane.
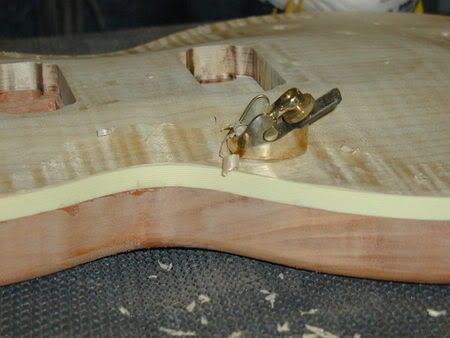
The binding was 3/8" and I routed it to the same level all the way around as I wanted to shape the cutaway, combined with the carved heel I think the carving in the cutaway should make for excellent upper fret access without weakening the glue joint. You can also see in the picture below another reason why I chose to not to use a tennon.
http://img.photobucket.com/albums/v65/xlr8...in/3db0f84c.jpg
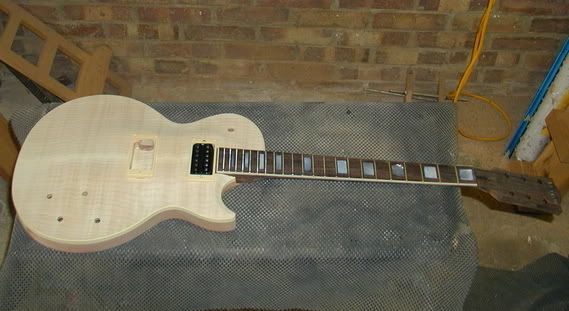
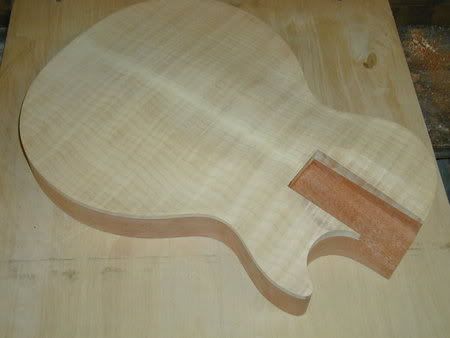
Next up I rounded over the back at the router table and finished the control cavities. The cavity covers will be made of the same mahogany as the body. All that's left to do on the body before staining and paint is to dummy fit all the electrics and mark out the position of the TOM. Lots of sanding too.
http://img.photobucket.com/albums/v65/xlr8...in/ebc08fe8.jpg
Fingerboard next
-
Nice work Neil!!! where are you based ??I am based here in Nottingham I pressume you are in the UK??? Have you taken any pics of the neck carving set-up that we spoke about a while back?? sure would love to see them and how to correctly do this again superb work. Kammo1
Hi Kammo,
I'm near Wokingham in Berkshire. I'll take some more pics on the next neck I do but it's pretty self explanatory.
Next up was to route the pickup cavities, I used a fairly standard template with a template bit in my plunge router but because the neck extends into the neck pickup it had to be clamped in place whilst the routing took place. I routed the neck cavity the minimum depth possible to leave as much of the neck intact as possible.
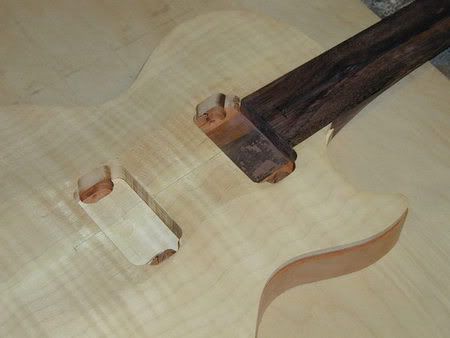
Next up was the Binding. My initial thoughts were to bind the cutaway in the original '50s style and follow the contour of the top but I changed my mind and decided to keep it level all the way round - it'll be obvious why later. To route the channel I once again went back to the pin router and using a pin undersized by the same thickness as the binding, used a spiral cutter to route the channel.
http://img.photobucket.com/albums/v65/xlr8...in/P1010018.jpg
I used a heat gun (carefully) to help with the bends around the cutaway and taped the binding in place. I then wicked thin CA glue into the gaps between the tapes and when that was dry removed the tape and glued where the tape had been. I used the ivoroid binding from StewMac, I recommend you don't try their LP ABS binding - it's just horrid and I threw mine in the bin after one look. Take the time to route a nice clean channel and make sure you're binding has a nice crisp edge (mine did) and it's not difficult to get a nice clean finished binding.
http://img.photobucket.com/albums/v65/xlr8...in/P1010033.jpg
-
Thanks guys, here's another angle;
Next jobs are to route the pickup cavaities, the binding channel and round over the rear - But it's back to the regular job for a few days so I'll post another progress report over the weekend.
Neil
-
Now I had the neck fitted I could mark the heel and get busy shaping the rear of the neck. I do the initial shaping at the pin router with a 7/8" round over bit. Once again this idea originally came from Myka (I definately owe David a beer or two should we ever meet
) Anyway here's my version of the jig being used to route over a tele neck from my previous project;
After I've done with the pin router it only takes ten minutes or so with a spokeshave and some sandpaper to finish up the roundover - the heel comes later. Here's the back of the neck showing the scarf joint;
As I said earlier I wanted to shape the heel body transition for better upper fret access. I started by using a small screw to hold the neck in place whilst I began shaping with a microplane and various files before a little sandpapering.
It won't be finished until I roundover the rear of the body and shape the transitions a little more but you get the idea.
-
Now I had the Basic neck it was time to fit it to the body. From the beginning of the project I decided I wanted to let the full width of the neck into the body rather than a tennon which would be covered by the fingerboard. The main reason for this was because I needed to do some significant shaping around the neck heel and cutaway. So it was back to the jig seen earlier where I clamped the neck in the correct positiom and then placed and clamped the guide rails around it to form the guides for the template bit in the router.
I got the idea from Myka, David does a great job of explaining how it works here;
http://www.mykaguitars.com/tools/neckpocketjig/default.htm
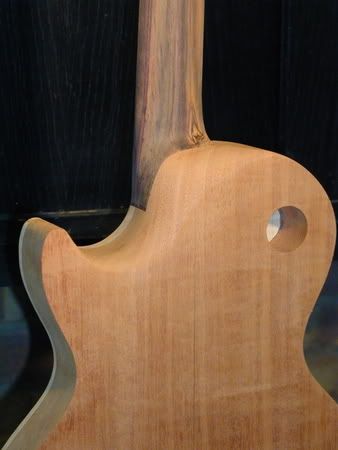
Here you can see the completed neck mortice after I've squared the corners
And here it is with the neck in place
It's a nice close fit meaning you can pick the guitar up by the neck but it needs no force to fit and remove.
-
These can be unsed interchange-able but you can see the problems with using a plunge routers on a neck pocket.
Derek,
Sorry but I can't see what you're getting at, what problems do you envisage by using a plunge router to do a neck pocket?
Neil
-
Having used routers for the last 25 years I'm going to have to disagree with Derek. A plunge router can do everything a fixed base router can and so much more. The Makita is OK as routers go but the best kit on the market by far is the Bosch;
http://www.amazon.com/exec/obidos/tg/detai...e&s=hi&n=552866
Very closely followed by the new Porter Cable. The bosch has the best run out, is one of the quietest and are the best made range of routers on the market.
-
After the scarf joint has dried I take the neck blank back to the woodrat, firstly to the level the face;
Using a 1 1/2" cutter to run over the surface whilst the neck is attached to the table, the principal is much the same as a milling machine.
Then by changing bits and locking the 'Y axis' I can move the table left and right, 'X axis', whilst plunging the bit a little deeper each pass for a nice clean truss rod channel.
Next stage was to bandsaw the rough outline before once again returning to the pin router with a template attached to the neck blank.
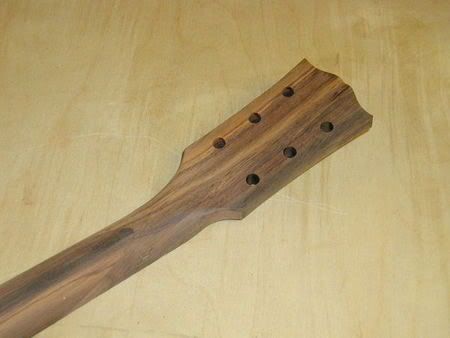
I still have to drill the holes for the tuning pegs, thin the headstock and roundover the rear.

Rosewood Neck Lp - New Project
in In Progress and Finished Work
Posted
Next up is a couple of my own design;
They'll both have rosewood set necks, bone nut, custom wound Barekuckle pickups, TonePros TOM and schaller tuners.
Neil