


xlr8
-
Posts
155 -
Joined
-
Last visited
Content Type
Profiles
News and Information
Tutorials
Product Reviews
Supplier Listings
Articles
Guitar Of The Month
Links and Resources
Forums
Gallery
Downloads
Posts posted by xlr8
-
-
Definately looking better this time around and I'm a fan of Blue guitars/

-
Great work so far!
How are you finding the Clifton concave spokeshave? I was eyeing one in the Axminster catalogue for quite a while, but it was a little spendy for me. Looks like a nice tool. Out of interest, how was the shipping on the maple from Durawoods?
Hi Setch,
The plane is great, although as you say it's a little expensive. With regard to Durawood - I have family in the States that I visit regularly so I get it shipped to them and carry it back myself. I've bought several pieces from them for future projects and it's all top notch, can't fault their service.
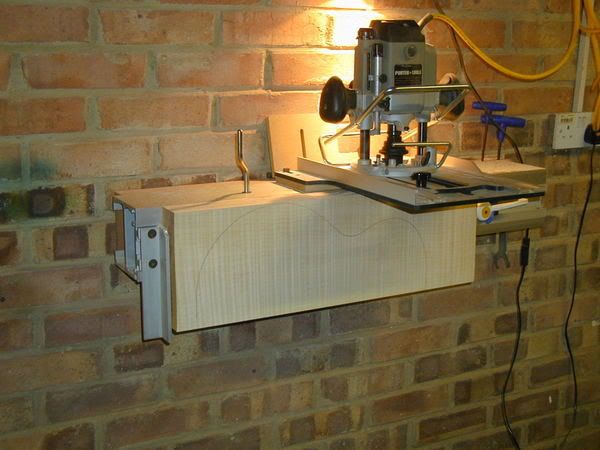
You might recognise the jig below, I first saw it on your Les Paul thread and subsequently checked out Mykas site.
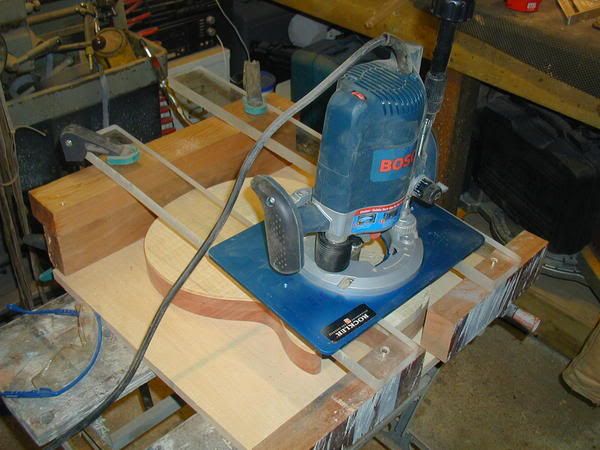
I'm using my Bosch router from my table router set up with the plate still installed as it gives a nice wide stable base whilst I machined the area of the neck tenon to five degrees. I used the method described in Melvyn Hiscocks book to determine the correct angle.
Next I used my Lie Neilson jointer plane (you definately wouldn't like the price of this one Setch
) to form the pickup plane - the area from just behind where the fingerboard ends to just in front of the bridge. It's not a measured angle as such, if you draw a line perpendicular to the centreline at those two points and plane the area flat you end up with your 'pickup plane'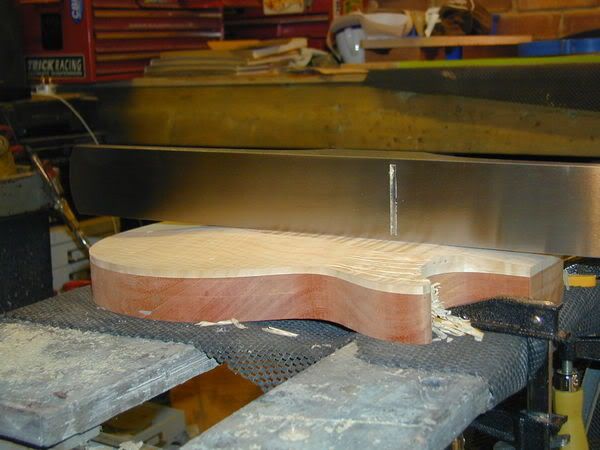
I then did a little more work on the carve but I won't finish it until after I've routed the neck mortice and added the binding.
Speaking of necks, Tim - the new owner plays in an Ozzy tribute band and is a serial neck abuser, bending the things to within an inch of their lives so I knew it had to be strong.
I decided to make the neck a threepiece. I started by ripping some of the rosewood down the middle and reversing it for an opposing grain. Marine epoxy was used to join the two pieces...
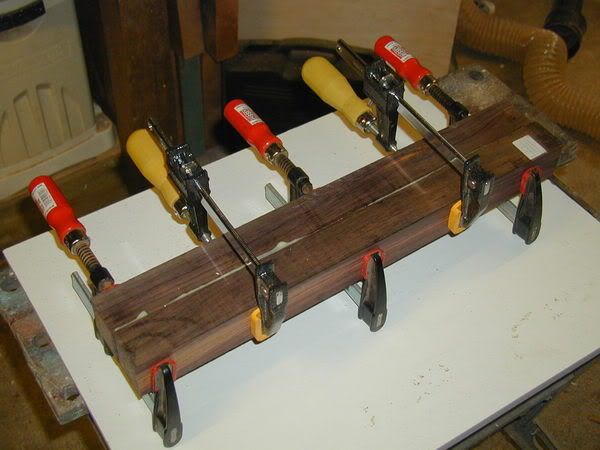
The blank is a little thick as you can see but I plan on cutting it to thickness on the bandsaw so that the offcut can be used to make the fingerboard, so it matches the neck exactly.
-
I want my own tools too so I can make guitars like that, the one I'm making at school is a couple of divisions down.
At least you're starting young, I'm 43 and started my first guitar over the Christmas period.
-
Damn, I soooo want a CNC. Nice work Donald
-
Next up was to route the body to its 'proper' dimensions, so it was over to the pin router and with the template attached to the bottom the spiral cutter did its bit (ha ha). I use a slightly oversize pin at first, about 1mm, and make three cuts each approximately 1/3 of the body depth. When that all looks good I change the pin to one which matches the cutters diameter and make three more passes until the body is the same size as the template.
This is the body after the final pass on the pin router. You'll notice I've drawn the contour map (downloaded from the MIMF forum) on the cap. Each line represents a 1mm increment which I'll use the pin router to remove. I did this very carefully freehand (no template against the pin) until I ended up with the stepped top you see below.
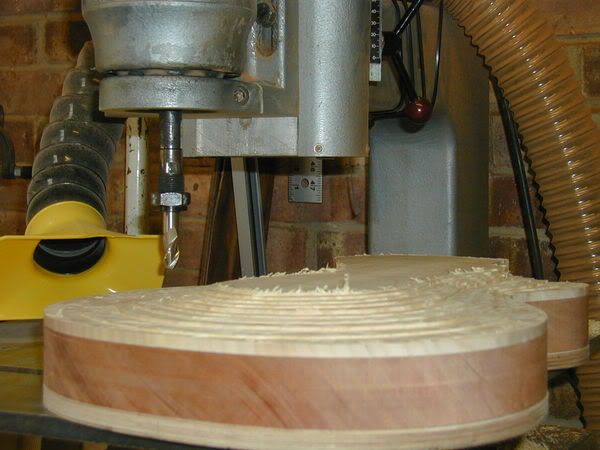
You can't see it in the pic but I stopped short where the neck tenon will be. next it was time to break out the concave spokeshave and knock the ridges off.
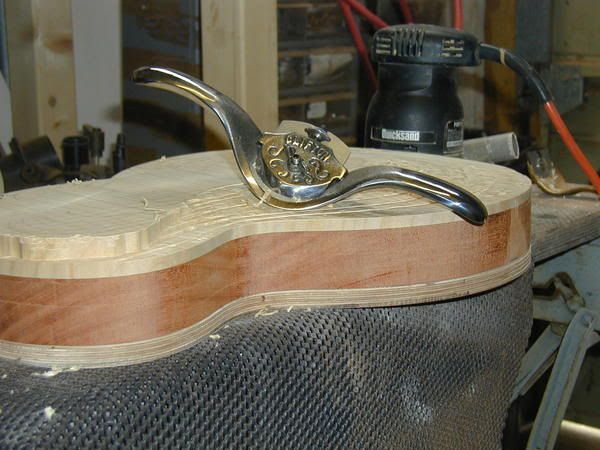
Because of the flame I found it best to angle the spokeshave at around 30 degress to the direction of cut to avoid tearout, it certainly made short work of it and I was ready to attack the carve with the sander after 10 minutes or so.
-
Before glueing the Maple cap to the Mahogany I route the control and switch cavities, also the wiring channel.
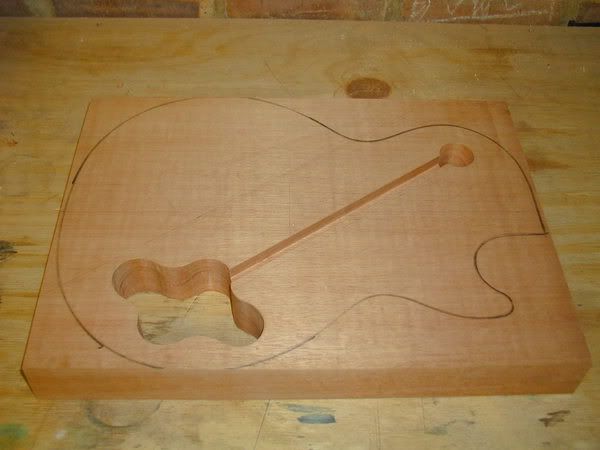
I used titebond two to attach the cap to the body, clamped it overnight and then using my 1/2" birch ply template marked the body for bandsawing.
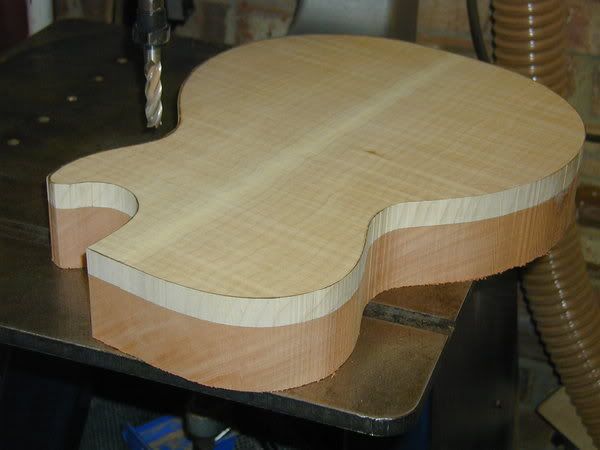
You'll notice that the guitar is waaay too thick at this point but there is method to my madness
I now use the pin router to take a light skim from the top of the maple ensuring I have a good flat surface from which to start the carve. When I'm happy with the cap I flip the body over and thickness the Mahogany side until I achieve the required overall depth. I then attach my template and route the final body shape. -
Looking good Neil!
Can i just ask what pick ups are going in this one (i know they will be Bareknuckles, but which ones)?
It would be interesting to know what his personal faves are!
Matt
Tims sending the pickups to me this week Matt, as soon as I know, you'll know. I just fitted some Mules in my SG2000 - just awesome, like a lightly warmed PAF. My favourites LP tones are those from Thin Lizzy and Gary Moore and these hit the nail right on the head.
-
That's going to look top notch I bet. Nice looking wood.
That woodrat thing is neat looking. I bet that comes in handy. I like the clamps too
those besseys? My friend has a bunch of them, I always "borrow" them when I do glueups..Yep they are indeed Besseys, not cheap but they work so well. The Woodrat is fantastic, I use it for so many of the guitar making processes - I hope to show some more as I go along.
-
I'm a bit reluctant to post this as Setch did such an amazing job with his Les Paul progress/tutorial thread. Never the less I thought I'd show how I'm going about building one with the tools/skills I have a my disposal. I'm not saying this is the right way, it's just my way.
Tim the owner of Bare Knuckle pick ups (www.bareknucklepickups.co.uk) asked me to build him a Les Paul after seeing the Teles I built a couple of months ago. We quickly settled on a spec and I set about sourcing the wood.

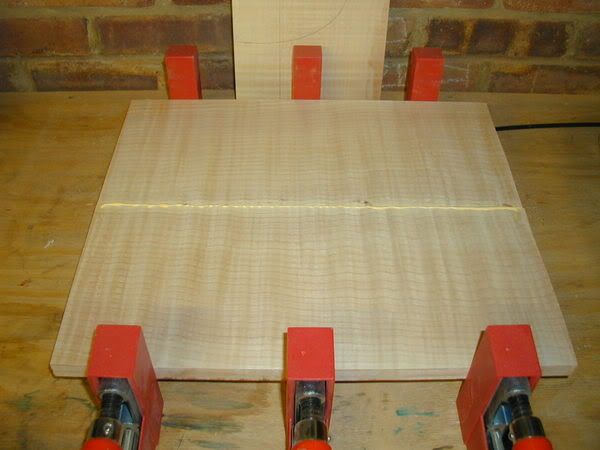
Brazilian Mahogany (London), East indian Rosewood (L.A) and Fiddleback Maple (Durawoods)
Before I cut the Maple on the bandsaw I jointed the centre edge on the Woodrat, www.woodrat.com, a fabulous bit of kit that I use all the time.
Then it's off to the bandsaw. This was such a nice thick piece, and as I only planned on a 3/4" top, I cut it twice to give two halves for the top and another, approximately 3/8", for some fingerboards in the future. You can see the pencil lines in the first pic.
As I'd already jointed the centre it was then just a question of glueing the boards together with the sawn face up and leaving to dry overnight.
-
I would agree with BP.. the temp probably has a lot to do with it.. At high altitudes.. it's butt-freezing cold and the cargo area isn't generally heated.. accompany that with a climate change in travel, and you could devinitely have some movement going on.
Finally a topic I'm probably the most qualified to answer, having been a pilot for 25 years and flying a 747 and all that.
Firstly a 'pressurised' cabin rarely climbs above 6000' but can go as high as 8000' so would you loosen your strings because you went to play in Denver?
Cargo holds are temperature controlled, usually around 15-18c or 59-65f if you prefer.
Guitars in hardcases are allowed in the cabin (yes even by the overzealous TSA) provided the type of aircraft you're flying on has overhead bins large enough to accomodate them.
My advice would be to keep your strings at the correct tension, always use a hardcase, leave your guitar in the case for as long as possible after flying to allow it to acclimatise slowly after your journey and make sure it's insured.
-
I think all my fellow entrants guitars are superb, they really are. I thought long and hard and in the end went with my gut feeling - if they were all lined up which would I pick up first to look over up close.
The bass
Good job we waited for a quiet month
-
I think that this is it?
http://www.110220volts.com/Merchant2/merch...nsformer/TC-200
buy a step up converter right?
Come on guys in Europe how do you run your stuff here?
That'll do it.
-
I don't see anything about that tool that suggests it can be used wet. I'd ask Bosch before I tried out for the Darwin awards.
Monty
Bosch still make the green series in Europe, over here Blue is reserved for the Pro series. If it has an electronic speed controller 50hz or 60hz won't make much difference. I use U.S voltage tools over here using a step down voltage transformer but still 50hz and they have performed admirably over many years of hard work.
BTW. Derek I have the same sander and whilst it's a good machine, nowhere in the spec have I seen it can be used for wet sanding - I haven't looked that hard but it's definately not watertight.
-
Should be fine but you guys run 60hz and we use 50hz. In europe we use either red or brown as the 'live' cable and black or blue for neutral.
-
www.autobodysupply.net has 3m gold sheet rolls in the following grits
-500
-400
-320
-240
-220
-180
-150
-120
-100
-80
my question is, which grits of this abrasive would you recommend to the average hobby-time builder, even though they are good sandpaper they're a bit expensive to buy them all, but in comparison to other dealers they are cheap, autobodysupply.net sells them for 34.85 a roll
These guys are a little cheaper and very helpful.
http://www.autobodydepot.net/scripts/depot...pgm=3m170-4.bbx
-
Gonna use more of the blue for the toner coats? Do you have any pics of the body when you had applied the black and then sanded it back? I'm curious to see it compared to how the black looked on mine.
Thanks.
Dave
Dave,
Sorry no I don't have any pics of it sanded back, I do remove most of the black so it's just in the edges of the soft grain.
What does your paint setup look like?
I have a pretty large compressor (14cfm) and use a devilbiss SRI hvlp grabity fed gun. HVLP takes a bit of getting used to but I find I can get it as good as a convential gun. I also have a badger 150 airbrush that I use for the detail shading etc.
Neil
-
Sweeeeeeeeeeeeeet, that's so wrong I love it.
-
Oh, sorry, I couldn't tell that from the pic. I love the color. What kind of stain are you using?
Dave
Stewmacs liquid stain, colourtone? Anyway I did the usual black and sand back first and this is just a few coats ragged on. I'll spray it with sanding sealer and then a couple of toner coats followed by a little shading at the edges and then more clear.
Neil
-
Looks great. Although I'd be afraid to stain before the body is completely routed and drilled for bridge, controls, etc.
Routing's all done and the control and bridge holes are all centre punched. You're right tho', I wouldn't stain it if everything hadn't been worked out and checked.
(edited 'cause on re-reading it sounded a little off
) -
Started staining the top to see how it looked
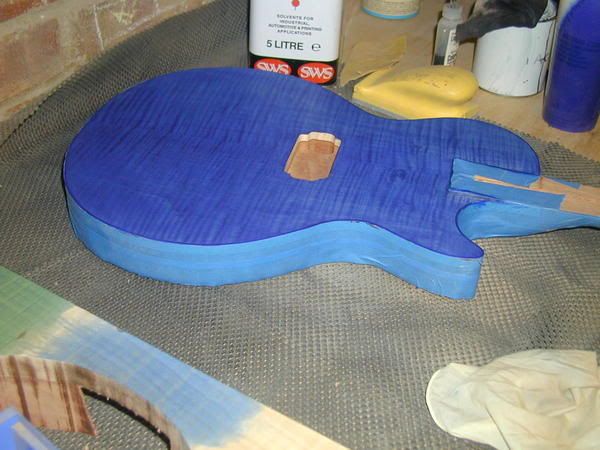
It is a much darker Blue than my Tele plus its only had a couple of coats so there's no depth to it yet.
-
One thing that puzzled me is that when rounding over the back of the neck won't the bearing go past the centre line on the neck towards the headstock end as the size difference from the heel end is greater and this will in turn make the bearing run aginst the curve? difficult to explain but you get the picture??
No, you set the roundover bit so that the max depth is achieved at the nut end leaving a small centre flat at the heel. A little work with a spokeshave/rasp/sanding sees it finished.
As for a tutorial, I hardly have enough time to build these things let alone do a tutorial. however I am doing another neck later in the week so I'll try to take more pics that illustrate it better. TBH Mykas site explains it pretty well.
-
Hi thanks for the response, any chance of posting some pics of how to correctly do this?? sure would appreciate it very much, also where would I get a cutter like this from part number??. I've seen Mykas jig and does he use a 1 1/4 roundover or have I got it wrong. Kammo1.
Firstly you need to build your own jig to hold the neck, take a look at both Mykas and mine. The important thing is being able to hold the neck securely with the top edge of the neck parralell to the base of the jig (horizontal) AND make it such a way that your hands go nowhere near the cutter.
Turn the bit at the slowest rpm your router will go and take four or so passes lowering the bit just a little at a time. The correct direction of cut would be to start the bit on the right and moving the neck to the right so it cuts along the neck to the left.
All woodworking shops and Home depot/Lowes usually carry a 7/8" roundover bit, as Jay5 says - get one with a 1/2" shaft (I'd be surprised if they made a bit this size with a 1/4").
If you're still not sure I suggest you hang on 'til you figure it out, done incorrectly it could be very dangerous.
-
Hi what size roundover bit do you use to round the back of the neck?? and what size shank 1/4inch or 1/2inch?Also when doing this do you start from the headstock end or the heel end?? any tips would be greatly appreciated on how much do you take off in one pass or do you rout the correct depth all in one go. I have been looking at making a jig like Myka's but would like some more info, any help would be greatly appreciated. Kammo1
I use a 7/8" roundover bit with a 1/2" shank - I seriously doubt you could get a bit large enough with a 1/4" shank. On one side you start from the headstock on the other from the heel and I usually take four passes.
-
Hey, cool! I am glad that you have found the jig helpful. Love the overhead router. I want one of those!
~David
I have found that jig SOOOOO useful.
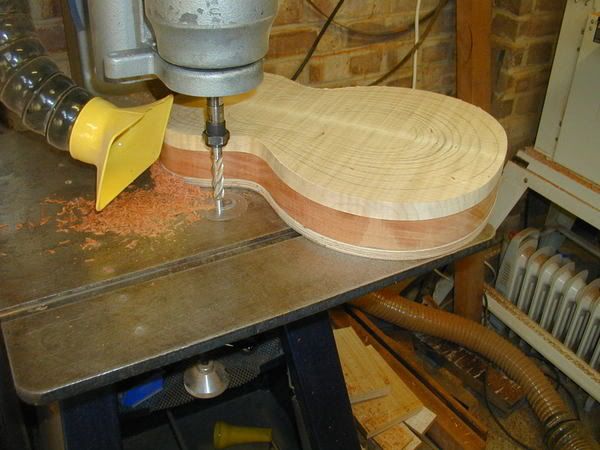
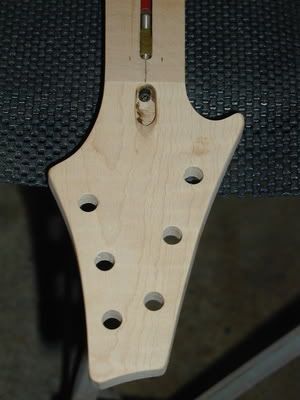
Got around to routing the truss rod channel today using this jig and a suitable collar,

and here's the truss rod in position - I managed to leave the nut supported by the maple rather than a through channel.
http://img.photobucket.com/albums/v65/xlr8...PJ/cd87d3b2.jpg
I then bandsawed the fingerboard close to it's final dimensions and used the pin router to finish up - note the tape on the jig, it's easier to sand a few thou' off than to try and stick it back on
http://img.photobucket.com/albums/v65/xlr8...PJ/660cd23b.jpg
and here's the trial fitting of the fingerboard,
http://img.photobucket.com/albums/v65/xlr8...PJ/3c86b6f9.jpg
Over the weekend I shall do the final sanding and fill the grain ready for staining and clearcoats.

Rosewood Neck Lp - New Project
in In Progress and Finished Work
Posted
Next job was to cut the scarf joint, I do this a little differently by using the woodrat.
Here you can see a mahogany neck clamped in the mitre box - I forgot to take a picture of the rosewood one . I've used twelve degrees but the beauty of this jig is you can set it to any angle you want without making a new jig. The mitre box holds the neck square and level to the woodrat then it's just a question of winding the carriage left and right , x axis, with the crank handle whilst sliding the router baseplate along the y axis. The depth of cut it controlled by the routers own plunge mechanism. This leaves an accurate cut ready to accept the headstock blank.
Here's the headstock glued and clamped, again using marine epoxy.
I have to go and do some 'real' work for the next few days but I'll post another update just as soon as I can.
Neil