


xlr8
-
Posts
155 -
Joined
-
Last visited
Content Type
Profiles
News and Information
Tutorials
Product Reviews
Supplier Listings
Articles
Guitar Of The Month
Links and Resources
Forums
Gallery
Downloads
Posts posted by xlr8
-
-
xlr8, no, I can't. It appears the thread has a stop although it seems to go all the way through. I think this is so when the stud is installed properly, you can't lower the post too far and into the body wood.
Ok, I'd do it this way.
Carefully open the hole at the bottom of the stud with a suitable drill bit. Find a suitable bolt and make yourself a puller from some metal strap and a couple of scraps of hard wood.

Once you've extracted the stud you can peen of the bottom with a hammer to stop the bolt driving into the wood beneath and if necessary remove a small amount from the bottom of the bolt to ensure you can screw it down flat.
Good luck
(edited because the first drawing showed a threaded extractor hole when of course it just needs to be a hole - doh!)
-
Well, for one, it's wrong and secondly, you cant thread the post into it this way and lastly, it looks different than the other one.
Can you thread a bolt into it as is?
-
It's amazing how 'real life' gets in the way of having the perfect shop.
 I often come to find a pile of 'stuff' in the garage because my wife no longer wants it in the house. You've gome nice tools there.
 -
xlr8, your guitars are inspiring. I wanna go home early today and do more work on mine.
What dyes did you use? I'm particularly interested in the name of the dye and color you used for the blue.
Thanks.
Dave
Hi dave,
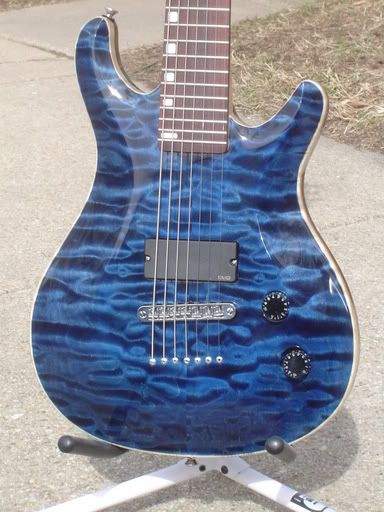
Thanks for the comments. The dyes are powdered alcohol soluble made by Transfast, turquoise blue and black. I picked them up at Rockler for around $13 each and mixed them at double strength in lacquer thinners. they are also available as water soluble if you prefer.
Initially I double stained with the black and after sanding applied the blue with a rag. I then shot a few coats of clear to seal it followed by a light flatting. Next I shot some blue toners coats by adding my lacquer thinner/dye mix in with some clear follwed by a couple more clear coats. After more light flatting I shot the burst using the black followed by several more clear coats before final polishing.
Neil
-
Thanks Hyunsu, I'm a great admirer of your work - it's
-
Nice guitars, i would have loved to see a TOM style setup on the blue one but the bigsby looks cool. On the second pic is that a cut out bit i see under the 22nd fret? it just looks odd
Although it's hard to see it is indeed a TOM style bridge on two studs that go through the pickup plate. As strange fruit noted the cut out is to access the truss rod adjuster - musicman style.
It seems to be for the truss rod adjustment.Very nice guitars. Did you give the Brown one to Sian? or am i just imagining that?
Matt
Hi Matt, Sian is indeed the new owner.
For those of you who have no idea what we're talking about, Sian is the lovely lady who organises GASfest here in the UK. A get together of like minded gearheads to rock the night away and raise money for the Drake Music project - a charity who, through technology, enable severely disabled kids to make music. Not long after I started the build of these two Teles it struck me that Sian would be the most deserving recipient of my handiwork and it was duly presented to her at the beginning of the evening.
 Beautiful work 'XLR8' !!!!!!
I'm particularly liking the Blue Tele. I love the way you've shaped the tops on the guitars. It looks very tactile.
I'm in the UK too (Wales). Where did you get your materials from (Craft Supplies maybe?)? The headstock logos look cool too. Are they decals and did you make them or get them done for you?
Sorry about all of the questions but I'm in the progress of making my first guitar at the moment (also a Tele,of sorts!) and I'm trying to find out as much as I can. It's sickening when you see how many great suppliers the people in the U.S. have compared to the U.K.. I suppose it's the same with everything though!
All the Best! JTM45.
Hi JTM45, thanks for the compliments. I source my materials from all over - the mahagony came from London and the Maple from LA (my son is studying in California). The headstock logos were made at the local sign maker, cut from vinyl sheets. I visit the US with my job on a regular basis and manage to pick bits and pieces as I need them. PM me if you need anything as I may already have it in the UK.
As an aside, I got to meet Bill Jehle at GASfest - nice guy, nice guitar
-
Well they're finally done, the pics aren't great but they give you an idea of the finished items.


The light spec in the lower pic is a reflection from the edge of the Bigsby.
So many people on this forum have helped me without even realising it, reading and re-reading all the hints and tips let me get through these, my first guitars, all the more easily.
-
That looks like an 'angry' SG to me - looking forward to seeing this one progress.
-
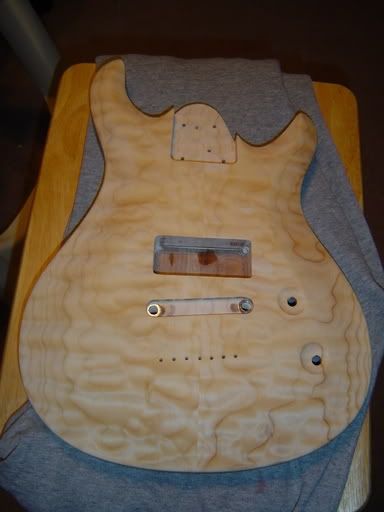
I got around to fretting the necks which meant that I could temporarily assemble them to check the neck/bridge alignment before marking and drilling all the holes for the hardware (and the string ferrules on the Honeyburst). The bodies have been colour sanded prior to final polish hence the matt finish.


Now it's lots of polishing and then final assembly.
here's a pic of the headstock logo,
http://img.photobucket.com/albums/v65/xlr8...le/6a96c4a4.jpg
and one of the the cases these babies will live in,
http://img.photobucket.com/albums/v65/xlr8...le/8daec963.jpg
-
I use this neck jig to round over the back of the necks on my pin router but it's also really good for holding the neck whilst drilling and fitting the side markers - Thanks Myka
Cool! It is good to see this jig in use. What a great idea to use it for the side dot drilling. I'll have to do that next time.
By the way, those guitars are looking sweet! I love the bursting over the dyed tops. What a cool effect and executed very well. Love it!
Wow, praise indeed. I have learnt so much from this forum and one day hope to give something back. I'm also in the process of building a modified version of your neck pocket jig for my next project - a Les Paul Junior (deluxe, sort of
) -
For me I would shot a toner coat over the whole guitar, it looks like it brought all the flame out!
That's exactly what I did. After sanding the previous clearcoat I shot a toner coat of the same blue dye mixed in with some clear then shot the burst with a weak Black mixture followed by another couple of clear coats.
-
Got around to 'bursting the Tele's today, as you can see the grain defects on the Blue one have all but gone.

Here's the honeyburst with brown shading,
http://img.photobucket.com/albums/v65/xlr8...le/29b322db.jpg
Also inlaid the abalone dots and the white side markers, just the sanding to come
http://img.photobucket.com/albums/v65/xlr8...le/5da89268.jpg
I use this neck jig to round over the back of the necks on my pin router but it's also really good for holding the neck whilst drilling and fitting the side markers - Thanks Myka
http://img.photobucket.com/albums/v65/xlr8...le/d56d8745.jpg
Should have them finished this weekend.
-
-
I'm sure it would, it's just down to personal preference really. The Les Paul Junior you can see under the Honeyburst will have a natural binding.
-
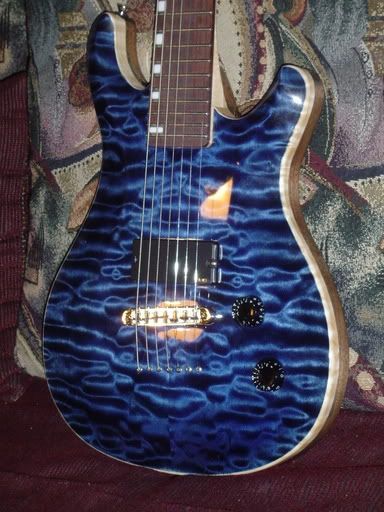
Can you post a pic of that blue one but looking at it from the front, if possible I will like to see how the grain looks I think that on that pic it is reflecting lines from the wall or the ceiling.
The lines you saw are not reflections but in the grain, they don't show up in daylight - only in the flash. I knew they were there but it didn't bother me as this is the first guitar I've built and it's more of an experiment than anything else.

-
Those guitars are jaw dropping! congrats, they're gorgeous, both of them, I didn't think it'd be possible to build guitars in the UK( because of humidity and all, i dunno i'm weird), i assume you own all tools and all, I tell you, i live in Venezuela , where mahogany is supossed to grow! and i have never seen such beautiful pieces, when it still could be found here we got decent mahogany, but never such exquisite pieces
Thanks Eddie,
I got round to applying the first few clear coats before I wet sand and shade the edges.

http://img.photobucket.com/albums/v65/xlr8...le/11e383df.jpg
That's a reflection in the lower horn on the Blue one.
I have to go away for a few days on busines but should have these finished up by the end of next week - fingers crossed.
-
Proter cable are great workhorses but I would recommend the Bosch kit. It's more refined than the 690 and has speed control. Last time I looked you could get it from Amazon for $188 incl. shipping
-
I was working on one of my guitar bodies and for some reason I cut it out wrong, then routed it wrong... now I have a body that is getting ready to become firewood.
Some days I should just stay inside and sleep, uhg, will post a pic.
#1 is almost done waiting for lacquer to cure
#2 maple burl pic is done and looks great just wired it last night I love that tele bridge pickup.
-derek
You have some beautiful looking Maple there. Do you mind me asking where you get it from.
Neil
-
it's not too bad...i can probably file some parts down to make it fit a little tighter then fill with somethin
Looking nice
It looks like you built a neck through Bass and then changed your mind and chopped the neck off -
Those tops were crying for a 2 step stain job, but they look awsome anyway, very nice figure right in the center.
They got them
the Honeyburst is over Brown and the Blue is over Black. The use of flash and because they're not clearcoated yet means they appear washed out in the pics and lack depth. I should be spraying the clear today or tomorrow. Then I have to fit the Abalone dots, thin the headstock, and install the nuts and frets. I'm going to spray the headstock but finish the back of the neck in an oil/wax finish a la Musicman.
-
Finished the staining today. These are as stained with no clear coat and unfortunately the flash washed out the blue.

The binding has been scraped on the Honeyburst but not the blue, after a few coats of clear I shall shade the edges lightly then more clear to finish up.
-
Nice mahogany, is it too much to ask were did you get it and how much per bf it was? I've been told that in PA there is a place that sells nice figured mahogany and it is about 1.5 hrs away. I might take the drive before I get out of here and get some. THat one looks like the one that Gilmer had on his site, lat year by Dec he was asking 65 for a 1pc blank but when I got my tax money and checked he bumped the price to 125. bummer. Too much for my budget at the time. I'm looking foward to see this one finish, I finish the headstock on mine thursday, and it plays fine. See you around.
Hi Maiden,
I`m in the UK so I`m afraid my supplier wouldn`t be much help to you. I bought enough for several guitars and the price worked out around 65US per guitar, which for the UK is very cheap but I did buy in bulk.
-
Here's the backs after three coats of urethane, hopefully you can see the figure. I'll leave these dry for a few days, wet sand them and then spray three more coats which should see the backs finished.

-
Cool, I have seen a lot of quilt on the mahogany, but not flamed, did see a flamed limba though. Nice, so you use laquer to seal the maple, I had a hard time sealing the scraps that Itested on (quilt) and decided to give sanding sealer a try, boy what a difference, this thing sealed the quilt in about 3 triple coats, while I was on the 6th with the straight laquer and I could still see the grain when the laquer was dried. I too use the black sand method that I got from Myka hewre in the forum, link to my thread I wouldn't do it any other way, I did try blue on blue, but the black gives it a far superior 3D look.
Yeah, I've been reading your thread. Just beautiful and tbh your body shape and carve are as good as anything I've seen from PRS or Carvin. I've been looking forward to seeing it finished and it looks great.
 I often come to find a pile of 'stuff' in the garage because my wife no longer wants it in the house. You've gome nice tools there.
First Project
in In Progress and Finished Work
Posted
Very nice Dave, and you're right - it's a lot easier to make two or more at a time.