


jer7440
-
Posts
1,056 -
Joined
-
Last visited
Content Type
Profiles
News and Information
Tutorials
Product Reviews
Supplier Listings
Articles
Guitar Of The Month
Links and Resources
Forums
Gallery
Downloads
Posts posted by jer7440
-
-
Daniel, are you using nitro for your finishes?
-
Good for you...it's a very nice guitar. I have one more electric project on the board before I get to building an acoustic. I have been reading up though.
-
I only have the LP I finished up last winter. I played it for a while and I decided it played as good or better than my USA strat plus, so I sold the strat. I currently have a PRS type guitar that is almost finished (just have to make the nut and install the pickups). At this stage in life there is no way I could afford to buy these guitars. I find if I don't go crazy with fancy wood...it's not too expensive.
I am like you Killemall....I build way better than I play. Maybe someday I'll knuckle down and practice...we'll see.
-
Man, that guitar is awesome! It is so beautiful...I just love black limba. Is this one for you, or is it sold? You guys are really knocking out some gorgeous guitars. Well done.
-
Kenny, if you look in you circuit breaker box you will see all the different breakers. Most of them will probably only take up one slot in the breaker box. (I'm assuming your home has circuit breakers and not old school fuses) The one slot breakers are 110v. If you have a breaker that takes up two slots...this is a 220v breaker. If you have a 220v breaker you must have a 220v circuit in your house. Maybe for that old washer and dryer you mentioned. If you had the circuit capped all they probably did was cover the end of the wires...All you would have to do is put an appropriate outlet in and get a matching plug (with a cord rated for 220v) for your saw. Just make sure the circuit breaker is turned off before you do anything. And leave it to a pro if you don't feel completely comfortable tackling it yourself.
-
Do they have a product called JB Weld where you live? It is a 2 part product like epoxy, but this stuff can be drilled even tapped for threads if you want. It would probably make a great filler for that trem post hole. Then you could drill it out straight and to the correct size.
-
Living in the USA you should have 220v single phase power coming into your house. That power is split into two lines of 110v...the power for the normal outlets in your house. Do you have an electric stove or clothes dryer? Maybe and electric water heater? These items would be on a 220v circuit. It would be fairly easy to run a 220v line for your saw if you wanted one.
-
Sweet paint on that strat....Love it!
-
I dig it. I really like the asymmetrical head stock. I love the way it looks like it is bent.
-
So far, i've read about and watched a few ways to do it:
Spokeshav, which is my personal favorite
Router template, which to me looks like a circus ride
Belt Sander, which looks like it'll do a good job, but seems time consuming and doesn't really get into all those little areas
Orbital Sander, which seems to work okay
Chizel, which worked for me, but i think its kinda iffy, as much more wood can come off due to grain shape, inner faults, etc.
and
Microplane, which is the newest one i learned about just surfing around in this forum.
I'm sure there's lots of other ways, but which way do you like the most?
ShopBot CNC Router.

Haas VF-3 VMC
Touche!

You probably have a higher RPM spindle than I do...
-
So far, i've read about and watched a few ways to do it:
Spokeshav, which is my personal favorite
Router template, which to me looks like a circus ride
Belt Sander, which looks like it'll do a good job, but seems time consuming and doesn't really get into all those little areas
Orbital Sander, which seems to work okay
Chizel, which worked for me, but i think its kinda iffy, as much more wood can come off due to grain shape, inner faults, etc.
and
Microplane, which is the newest one i learned about just surfing around in this forum.
I'm sure there's lots of other ways, but which way do you like the most?
ShopBot CNC Router.
Haas VF-3 VMC
-
Hey, this quote came from the thread you referenced....
Their website is http://www.mscdirect.com . The pieces I bought are their part numbers 0879024 (3/8" counterbore) and (5/16" pilot) - these are for the recessed lip on the ferrule.I also bought a 5/32" pilot with 5/16" couterbore to get the main ferrule counterbore done.
This quote seems to reference part #s.
Here ya go
Thats a 3/8 counterbore and a 5/16 pilot...you should make sure these are the sizes you need for your ferrules
-
The extra mods are helping out a lot as well. Jmrentis was johnny on the spot this morning, getting the 3 pages of porn spam taken care of. Thanks for everything you guys are doing to keep this place clean!
-
3 Days should be plenty...as soon as the weather is nice spray that sucker!
-
I don't know jack about recording....but I thought it sounded great. I liked your tone a lot.
-
I hear ya Ihocky2. The cnc machine I use is normally used for metal. If I am using it for guitar stuff I have to go through and clean everything up. It can really be a pain. I have been fortunate though, the couple of drips I have encountered (when I didn't take the time to clean up properly) have sanded out.
-
my dad is an optical/mechanical engineer, so he makes microscope and the stuff you see on shows like CSI. the company he works for specializes in spectroscopy, so he has a lot of machines that are precise down to the .0001 of an inch. I'm pretty sure he can handle the guitar, he's been doing this stuff for many years. Also, if he has trouble he has many colleagues, and also works with many different machine shops he could get some help with.
(none of the machines have oil all over them, well maybe the drill presses, but not the CNC)
size neck is it designed for?
thanks
I used the standard gibson fretboard from Stew mac. The one that is not quite 24.75 for scale length (I can't remember what the exact decimal is). I used a custom neck design for my guitar....I can throw that file out as well if you want. Here ya go: http://dl.getdropbox.com/u/82884/LP%20NECK.IGS. I used a 4 degree neck angle and that worked out pretty good with my tune-o-matic bridge....YMMV. Please make sure you do the proper calculations for your bridge.
Phil...thanks for the compliments....I have a fairly decent PRS custom surface as well...Let me know if you want to play with it.
-
Good luck
-
Ok here we go. I am including a link to a LP file that I made. This is not a full 3d solid like you would create in Solidworks, but you should be able to take what I have here and create what you need. In this file you will find the outline of a LP with all the cavity shapes. You will also find a surface that replicates the carve on the top of the Les Paul.
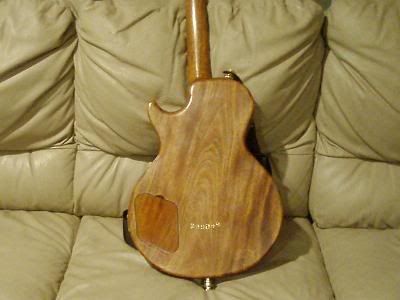
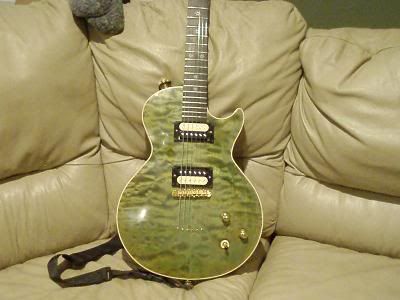
A LP usually has 1.5" thick mahogany body with a .750" thick maple cap on it, for a total thickness of 2.25". The carved section is .5" deep at the deepest point. If your dad takes the out line and extrudes it to 2.25 and then lays the surfaces for the carve so that the highest point of the carve is at the top of that 2.25 extrusion, he should be able to trim his solid model the that surface. It sounds confusing, but he should understand if this is what he does for his work. You will have to do a little research for pickup pocket depths and what not...I don't remember what I used. Here is a link to this file:
when you click the link just choose to save to disk. This is an IGES file...your dad should be able to open this. Here are a couple of pics of the LP I built from this file.
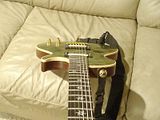

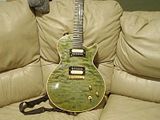
The body outline is right on the money of a standard LP. The carve is my own creation and is a little more extreme than a regular LP. I did not include the neck pocket in this file...I varied from the standard LP and I didn't want to confuse anyone.
-
Oh...I totally misunderstood you wez. The wood knob thing will be way easier without having to monkey around with a metal insert. I will try to post some pics of my knobs tonight.
-
I figured I would need to have some sort of metal insert and I have the facilities to make my own...I was just hoping someone had already found a ready made alternative.
-
Thanks Wez...I figured I would probably need something metal inside of there for the knob to last long term.
-
When you guys make your own control knobs out of wood....do you put some kind of metal insert in them? Do you use a set screw to hold them on? Or do you just drill a tight hole in the wood?
-
binding is ebony. Simple yet effective. I didn't wanna go to crazy with the little details for my first build.
I think it looks great! I think the binding and all that trim type stuff looks like the hardest part to get right on an acoustic guitar.


My Black Limba Acoustic
in Acoustic and Hollowbody Guitar Chat
Posted
I realize you are spraying in a booth, but would it be safe to spray this product outside with a respirator? That's how I'm spraying nitro right now.