


jer7440
-
Posts
1,056 -
Joined
-
Last visited
Content Type
Profiles
News and Information
Tutorials
Product Reviews
Supplier Listings
Articles
Guitar Of The Month
Links and Resources
Forums
Gallery
Downloads
Posts posted by jer7440
-
-
These discussions crack me up. The general public doesn't know jack about music...from a technical standpoint. They listen to DF and they hear some guys playing the guitar really fast. If you tried to explain to them why you think DF sucks so much, they would just look at you with a blank look and say "What?" They don't have your understanding of the technical side of music. Most honestly don't care. If it sounds kinda cool and you can tap you foot to it, or it is entertaining in any other way, average people are happy to buy it. Are these people stupid mindless sheep because they don't possess your "vast knowledge of music" and "ability to judge who is and isn't talented"? No. They just listen to what sounds good to them without over analyzing every note.
So as an artist you have a choice to make...do you pursue critical acclaim(with deep, out of the box music) or record sales. A rare few manage both.
-
The guitar looks great! Nice work. The only thing I would change is I would have used a black control cover.
-
No one said you have bad taste. Just different taste. Something that is bound to happen in a group of this size.
-
I probably have about 2 hrs into programing and cutting the 2d stuff. It took me about1 1/2 or 2 hrs to create the 3d surface for the carve, and the carve takes about an hour to machine. I had about 4 different endmills to cut this. A 3/4" 1/2" and a 3/8" straight endmill for the 2d stuff, and a 1/2 ballnose endmill for the carve
Faster than me
 Course my CNC wont take CAD imports (about to change I finally found R14 which is old enough to work) so it takes me FOREVER to get the body shape right.
 Looks awesome though
You'll be surprized how fast that sands smooth. 15 minutes topsYeah...modern equipment is nice. I downloaded the file from PG and I had to clean up the outside contour to get rid of the splines. create my tool path in Mastercam, and then download the g-code to the mill over the network. It would take some mad programming skills to program guitar bodies at the machine!
-
Prostheta, You are right on, 15 or 20 min with a scraper and some sand paper and the top is looking pretty good. I will cnc the necks also. If you look back in my LP thread, I think I ran through the steps I took to cnc a neck.
Maiden, I haven't decided what to do with the cutaway yet. I may leave it the way it is...it looks pretty good and I don't play up that high very often anyway.
-
Actually, the control cavity is cut in the back. I will probably set this body up in the mill one more time to do the control recesses and the bridge and string through holes
I probably have about 2 hrs into programing and cutting the 2d stuff. It took me about1 1/2 or 2 hrs to create the 3d surface for the carve, and the carve takes about an hour to machine. I had about 4 different endmills to cut this. A 3/4" 1/2" and a 3/8" straight endmill for the 2d stuff, and a 1/2 ballnose endmill for the carve
-
right now there is a 2 degree drop from the bridge to the neck...this may need to be adjusted slightly, but there isn't much interaction between the fretboard and the body on a PRS
-
Here is my latest hot off the CNC. Its a PRS custom 22 design based on the cad drawings done by AlexVDL (I think), found in the download section. The outline of the guitar and the pickup and neck pocket locations are from Alexes drawing. The 3D carve is my own programming creation. I realize the carve isn't an exact copy, and it needs a little sandpaper adjustment, but I like it. The body wood is alder and the top is maple.
I joined forces with another member, PRSman. He has a bunch of wood and I have the CNC, so we are making a couple of these.
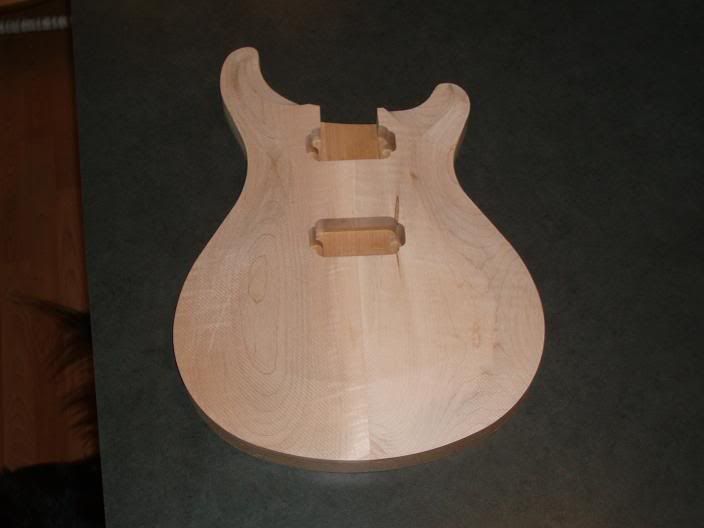
Here is another pic. another view
-
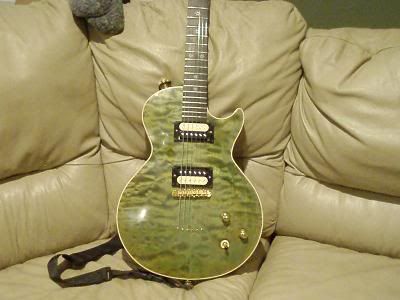
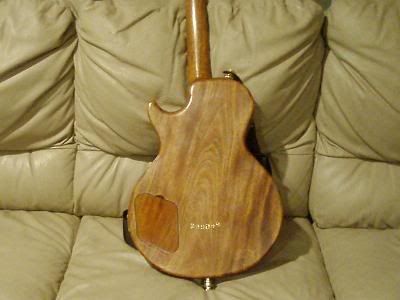
Well, I finally wired this thing up last night and played it for the first time. That was pretty cool. I have the admit the finish kicked may @$$! It looks good from far, but far from good :D . I made a few mistakes and I was running out of warm weather to spray lacquer, so I decided to just put the thing together and see if it will even play! It plays pretty good and I haven't even finished all the final set up stuff yet. I figure I will play it over the winter and if I am so motivated, I will strip it down and refinish it in the spring. I will try to add some pictures this afternoon.
Here are those pictures
-
Can any of you guys point an amp building newbie (actually pretty much and electronics newbie) in the right direction to start learning about this stuff?
-
Well, I finally wired this thing up last night and played it for the first time. That was pretty cool. I have the admit the finish kicked may @$$! It looks good from far, but far from good
:D . I made a few mistakes and I was running out of warm weather to spray lacquer, so I decided to just put the thing together and see if it will even play! It plays pretty good and I haven't even finished all the final set up stuff yet. I figure I will play it over the winter and if I am so motivated, I will strip it down and refinish it in the spring. I will try to add some pictures this afternoon. -
Like Aidlook said...you may have to make the intonation adjustment with no string pressure. This will surely be a pain...but it may be you best bet.
-
Hey, I love the project! It's nice to see another CNC guy on here.
-
Thanks Drak and Maiden69. I am one of those who didn't know that thinner came in differents speeds. I will have to check around for a slower thinner. Does the can indicate the speed of the thinner? I never looked real close at the can I have right now. I just figured thinner was thinner. Do you accomplish a similar result by using a thinner mix, ie. more thinner and less lacquer?
I am currently using a top loader gun...so even if the air is disconnected, I still get paint if I pull the trigger. This makes it kind of hard to judge my mix by my air pressure. The 35 psi number was just something I read somewhere, or somebody told me to try. I will have to try cranking that down. I was also thinking about trying a bottom feeding jam gun. I was contemplating some bursting and I don't think my current gun is up to the job.
I'm pretty sure what I am seeing is orange peel. The finish dries and it is bumpy or almost pebbly feeling...like the peel of an orange.
-
Syxxstring, The 35 psi was at the gun, and I am using a 3/8" dia. hose.
Maiden69 Thanks for the suggestions. I guess I will try a thinner mix, and play around with it a little more.
-
Hey, I was wondering what to adjust on my spray gun to reduce the orange peel that I am getting. Here are a few details:
1- This is my spray gun. sray gun I know...very low end, but it's what I have to work with.
2- I am using Behlens stringed instrument lacquer and thinner.
3- I have been spraying at about 35 psi.
4- I have tried changing my finish mix... first I sprayed the lacquer straight out of the can (like the directions said), then I tried mixing 1/3 thinner 2/3 lacquer. The thinned mix seemed a little better, but still not great.
I have spent a ton of time trying to get this level, and that's fine, but I have 2 small sand throughs that need to be re sprayed and I don't want to start over with the major leveling if I don't have to. And it would just be nice to understand how to best set up my spray gun
-
It's very sturdy. The extruded construction makes a very sturdy structure even though the walls are fairly thin. I find both of mine to be very handy for all kinds of sanding tasks.
-
Hey guys,
I recently had to level the frets on my LP project and I had one of these sitting around from my RC airplane building days.
Works great with adhesive backed sandpaper, its light, and it has a nice handle. If you look through the web site, they have them in several different lengths (I also have the 22" one). When I put my straight edge on it, it was dead flat, but if it wasn't you could easily true up the bottom edge on a flat surface with some sand paper. Like you would do if you tuning the sole on a hand plane.
Anyway, it was something I hit on that worked and it was reasonably priced so I thought I would throw it up here.
-
HB You are rippin it up man! I love that neck! The inlay concept is so cool, and I love the binding with the back/ white thing....nice work
-
Sounds good to me....thanks!
-
Hey your guitars are looking awesome. I have a couple of quick questions for you. Did you mask the bindings or the body of the guitar at all before you dyed the top, or are you just really careful? On the same note, did you mask the top for the grainfill?
-
I'm asking because I have some cracks on my body and so looking for ways to hide them.
Pants might be a good place to start.....I'm sorry, I'm an idiot
-
Love the paint man! I can't wait to see this all together.
-
Cool! Thanks Southpa.
 Course my CNC wont take CAD imports (about to change I finally found R14 which is old enough to work) so it takes me FOREVER to get the body shape right.
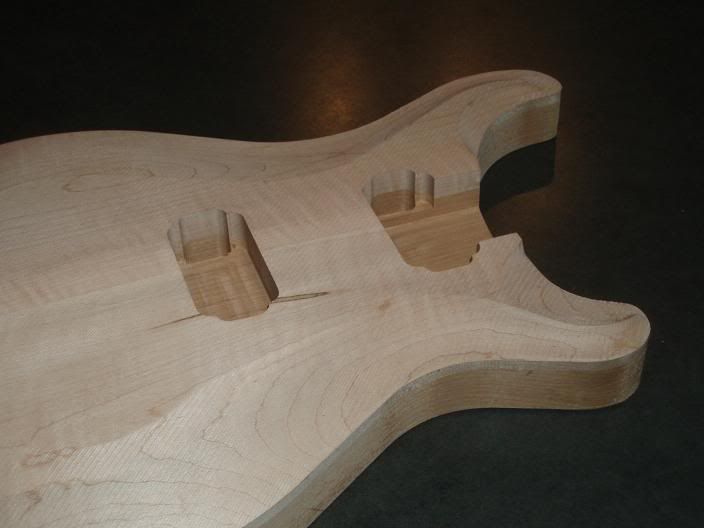
Cnc Prs
in In Progress and Finished Work
Posted
Just a quick update...I saw PRS man on Sat. He has the maple neck blanks glued up and a couple of sweet blood wood fingerboards all slotted. The blood wood on the maple looks great. I hope to machine these necks in the next couple of weeks.