


n8rofwyo
-
Posts
314 -
Joined
-
Last visited
Content Type
Profiles
News and Information
Tutorials
Product Reviews
Supplier Listings
Articles
Guitar Of The Month
Links and Resources
Forums
Gallery
Downloads
Posts posted by n8rofwyo
-
-
The closest thing that I have worked with that looks close to that is Cocobolo, but it didn't have near that many "channels" in it and it didn't get near that dark until several months after I had milled it. Safe to say it ain't maple but beyond that....
Nate Robinson
-
MG, that last one you posted (in #77) really does it for me too. Just kinda fits when I look at it next to a pic of your string-on mock up. But like you said, with the logo being on the cover you do up a few and change em out with your strings.
Nate Robinson

-
Lets approach the tension vs. length question from a different perspective. Say you want to set up an old fashion clothesline in your back yard. If you clothsline is 10' long, it won't take much for you to pull the lines taught. However, if the clothsline is 100' long it will take a large amount of force to keep those lines from drooping. Now this is an exagerated example, but the underlying principles are simaliar to what Mattia is talking about. As was stated earlier mass plays a vital role in this. The thing to remember is that mass can be added by increasing the diameter of the string as well as adding length to it. Anytime a piece of nonrigid solid material (string, rope, cable, ductile metal, etc.) is stretched to a specified tension there is a relation to length and or diameter. More length and or diameter will always mean more force will be needed to reach a specific tension.
Hope that makes some sense.
Nate Robinson
-
A frett board can be quickly and precisely cut when the shooting board is used in conjuction with Stewart MacDonalds Frett Cutting Table Saw Blade (item # 1557), and Stewart MacDonalds Dual Scale Frett Templates (item #'s 4915 - 4920).
-
Leads in several reviews, and brand is renowned for its quality.
Little steep at $400 though, so this is what I run (about $200).
Nate Robinson
-
You could shim the nut and deepen the other slots, or fill the slot with epoxy (or some such durable filler) and refile it. Personaly, I'd buy another nut and redo it. I might even flop the existing nut over and practice filing it while the new nut was in the mail.
Nate Robinson
-
Common bevel angles are 15 20 25 30 degrees. The bevel needed varies from plane to plane (like a low angle smoother or high angle scraper) and the hardness of the stock you are working. I have better luck working very hard woods with larger bevel angles. 25 degrees would probably be a good place to start, then follow that with the 5 degree cutting edge and micro bevel as MATT said. I have different planes set up with different bevels - a few don't even have the 5 degree cutting edge. The micro bevel is a must, though, that alone will make a huge difference in how effective the plane is.
The stones used to sharpen the blade is personal choice, some like the jap stones, some like the diamond embedded ones, or good old arkansaw stones - doesn't matter as long as the stone is flat. You can sharpen without a honing guide but they're about $15(and up) and do make the job go easier, otherwise ya about have to set your knuckles to the stone to maintain your bevel and that starts to suck pretty quick.
This link may help some.
One way to tune and sharpen a handplane
Hope it works out for you,
Nate Robinson
-
Zoso: the only problem is that you just reinvented the wheel and this wheel requires alot of attention to keep you going down the road. Creative idea though.
Nate Robinson
-
What do you have in mind for a finish? I'm seeing an amber hue with a burst perhaps. Gotta admit I was a little sketchy about the f-holes but they have quickly grown on me.
Keep up the good work,
Nate Robinson
-
If you are looking solely for the best quality single plane you can get for the above mentioned tasks this is as close as I could find retail.
But for $150 you should be able to pick up the following by looking around:
Modern Stanley Jack $49.99 Will take some work to get it in shape but on a budget it should do the trick. You would be much better off searching for a Stanley 605c Bedrock #5 (LN's is based on this model) They can get pretty pricey but may be found at garage sales, flea markets,etc. for a fair price. If you do pursue looking for older stanley's the baileys aren't too shabby, but given the choice I'd pick up a bedrock style. Just my opinion, though, as I find them easier to initially tune up. If you are thinking of going the route of buying an older plane to tune up you may want to start by reading up and tuning your block plane. It'll let you know what you can realisticaly do, and a good block plane is always welcome in the shop anyway.
Anant spokeshave $16.99 Anant's planes aren't all that great, but I have had good results with this spokeshave.
The other two planes I use regularly are; a shoulder plane, and a # 7 Bailey smoothing plane. But I couldn't find anything that would fit into the current budget, and as these are a bit more specialized, they may be something to consider down the road.
But with a jackplane, blockplane, spokeshave and a couple of scrapers you should be able to meet most of your needs one way or the other. Hope this is of some help.
Nate Robinson
-
Looks good, Idch. Are you sticking with the original finish idea? I think the translucent red over black would look pretty damn sharp on the rocket.
Hope everything continues to go well.
Nate Robinson
-
Ok, at this point all of the woodwork is done on the body, with the exception of drilling the holes for mounting the bridge and pots. I am waiting for the bridge and pots to arrive before proceeding down that road. I have run across difficulties with the battery in my camera and as such am forced to use my wifes. Unfortunately the resolution of her camera leaves something to be desired. This is the only pic out of 13 that came out worth a damn.

This is a deviation of the general finishing technique. I have sanded the body to 150 grit at this point. I put a light coat of primer on with the sole purpose of sanding it off. While I hesitate to recomend doing this, the reason I do it is that I have a hard time picking out all the minor deffects or blemishes that result from working the wood. In doing this I find it easier to spot blemishes or eradic sanding that I tend to miss, as the blemishes turn up after sanding back to the wood. This, for me, makes spotting those blemishes much easier, though it is an added expense in both money and time. More sanding to come in the next few days, then a real primer coat.
Nate Robinson
-
Hey Idch,
How about PGatPG.
Ya know; Pickguard Guru at Project Guitar!!!

Nate Robinson
PS: Sorry couldn't help it.
-
Why do you want someone to build it for you?
Do you not have the tools?
Maybe no shop?
Not enough knowledge/skill?
You can do a neck with nothing more than a backsaw, square and sanpaper. Not the easiest thing to do but on a budget it works.
Many members build fantastic guitars out of rooms in thier houses.
Might have to buckle down and improve your knowledge of guitars as well as practicing on cheap scrap material (as damn near all of us here have done).
Not trying to be a pain in the ass here, but it is Project Guitar, not Skills For Hire. However if you can find someone willing to do it, more power to you.
Nate Robinson
-
I think that the "almighty dollar" will probably make the decision for you.
I try to do as Mattia says, and get the most bang for my buck. Obviously you want the best you can get, who doesn't? But... you have to weigh the cost versus the use, if you plan on really putting the router through it's paces - often- then go for it. On the other hand, if you are using it solely for hobby guitars then there is only so much you can logistically do with it to neccesitate the cost. Personally I run a Bosch model 1617EVSPK (both for professional and personal use). Haven't had any complaints yet.
Nate Robinson
-
I hope I don't overstep my bounds here, but... I think that LK is hoping that you take a little initiative.
Electrical diagram description (posted in a pinned elecrical thread by LK)
While these questions are sometimes answered by patient members of the forum, I find that showing that I am willing to do some leg work gets much more informative and sympathetic responses.
I don't want to appear as though I am on a soapbox, though, as I had to read the thread I linked three times before even the basics began to sink in.
Hope it helps.
Nate Robinson
-
You want to hit as many of them as you can. When I first started using it on guitars I didn't sand between coats. After getting a ding I noticed what looked like a little piece of saran wrap at the edge of the ding. I grabbed it, pulled it, and a strip of poly came off in my hand. It was just like peeling an old sticker. I had to pulls "strips" of finish off for a solid 4 hrs. just to start all over with the finish.
Try gently hitting the edges with 400 grit, it seems to work well for me as long as use a light touch.
Hope all goes well.
Nate Robinson
-
Hope the project continues to go well, and don't be afraid a to post a picture of it.
Nate Robinson
-
Southpa: I read a post of yours a couple of months ago stating the same concept. I tried it and won't do it any other way now. Sags in the finish on the final coats fill my heart with an undiscribable(sp) hatred of gravity....especially with poly's nuance for "letting it all go".
Ledzendrix: The real bitch of poly is that as soon as you sand through it, the top coat- or finish - is blown. Nothing to do then but cuss and throw tools. It still bugs me to shoot over a mistake, but in this case its the best option.
By the way happy B-Day!
Nate Robinson
-
Saw that too and was a little skeptical. I don't think that Skill is an everyday use brand but... The price is right. My scales would be tipped depending on how it performs with the buffer attachment. If you get a chance to try that out please share.
Nate Robinson
-
GOLDEN ADVICE WARNING
It's a high-speed tool, practice (on scrap) is essential before attacking a guitar! Also, wear safety gear when working with this one.Idch is right about practicing on scrap and eye protection. Can't stress that enough! Key words for succesful routing are:
Plunge Base
Fixed Base
Guide Bushing
Bearing bit
Router Table
Collet (and shank size)
Variable speed module
Somethings to keep in mind while learning your router:
Make shallow passes, both in depth and in taking away stock at a set depth. This helps:
1)Take it easy on the motor of the router (lengthening the life of the tool)
2)Prevent router burn on the stock
3)Lessens the amount of residue build up on the bit itself (lengthening the life of the bit)
4)Lessens the odds of throwing "chips" (When making a pass with a router, you want to come into the stock with the grain and exit the stock with the grain runout. This reduces the odds of the bit grabbing the grain and ripping a chunk of wood (or chip) out of your stock.
5) Some bits are too large to be run with a handheld router and NEED to be put in a router mounted under a table. Most of these bits are profile bits, most straight bits can be handled from a hand held set up.
And for Pete's sake keep both your hands on the router. At some point you'll get lax and all of a sudden the router will grab the stock and try to jump out of your hands. Better it chew your project than your leg or gut.
Research, and get an idea of how to use this extremely versatile tool - it's well worth it!
Nate Robinson
-
I suppose it depends on the sound you like, but.. in my opinion the hotter your pups are the farther from the bridge you want to put them. However, its really a personal preference. What I like might suck to your ears. At that price, though, you may be able to experiment a little.
Sorry I can't help, I'm constantly in search of pups myself!
Nate Robinson
-
Set the neck and got the heel partly carved today. Also roughed out the neck carve.
Then slotted the fingerboard as per this tutorial
Pic of guitar prior to glueing the neck in

Also routed out for the pups, but camera was dead so no pics yet.
Nate Robinson
-
I'm in the same boat as you, Russ, I'm eager to see it with a little laquer. But there are only two outcomes that I can see.... It will either suck or shine, guess we'll see...
I was a little thrown off by the "interesting carve" comments. I know I left the carve heavier than normal for a PRS by the lower bouts but I thought that was about the extent of the difference. Then I asked my wife what she saw and she started pointing out all kinds of differences (leave it to a woman to tell you what you thought you knew
)Oh, I completely forgot about the pic for routing the truss rod channel. Here's the setup for that.
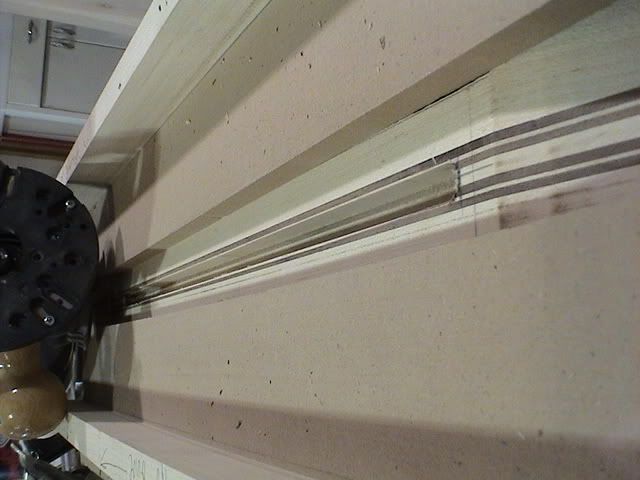
I use the same jig for cutting the truss rod channel as I do for leveling the body blank. Gotta love multi function jigs.
Nate Robinson


Band Saw Blade
in Solidbody Guitar and Bass Chat
Posted
Whatever you can control. A. Mahogany isn't all that hard in the grand scheme of things. I use a 3/4" 4tpi blade for resawing and a 3/8" 12tpi for cutting curves.
Nate Robinson