


RFR
-
Posts
99 -
Joined
-
Last visited
Content Type
Profiles
News and Information
Tutorials
Product Reviews
Supplier Listings
Articles
Guitar Of The Month
Links and Resources
Forums
Gallery
Downloads
Posts posted by RFR
-
-
Here is a link to Will "wanking" with some Jake E Lee riffs. It is a photobucket video
-
Mine is called the WB. The nickname is simplistic without any fanfare, as it is named after it's new owner, WIll Boggs of WB pickups.
This is a player, not a "case queen". Will plays it every day.

Specs and Features:
Koa neck with Indian Rswd fingerboard.
Vintage 60s fender fretwire
12 inch radius on a 22 fret thick Rswd board
A mixture of gold and chrome hardware at the request of Will.
The body is a solid chunk of hard ash from a reclaimed 25 year old solid ash bookcase. with mahogany top and back.
It is completely chambered almost like a 335.
Double bound body with bound "F hole."
Both Body and neck are finished in Nitro Lacquer, with the body finished as thin as possible. There is no sanding sealer, no pore filler, just straight lacquer.
Here is where it gets fun.
WB custom wound pickups are installed.
All pickups are wound with vintage 60s enamel wire and alnico magnets
The neck has staggered pole pieces, and the middle has flat poles so there is more picking clearance.
The bridge however is a monster!
It is wound so it will go from that "Tele Spank" to a P 90 growl!
OK, enough Yacking lets post pictures.


While I don't expect to win, ( there are so many beautiful guitars entered here) the guitar is still a winner!
Will Loves it and that is all that matters!
Here is a video sound clip,
http://s298.photobucket.com/albums/mm247/w...nt=102_4459.flv
and another,
http://s298.photobucket.com/albums/mm247/w...nt=100_4421.flv
Thanks for looking!
Roman
-
That is some very nice work! I'm not always the biggest fan of teles but that is beautiful and classy looking guitar. Also I never can seem to really like tele headstocks, but that looks really good! I think it's just because the wood's so pretty Basically, great job, that's an awesome guitar.
Thanks a bunch!
Here is another pose.
-
Hi folks, I haven't been here in a while. I have been awful busy.
I have some completed pictures of this Tele should you be interested.

-
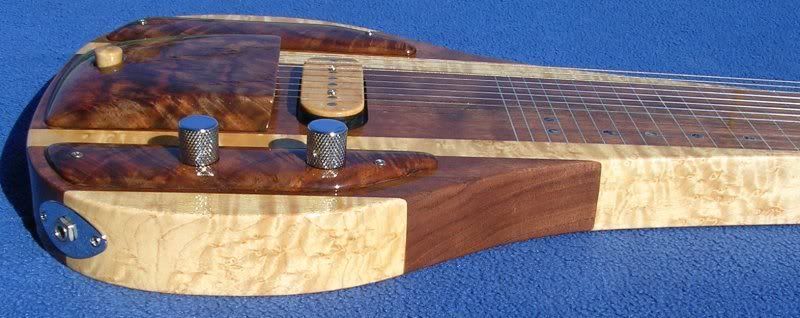
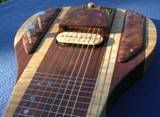
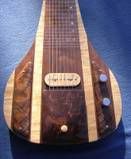
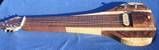
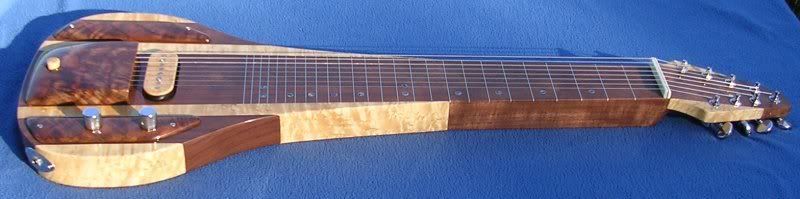
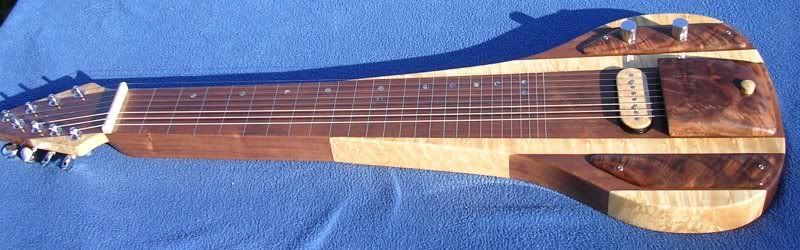
Here is my latest steel
Black walnut and birdseye maple
25" scale
Lollar reproduction Gibson Console Grand 8-string pickup
Tru Oil finish
.
.
<a href="http://"http://i54.photobucket.com/albums/g94/quarterbend/TD8/td8-5.jpg"" target="_blank">
 </a>
</a>
Damn Fine Piece!
-
beautiful work, looking forward to my own tele build this fall.
Thank you sir! Teles are fun to build and play!
Roman
-
Why would you need to paint the headstock just because you inlaid the logo?
I guess you missed this in the last post.
I am sure there are guys that could actually inlay my logo without any filler. but........................I'm not one of them!
For me, that would be real tricky to do a gap less inlay of my name by hand. I build guitars. I am not an inlay artist. maybe you are but I'm not.
-
Here is the headstock with the rist decal in place.
I was going to do an inlay at first, but couldn't bear to hide the figure in the Koa under black paint.
I am sure there are guys that could actually inlay my logo without any filler. but........................I'm not one of them!
So, I did a decal.

-
Should any one care to follow along, here is a link to the original build thread.
http://www.mylespaul.com/forums/luthiers-c...ups-dilema.html
Here is the Koa Neck after a coat of nitro.

-
I often times asemmble a guitar I am building before doing the finish.
There are a couple of reasons.
a) I like to do a final neck carve with strings on. No matter how they feel when you carve them they feel different once the strings go on.
this also gives me a chance to work out any minor bugs in the build.This one passed all tests with flying colors! I have enjoyed playing it.

-
Hi y'all. I'm new here.
In a step towards educating myself into building and setting up guitars I assembled one from parts. I'm not in a position to do the woodwork as yet. The parts are Mighty Mite neck and body. Maple neck with ebony fretboard, pretty big frets and an ash body with a thin but very striking curly maple veneer. From a distance of more than three feet it's stunning!
Anyway, it's assembled now, but I have a problem: it's buzzing along the entire neck, at every string. Strings are new, .010 gauge. Bridge is good. Action is actually pretty high, over 2mm (.08") on the low E and 1.8 (.07) at the high E. Relief is setup to factory spec as in the "Guitar Player Repair Guide (pg30,31)": capo on 1, depress string on 17 and measure on 7th fret: .3 mm, .012". The buzz is very noticable, also through an amp, it impairs the ringing out of the strings. They sound dampened. I replaced the nut with an Earvana, there's no buzz on the open strings. depressing at the second fret shows only a slight gap at the first, so that should be OK.
I've tried loosening the neck more to more relief, I've tried setting it straight. Didn't help. So I set it back to slight relief since I believe that the strings need room to vibrate, no?
Frets are perfect. Along several straightedges there is only the relief that shows. I have a Stewmac fret rocker, that showed no high frets, even when I had it straight, no relief. Checking the buzz with an LED like this method: http://www.schrammguitars.com/buzz.html and it shows it's usually lighting up at two to three strings up from the depressed one. So it's just not making enough of an angle coming away from the depressed fret? Therefore it needs more relief? I can't think of anything that would otherwise remedy that. So, just now I turned down the tension on the neck even more, relief is now a 0.6mm, .022" and if I capo at 7 the g-string now the led shows contact at every fret up until the 19th.
Oh, and pickups are further away than fender specs. over 1/8".
Now I like a fairly, but not extreme low action. And I play the strings fairly hard. But I do that on all my guitars and they don't buzz. I have two more strats and a PRS-type that all play fine that way. This one plays hard already and still buzzes.
I'm out of ideas on this one.
Can anyone please shed some light on this? What could I be doing wrong?
And I read about techs and pro players (GPrepair guide, pg 30, halfway first colum, and in the table pg 31) that they "like" their necks dead straight with low action. Like they have the choice to do that or not! How the @*#$ do they do that? That's going against physics! I would love to have this neck straight with low action and no fret buzz! Sorry, I'm slightly frustrated here.
You need to dress the frets, plain and simple. A fret file does not lie. Low action and a relatively straight neck IS possible provided the frets are properly dressed.
Roman
-
I think we need a "hats off" smiley for this one! Well done.
-
I think my trouble comes from this. To drill the holes for the screws, I used a bit that was the diameter of the "center" of the screw where the thread attaches, i.e., the full diameter of the screw thread had to cut through the wood. So it needed some elbow grease to get them in. Perhaps I should remove the screws and run the next-size-up bit through the holes? I just thought I should leave enough wood for the threads to grab since the neck must withstand so much tension. But this...
I just did something similar to myself on an electric bolt-on neck. So a question for the more experienced. When choosing a drill bit to drill a hole in wood, into which a wood screw must be inserted, how to you choose the size of the drill bit? Like geo, I chose to match the diameter of the "centre" of the screw, resulting in a very tight fit, and lot's of effort to get the screws in. I am worrying that if the bit is too large, then the threads won't have enough wood to bite into.
I do the diameter of the screw body and let the threads cut into the wood. If I am worried about the hardness of the wood being too much I will wiggle the drill bit a touch to enlarge the hole.
A bit of wax on the threads of the screw and we are good to go.
-
I know it is probably just another boring tele, but I love them!
No, that's lovely! The simplicity of that body is really beautiful.
You are a good man, Geo. Glad we see eye to eye!
There's a dang good reason that the same basic shapes have been selling consistently for the last 60 years. The simple, classic beauty of the Strat, LP, and Tele are undeniable. The PRS & SG are just more variations on a theme. Even in many of the BC Rich bodies, you can see a Strat or Tele. No, you can never go worng with something that's been proven to stand the test of time.
How true. They just work! Speaking of work, to me a Good Tele is truly the work horse of guitars. Whereas a nice Les Paul or PRS are The high maintenance "beauty Queens" A good Tele is like an old Timex watch, " takes a licking and keeps on ticking".
Teles, I love them.
Roman
-
Is this an acoustic you are building? Either way, acoustic or electric the neck needs to be removed.
-
I know it is probably just another boring tele, but I love them!
No, that's lovely! The simplicity of that body is really beautiful.
You are a good man, Geo. Glad we see eye to eye!
Roman
-
Here is the last for today. The neck is getting a soft V carve. Here is the initial rough carve.

-
Here we are doing the actual truss rod route.
The tape on the jig is to show where you stop the route.

Here is a shot of the completed route with the rod laid in.

-
Time to get this one off of page 4. The thread has been buried!
I have been working on the Koa neck.
The blank has been rough shaped. the next step is to drill for the truss rod nut.
I just find the center point and drill, nothing fancy.

Now I remove the F/B which is just glued with a couple of drops of glue and break out my trusty truss rod jig.
It is a very simple yet effective jig. It screws onto the neck with 2 screws and the router sits inside the walls, giving you a clean straight route every time.
This neck is getting a simple double action truss rod that sits on a flat bottom.

-
I skimmed over the build thread and wow what a nice build
i do have one question after looking and reading part of the post over there i am wondering was it worth fixing that body or would it have been easier to just build form scratch?
the reason i ask is it seems that by the time you fixed the neck pocket carved the top put the back on and re routed the controls you could have just built the body.
any way like i said really nice build or save and for everyone else if you didn't look at the build thread you need too lots more pics that will make you truely appriciate this build.
:D 
I could have built 3 bodies with the work put into that one!
This originally started out as the client just wanting a neck built for his EBAY purchase, then took on a life of it's own.
Hidden underneath, there was a really nice peice of wood and I couldn't see it going to waste.
Besides, I like a challenge
In case anyone wants to follow it here is the link to the original thread
http://www.mylespaul.com/forums/luthiers-c...hotgun-lew.html
cheers,
Roman
-
My vote went to RFR on the basis of it being the guitar that I'd most likely part with money to own. The shape is just a classic, the workmanship and materials look amazing, I love the look of the shaped top and a 12 string LP DC design intrigues me!
Thank you, sir.
Roman
-
More importantly however, the client loves it. that is the real and only person I need to please.
Bingo! We can debate looks and preferences all we want, and that's great because it sparks ideas, but when it's a comissioned piece, it's all about what THEY want.
But there's nothing wrong with trying to talk them out of a bad idea.
I agree . But I like it too, and think it is turning out wonderfully.
-
I like the idea of using figured wood for the F/B inlays. With this top, though, I don't think it's working. I'm all for color contrast, but there's nothing to tie the inliays into the body. Is it too late to tape off the blocks and dye them to match the top?
I happen to love the way this guitar is coming out. But I suppose, one way to accomplish what avengers63 is concerned about...although it's too late to consider doing this...would be to use matching flamed maple binding on the body and neck to tie into the maple inlays.
Thanks Frank, I love it too. More importantly however, the client loves it. that is the real and only person I need to please.
Here is another progress shot. The headstock is bound and the body is bound front and back. The neck has quilted maple binding.
She's coming along.

-
You ain't a noobie. you are a pofessional!
Hiya Frank!
Roman


Guitar Of The Month For March
in Guitar Of The Month entry/poll archive
Posted
Here is one of my Acoustic electrics.
I'll call it "Abbey"
Why Abbey, you may ask? Well, she just came back from Abbey road Studios. The owner fulfilled a lifelong dream of recording there and meeting George Martin.
Anyway onto the instrument.
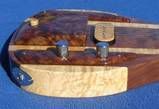
Completely hollow Honduras Mahogany body, very thin braced quilted maple top.
Honduras Mahogany Set neck, Ebony fingerboard.
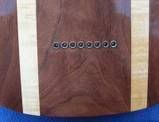
Dunlap 6230 fretwire, with Abalone dot markers.
Bone nut and saddle.
Body and neck are both bound in celluloid binding, finished in Nitrocellulose Lacquer.
Electronics consist of a Loyd Baggs under the bridge transducer and preamp system.
A TV Jones passive pickup is in the neck position.
The Baggs preamp includes full EQ adjustable by trim pots inside the back cover.
On the on the top you have a single volume and tone for each pickup controlled by a 3 way switch so you can choose the bridge neck or both.
Thanks for looking.
Roman