


RFR
-
Posts
99 -
Joined
-
Last visited
Content Type
Profiles
News and Information
Tutorials
Product Reviews
Supplier Listings
Articles
Guitar Of The Month
Links and Resources
Forums
Gallery
Downloads
Posts posted by RFR
-
-
This is probably NO help at all in solving the problem, but I will share my experience anyway.
I have over the years built many instruments out of Paduak. I have yet to find something that keeps the color.
I have tried Nitro, Poly, various oils, water based Lacquers, Urethanes, and it all still turns that deep brownish red color.
Roman
-
I had a floating router setup custom built.
Stewart Mcdonalds has one now in the catalog. it seems pretty simple but effective
Roman
-
Thanks for the votes folks!
Yes this month there are some fine instruments, I must say. it would be difficult for me to pick one.
As to the red devil, I wish I had some picks of the back. All shots however were with the girls and the temporary owner.
We did a buckcherry "crazy b**ch" photo shoot to follow the theme of the tour.
Thanks all!
Roman
PS. That's Roman not Ed Roman
-
I have found a simple triangle file helps. You file a bevel on the top of the slot. I have never had to remove the tang for an inlay
-
This is my first gibson style guitar. I normally do strats and the dot inlay's are easy, but now I'm doing an SG. I'm ordering the precut MOP inlays, they're 7mm thick I believe, and I have a flat template to clamp to the fretboard. The problem is' it's pre-radiused. So first, should I use some sort of dremel attachment to take advantage of the template, and then how do I make sure it's uniform depth with the radiusing?
First off, since you are using MOP rather than a plastic inlay material, you have no flex in the inlay.
If it was mother of toilet seat you could follow the radius and have the bottom match.
Here I would say, just route a flat bottom to the depth of the inlay at the highest point in the radius. The ends of the MOP will be higher, and you just file/sand them to match the radius.
Hope it makes sense I typed this response in a hurry

Roman
-
Thanks guys. I am a big fan of natural wood.The combo of woods seem to compliment each other.
I'll be putting on gold hardware and may leave it with out a pickgaurd as well. I love thinlines, but have never been fond of the way the pickgaurd "misses" the bottom horn.
Right now I have a bunch of guitars in the works, so it might be a little bit before I do updates on this build.
cheers,
Roman
-
Here is a Custom Tele I am building for my buddy Will Boggs of WB pickups.
Specs;
Chambered Ash core with Mahogany back and top.
Double bound body with bound F hole
2 strat pickups with a Tele bridge pickup
Koa neck with rosewood fingerboard

This is super light, and will can experiment on different pickup combos
More pics will come as it progresses.
Cheers
Roman
-
Hmm, worked 4 years ago, then after sitting 4 years, doesn't work. I know little about amps, but I have to say if that thing still has original filter capacitors, I bet that's the problem.
+ 1
That is the first thing I would check.
Roman
-
I was thinking about adding binding, but I dont think I'de be confident enough (especially with the added fretting difficulties)
yeah its tapered to unfortunately cant use that,
Since the neck is tapered, and the blank is still square, you could do binding.
Just use a binding bit with a bearing.
Fretting it will not be much harder than without binding. Fret it first then nip off the fret ends, file them flush and do the binding gibson style.
Even though you are not confident you may surprise yourself, and have something to be proud of.
Give it a shot!
Roman
-
Hey I recently glued my fret board to my neck for a guitar I'm working on but when I unclamped and inspected it, I found that an area had not glued properly and there was a gap, there was also no squeeze out from the glue so I'm assuming there wasnt enough clamp pressure in that area.
I'm wondering whether I can just insert some glue in to the gap (titebond in a syringe) and re clamp that area or do I have to re do the whole thing?
Its a very thin gap, I put a bit of paper in to see how deep it is, and its pretty shallow, approx 5mm before the two peices have glued.

http://i5.photobucket.com/albums/y176/neil...h/NeckPaper.jpg
Cheers
There are two ways to go.
one heat the neck and remove the fingerboard and start over..................OR......................
Take some ebony dust and water thin superglue
put the dust in the crack and shoot in some superglue. you will never see the fix.
cheers,
Roman
-
Charles,
Are you going to add a maple top?
The good news is it is on the bottom of the horn.
If you go dark back and do the color with a spray gun or airbrush you can make that invisible.
Roman
-
Wire it exactly as is and just leave out any tone wiring.
If you want leave the .001 cap at the vol pot. this keeps your highs as you roll off the volume.
Roman
-
Oh wow, that bridge and tailpiece look amazing! Really really classy.
I've seen a lot of these around the forums, and one question has always nagged at me:
If you're only carving the top into a guitar like on your first pic, how do you set up the two bodies so that they match perfectly, just a lot of setting up and trial-and-error? I can see it being really easy if you're starting with a block of wood, but when you've got a body shape to deal with.....
Thanks for the coments on the hardware!
Setting up the bodies is a bit of trial and error. you have to do quite a bit of setup to make sure the center lines are accurate.
I am making up a jig system so that set up is a breeze.
The whole system is an ongoing project.
Roman
-
I'm building almost exactly the same thing Roman, except i'm not duplicarving. Just an XY rail setup with a router attached for template cutting, or with the option of the router floating on springs with the router being slightly heavier than the springs balance for binding channel routing. It will be very useful for thicknessing also.
Cool. It is agreat asset to the shop.
I use mine for carving bodies, template routing, thickness planing, and have an attachment for a floating router setup as well.
With the floating router, I have for the first time in my building career, been able to route binding channels in carved tops in one pass!
-
How about planing it flat?
The board is starting out @ 1 inch thick. Planing out a 1/4 inch lift (or twist) is going to remove a lot of stock.
I would (if it was maple) slice it up for fingerboards and start fresh with another piece of wood.
just my .02.
Roman
Most necks are around 7/8" thick including a 1/4" finger board. So he would be removing that wood anyway. I would just plane it out and go from there.
True, but he is planning on doing a neck through body.
with one inch thick of warped board you do not have enough to angle the headstock ( unless using a scarf joint)
You do not have the thickness to do glue body wings on unless he laminates. To factor in the neck angle you would need more than a 3/4 inch laminate as previously suggested.
I would start with a more substantial chunk of wood if it was me.
Roman
-
How about planing it flat?
The board is starting out @ 1 inch thick. Planing out a 1/4 inch lift (or twist) is going to remove a lot of stock.
I would (if it was maple) slice it up for fingerboards and start fresh with another piece of wood.
just my .02.
Roman
-
This one is called the RED DEVIL.
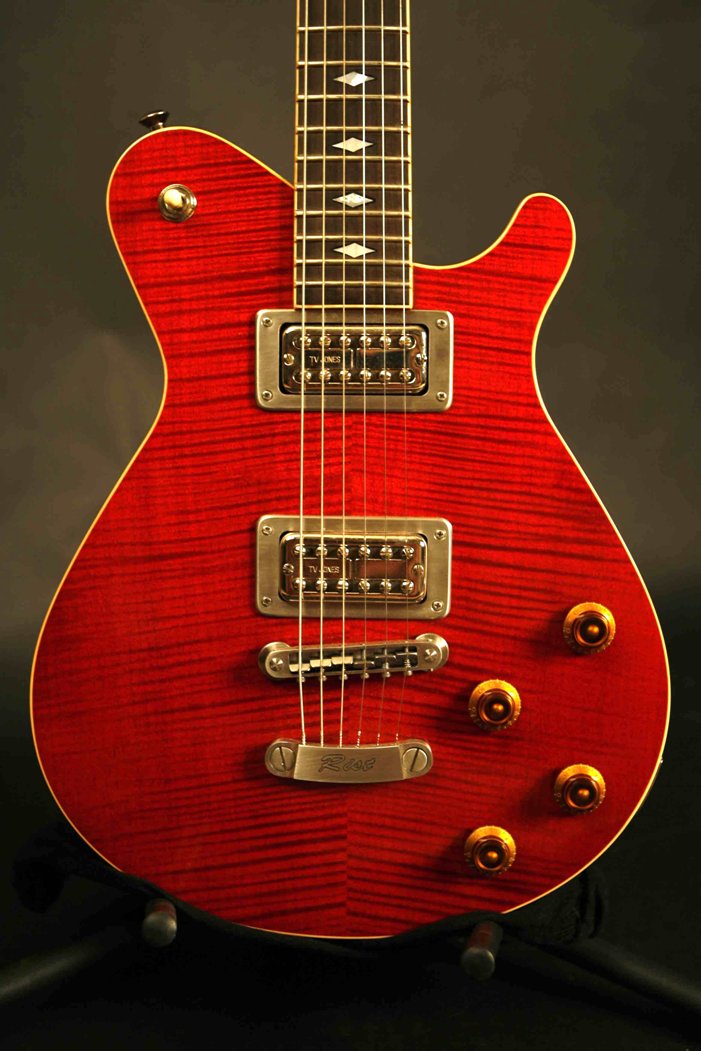
Here are the specs;
One Piece chambered Honduras mahogany body / with bookmatched flame maple top.
One piece Honudras mahogany neck.
Macassar Ebony Fingerboard/ with MOP diamond inlays and Dunlap 6230 fretwire.
TV Jones Hot Filtertron pups with custom made bezels
Custom made stainless steel bridge and tail piece.
Neck and body bound in cellulose binding.
Finished in Nitrocellulose Lacquer.
This instrument combines all the features I like from traditional instruments, while being a new design with traditional roots.
This particular one was on the road with the band Buck Cherry for the first leg of their tour.
Here is a picture with the girls...........sorry they are not included. ;-)

-
I vote for the acoustic. I really admire someone who can build an acoustic.
Everyone else's entries a nice too.
Roman
-
An old Gibson trick is this;
You take two inlays, the inlay that is already inlaid on the guitar is hit with some lacquer.
Then stick your second inlay on top of the first. The finish will act as glue, sticking the second inlay on the first.
Spray away, and pop off the second inlay with a razor blade. Works like a charm!
Roman
-
Here is a pic of the sister and the client.
This is the a little different in that it has the 2 TV jones filtertrons and the piezeo tunamatic bridge, but the construction is the same.
I'll dig up some more pics.

-
Here is another one I did. too bad I never got any finished pics of it.

-
Thanks Erik!
The switch controls the pickups just like a normal 2 pickup instrument.
In this case it selects the passive tv jones or the active baggs , and in the middle selcts both.
I looked at your services, NICE. at some point i'll be in touch for some wood.
Roman
-
Roman,
I am curious about your bracing. You mentioned acoustic style bracing and bridge block, and it looks like a pinned bridge. Tell us more
Pics would be super if you happen to take a shot or two Beauty finish!
Peace,Rich
Thanks Rich.
The Pins are strictly for the traditional look. At one point I worked at Tom Anderson Guitarworks, and they have a model called the Crowdster, which was an inspiration for my model.
There were many things I liked about the guitar, but some things I wasn't fond of.
1) It had a bolt on neck
2) the body size was very big.
3) it was strung thru the body and the strings came out of the holes where the pins would be.
I liked the idea of stringing thru the body, but liked the traditional look. So I went for bridge pins.
he stringing thru the back really contributes to the sustain and I needed somewhere to install a string ground for the TV jones pickups.
Instead of the Tele style string ferrules I machined a solid block with "built in ferrules".
The bracing is similar but different form traditional acoustic bracing. The Crowdster uses no bracing what so ever , but I wanted a thinner top, so opted for bracing.
With the smaller "Les Paul" size body, I wanted to get as much top vibration as I could out of the design, and I am quite pleased!
I wish I had some in progress pics but I don't have any........sorry.
Cheers, I hope that answers your questions
Roman
-
Here is a recent creation.
A quilt top acoustic/ electric
Hollow Honduras mahogany body with a neck block and bridge block.
Very thin western bigleaf quilted maple top with acoustic bracing.
Honduras mahogany set neck.
Ebony board
Loyd Baggs bridge saddle pickup and active electronics mixed with passive TV Jones neck pickup
The whole guitar weighs about 4 lbs and fits into a Les Paul case.
The baggs electronics are amazing.........True acoustic sounds when it is plugged in.

cheers,
Roman

Paduak And Purpleheart
in Inlays and Finishing Chat
Posted
Most all of the Paduak instruments I have built had gold hardware.
Although I am in progress of doing a Paduak/flame maple explorer right now and it will have chrome.
Roman