


orgmorg
-
Posts
800 -
Joined
-
Last visited
-
Days Won
5
Content Type
Profiles
News and Information
Tutorials
Product Reviews
Supplier Listings
Articles
Guitar Of The Month
Links and Resources
Forums
Gallery
Downloads
Posts posted by orgmorg
-
-
I think it would look incredible. My woodworking mind says the glue joints are better, but my artist mind says go for it!
-
Makes VERY sharp splinters, wear eye protection on the tablesaw especially.

-
Yeah, that looks a bit sketchy. What happens when the fingerboard is longer than the distance from the front of the blade to the front of the fence?
Two lever type hold downs can be easily mounted to a piece of plywood to make a very versatile tapering jig. Just draw the profile on the fingerboard, line one side up with the edge of the plywood, clamp it down, and cut. Then the other side.
-
I'm gonna say maybe your buddy's bass has a screwy output jack, or maybe a cord problem?
-
Matt, you can get an angled headstock out of 2 1/2" but maybe not as long as you might like for a 7 string. Draw it out on some paper like in the neck angle tutorial.
Another concern is grain runout, which makes for a weak point where the head angles away from the plane of the neck. That is the main reason for a seperate, scarf jointed headstock.
Hard maple is freakin luscious when it gets spalty! You are in for a treat.
-
Beautiful! Really nice curves!
Is that spalted maple? If so, did you stain it at all, or did you just find a real colorful piece?
Have you used the KTM-9 before? I've been thinking about checking it out.
-
Can you put it on the back?
-
I thought I would jump in here, since I have recently started cutting and drying my own wood.
First off, for instruments, don't bother with any log under 12" in diameter. You will not get anything out of it that will be stable enough, even if it is properly dried.
Do not confuse dead trees/logs with dry wood. logs hold moisture a long time, and dry unevenly, causing checks and other defects. Logs should be sawn as soon as possible. The exception, of course is for spalted wood. Spalt does not occur in the standing tree. It is a fungus that affects timber on the ground, often cultivated by the ambrosia beetle.
Rule of thumb for air drying is 1 year per inch of thickness, but that will rarely get it down to a moisture level acceptable for instrument building, and is dependent on proper stacking, relative humidity, and air flow. Drying must be controlled until the wood reaches 20% moisture content to prevent checking and cracking. It was said earlier that 5% is best, but you are not likely to find wood that dry. Actually, drying to 5% is risking other kinds of degrade. Most hardwood is kiln dried to 7 or 8 percent, and by the time you get it, it has usually crept back up to 10 or 12 unless it is kept in a humidity controlled environment.
I'm not trying to discourage anyone from producing their own instrument wood from salvaged logs. I just want to point out that, unless it is done properly, the results will be dissapointing. I hate seeing good timber go to waste, and I try to saw up as much as I can, but only a small portion of even the logs I buy proves usable for instrument building.
That said, file that chain and let 'er rip!
-
Or at least a cheapo plywood and pallet stock shipping box. That is an absolute shame, Matt. I really feel for you

Well, I guess things can only get better, now, right?
Who was it had the song about united airlines breaking the neck on his guitar?
-
Never heard of it.
But this is a page I found with a lot of info on it:
The genus is Flindersia, so it is not related to any american or european ashes ( genus Fraxinus ) Not even in the same family. The weight is 640-675 kg per cubic meter. American white ash is around 40lbs per cubic foot, swamp ash is around 25 lb/cu. ft. You can do the math.
-
Cool idea, but definitely make sure all metal parts are properly grounded.
-
English sycamore is also known as European maple, Acer Campestre.
Other way around, apparently.
This puzzled me, so I looked it up. Acer Campestre, European, or field maple is sold under the name "English sycamore. " New one on me.
Mikestro, if this is the wood you were referring to, please disregard my coments on sycamore. There is sycamore ( Platanus sp. ) in England, isn't there. Is it perhaps called "planetree?"
Sorry for barking up the wrong tree.
-
In other words, so that the glue joint is in line with the back of the headstock.
-
I also forgot to mention, the joint would only be about an inch across total because I'm laminating this peice of maple with ebony and purpleheart.
Ok, I see. In that case, I agree with Wes.
The puzzle piece stuff is fine for Japanese joinery, but simpler is better in this case, and a butt joint is worthless in almost any situation.
-
That's about what I do, except I drill smaller holes to accept 16ga brad nails. That way, it can be done on as narrow a piece as you can use.
-
In your design, is the headstock a separate piece, or one with the rest of the neck?
As it stands, where would the joint be placed?
-
Cherry is quite like soft maple in many ways.
Lime IS basswood as far as i know, just another name. The "limey" name, apparently.
English sycamore, if it is like the american, is very nice, too. I wouldn't make a one piece back with it, though, as it likes to warp. 2 or 3 quartersawn pieces would be better. Also, the quartersawn will show a flake figure that will compliment the lacewood very nicely.
-
A set neck is glued into the body with some form of mortise and tenon joint.
A neck thru is when the neck material runs the entire length of the guitar and body sides are glued on to it.
A bolt on neck, well.. that is what you have if I am not mistaken.
If you are worried about weakening it with the bigger cutaway, leave the body a full 1 3/4"
Also, dig thru the old posts here, there really is a lot of good info.
-
Also, if you did steam it apart, you would still have to sand off the glue and then plane the faces again to ensure a good bond.
For the record, I didn't mean to imply that the neck would be an acceptable substitute for one properly done, only that it would be worthwile to continue with it, rather than scrap it. It's not too hard to screw up a neck in the carving process either, so why not start out on something you can afford to make mistakes on?
Sheep?
-
Cool, thanks! I figured since I'm gonna have it, I might as well use it. So, it seems the longer scale really helps out the 5 and 6 string basses ( with low strings ) but it wouldn't hurt a 4 string either, I suppose.
-
I just ordered a fretting template for 25" scale, and it has 35" on the other side.
This is new to me, I've only ever played 34" scale.
Who makes 35" scale basses? I assume there is a precedent for this.
How do they sound/play/feel compared to the 34" ?
-
As far as necks go, I think I would hold off because of its "conforming" abilities. I mean, like hickory, it succomes to gradual bending pressure.
Could you elaborate on that please? I am not doubting you, I'd just like to get some more info, since I had been planning to make some more of these.
Possibly carbon fiber strips/rods would help out?
-
Cutting them was fairly easy, I just ripped the maple pieces at an angle, and sandwiched the wenge strips between the halves. Gluing it is the tough part, everything wants to slide in a different direction.
Are you a HP Lovecraft fan, Lovekraft? I grew up in Providence, RI, and my grandparents are buried a few plots over from him.
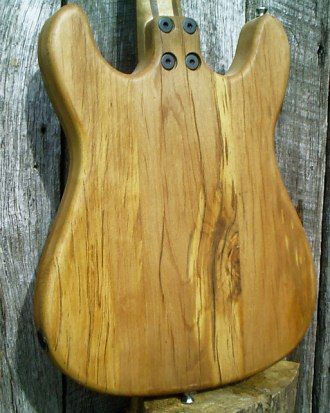
One more of the barnwood guitar, showing the back. I've been playing around with using old wood, trying to use the "defects" as part of the design.
-
Wow, this opens up a whole new range of possibilities for me, since my girlfriend makes quilts! I could make a REAL quilted top!
Seriously, I think I'm gonna try it... along with all the other wacky ideas in my addled brain.


In Progress: Doubleneck 12/6 Strat
in In Progress and Finished Work
Posted
I love the bookmatched spalting patterns. It really gives it that freakish siamese twins look.