


guitar_player
-
Posts
262 -
Joined
-
Last visited
Content Type
Profiles
News and Information
Tutorials
Product Reviews
Supplier Listings
Articles
Guitar Of The Month
Links and Resources
Forums
Gallery
Downloads
Posts posted by guitar_player
-
-
I have a couple electrics I have to finish up and I have to make some jigs and stuff for this so I should be making some progress in a week or two. It's going to be pretty much a standard dreadnought, it will have walnut back and sides, sitka spruce soundboard, one piece mahogany neck, walnut headstock veneer and pickguard, ebony bridge, and a striped ebony fingerboard. I'm going to use pre-shaped braces for this one if there's a next I'll do my own and I would probably have to since I'm hoping to do a 12 string if I decide to build another acoustic.
back:

sides (all or most of the sap wood should be cut away):

soundboard:

neck blank (big enough for 2 necks):


-
I have a nice piece of flame maple measuring about 42 in X 12 in X 1.5 in and am planning on making a neck and maybe a bookmatched top later. The problem is there is a slight bow in the wood, sagging somewhere near the middle. My dad suggested screwing the board to a known flat slab that was slightly longer than the maple and run it through the planer. After a couple of passes showing no improvement, he thought maybe if we stuck a thin shim under the bow in the middle, it would keep the planer from pushing down on the middle of the board and thus would give us a flat top to work with from there.
Is this the best way to get a flat surface? What methods have you guys used if you've run into the same conundrum?
Thanks and Merry Christmas to all.
The only way I think it could be done properly is face-jointing one face most likely the one that's not concave. It's 12" wide and most people wouldn't have access to a jointer that big. What you could do is do it with a router it would take a while though. you could attach it to a flat surface and set up 2 sticks taller than the maple by a little bit at least and attach a longer piece of wood to your router base (doublestick tape) then rout away until everything is routed. Planers will only work good if one face of the wood your planing is flat since it will copy imperfections into the other side that's why you should face-joint everything you put through it if possible.
-
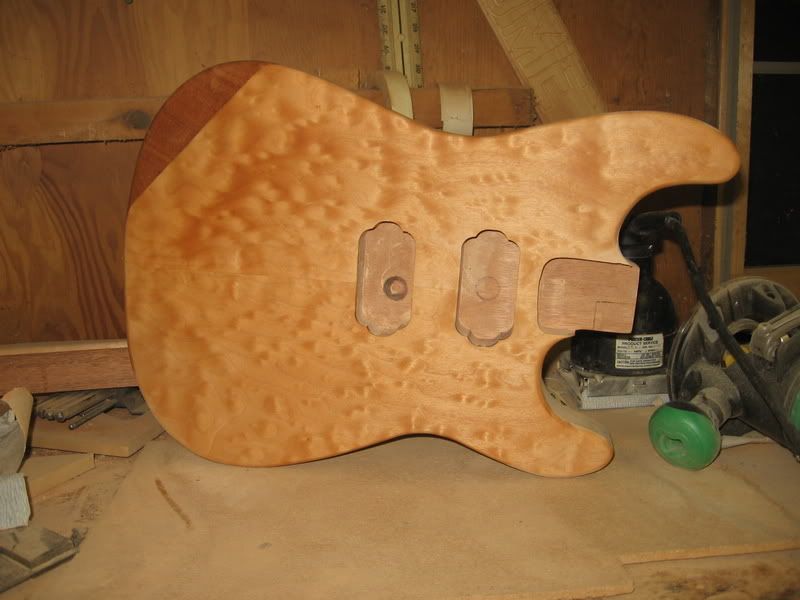
I got the wings sanded and carved today and I routed the control cavity. I couldn't fit the recessed output into it so it's going to have an sg style output jack. I still have to carve the back of the bottom wing. I did the carves differently than the tiger, I like them this way better it reminds me of some of the alembic guitars and I think it flows better with the maple.


I can't decide weather or not to do an arm contour or not, it would be more comfortable but it will change the look a lot. This is how I'd do it, any opinions?
-
I had to start the neck over but decided not to do the maple strip. I didn't think the neck with the strip looked too good with the body pieces after seeing it. Mahogany with 2 maple thin maple strips would have looked better but I didn't think of that until after the headstock was glued on. I also rough cut the body. I'll sand it tomorrow rout the control cavity and output jack cavity and do the carving. I'll also glue some maple wings onto the headstock and glue on a bookmatched quilted maple veneer (scrap from the body) if the truss rod comes from stewmac.


-
Exactly - although it would be another case of "i'd prefer to be thwacked by the airbag than..." :-D
I can only imagine the day when routers are given artificial intelligence to prevent or mitigate the results of accidents, and you end up buying one with a personality like Bender who insults your work and insists on smoking cigars near your workpieces (and flammable dust/chippings).
Has anyone used/bought one of these tables?
I've used the cabinet saw version and it's a great saw I hate having to use mine compared to the sawstop not just because of the safety feature.
How about a drill press that shuts off the second the damn chuck starts to fall out ! Oh yeah, probably only needed on the cheap imports, then hard telling what the "safety feature" would really end up doing.Anyone know of anybody getting their hand cut by a table-saw blade when using adequate sized push sticks ?
I've only had the chuck fall out of my drill press once and I've had it for 5 or 6 years and that was right after I let my brother use it to drill hole in some metal and the table too
 . It's the cheapest Delta there is.
My dad said he was using push sticks when he cut off half his thumb. His push sticks are good sized too.
-
So what part of this is actually going to be like the Tiger? Other than the body shape, of course, it seems like nearly everything that could be different is going to be different.
Not meant to be a critique, just a comment.
Pretty much just the shape and the pickup setup. Someday I'll make one with the "hippie sandwich". In the beginning it was going to be more like the tiger.
I've got the wings and neck clamped up. The wings ended up being spanish cedar which is supposed to be a really good tonewood.
[


-
If your building a guitar you have a router right? You can thickness very easily with it. Set up 2 sticks of wood thicker than the wood to be thicknessed on the sides, doublestick tape a longer piece of wood to your router base and rout till it's the right thickness. I do this with smaller things when I have to remove a lot of wood (hedadstocks, backplates, truss rod covers) sice it's faster and easier than my planer.
-
Thanks to MAGGOTBRAIN I have the plans for a Tiger I got them a few months ago but didn't get to start until today. I ordered all the parts I don't have and will hopefully get started tomorrow.
I am starting my next guitar build. It's going to be a copy of Jerry Garcia's tiger. It will be neck through mahogany neck with a maple strip down the center. The body wings will be mahogany sandwiched between quilted maple. 24 3/4" scale rosewood fingerboard. Jumbo stainless steel frets. Output jack recessed into the side like on my bass. The bridge pickup will be a dimarzio double whammy, the middle will be a dimarzio air zone, and the neck is a single coil that I pulled out of an old Ibanez that sounds great. The tuners will be locking Schallers. Hope to get pics up soon
-
I see that the real-life demonstration was the dude edging his finger towards the blade a smidgeon at a time, whereas in a real situation, you'd be moving it at up to a foot per second. I wonder if "normal" blades can take those 1000G of deceleration, or whether they're made for the purpose.
Here's a demo at normal speed:
You can use any blade you want, but tripping the mechanism ruins the blade. You also have to replace the brake. Personally, I'd rather be out about $200 than one of my fingers. The idea is that you never want to have to use this safety feature, but it's there if/when you need it. Kind of like airbags, I suppose.
In that example, it took a pretty big chunk out of the hot dog. It's not losing a finger, but man, that would still be a mess!
I would much rather have the mess lol. I bet my dad would rather have had the mess hat would heal instead of just part of it that he has now.
-
On my bass build I tried an ebony nut and it was at least twice as hard to shape and slot as the corian so I think ebony should be fine.
-
The list isn't what you need it's more everything that would be useful the more tools you have the easier it will be. You may want to start checking the tools section on your local craigslist regularly, you can find some good deals as far as tools I have gotten a like new $600 air compressor for $100 delivered to my door. Today I just bought a delta spindle sander for $45 I need to get some more spindles but I'll still be getting it for about 3rd the price of a new one.
-
Yes...but make sure to cut back away from the line a bit because the blade tends to lean around corners....
Just follow that and you should be set, it'll take a while but the good thing is you have a good jig saw and they cut pretty good.
-
All acoustic backs and sides are flatsawn anyway. Have a look at this picture. It depends on what sort of stresses the wood is undergoing and what measures are taken to alleviate those stresses. All guitar tops are q-sawn, easy to tell by what the grain looks like ie. parallel lines 1/16th to 1/8" apart. The top wood has to be q-sawn for its natural stability and its ability to deal with direct string tension while using as little bracing as possible.
So, the back and sides are fine not to be quartersawn? I know on my augustion AR-60 the sides are quartersawn and the back is close to quartersawn. That's the only acoustic I have to look at besides $50 ones.
-
There's a reason quartersawn wood is used. Check out a book about acoustic guitar building, it will explain it right at the beginning. Melvyn Hiscock's book about electrics explains it as well. Basically, it's more stable than flatsawn wood.
I understand that quartersawn wood is more stable, what I would like too know is how bad is it to have the back and sides flatsawn or as far from flatsawn as possible. The website I linked to is selling flatsawn back and side sets so I take it it's ok to use?
-
These are awesome. We got the cabinet saw at school when my teacher cut off his thumb and my dad uses them at work. There expensive though the contractor saw is $1600. I've got an an old table saw here, I hate using it I feel a lot safer on one of these lol and atleast the fence doesn't have to be locked on both side.
-
I just found out that all the spruce is quarter sawn and since I'm getting a good deal on it I'm going to be stocking up on soundboards might even try an electric with it.
-
I use a 40 grit flap wheel on an angle grinder then go to 100 grit on the orbital sander. Sometime I just use a belt sander for the arm cut other times i use a handplane or angle grinder followed by a belt sander followed by an orbital sander.
-
I am going to be building an acoustic in a month or two probably. I would like to have rosewood sides and back, I have heard the sides need to be quartersawn but if I go here they are not http://www.westpennhardwoods.com/shop/cart...ategory_id=1063. I can't get any rosewood quartersawn so would it be ok to use flatsawn or not? Also I am going to be getting a bunch of sitka spruce tops do these have to be quartersawn or is flatsawn ok? Should I just try to use the closest to quartersawn piece I can? Thanks for any help, I am new to building acoustic guitars.
-
I finished it today. I will probably switch the pickup out sometime when I have money for it. It plays great. It also has an ebony nut.


-
I might be worried about how dry they are but you could get like up to a 2x12 and have a 2 piece soundboard.
-
I have been re-building an old memphis bass that had a warped neck. I stole all the hardware, truss rod, and fingerboard off of it. It is my own design the neck is maple with walnut glued on to the back to make up for the thickness of the body. I'm low on money so I'm trying to do this really cheap far all I've spent on it is $36 $20 of that was for strings. I'm going to put 2 more coats of rub on poly on it tonight and tomorrow I'll level the frets make a nut and put it together.


-
Here is one that iam currently building, It keeps all work being done to the top and it so far seems very stable.
I just made one similar I still need to find a better way to clamp the router down I might just have to break down and buy a hold down. I drilled a hole through my table and stuck the shank of a 1/2'' shank router bit in it as a pin and I drilled a hole in 2x4 and used that to line the 1/2'' router bit up with it and screwed down the thing. I need to get a longer router bit though I can only go down a little bit more than 3/4" on top of the 3/8" template.
-
any idea how to keep the FB/neck combo flat on the router table so i can make a perfect perpendicular cut?
Next time... perhaps route the taper before radiusing the board.
This time... maybe flip the neck over? Is there any flat surface left? Well, I suppose that won't work if it's an angled head.
Consider using a hand-held router with a bearing bit. Instead of riding it on the radiused fingerboard, set up two rails on either side of the neck, slightly higher than the middle of the fingerboard.
good idea, but there has to be an easier way.....no?
Your going to spend longer worrying about an easier way to do it then taking 10 minutes to set up some rails it's really not that hard.
-
If this is anything like his electric book it'll be great. I'm going to build an acoustic this summer and already have Cumpiano's and Irving sloane's book but I'll be buying this when it comes out.
 . It's the cheapest Delta there is.
Jerry Garcia Tiger Copy
in In Progress and Finished Work
Posted
I rough shaped the neck, routed for the truss rod and have the maple wings and the veneer glued on and then steamed it off since it didn't glue right I'll make another one today.