


chops1983
-
Posts
432 -
Joined
-
Last visited
Content Type
Profiles
News and Information
Tutorials
Product Reviews
Supplier Listings
Articles
Guitar Of The Month
Links and Resources
Forums
Gallery
Downloads
Posts posted by chops1983
-
-
Alcohol is the solvent for shellac. Next time use a little water on your shellac if you want to wet sand. Otherwise good work on the first build! Did you use a top coat of clear or anything?
-
The WB for me! It was the guitar that i would like to own the most. Love the maple on simo's bass! Low end fuzz, i think you did a great job on your bass with all your laminations, I reckon it looks unique and brilliant!
Always good every month lads, keep up the good work!
-
You could always add a veneer to the headstock, like some black fiber veneer or ebony, it would cover the color discoloration on top and on bottom if you did both and would look nice with the inlay. Pearl in dark wood always looks sweet. The grain does match pretty nicely, good job on that, have you wetted the headstock to see how big of difference it looks when it will be finished. Sometimes once finished it'll look better or worse than it does dry. Check it out and see. Painted black is cool too, though if the coloration doesn't look bad I might be tempted to just add an ebony veneer on top and the rest natural. Anyway you do it will look fine I'm sure.
Great work on the projects so far, everything looks good. Really nice choice on fingerboards and inlay. Did you end up ordering any router bits?
Cheers jm. Yeah i did order four router bits. A 25mm inverted flush cut bit , a triple wing flush cut and a normal straight flush cut bit both 50mm cutting depth and a regular 12x50mm straight bit for routing my neck pockets. Probably saved like $150 dollars buying over the net from america than our tool shops. Router bits are just so expensive over here in oz.
Yeah i thought about a veneer for the headstock but im undecided. Ill try wetting it first and seeing what it looks like.
The good news was i got a replacement flush cutting bit and finished routing the d/c. The tear goes in about 4mm so i decided to just take the cutaways abit deeper on this guitar. It would be a shame to waste this bit of spotted gum. Ill post some more pics tomorrow when i get some more work done. Have to do some real work today and gets some quotes off!
Chad.
-
Looks good. The shape is a little different but that just means its more original! Good work. Hope to see some more projects from you.
-
Hey Guys,
So i got abit of progress done on these two.
On the semi hollow i have routed the binding channels and got the necks on both rough cut.
Binding channel from front right
I also got the rosewood fingerboards from stewmac.I think i got fairly lucky because the figure on both pieces is quite nice.
When im not building guitars and the swell is not huge where i'am, i go for the odd abalone dive. We got a couple of good sized greenlips and i thought "why not use the shell for some logo inlays?". So instead of paying money to stew for some blanks, i decided to have a crack at shaping the letters of my logo out of the shell. I used the bandsaw to cut the shell into small squares abit bigger than the letters. Then used the belt sander to get them flat and i shaped them with a cheap set of small jellewry files. It took a fair bit of time, about 2hours and i had a couple of goes at the C. Lucky my last name isn't schwazzennegger or something

Caro logo on the same neck material
The O on the logo isn't quite up to the same standard as the others so i will redo it!
Just a quick question for you all. On the doublecut i wanted to keep the headstock natural with the abalone inlay, but i had to glue small ears on it to get the width. Unfortunately i was scraping the barrel for some scrap off the neck. Ive matched the grain aswell as i could out of what i had left but there is definately colour difference in the timber. What do you guys think i should do? Leave it natural or paint it black like my other headstocks!
Cheers Chad.
-
I've used several bits from MLCS for a long while now and they are still very sharp and do a great job. I have bits from several other places and out of them the MLCS are my favorites. Sharp, strong, good prices, clean cuts. No problems with them for me. They also have several types now like the Katana's and the triple fluted bits which I've been wanting to give a try, but I've had no issues with the straight bits, sheer bits, I even have an upcut spiral for truss rods that works great and was cheap. A flush trim and a pattern bit that have treated me well. I know that many people go strictly with Whiteside bits from places like Routerbits.com and I was going to as well, until I found MLCS which was slightly cheaper and had free shipping in the US, so I tried those bits to see how they were and they've really treated me well and are still sharp even after using at least one of those bits as a planer on some very hard woods. So, I think you'd be fine with Whiteside of MLCS bits. J
Cheers rentis for the down low. Looks like i will be purchasing a few new router bits! For work of course!
-
Router bits are evil.... I always make my templates 1/8 in big so I have a chance to save a body when the router bite happens.
I always run into problems when I get greedy with the router.
If you buy a short 1/2" template router bit and make your first cut shallow (less than 25% the thickness) then come back with a bigger 3/4" router bit and make your next rough cut 50% of the body. Then make a final clean up pass You will get better results.
I also think the three flute router bits produce less tear out.
MLCS has really nice low price bits.
Are MLCS bits good? Do you use them? They seem really cheap compared to tools over in oz. Going on experience is to buy good quality tools, its saves you in the long run.
-
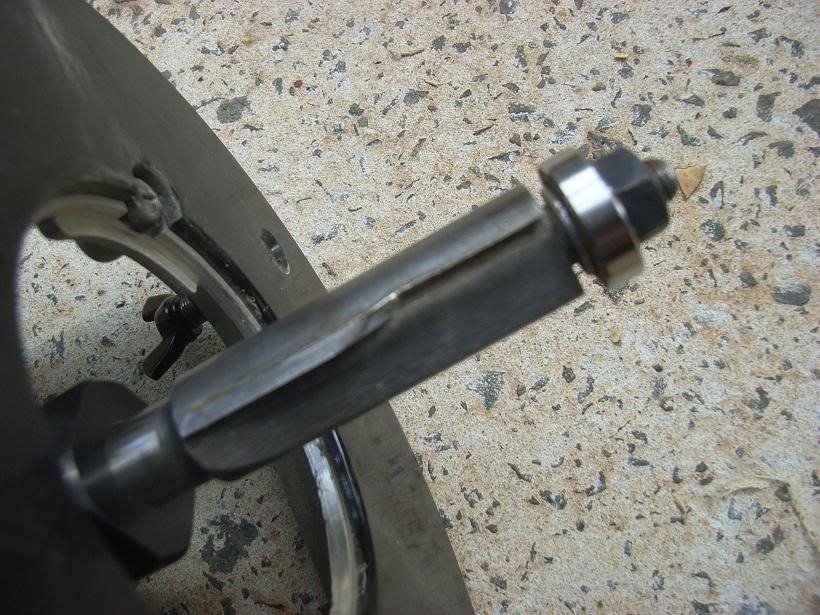
Thanks for all the feedback guys! To answer a few questions. The router bit is only 6 months old, but in saying that, this is only the third body and about the 5th pass around a guitar body so the bit is practically brand new. I was talking to one of my neighbours who is a boat builder and i showed him the bit, he seems to think there was a hairline fracture in the tungsten going by the colour of the blade where the fracture happened, which with a few people saying they have never seen this, its becoming more evident. Its not a cheap bit either at $80 or so.
Myka I agree with your comment on the router table. Holding the workpiece rather than the router will give much more control. Ill have to have a look into making a decent workbench. Also that body you showed in your picture, i noticed you have hollowed the entire body leaving no block where the bridge would go. How do they go for feedback? Im assuming thats a hollowbody electric. That was my original plan but i thought i better play it safe with a block under the bridge.
All is not lost though. Im going to finish routing the body and just reshape the cutouts a little deeper on both sides and hopefully ill get away with it. Ill post some pics of the outcome. Just give me a week to get a new bit etc.
-
That sucks matey! They are brilliant one of a kind guitar so i hope that works in your favour! Goodluck and i hope the **** that stole them gets hit by a truck!
-
So i have a question for you all. How do you guys rout around your horns and endgrain sections? I had a mishap this morning. When i was routing around the horns unfortunately the bit grabbed into the grain and has torn it a little also breaking the bit. There is still about 1-1.5mm before it is flush with the template so it may not be too bad and I think the other fatal mistake i made was i took the relief cuts on the bandsaw a little too close to the outline which has probably not helped.
Some Photo's
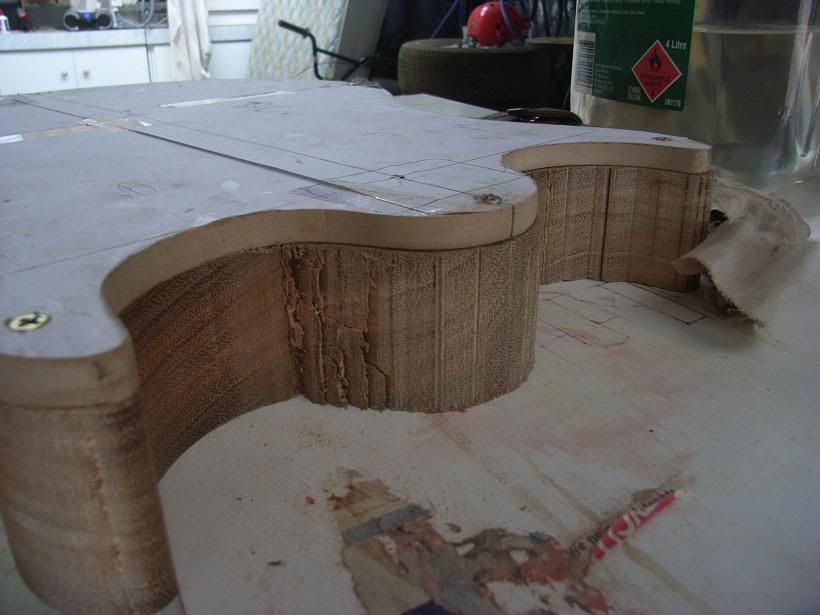
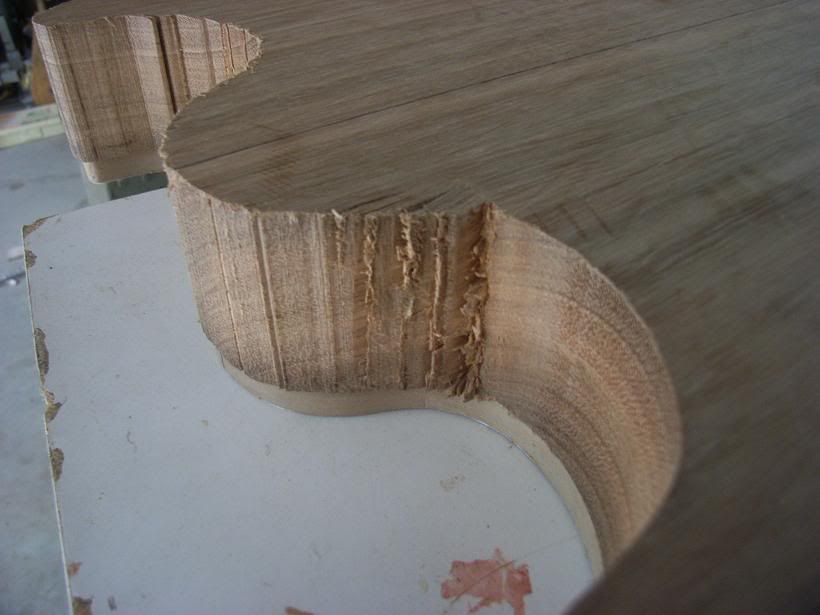
Ive now come to the conclusion that maybe for those points i should flip the guitar upside down and always rout with the grain(obvious really but i haven't had this problem before. I usually do light sweeps with the direstion of the cutter and then take the final pass the normal way). But flipping the guitar would mean buying another flushcut bit with the bearing at the top(expensive) or to flip the template. However the problem with flipping the template is that i use screws to hold the template to the body.
What is your methods at these points?
Im hoping all is not lost though. I will take the router bit back to the tool shop hopefully for an exchange, as it was $80 and finish routing the guitar and then make a decision on if its F****d!
Cheers Chad.
-
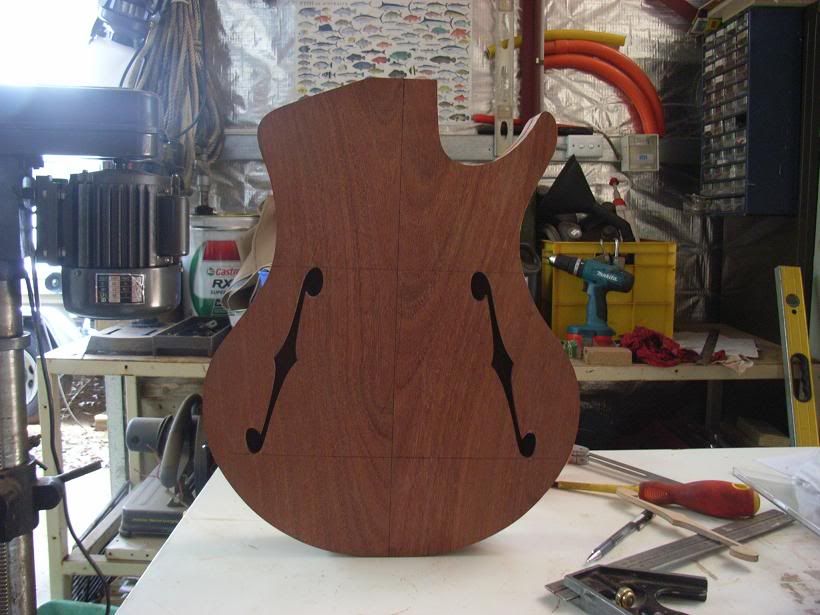
Did you paint the inside black just so the f holes show up as black?
Yes and no! The f holes already looked black before i painted the inside but it looks much neater when someone has a sticky beak through them.
Spotted Gum is just another ozzie hardwood. At the moment im new to building guitars and i just want to be original and try things different and see where it takes me. I get all my timber from our local joinery and he saw this bit of timber and put it aside for me. Its really heavy though so im going to have to do some sort of weight reduction before i stick on the jarrah top. Anyway off to the shed to do some work on them!
-
Nice work mitch! When i was your age i was making wooden spoons and spice racks for mum so your going well! Keep up the good work!
-
Awesome Guitar! I love the timbers you used and your build looks sweet! Top work!
-
Thats a sweet video! How good was all his tools!sorry abit too excited.
-
Hey All,
Work has gone abit quiet in the building industry where i live so i thought it would be a good time to start a couple of new projects.
First guitar is a semi hollow single cut.
Body: Jarrah
Neck: Vic Ash with rosewood fretboard.
Not sure if im gonna have a set neck in this one yet, ill know when i start to rout out the neck pocket.
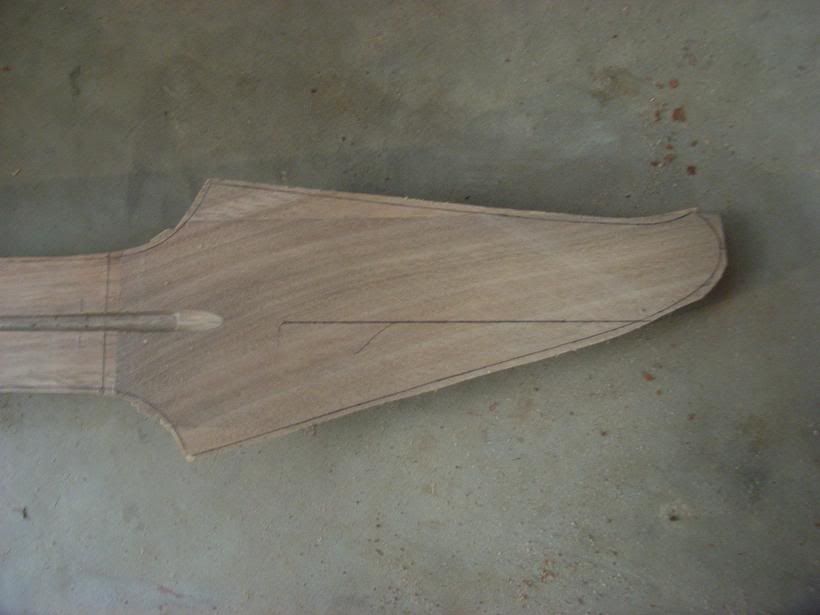
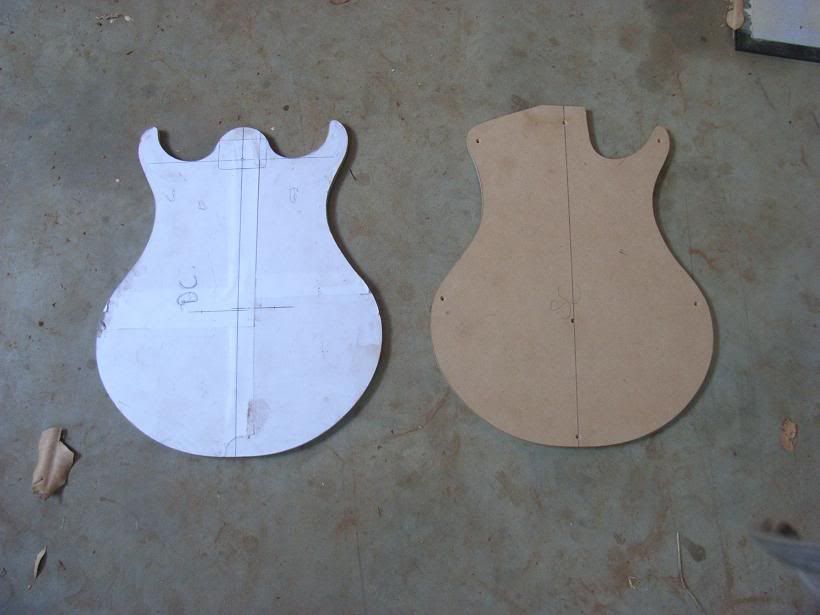
Second Guitar is a solid body double cut.
Body: Spotted Gum with a figured Jarrah top.
Neck: Spotted Gum with a rosewood fretboard.
This guitar will have a set neck and im gonna attempt a PRS like carve in the top of this guitar.
Sorry about the brief discriptions guys but im hungover as hell. Let me know what you think!
-
Hey toneblind!
Love the mechanics tool chest you built, great job!It just goes to show with enough time and patience you can put your mind to anything.
With your binding try not to sand it as it will leave grooves for the timber dust to fill and discolour it. Order slightly larger binding than you need and scrape that flush to the timber. When bending around tight curves use a hairdryer to heat it up and it will bend easier. After painting use a small offcut of binding, taped to a square razor blade as a guide. Set it back from the edge of your razor the width that you want your binding to be. This should keep your binding on the front even. Scrape the face of your binding but tape the sides.
Just a few things i have picked up with binding on my jobs. Try and practice on scrap aswell where you can.
Goodluck!
-
Do a full setup on the guitar, adjusting your neck relief, action and intonation and if the problem is still there it could be the nut like bluesy mentioned. Meaning the frets are in their correct positions to the bridge but the distance from the nut to the bridge is slightly off. There will be a tutorial on the main projectguitar.com page for setting up your guitar. Goodluck!
-
Excellent job!!!!!!!!!!!!! This is probably one of my favourite guitars on this website. Just beautiful! Well done!
-
Hey avengers. Try guitarwiring.com they have got all the different ways to wire up a guitar with 1,2 or 3 p/ups.
Here is a link to the two p/up page:
http://guitarelectronics.zoovy.com/c=7STWh...ickup_diagrams/
Just look for the options that suits you and click on the red description and a wiring diagram will pop up.Hope this helps.
-
Great month again crew! Kenny got my vote this month because when i first saw it i thought " wow now thats a sexy guitar!" Loved everything about it.
A few mentions:
Low end fuzz: Not a fan of sg's but really liked this guitar. The workmanship looks great and i actually don't mind the bits and pieces look.
RDI: Absolutely beautiful! This very nearly got my vote for the workmanship and overall build. Top job and i hope your son will love it one day!
kp: I think you were a bit harsh calling your guitar ugly! I really like your build, it kinda makes me want to play some bass. I like the slight burst!
Andy: Awesome finish mate! You were( and are) on a winner with that one.
Swedish: Another killer build mate. Your finishes and designs are really nice! Thats definately a guitar i would like in my collection.
Hydro: Im a massive fan of tele's and your is no different. Loved the old walnut you used in the body and the pearloid pickguard is a great touch. I also really liked your headstock. Don't really like fenders tele headstock apart from a tele custom deluxe with the oversized strat headstock.
I have not offered any opinions for changes with any of this months guitars because i liked them all as is!
Looking forward to next month! Happy building.
-
Great work!The workmanship is amazing! I wonder how many aussies on this site are Chippy's? You can add me to the list of chippy's and i think Perry was one aswell as a cabinet maker!
-
Hey your design looks great. This is pretty much my next project which im in the process of starting (gathering timber etc.) Im interested though in the block under the bridge? Is the top suppose to vibrate slightly like in an acoustic? And would the block just stop this completely?
-
Hey Nicko,
Great job on the first build. Looks great. Love the eye of horus inlay aswell! I have a tattoo of one on my leg! Look forward to seeing some more guitars from you!
-
Post it up in guitar of the month for december. Rules and guidelines are in that thread. Goodluck!

Latest Work Nearly Finished
in In Progress and Finished Work
Posted
I reckon it looks pretty cool! Great job on the finish. Just don't knock the horns!