


chops1983
-
Posts
432 -
Joined
-
Last visited
Content Type
Profiles
News and Information
Tutorials
Product Reviews
Supplier Listings
Articles
Guitar Of The Month
Links and Resources
Forums
Gallery
Downloads
Posts posted by chops1983
-
-
Good Marketing stratedgy? I think not.....

-
Mate, NSW has a great timber industry, im always looking at timber yards in NSW. If i can find blackwood here in abundance you will have no probs! We have a company called Austim in the west,but they could be a national thing so hit them up on google. They also import many exotic hardwoods from all over the world so they have alot of the more basic guitar building timbers as in Mahogany,maple, oaks, walnuts, teaks, blackwoods etc. check em out.
Yeah we have good surf!Going into chilly season though, so the motivation lacks to go for a surf, still get a wave here and there though.
Chad
-
-
I guess it all depends on what you're going for. Black on endgrain can make things look pretty drastic. Sometimes it can be overkill. In person, the grain will still dance as long as you sand back enough. I made some pens in the "other woodworking" section of the forum, and i used only black dye on them, and sanded back some (probably could have sanded back a little more). The pictures are aweful and do the grain no justice, but the actual pens are pretty sweet in person!
Yeah for sure. Im guessing you are all familiar with Jeff Miller, well here is a build which he used the same method as Metalhead, his, i thought used black dye first but going back through the photos he hasn't. So i proved myself wrong basically!haha Nice look though!
-
Tassie Blackwood. For the body and the neck if you want. Ive also used Jarrah, Marri(redgum) Aussie oak and sheoak. Im abit different though! But my recommendation is definately Tassie Blackwood.
Where in Oz are ya Jeff?
-
Beautiful as usual Metalhead!!! But i don't know if the comments about using black dye first killing the 3D affect are all true. Take this for instance
http://projectguitar.ibforums.com/index.ph...=41949&st=0
And im sure ive seen Drak use black dye first on his finishes,it just depends on the type of finish you want and of course skill in creating what you setout to achieve.
Looking forward to see this beauty with some hardware mate.
Chad.
-
Looks great Peter!How does it sound?
Haven't seen you round here much lately.
Chad.
-
For some reason, the main topic that I had in mind when I mkade this post got changed around into the typical condesending attitude that many people find offensive when new to this site.. I simply said hey lets get tolgether and ALL put in and make some tutorials... I even went as far as to say I will do the carved top tutorial... I never said I wanted these for myself, im just looking at the original and basic principle and goals of this website. TO HELP, to teach, and to learn how to build stringed instruments, Specifically the guitar, and if pooling together and updating, and making changes, and adding new tutorials for the site will help some guy that is completely lost even with the help of hiscocks book, and the search function then whats the big deal? Dont we want to better this community, and help in anyway we can??
Forgive the rant, i think its the Marine coming out of me. WIth that said, when I see something that can be improved, especially with the help of others than i go to work.
-Steve
Steve, sorry if i came over condesending, i see arguments like this on here all the time and usually stay away, but..., the point i was trying to make, is that this whole website is one giant tutorial. I would bet that any problem a newbie would have, its been covered time and time again. It just takes a little bit of effort on a personal front to find it.
Technically, there is a whole tutorial section on www.projectguitar.com. If that fails, just try googling it.
Chad.
-
Stewmac gives an accuracy of 0.5mm either side but you should always try to atleast setout to 0.1mm. Basically if the measurement is 63.345mm i would mark it to 63.3mm. I think by eye you should be able to get relatively close to that. Then depending on how your slotting atleast your setout should be on the money. Not sure how others mark out but i always scribe my frets with a craft knife(scapel whatever its called) to guide my fretsaw. So far intonation on my guitars has been spot on. Just take your time,double check your measurements and if your handsawing have a break every few frets so your arm isn't tired and your accuracy of cut stays good.
-
I have to agree with DC Ross, Spoke, Soapbarstrat on this one. It is all in the forum....and yes the search function isn't great, but its all there. The neck taper and angle is already pinned in the form of Perrys tutorial. Its so easy, All you have to do is grab a pencil,ruler and a piece of paper and you can work it out pretty quickly.
How about, the best way to learn is to read and start building guitars or any other wood project to your ability, resources etc. Start at a Tele or something similar and build up to that carved top PRS flamed,quilted,burled,bursted 3d wood popping creation that we all love to look at. S**t you may even have fun along the way learning the process.
Im not directing this at anyone, but we all have humble beginnings and need to start somewhere. Take the time to research,plan and think out the steps instead of getting someone else to do it and then copy that. I guarantee you will learn more and enjoy yourself in the process.Sorry to get abit crazy there but laziness and incompetence really s**t me because its just a state of mind.
Chad.
-
John, this build is looking great, the white body with the dark neck should look awesome. Keep the pics coming.
-
I love how you can send back the old smashed parts to get a new custom built guitar to smash. At an additional cost mind you!
-
Nice to see you building your own necks John, looks like some clean inlay work there mate. Im the same as you, i don't shape the neck until all the frets are hammered in. This is looking good but im not to sure if i like the HS shape, maybe with tuners it will be better.
-
You can mix up smaller amounts in any sized gun so saving paint with a smaller gun is nonsense.. But
Yep, you can mix up smaller amounts with any gun, but what i was saying is when my quart sized syphon gun gets down to, say the last 50-100ml it doesn't spray consistently when tilted at an angle (Sorry my bad, I should have clarified that a bit better). Its fine for nitro as i mix up 500ml each time and then store it after ive sprayed, but i would hate to waste 50-100ml of 2k at the end of each spraying session, it isn't cheap stuff over here. That's why i was recommended a touch up gravity fed gun for spraying guitars because you can use every last drop.
Just passing on some advice i was given by a person in the spraying industry to the fella who asked about the Stew Mac guns.
Chad.
-
I have a Stew Mac gun. I bought it thinking it was special for guitars, but it is just a production sized syphon gun.
Now, would i recommend one...it sprays good, has all the different adjustments,cleans well and will do the job great depending on your skill at spraying. But..., i got talking to a fella at the paint shop where i just bought my last batch of 2k poly and he recommend for spraying guitars, a small gravity feed gun(touch up gun i think he called it) which comes with a 100ml tank, but, you can also attach the measuring cup which has all the mix ratios printed on the side. Why did he recommend this? Because the size of the objects we are spraying are small, you can mix up smaller amounts of paint and have less waste. 2k is going to go off even in a sealed container once mixed, so with my production gun i have to mix up around 150-200ml just so it will spray smoothly usually leaving some left over paint. Fine for nitro though as you can leave it in the sealed gun overnight for your next spray session or, tranfer it back to a spare can.
As for asking and giving advice, take what you want from posts, when i read this forum i skip over so much BS and take all the useful parts. If someone like Drak is giving finishing advice, i would be listening.
I basically think the original question has been answered. I will agree that really Pro jobs aren't sprayed with hand sprayers though, guns will always offer better finishes, and yes that does come from experience.
John, if you find a decent cheap setup, make sure you post your findings for other people on the forum who are in the same mindset.
Cheers
Chad.
-
I'm generally not one for explorers, but that ones really nice! Very classy. The abalone topped knobs work well too.
What he said pretty much somes it up for me too
Lovin it! -
Haha cool thread John! Bigjim they are classic shots mate... love the airborne pic!
Wez some serious snaps there, congrats!
Here is a couple of me and my builds from a few parties our band has played,
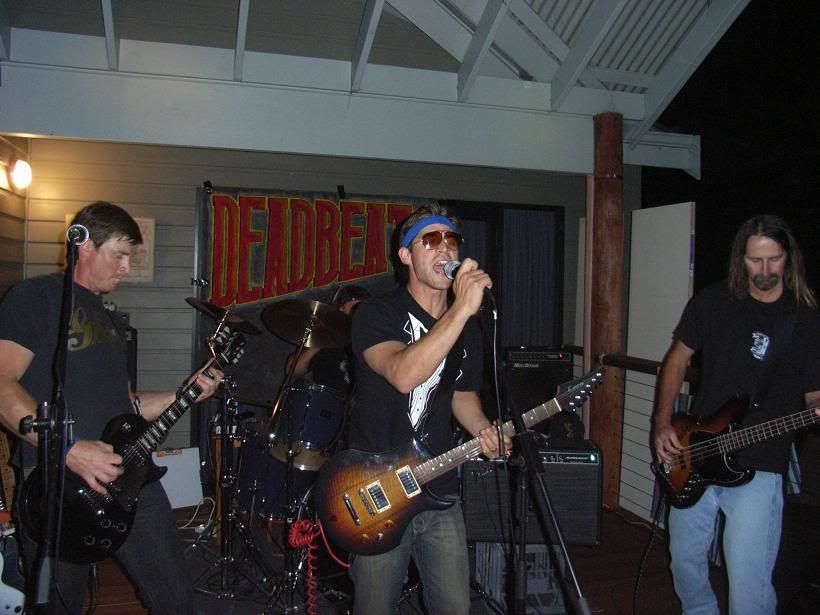
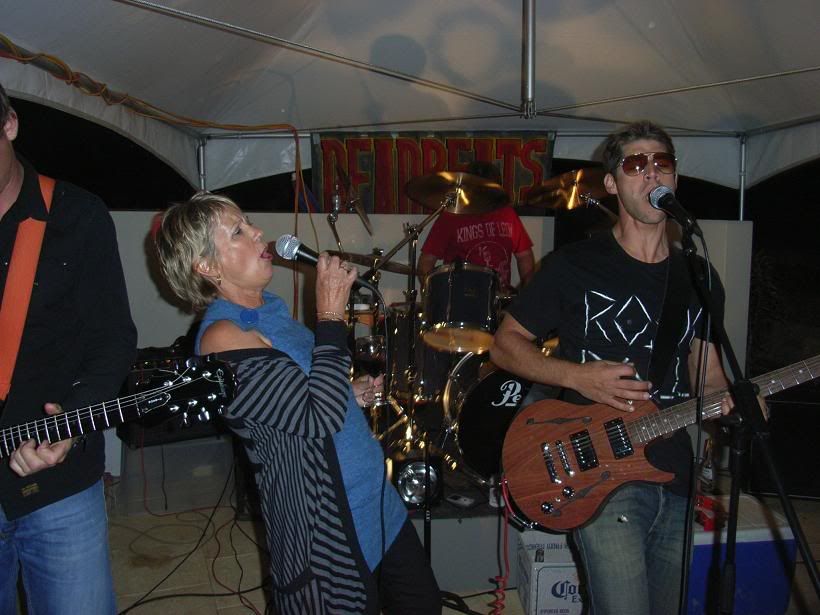
It just occured to me that those glasses i only wear at gigs or these...

-
Sounds good PG. Ive been smashed with these PM's just in the last couple of days...hope all goes well.
-
Mate that looks like a nice joist of Jarrah! Only native to the south west of oz where im from so its surprising that it came out of a house in SA, thats not to say they didn't ship any over eastward. How heavy is it?
-
Looks great Peter! I really enjoy watching you build. Keep the pics coming! Nice bit of zebrawood aswell
Chad.
-
For me it was the tri caster! As soon as i saw it i really liked it. Followed closely this month by the two basses. Scottyd's control cover is simply excellent work and i liked avdekan's whole design. Great work!
To the other builds, all were great this month as usual and i would have liked to play them all!
Eshuffle- you really have to give us some more info on your build. Some build pics would be good also.
Cheers
Chad.
-
Nice work John. The build came out great! Looking forward to some shiny daylight shots
The wiring was just like the neck, you didn't want to do any work on necks for ages until this build and you pulled that off and its the same with the wiring, Just be methodical about it and then its (as we say in oz) a piece of piss. GOTM? -
Thanks for the kind words gents!Really having a good time on this build. The mind is moving towards the finishing process now and im stumped on what i want to do. Im thinking natural or natural top with solid colour back or even a orange of some sort on the top so it kind of looks like a tiger. I might have to consult the boss on this one
Pestvic the body measures 59mm so not quite 3inches but fairly meaty. There is abit of carving that needs to take place on the back still and is likely the next step in the process once the neck is upto scratch. My builds so far have all started with an idea and a rough plan and then progress as i go. I know some on this forum usually have every element planned but im abit different. Plus this is all just fun for me so i like to keep my options open. So if anyone has any ideas for a finish on this puppy feel free to chime in!Please bear in mind the egyptian theme and im probably thinking more neutral earthy colours.
Now for some progress. This is where im at. Inlays routed and gluing. Obviously the fretboard is glued to the neck and slotted.
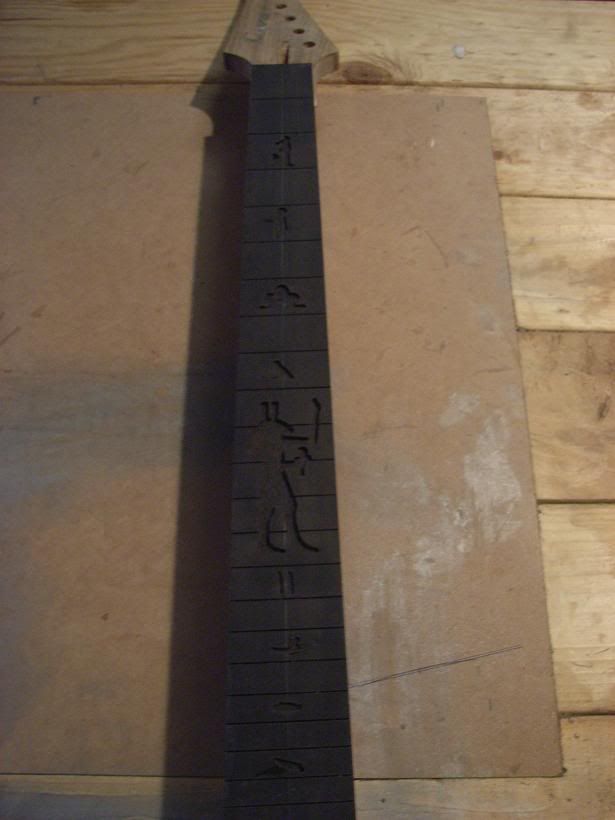
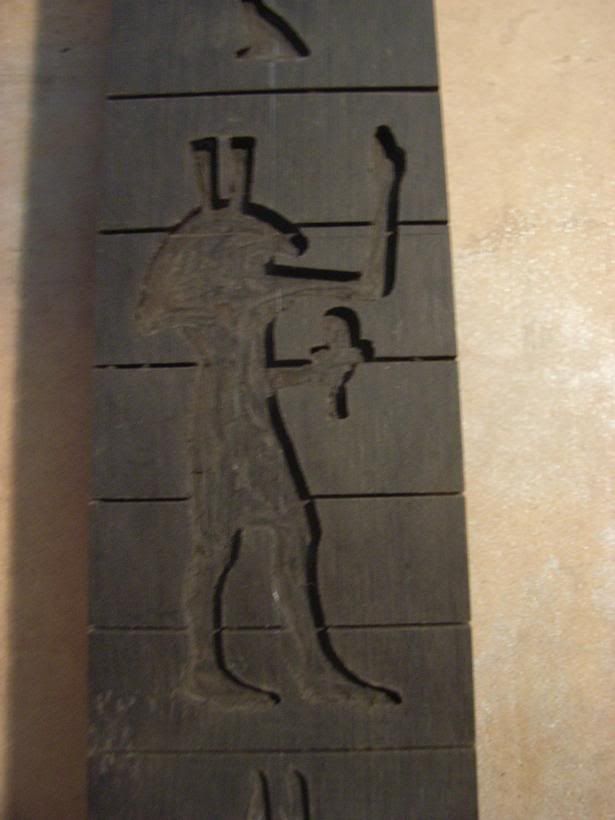

Next is to sand the inlays flush, radius the fretboard, re-slot the fret slots to the finished depth and detail the inlays before i can fret this neck and rout it in to the body.
Cheers Chad.
-
Very tasty indeed!!!

Pointy Stick
in In Progress and Finished Work
Posted
oh Beware Muzz of the cheap drillbits! My experience has taught me that cheap tools end up costing me alot more heartache than pinching a penny, anyway Goodluck!
Oh yeah and the build looks great mate!