


Linny
-
Posts
68 -
Joined
-
Last visited
Content Type
Profiles
News and Information
Tutorials
Product Reviews
Supplier Listings
Articles
Guitar Of The Month
Links and Resources
Forums
Gallery
Downloads
Posts posted by Linny
-
-
I voted for decadentjon, i like the understated elegance of a unique design that looks familiar. They are all nice though.
-
If the woods you use are a bit oily then you can use epoxy to glue them together, not the 5 min stuff but proper marine epoxy like West system.
-
This what i am able to do with illustrator. I find the flowing curves to be easy to make. It is things like trapezoids for fingerboards that i am not sure how to draw. Excuse the childish burst.
 Anyone have any screenshots of what they can do in a proper cad program?
-
Just wondering what the rest of you guys use when designing a guitar. I currently use Adobe Illustrator which does kinda allow me to draw what i need but i know its not the right thing to use for a technical drawing but i don't know what i should be using.
I basically need to be able to draw full scale and then be able to print it.
How do you go about designing something to make your templates?
-
I'm fairly new to the setup game, just a few years under my belt and mostly setting up new guitars, so correct me if I'm wrong. However, one element I think should be recognized would be the neck angle. Now, I know about why some necks need angles and some dont, but I think this is actually relevant in a different way. Depending on the material and specs of the neck, your neck is going to bend. Even with a truss rod, a more flexible neck will have more variation in where it bends and how much it bends. With a strong neck, like say a 5 piece neck with double action truss rod
neck angle won't vary much. But a flexible neck(maybe with a one-way truss rod) might bend more at the bottom or at the middle, and depending on the neck, a little neck angle will get a lower action without buzz.The neck angle is just there to accommodate the bridge, set neck guitars that have the fingerboard flush with the top of the body will always need some sort of angle so u can fit a bridge and pickups under the strings. It doesn't alter anything else with regards to setting up the neck. It is easier to sort problems on bolt on necks.
If you come across an old Ibanez with a wizard neck (1 piece neck, single action rod) you can often find that its a warped over the years into a stretched out "S" shape. It tends to be high at the end of the fingerboard where it has been solidly attached and hasn't moved and lower around the 12th fret. It can happen on other guitars but because the Ibanez is so thin it tends to be worse. A few times i have had to repair this situation either by heavily dressing the upper frets or by removing the frets and planing the hump from the end, re-radiusing and re-freting. This is especially true on guitars that have a floyd rose which adds extra stress to the neck if used heavily.
-
Well first of all it depends if we are talking about acoustic or electric guitars. Acoustics need a higher action in general because we don't want a huge amount of buzz coming from a un-amplfied instrument. Electrics can have an acceptable amount of buzzing and still be considered buzz free when played through an amp. The term "buzz free" is a personal opinion. I worked in a guitar shop for 5 years and i must have setup thousands of guitars and even with the best playing guitar ever some customers were still unhappy if their electric guitar buzzed slightly when played unplugged. All guitars buzz depending on setup and how hard its played.
So ignoring acoustics this time.
With electrics my personal preference is to have a nearly dead straight neck and as low an action as i can get away with. Now if you have an old tele with a 7.5" radius then it isn't gonna cut the mustard as its gonna choke when you bend a string. With some guitars its nearly impossible by design to have it set-up the way i like it . You have to accept that with certain guitars.
The last guitar i finished building had a 5 piece neck, trapezoid neck profile, double action truss rod, ebony fingerboard and no radius (flat) with tall/medium width frets and it does have an incredibly low action but it still buzzes! It does buzz to an acceptable level (in my opinion) but some may feel it does a little to much but would understand when they see how low the action is and how little relief it has.
The high e at the 1st fret measures .012 (.33mm) and low E measures .020 (.5mm) and high e at the 12th is .020 (.5mm) and the low E is .040 (1.1mm)
When i decided to build the neck the way i did i knew that a 5 piece neck and ebony board with a trapezoid profile would result in a very stable, solid and straight neck. So much so that when i strung it up for the first time i had to dial in some relief with the truss rod. I also dressed the frets with a little relief at the 7th-12th fret and added some fall away to higher frets so it would buzz less lower down on the low strings.
To measure relief i use the 1st and 17th fret and look for a gap at the 3rd fret on the low E. Some use the first and last fret and look for the gap a the 7th or so. I use the 1st and 17th because all guitars have a 17th fret (the last fret could be the 20th-24th depending on the guitar) and this is the round about the point where the truss rod ends/stop working anyway. I give the string a tap with my pinky at the 3rd while holding down the string at the 1st and 17th and look for a small gap (around .33 mm) for a pretty straight neck. Once thats done i adjust the action at the bridge to a reasonable height then i look at the nut to see if it needs its slots filed. The nut needs to be at the correct height if you want any chance at setting it up properly.
This is a good book for understanding the topic Dan Erlewine
Hope that helps in someway............
-
11.5mm deep slot + 5mm for fingerboard leaves nothing under the rod.
-
scan through this forum, plenty of peeps have refinished that guitar.
http://www.sevenstring.org/forum/luthiery-modifications-customizations/
-


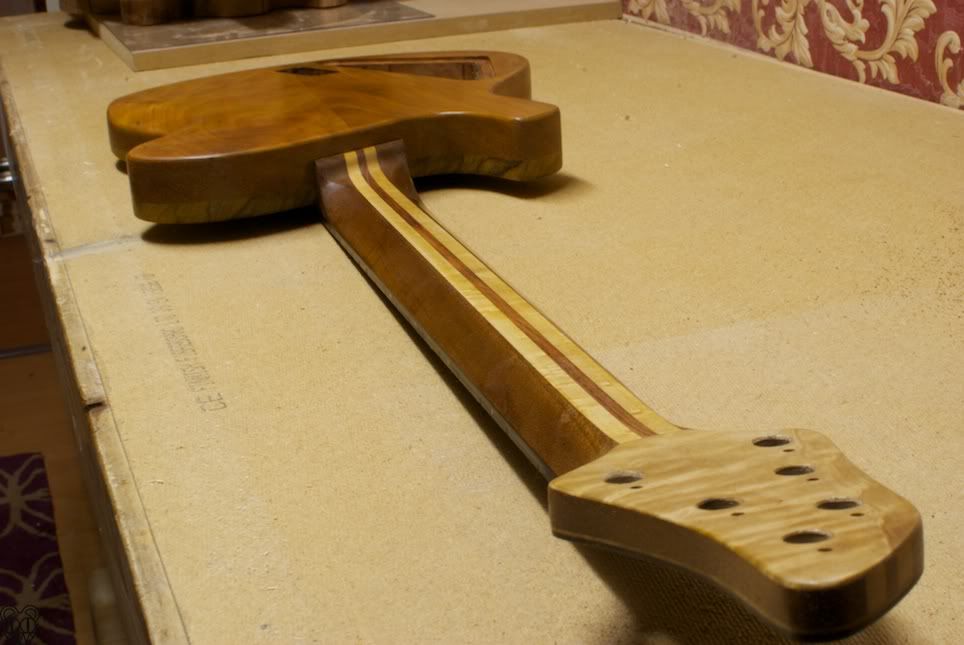
Here it is in its semi-finished state, frets are dressed and it plays amazing. I love the neck profile and with no/flat/infinite radius it has as low an action as i have seen (which i like), the profile combined with an ebony board made neck is dead straight with the truss rod "off".
Scratchplate was made from 3mm acrylic sheet from ebay. Stewmac 3m polishing papers were used to polish it up.
I still have the mock up tuners fitted, i have drilled the headstock for sperzel locking tuners, just need to get a set. Probably going to change the control knobs also. The bridge is a tonepros nashville but i had to mill the saddles to remove the radius, i will replace these with 6 of the same height at some point.
The only finish on it atm the moment is shellac but i plan to spray waterbased poly over the top when i think i am good enough to do it right
-
0000 grade steel wool will do it. A soft toothbrush can be used to clean it with a little oil too.
-
Awesome finishing, i really want to try em 6000 but its not available in the UK afaik.
-
1. The neck will fit, if you make it fit!
2. See above.
3. Plenty! Just read, plan and draw a full size plan on paper or cad. Templates are everything, sometimes they are the hard bit.
4. Profit!!!??
-
I see Dust!!!!!!!!!
-
I love how you square off the top of the headstock perfectly even though its not necessary. You got OCD simo
. I would love you to pop over and tidy my workshop! -
I love the way you did the neck. Real tight! I kinda stole your method as I nearly lack powertools, the chiseling went a lot better then I expected. I'm at the level I want now, and i'm wondering this: How did you get from the roughly chiselled headstock to the smooth (and wonderful) headstock in the next pic? Thanks in advance!
Cheers.
Willem
Thanks for the kind words!
First i marked the headstock thickness all the way round and then used a saw to make some kerfs, i then used a carving chisel to knock the majority out and cleaned it up using a small rasp an ibex carving plane and cabinet scraper to smooth it all out. It was a fun little job doing it that way.
-
The joys of single action rods! Chances are with the rod loose a little more relief will come with time.
-
Just a little update
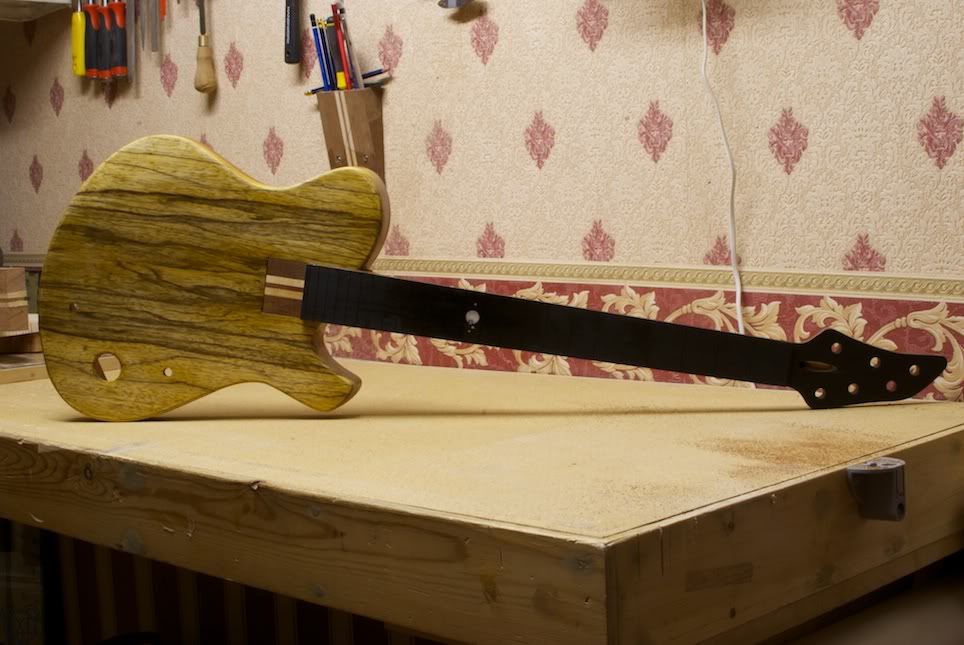
Finished with shellac to add some color and getting ready to be sprayed with poly.
Just need to fit bridge, ferrules, route pickup and fret.
-
My Version.
-
Thickness that a neck will allow has a lot of factor going into it. Fretboard thickness, type of truss rod, etc. I can't just answer "yes, you can do a 18mm neck with this." That said, all things equal besides the carve, if you can do a normal carve with the neck in question, you can do a trapezoid carve with it too. And "more meat" means yes, less wood is removed in the carve. I mean, draw out a trapezoid and a C-carve and compute the area. But my guess would be the trap has more cross-sectional area.
Chris
PS: Ricky, my guitars are on here as well. Not that I know which you're referring to or what other board (I'm on a couple)?
I'm talking about TGP
and for OP, could you show us (or me, in this case) how to do this trapezoid neck profile, step by step.
I might try it in my next build.
cheers!!!
I don't think i could do a step by step, but the very first step is to thickness the neck to final thickness, then mark the width of the flat part along the neck and then start to join up those lines with the edge of the fingerboard. I used a couple of rasps, a file and a scraper. Then when i was finished shaping it i grabbed some 320 grit paper just to break the edges.
-
so... the board is all radiused... it was much easier to do the 'step up' than I thought. I put a stainless steel shim in the 13th fret slot to stop the block from going too far up the neck , hogged out the initial 'step' with a rasp and then started sanding the radius. Got the nut to the 13th nice and rounded, I check with the fret press insert to verify radius, as well as a long straight edge for flatness. after I got that finished. I started on the upraised part, which was surprisingly easy. 13th- 22nd frets are just a tad lower than the fret crown will be. I'll be using white plastic strips to mark the fret locations on the upper frets.
I'm also going to see how well my 'guide fret' setup works on a bass. So far its worked on every guitar I've attempted it on, straight string pull or not.
Go on show us a picture!
-
Clean the Cocobolo with acetone to remove some of the natural oils and then finish as normal. A couple of coats of that zinnser stuff would be a good idea.
-
Mentholated spirits in UK at least is denatured alcohol. Isopropanol is fine too just make sure is the Propan 2 variety. I find naptha (lighter fluid) better at anything for removing sticky goop.
-
-
The whole guitar is beautiful, lovely choice of woods there.
 Anyone have any screenshots of what they can do in a proper cad program?
My Second Build Attempt
in In Progress and Finished Work
Posted
Nice fret job man.