


Bluestreak
-
Posts
28 -
Joined
-
Last visited
Content Type
Profiles
News and Information
Tutorials
Product Reviews
Supplier Listings
Articles
Guitar Of The Month
Links and Resources
Forums
Gallery
Downloads
Posts posted by Bluestreak
-
-
Way cool. I thought I was the only one to have a guitar to match a car (cheap Yamaha fat strat to match my blue WRX).
Eventually, I'm going to build one to match my 30th Anniversary Trans Am.
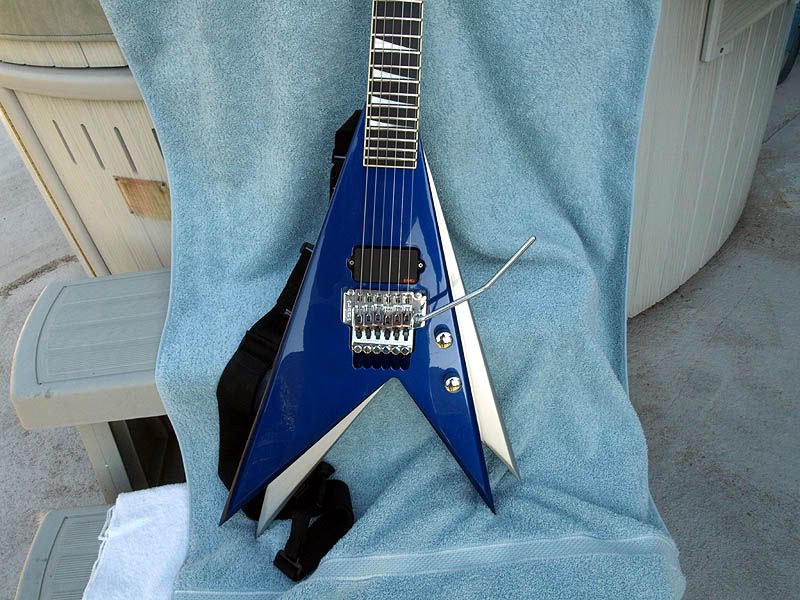
 I was really ambivalent towards the build in its first stages, but the color makes the piece great, and you can't beat EMGs and no pickup rings.
I debated long and hard about the pickup ring. All the real McCoys had pickup rings supporting an EMG. I prefer guitars w/o mounting rings these days, so I gambled and it turned out perfectly.
Seriously?Vinnie Vincent replaced Ace Frehley in KISS. VV was the guitarist on "Creatures Of The Night" but the album cover showed Ace. VV went on to record the album "Lick It Up" with KISS but was fired after the tour. VV then formed Vinnie Vincent Invasion and recorded at least one album, "All Systems Go". This album also included Mark Slaughter as lead vocals before he went on to form Slaughter.
Ah, cut him some slack.
Even if he was born in '80, he was barely two years old when Vinnie took over Ace's spot in KISS in '82. Unfortunately, as talented as he is/was, it seems that Vinnie was such an asshole that he ran himself out of the music business. He all but disappeared after about 1988 when the record company pulled the deal for VVI and gave the contract to Mark Slaughter and Dana Strum. Unless you're a mid 30-something (or older) and a KISS fan, you probably don't know who Vinnie Vincent is... even most young guitarists don't. Sad to see so many talented 80's shredders like Vinnie being forgotten by the upcoming generation of players.I like KISS, but I'm not their biggest fan. I'm more of a Paul Gilbert, George Lynch, Vai or Dream Theater fan. It just so happens Vinnie Vincent was on MTV at the right time to inspire me to want to play guitar back in '86, so I have a soft spot for the dude, cheesey as he is. I think the most entertaining part about building this guitar has been showing it to a few diehard KISS fans - and most of them surprisingly had no clue whose guitar it was!
Thanks for the compliments, guys.
-Roger
-
And finally...
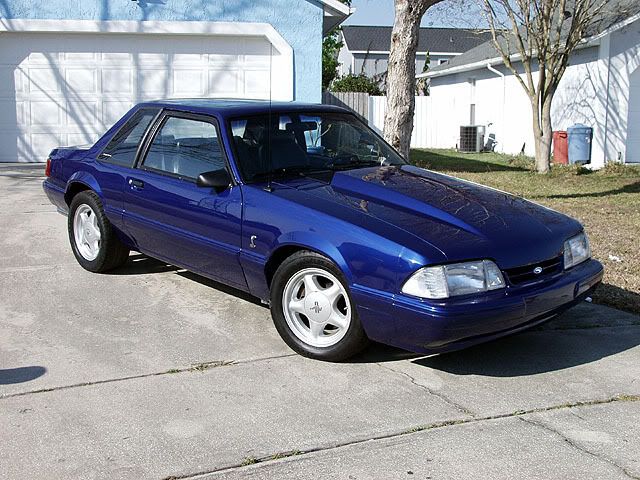
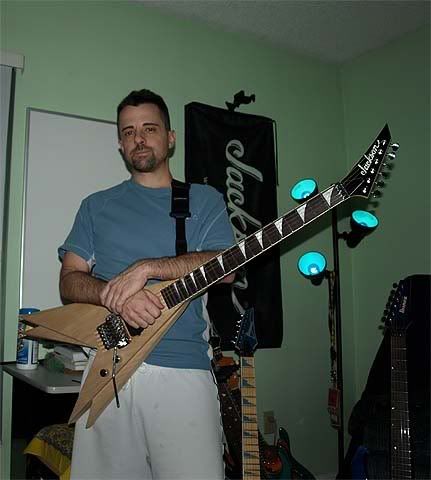
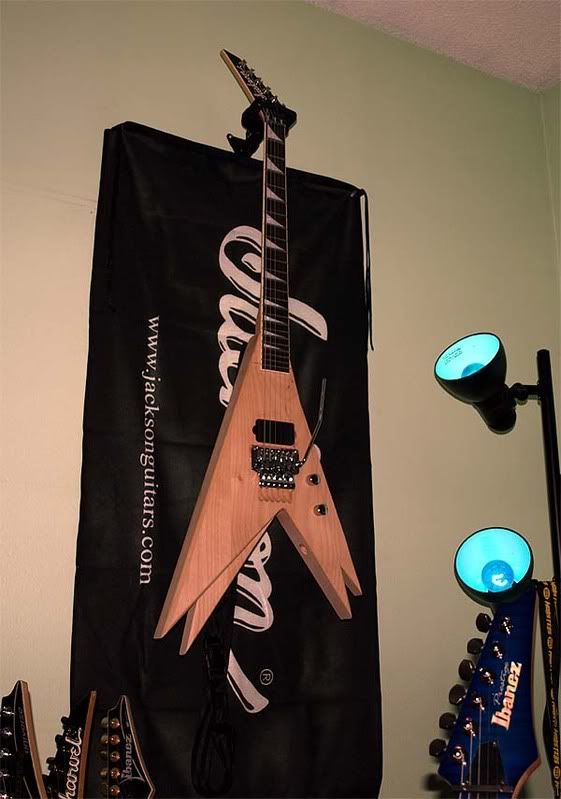
The color just doesn't pop until you put it in natural light. I painted it "Sonic Blue", a Ford color. The guitar was painted to match my Mustang coupe. I haven't taken a picture of the two together yet. I'll do that later today when I take the Mustang out of the garage.
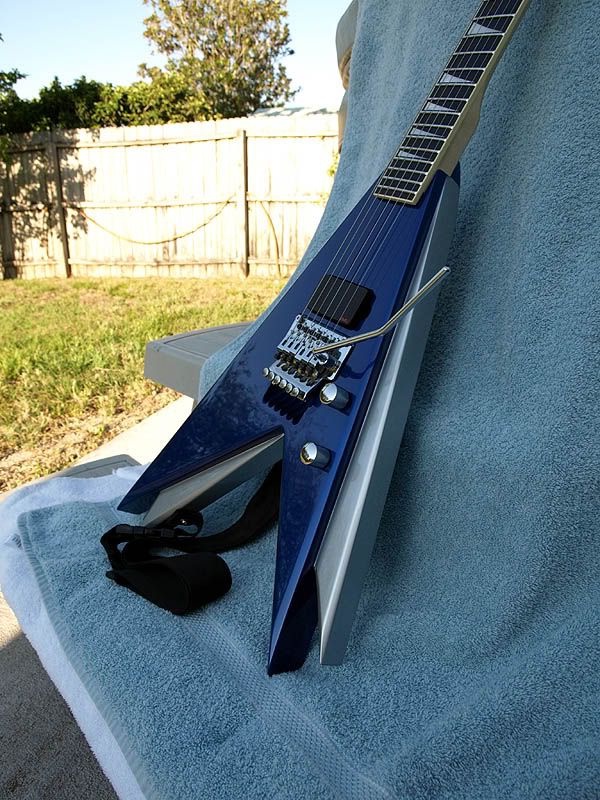
So that was my first guitar build. Total cost came in just under $600 - unbelievably cheap, and it plays as well as my collection of high-end Ibanez and Jackson guitars that cost much more. My next project is a 7-string strat based on a fixed-bridge Ibanez RG7621, already in progress. I can see how this can become addictive!
-Roger
-
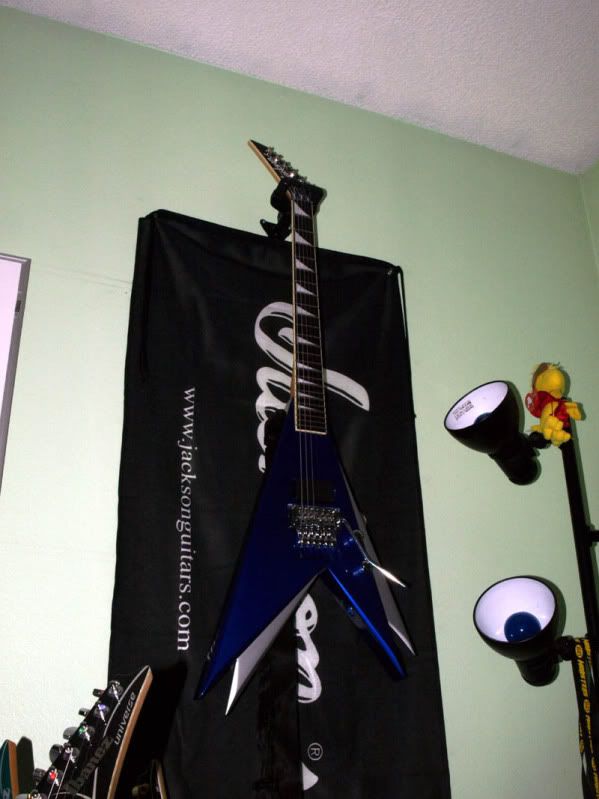
This was the first guitar I ever saw on MTV way back in 1986.
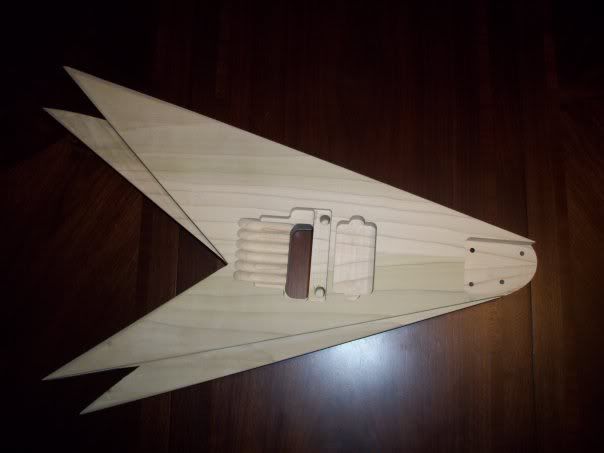
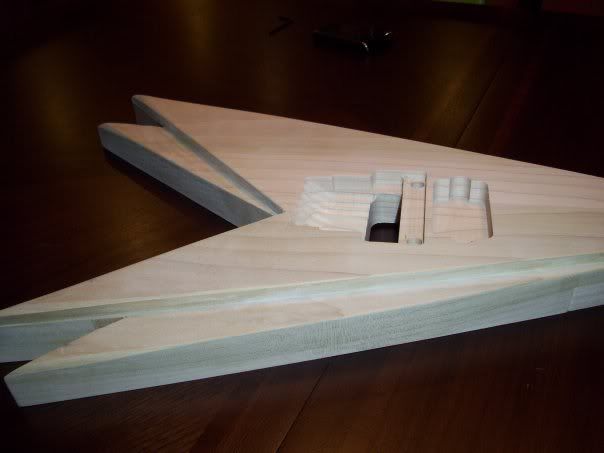
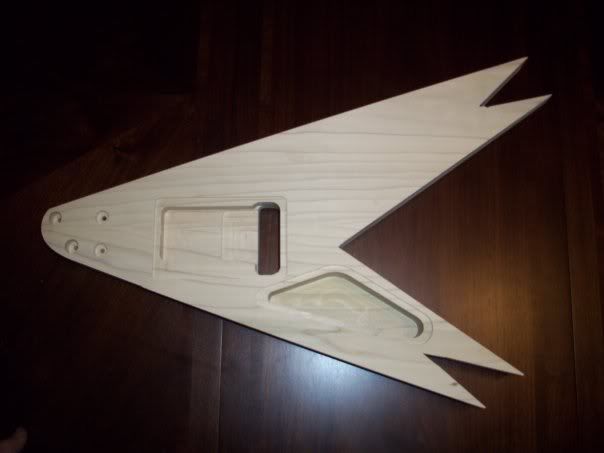
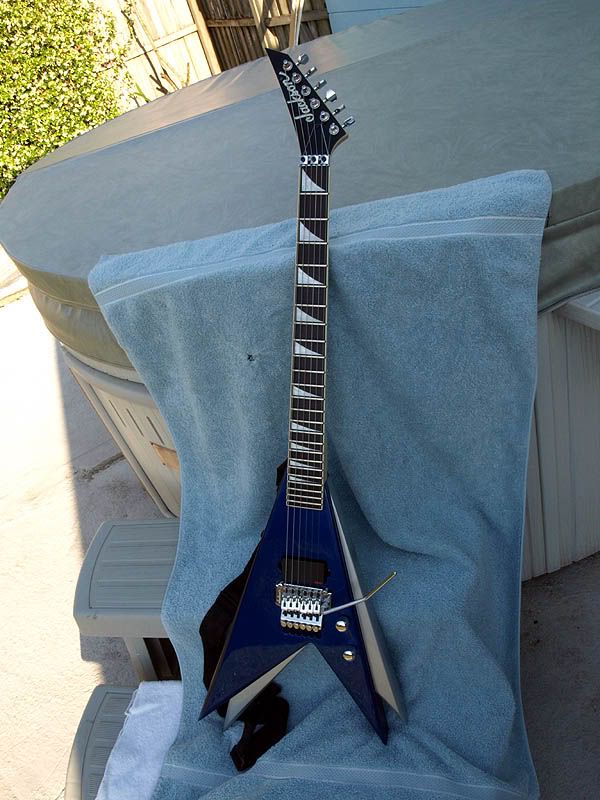
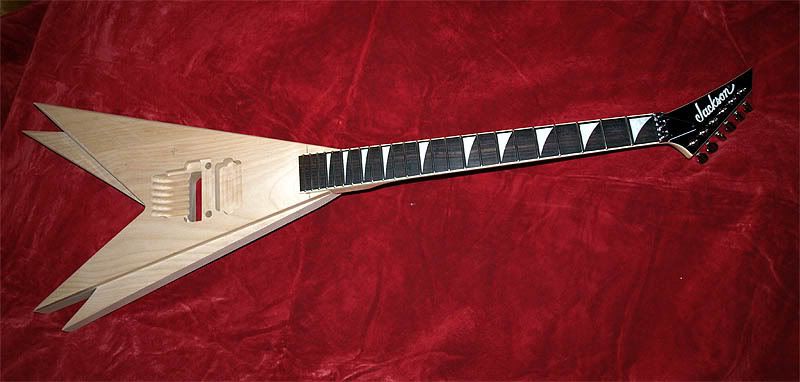
The body was cut from two-piece alder, drawn on a computer and then cut on a CNC machine by a friend in Michigan. In all honestly, the only real work I had to was sand in the bevels and detail-sand the body for paint.
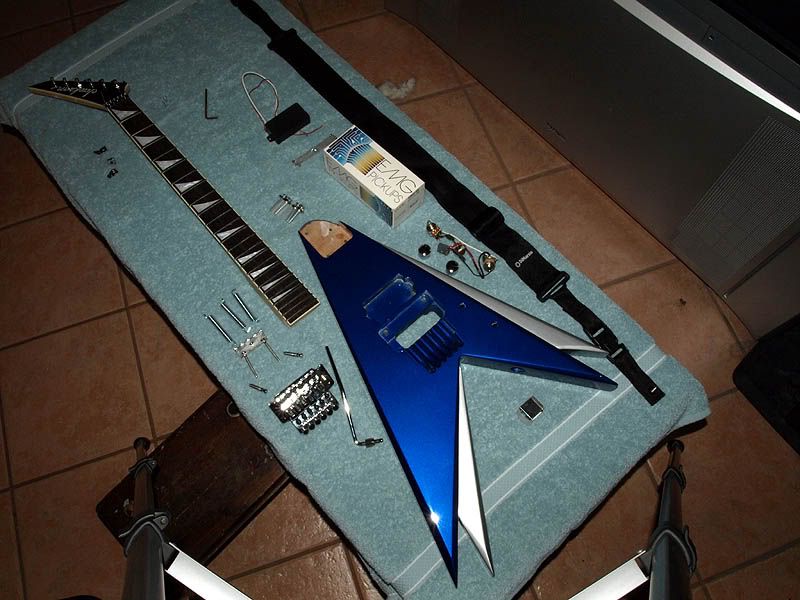
The neck (NOS Jackson neck, meant for a Jackson DXMG) and the EMG-89 pickup that went in.
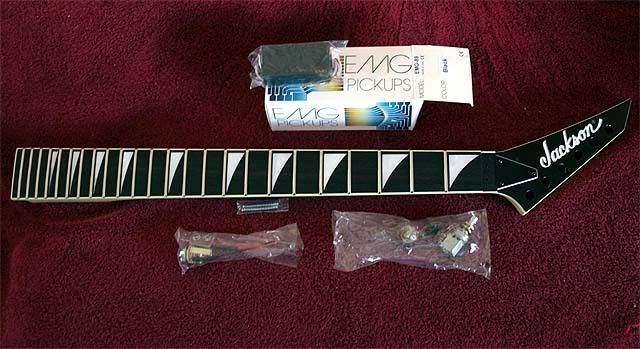
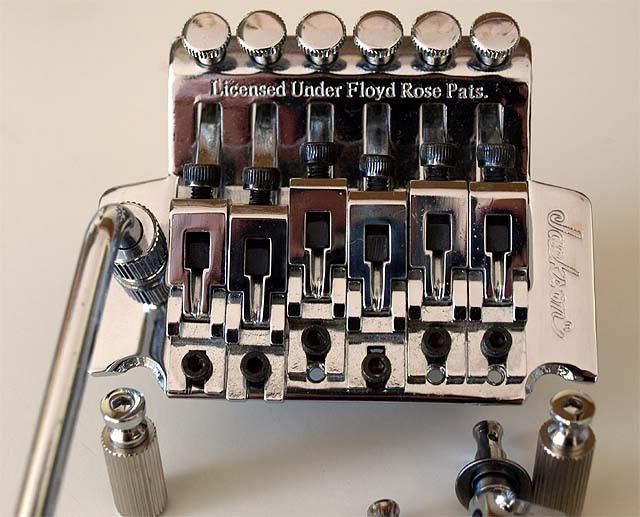
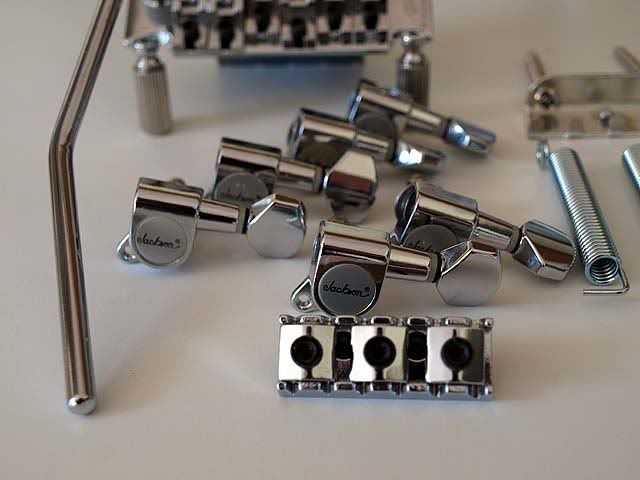
The hardware came from a parted-out Jackson Randy Rhoads, or so the EvilBay auction claimed.
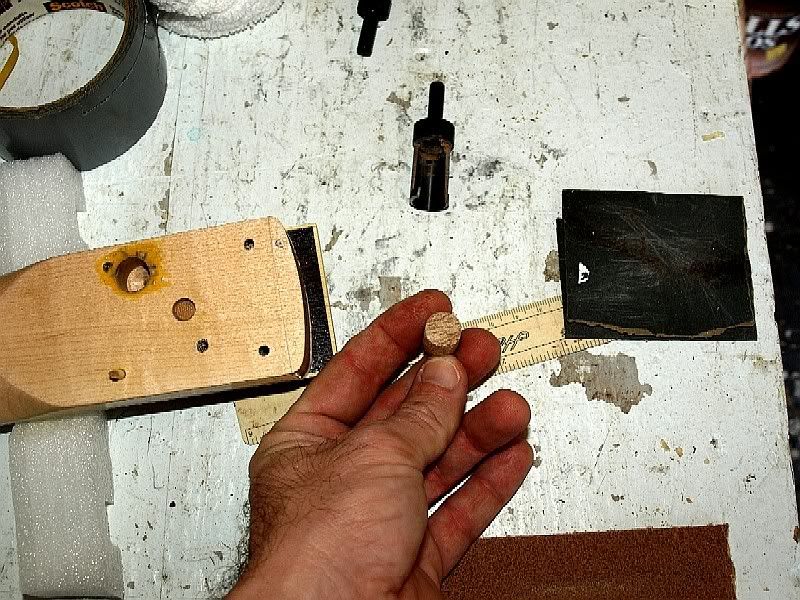
A screw broke off in the neck while I was re-drilling the neck holes, and the broken screw had to be drilled out. I cut a cross-grain plug (thanks to this forum's advice!) and the repair went smoothly.
Here it is, test-assembled and fully set-up, just before it went to paint. It was so much fun to play, I hated to tear it down for paint.
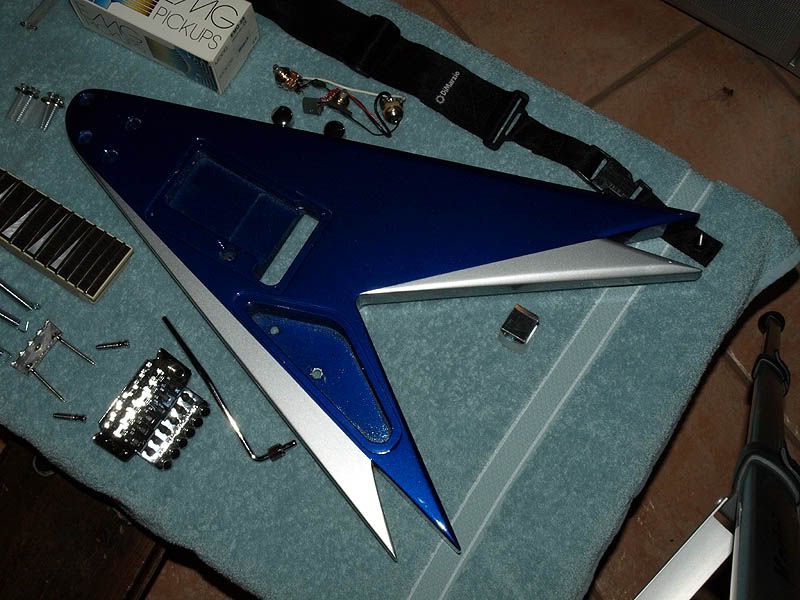
The jigsaw puzzle this past Monday night, when the body came back from paint. It turned out immaculate!
From the back...
-
looks good... isn't that the same shape as the one Vinnie Vincent (ex Kiss/ Vinnie Vincent Invasion) ???
It is. It was the first guitar I ever saw when I first turned on MTV when I was a kid in '86 (the "Boyz Are Gonna Rock" video). I wanted to play guitar from that day... when I decided I wanted a new guitar, that V came to mind. I couldn't find/afford an original one (they only made 28)... so I made my own.
You're the first guy to figure out whose guitar it was... most other people I've shown didn't know who invented it or they thought the twin-V was my idea!You dont need to grain fill that wood, IIRC, Its poplar or something, which doesnt need to be grainfilled. So you dont have to worry about any epoxy or anything.It's a two-piece alder body. It has very fine grain, but it does have grain, so I wasn't sure if it required filling.
Interesting seeing how other people would go about this. Having tried epoxy as a grain filler many moons ago I'd advise against using it, one because in my experience it's a pain in the butt to use, and two, because again, in my personal experience, on a guitar body like yours it's totally unnecessary.I ended up using epoxy where it was needed. I used a hard piece of plastic as a squeegee and spread it very lightly into the grain over the face, back, top/bottoms sides, around the jack input, and on the tips of the V's. Hopefully this makes the wood stronger. There were also a few very small imperfections in the wood grain I wanted to smooth to ensure a nice finish. It really popped the wood grain where I filled, and it's almost a shame to cover such a nice piece of wood with paint.
To answer your question about using automotive primer, yes, automotive primer is perfectly acceptable for use on guitars. Particularly in this case as you're getting it painted by an automotive painter, who'll no doubt be using automotive paints likely of the same paint scheme. With your primer a good tip is, if you're applying a light colour basecoat after priming, ideally use white primer as this makes your bright colours brighter. If you're using a dark colour basecoat, a grey primer is fine.The main body will be Sonic Blue (a purple/blue chameleon color offered on Ford cars from '03 to '08). The secondary V-fins poking out are going to be some kind of metallic silver. I left the shade of silver up to my paint guy, as long as it's a bright silver.
If your man is a professional car sprayer he should know how to paint and clearcoat anyway, so you shouldn't really have a problem.This guy does award-winning auto restorations, mainly on late model Mustangs. He knows paint, he was just unsure if auto primer would be suitable for this application as he's never painted a guitar before.
Thanks for all the tips.
-R
-
Hi guys,
I've just finished building my custom V. You can view it here.
Now that it's assembled, working, and playable, I'm going to tear it down and send the body off to be painted.
Question 1: Grain filler. I have some Dexcon 4000-psi epoxy here at home. Rather than order some Z-poxy, I was going to use this stuff as grain filler. Any reason why I shouldn't, or why I should just use Z-poxy instead? I notice Z-poxy seems to be the product of choice for grain filler and I was wondering why can't any clear epoxy be used. I use Dexcon on things like the tremolo post holes (keeps them from oblonging over time) and I have good luck with the stuff. Since this is my first guitar build, I figured I'd ask. The only stupid question is the one you don't say.
Question 2: Primer. I struck a deal with a local auto body shop to paint the body. This guy helped restore my Mustang coupe. We were going to use an auto body primer, but aren't sure it is the proper product to prep the body for paint once the grain has been sealed. Will auto body primer work fine, or is there some other product that is better suited to painting my guitar?
I think that's it. I may have more questions later. Thanks!
-Roger
-
Slotting the fragment was an inspired move! I'll have to remember that one.
I beat my head against the desk for a while to think of that one! I have a lot of fragment extractors from many years of working on engines, but they were all WAY too big to retrieve the broken #10 screw.
What really torques my beanie is that I was almost ready to start installing the hardware and wiring the electronics. This little setback is gonna take a few days (and a crapload of four-letter words) to sort out.
Gettin' there...
-Roger
-
I had a screw break off deep in one of the mounting holes on a guitar neck. In order to retrieve the piece of the screw, I had to drill the neck hole out, larger than it was meant to be. Then using a Dremel, I slotted the top of the screw fragment and just "unscrewed" it from the neck.
Now I'm left with an enlarged hole mount in the neck. I was thinking of drilling the hold considerably larger and using a dowel and some Titebond to repair the hole. Would that work best, or would filling it with a 2500-psi epoxy be a better idea? Any ideas/comments appreciated. Thanks,
-Roger
-
I've heard bad things too, enough to put me off even looking at ER's website.
Bluestreak, that paint scheme you were talking about (Blue and Silver) has gotten me really excited, and the fact that it will match your mustang, wow.
That's awesome.
Thanks!
I'm at a standstill now. I have all the hardware, pieces and parts except the body. I paid him on evilBay last Sunday... I want my product!
Actually, I just wanna put it all together so I can get it adjusted and play it before I take it off to be painted. I hate being patient! -
If you don't mind telling, who was the luthier that you bought this from? I would like one for myself!
You have a PM.
-
How many coats of tung oil do you apply?
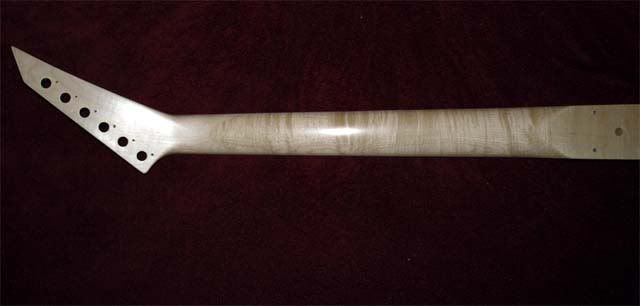
The neck I posted was a Jackson DXMG neck purchased for my current project. I cleaned up a few nicks, scratches and imperfections in it but much of its original finish was still clean and intact. And it's a gorgeous piece of maple, so having a really nice piece of wood from the factory helps. That neck only got a couple of coats of pure tung oil applied on top to seal where I sanded it.
If it were a new neck made from scratch/bare wood, I'd layer 3-5 coats depending on how the neck feels to the touch. I like the wood to be sealed enough to prevent staining/dirt from becoming embedded, but thin enough that the feel of the wood is still evident. For the first 2-3 coats, I like to use naphtha to cut the tung oil down and help it penetrate better in the initial coats. Successive layers (3-5, sometimes more) will be applied at full-strength and the final layer is always pure TO. It gives a really silky, wet-wood look and creates a translucent matte finish. As you can see from the neck I polished up, any figuring in the wood is amplified and takes on an almost 3D look and the grain underneath is clearly evident.
I experimented on a lot of necks to come up with that... all my guitars are treated to this because that's just a feel I enjoy in a guitar neck. And to be honest, I can't take credit. WAAAAY back in the 80's when I was learning to play, I read an interview with Steve Stevens (Billy Idol's guitarist). He said he required all his guitars to be made with a bare wood or oil-only necks. He did this contrary to advice at the time which said that unsealed necks were more vulnerable to warping. So I took my Charvel (which I still have!), removed the neck, stripped it, and played around with the finish until I got it where I liked it. Ever since... I've been doing that to my guitars.
One thing's for sure: I'll never own a guitar with a painted neck. Not being able to feel the bare wood in my left hand takes away a lot of the pleasure of playing for me.
-R
-
What you could have done to get a guitar like the Vinnie is order one from this guy named ed roman. He builds that model.
Yes, I know he builds them. First, it wouldn't have the Jackson name on it, and I wanted that. This guitar will be built with 100% original Jackson hardware including the neck itself. Second, I couldn't get it from ERG for the money I spent (and I haven't heard the best things about Ed Roman guitars, either). This guitar will be completed for just under $750, I'll build it myself, and I just sold one of the guitars that's just passing through my collection for $350. Net effect is? For about $400, I'll have built a guitar no one else has. And I did it myself.
Cheers,
-R
-
That's a sweet body, hope it works out for you.
But the tremolo routes and stud locations could be for an Ibanez edge...
Measure three times and avoid dissapointment, OFR and Edges DON'T MIX.
Thanks.
I got a hold of the luthier before he sent me the body. It was routed for an OFR, not an Edge/LPE/Edge Pro. He's going to cut a body for me with a Jackson-specific neck pocket set for a 24-fret/25.5" neck. My problems are solved in one easy swat!
I'll be back in a few days with photos of all the pieces/parts when the body arrives, and I'll document assembly. My biggest pain now is the paint job. I've got to get a hold of the guys who painted my Mustang, because I want the guitar painted Ford Sonic Blue to match my car (with the shadow V in metallic silver). I figure they can paint and clear coat it super-easy for me. And they'll get a kick out of the project, since they helped me restore my 'Stang.
Cheers,
-Roger
-
I do all my guitar necks with lightly rubbed-on coats of tung oil. In between coats, I use 0000 steel wool to give it a very smooth, natural, and soft finish. It also brings out a satin-like luster in the wood. IMO, this produces the best finish on maple necks, but it works on any type of neck/wood.
Here's a neck I just finished cleaning up for my current project. Nothin' but tung oil and lots of love with 0000. The picture doesn't do it justice at all, but I thought I'd share.
-Roger
-
This neck is 2-3/16 wide, or 56mm - the same width as the Ibanez AANJ neck pocket, so it should slide in just fine. The neck I have is for a 25.5" scale.
I researched the distance from the nut to the first post on an OFR and that appears to be 25.0" for a 25.5" scale guitar (according to StewMac's fret calculator as well as a few other web sources). I'm going with an OFR that came from a Jackson Dinky, as did the neck. The neck doesn't have an angle to it and the V body I purchased was routed w/o a neck angle as well. This neck installation should be as simple as making sure the correct length is applied as the neck is adjusted in the pocket, and then bolting it in at that position. Once the neck is positioned properly to have the correct scale length I'll have to drill new holes in the neck to bolt it to body at that corrected length.
Anyone see any problems with this methodology?
Much appreciated.
-R
-
Hi,
I'm building a custom Jackson V, a replica of a late 80's Vinnie Vincent Jackson double V. I just bought this body off EvilBay and need help fitting the neck to the body. The neck pocket was cut for an AANJ Ibanez neck, but I already have a Jackson Dinky 24-fret neck that I purchased to install on the project. Since it's a Jackson replica, I obviously want it to have a Jackson neck.
What I need to know is this: Does anyone have the dimensions of the neck pocket for a Jackson Dinky? I need to modify the neck pocket on the body I purchased to accept the Jackson neck, but I'm not sure how to go about this. Any help would be greatly appreciated. I searched the forums for a neck pocket template for a Jackson, but after searching through ten pages of posts, I gave up.
Thanks,
-Roger
-
No experience with that particular piece of equipment, but the hipshot gear I have used before (bass bridges and the that drop-d tuning peg gizmo for guitar) has all been really nice gear worth the money.
I was interested in that tremolo for another project guitar I'm working on. I'd be interested in hearing people's experience with this product.
I used a Hipshot bridge on my fixed-bridge 7-string project and couldn't be happier with it. I used a Tremsetter on another guitar trying to stablize a floating tremolo problem and couldn't have hated it more! So my experience with their products is 50/50 right now. If anyone knows, I'd appreciate a chime-in too. Thanks.
-
Hey guys...
I have a piece of AAAA quilted maple (0.015" thickness) that I'm going to apply to the headstock and body of my project 7-string strat (it started life as an Ibanez RG7621).
I've never veneered a guitar before, so I cut out a small piece of the veneer and figured I'd start experimenting on the headstock. So... I glued it on, shaped it, cut holes for the tuning key posts, etc... and began to sand/polish the veneer up.
As I worked on it, the veneer seemed to get... dirty. I started with a short stint with 320 grit, then 400, then 600, all the way up to 0000 steel wool. As I progressed with each step, the veneer became grey in color and that "greyness" wouldn't lift out of the veneer despite me trying to use every trick I know on maple. Usually lighter fluid works great to clean up a dirty maple fretboard, so I tried it on the headstock and it didn't help. So I kept polishing the wood, and that "dirty look" never went away, until I'd just about thinned the veneer to nothing with sanding and cleaning it. I even tried a little bleach solution just to try it... I eventually ended up sanding the veneer off, and I'm ready to try again.
My question is... since I've never veneered, is there something I should know about the process of handling or polishing veneer wood that I contaminated the piece I glued down somehow? How can I avoid this? Or did I just ruin a perfectly good piece of veneer? I plan to die the face of the guitar and headstock a deep blue - would that "greyness" affect the color of the dye?
Many thanks for the responses.
-R
-
On the guitars I play, the bindings always extend around the headstock, too. I think that would make it impossible to remove the fretboard with the binding in one unbroken piece. But I've never removed a fretboard that had binding before.
-
I have a set of feeler gauges I can use to measuring the existing relief. No real measurement has been taken in that regard.
It's listed as a 5-piece maple neck, but the structural portion of the neck is three piece, the other two pieces are only there to shape the headstock.
-R
-
I certainly didn't mean to cause so much discussion over something so trivial in the grand scheme... I'll try to describe the whole process from beginning to end of what's gone on with this guitar.
The guitar's action was set cumbersomely high from the factory. Keep in mind - this guitar was constructed in Japan in late 2004, then traveled from Japan to Florida in late January. It saw a rather large change in atmospheric conditions and I thought initially this could perhaps be the root of the problem. It wouldn't be the first time I saw a guitar change completely with a change in climate - I once traveled from Orlando to Denver with one of my Ibanez guitars and the change in climate and altitude really hosed the setup on the guitar.
The first thing I did was check the nut and clearance to the first fret. This was set higher than I've seen on other RG's, and when I removed the locking nut, it had a 0.1-mm shim under it and one-half of a 0.1-mm shim under the bass string side of the neck (under the nut for strings 4, 5 & 6). I removed the full 0.1-mm shim and reassessed the setup. I have always used the following guideline for open-string-to-first-fret clearance: if you fret the first fret and see the clearance you have at the second fret (without fret buzz, of course), that's the amount of clearance I normally leave at the open string to the first fret for open string action. I've never had a problem with fret buzz in the past using this scheme to set open string action at the first fret. I have four other Ibanez RG's, all set up like this and they all have great low action and play like a dream - fret buzz isn't a problem on them, even on the low-B on my two RG 7-strings.
Once action at the nut was set, I checked the tremolo posts. I lowered them until they matched measurements taken off my other two 6-string RG's. At this point, the guitar was buzzing like a bee in a flowerbed.
So I figured I could cure this with some truss rod adjustment. However, I discovered that the truss rod was only tightened one full turn away from being completely loose. With only one turn on the truss rod, I don't think it was doing much if anything at all - so to see what would happen to the neck, I let it out completely and let the guitar sit overnight. I marked the position of the truss rod nut with a Sharpie so I wouldn't lose its initial position. I noticed no change in the neck profile the next day. With the truss rod completely loose, the guitar appeared to have a dead-straight neck under string tension.
I borrowed a neck jig from a friend, turned the truss rod back to where it was when I received the guitar, and placed the guitar in it to simulate the truss rod action and string tension on the neck. Again, the neck appeared to be perfectly flat along its length - the center frets appeared level with both ends of the neck. Assessing the frets was performed using a draftsman's straight edge (a perfectly straight, flat metal straight edge used by old-school draftsmen). I placed the straight edge lengthwise on the fretboard and ran it up and down the neck. Frets 4, 5 & 6 appeared to be ever so slightly higher than the rest of the fretboard. These are the frets that have been dressed - I have a fret dressing tool kit I got from StewMac a few years ago. I first gently leveled them, then recrowned them using a fret dressing file. Like I said, this is something I've done in the past in the course of refret jobs or replacing/upgrading fretboards, so I was pretty confident I could do the job just fine.
I did not assess how the frets were seated; I assumed they were seated properly. After having taken a look at the fret seating last night, they all appear to be seated fine with no play in them when pressed. I have a drill-press in my garage with which I have a home-made arbor press type setup for refret jobs I've done in the past. The frets don't feel or appear to be moving in the fretboard, but I may not be able to see that with my eyes or they may be seated at the ends but not quite properly at the center of the fret. I'm afraid if I set the neck in my arbor press setup and try to make sure that the frets are seated properly that I may push any loose frets deeper into the board (if indeed they aren't all seated properly) and I may have to dress all of the frets on the guitar - this is an assessment I should have made initially but didn't, so I'll probably go ahead and check this soon. I assumed that the luthiers who I hired to inspect the guitar made this assessment, but I didn't ask specifically.
Once I knew (or so I thought) that the frets were true, the nut action was set properly, the EdgePro tremolo was adjusted properly, and that the truss rod wasn't able to be loosened enough to perform its intended function, I sought professional help. One month and two luthiers later, I had no more answers than when I started except that it sounded like a more involved repair could be needed, though I never got a clear, concise answer from either of them as to what that repair might be. I was more disgusted that I'd been without my guitar for a month and no closer to a solution.
That's pretty much it.
-Roger
-
I didn't say that, Wes. I've refretted a few guitars - "well-versed" is not the term to use. I know how to adjust a truss rod - loose means relief, tighter means flatter - that's it! That's all I was saying. An expert I am not, which is why I asked you.
My apologies for wasting your time.
-R
-
First of all, I'm no beginner. I've made new fretboards for existing necks (I just finished a retrofit on my Ibanez RG7621, to which I added a Brazilian bloodwood fretboard and quilted maple veneer to the face and headstock). Since I've made fretboards, you could surmise I've done a few fretjobs.
I've just never built a neck from scratch, let alone tried to repair a problem like this, and I'm not as familiar as I could be with truss rod operation beyond knowing how to set up a guitar - I've never installed a truss rod - I've only removed and replaced good parts on healthy necks; I've never tried to correct this sort of problem. I'm an amateur craftsman, but I'm no luthier. That's why I'm asking you what's up here. If I said "file" where I should have said "dress" - don't **** a twinkie! I just don't talk much about this stuff, I just do it in my garage by myself. I'm not a well-socialized amateur luthier... so I lack the vocabulary.
Anyway... so I'm not as familiar with truss rod installation as I could be.
Trust me, I didn't screw anything up. This guitar has been inspected by two trained luthiers after I dressed the frets (my fretwork was just fine, thank you!). I never got a straight answer out of them as to how the problem could be solved.
-
Ok, I've got a fix in the works for this. When I rig this up (it ought to be interesting!) I'll snap a picture and share with you guys.
-R
-
it sounds a bit odd that the guitar buzzes all along the neck. This probably means there is relief but not in the right place and or there is a little rise in the board as you have said. I would be inclined to have it fret dressed to see if it does make the difference. Big frets are easy to dress, also make sure your striaght is not just a ruler and is an actual straight edge.
This was done already - first by me, then I had a qualified luthier take a look at the frets. They're as straight and true as it gets.
I've got an idea ... think about this.
Basically, I will leave the neck on the guitar, the truss rod tightened a little, and I leave it tuned to standard with 9's on it. Then, every night when I'm done playing (yes, it is playable, just a little annoying at times) I brace the neck near the nut with a caul radiused to the back of the neck, run a piece of 2x4 from the back of the body braced on the back of the neck pocket to the caul behind the nut, and using a clamp, put an ever-so-gentle amount of pressure near the center of the neck (forcing the down-bow I'm looking for) and check it daily until it's achieved enough relief to be adjustable with the truss rod tightened slightly... in time, that theoretically would force the neck to where it should be with the truss rod usable for adjustments again.
Assuming I described this enough for you to understood what I just typed... what do you think?
-R

Double V Project Completed...
in In Progress and Finished Work
Posted
I found the video on YouTube! It's called "Boyz Are Gonna Rock". I knew YouTube would have it... they have everything. You can see Vinnie's original Jackson Double-V guitar in the video.
Just a suggestion, but the mods on this boards ought to think about enabling YouTube in forum posts so we can more easily share videos and music, our own works included.