


Juntunen Guitars
-
Posts
569 -
Joined
-
Last visited
-
Days Won
8
Content Type
Profiles
News and Information
Tutorials
Product Reviews
Supplier Listings
Articles
Guitar Of The Month
Links and Resources
Forums
Gallery
Downloads
Posts posted by Juntunen Guitars
-
-
Here's a couple shots of the binding all scraped flush. I just use a scraper and sanding stick to level it.


-
Forgot to post that the dovetail was routed. The only picture I have is of the body route.
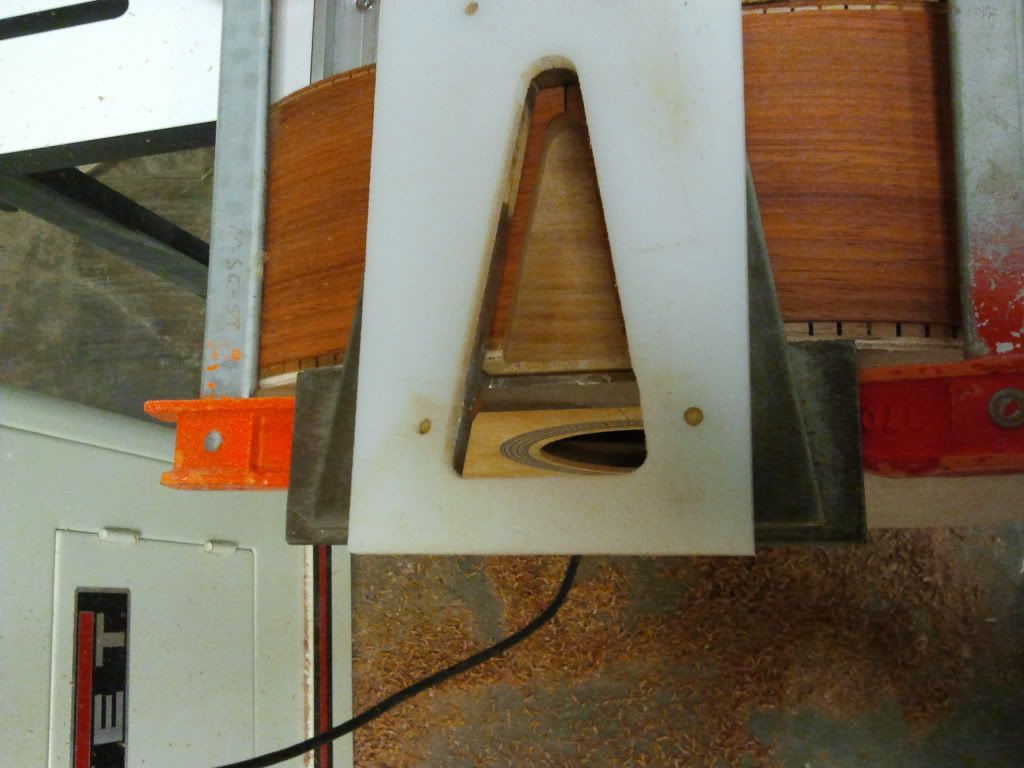
I'm setting the neck today. I will post pictures of that later.
-
End Graft in.
Binding in. The binding ended up being northern minnesota white ash.

Scraping the binding flush.


The gluing process:
I used titebond 1. Put the purfling in first then the binding over that and it's all held in with strapping tape.


Couldn't help setting the neck in the pocket.

-
I make rods like stew macs hot rods but mine didn't have threads on each end. It's bent on one and threaded on the other. I prefer rods like the hot rod because it holds the neck perfectly where you want it.
-
Or are you saying an angled neck pocket? If that's the case yeah it's fine, as long as the neck angle is right. It will actually help you in the long run with the action.
Now that I look at your picture I'm guessing you are talking about the neck pocket not being a rectangle or squared like a Fender correct? The rounded edge won't be a problem at all.
-
I hate it when this stuff happens. I've had two guitars go terribly bad on me. The latest my first neck through. I had to cut the neck out of it twice and either glue in new wood or remove bad glue joints not to mention my router decided it was very hungry that day and ate a lot of wood for the control cavity, no more on that guitar. It now sits on my wood rack so every time I go to get wood it reminds me of things I shouldn't do when building.
-
Could have sworn I just saw different pictures of a different guitar, checked a different page of this thread to be sure I had the right one then went back and they were to the right pictures? Am I seeing things?
It is called "edit"
Haha that's what I was thinking happened I was just making sure I wasn't seeing things

-
Could have sworn I just saw different pictures of a different guitar, checked a different page of this thread to be sure I had the right one then went back and they were to the right pictures? Am I seeing things?
-
Got the binding and purfling channels cut as well.


Also cut the endgraft slot.

When you cut the binding channels you should cut it deeper than the binding is thick by a few thousandths of an inch. If you don't you have to scrape the biding back to the edge of the sides which is fine but there is more of a chance of it looking uneven and binding seems to be the first place that other builders look at a guitar and if the binding is bad and has gaps then the customer will notice it too.
-
You want to sand in the neck extension height into the top. You figure this out with an equation that determines the settle in that should happen in the first week of the instruments life when all strung up. I don't remember the equation at the moment but I will post it later. Once you figure out everything you make a shim 1/32" thinner than the neck extension height, then you tape it down where the bridge will be and use a long straight board to sand in the extension height.

And sanded in. The pencil marks will be where the dovetail joint will be.

I'm glad I cut out two necks. One warped somehow and the other didn't so I had to plane the neck flat again. This is also why you should always overcut everything, if I hadn't this neck would have had to be scraped.

-
Got some work done on the neck.

I had a veneer of the neck blank I cut off when squaring it up that I decided to test the glue joint. The ash piece split right down the middle.

And one of the necks cut out.

Radiused the fingerboard. Cocobolo is rediculously oily, a lot more than I thought, I went through a lot of sandpaper to radius the board.

-
Bending the white ash binding. They were set up the exact same way as the sides were for bending and the same time frames were used.

Out of the bending jig

And opening them up.

-
Oh, if you've got them bent you're good to go. I didn't have any issues with my sides bending with Padauk either. However, a bunch of folks have. That said, for these brittle woods prone to cracking I've actually been told to get the wood a little OFF quartered, which is what mine was. Maybe your's was too?
Chris
Mine wasn't off quartered, the edges were a little on the back but the sides were pretty dead on. I think a lot of it could do with the bending method too since there are quite a few ways to do that. I used a heating blanket and spring steel. In my limited experience with acoustics bending pipes don't seem to get enough heat to the wood. I cracked a lot of oak sides but white ash bends like butter no matter what you do so I'm not sure really. I also wrap the wood I am bending in paper towel to hold a little more moisture then in tin foil with the heat blanket on top and a sheet of spring steel on the top and bottom of the stack. The bending process is to plug the blanket in on a timer for 3 mins, wait 45 seconds for it to warm up, clamp the waist slowly, bend the lower bout taking 45 seconds for that then the same for the upper bout. Then I wait 40 mins and re-align it if I have too then re-heat for 3 mins then wait 20 mins until it is cool to the touch before I take it out. That being said it's not perfect either, one of the other guys building acoustics in class broke his indian rosewood doing the same thing.
Got some more work done.
Marking for binding strips. This is some white ash

For some reason I had to use a router for the back brace slots or I would fail that part.

Why I prefer to not use routers for brace slots and just use a chisel. When I had to use the brace jig to glue the back braces, which again I didnt understand since I didn't have to for the top, The jig slipped a little so my braces glued just a little off center and I wasn't able to tell until I routed and nothing would fit right, so out with the chisels so I can widen the slots.

Gluing the back on.

Binding strips cut out. They are about .080" thick and will be sanded to .060"

Out of the mold.

Why I absolutely love Padauk, one side is sanded and the other isn't.

-
Padauk scares some folks due to it being prone to cracking. However, it makes a great sounding and looking instrument. You're gunna love it!
Chris
I've heard it turns out nice for acoustics plus the woods looks sweet so I figured why not. I believe RAD mentioned that it was a brittle wood before I started this build so I was surprised with how smoothly the sides bent. I've had no issues with it so far and hopefully it stays that way
Awesome work Ryan.
+1 Padauk
You have reminded me why I don't build acoustics... Man that is a lot of work.
This thing should be amazing when you finish it up.
Thanks, yeah it has been a lot of work and there is more to come but it has been a lot of fun, acoustics I have fun with since it's not like electrics where you just hog wood out with a router and make all the parts fit, it's really cool to see how the different wood sound when you take wood off or brace them in certain ways I think.
I decided on Padauk actually because I thought it looked sweet on your builds and figured it would be equally as good on an acoustic. By the way I still have that Diablo 7 string humbucker from you, it's just been sitting in my shop waiting for the guitar to be finished, hopefully this summer I will have the money for it.
I love the look of them and really want to make one, then when I look at a thread like this I think "**** that!"... Then the excuses come out, "I don't even play acoustic" - then back to step one a month later where I really want to make one!
You're doing some awesome work mate. Can't wait to see the finished guitar.
Haha yeah it's a lot of work but definatelly worth it I think. You really just have to get out and do it and believe me I can't wait to see this finished either.
-
There are three things that help the saw cut through thick wood: 1) saw quality, 2) blade selection/quality, and 3) experience. It's EXACTLY like re-sawing with a bandsaw.
FWIW: The blade had to be changed out in the middle of the cut, so I just grabbed a leftover "thick wood" blade. Wonder Girl was having trouble controlling the piece with the new blade, so I finished it up for her. There was a significant difference in what was cut with the two blades. The 1st (better quality) was dang neat 90 degrees. The 2nd (junk), was bowed and uneven.
The saw was the same one you have but I'm pretty sure the blade was bad or I just didn't understand it because the cut came out bowed. I'll keep this in mind for next time.
-
Kerfing slotted and braces all fit. I really like looking at pictures of half finished acoustic where you get to see all the barces and such. It's like a hidden art that not many people see when they buy acoustics.

Checking for any gaps.

Top glued on. I use two cam clamps on each block then 45' of bungie cord with at least an inch of space between each wrap. You should use Titebond 1 for the top to allow wood movement in the future. If you don't use glues that allow wood movement over time the guitar will not hold up in perfect condition over time it will just slowly fall apart. I'm experimenting with using titebond 2 for braces with this guitar to see if that makes any difference or not.


-
Here are some pictures of last weeks work.
I got the top voiced. I did this using Dana Bourgeois's method, if anyone is interested you can check out his articles here

Notching the kerfing for the side braces. When you do this remember that you will only be able to see the notches on the back kerfing and not the kerfing bordering the top so use the bottom to mark this all first. That will it will look cleaner too. This picture shows the top edge. To find the places to when the braces go count all the kerfing slots on a side and divide by 5 if you want 4 braces or by 6 if you want 5 braces. I am using 4 braces and had a decimal answer so I just changed it a little, so each brace isn't spaced evenly, it ended up being 18,18,19,18 kerfing slots between each brace.

Back braces being shaped.

Side braces glued. These help to prevent cracks from going around the side if the guitar was ever cracked, these also help to make repairs of cracked sides easier since the crack can't spread.

Using a radius dish to put a 20 foot radius to the back gluing surface. The top gluing surface was radiused to 25 foot

Marking the kerfing for where it will get notched to fit the braces through.

-
How clean does that scroll saw cut through thicker woods? I tried using one cut out out a guitar with a lot of curves once and just couldn't get it to to work at all. The cuts weren't straight and it was just a pain.
-
Yeah I am still interested in that quilted sets too, I sent you message a few days ago and never heard back, not sure if you got it or not.
-
Looks great!
Good pictures too.
Thanks.
Center seam in

You want to round over the center strip. I just took a block of wood and held it to the spindle sander

Glueing the kerfing


Notching the slots for the back braces, I use a chisel to cut through the strip then a smaller chisel with the bevel side down to pop the braces slot out.

And back braces

Kerfing done

And slotted the fingerboard


-
I use 13 or 15. I don't think there is really one "correct" angle to use.
-
The back

Gluing in the center lining on the inside of the guitar. This runs from block to block, don't cut out spaces for the braces yet just glue in the strip, you want to add about 1/8th" extra into where the blocks go on each side. You can trim that back later and get a good fit. The back braces and center lining are glued in a 20' radius dish, the top was 25'.

Marking out where the braces go.

-
After the sides are bent you want to cut off the extra so you can close the mold up. The mold I am using has a hinge on one side. It's ok if there is a gap between the sides since they will get covered later.

Gluing in the blocks. I use titebond 2 only the neck block because when it needs a neck reset (all guitars should at some point that's why you never use epoxy) titebond 2 is water based and more water resistant than hot hide and titebond 1 so when you go to steam the neck off it won't have the risk of steaming the neck block with it.


Sanding the inside of the ribs for kerfing

Finally figured out what cheetos are made of

-
Nice! I did a Padauk and Bearclaw Sitka OM sized guitar a couple of years ago for a guy... Great combination... I still get notes from him praising it. What'd you use for the bridge plate is that also Cocobolo? Just making sure it's not Indian Rosewood.
Padauk is such a nice back and side wood... love it.
Yes it is Indian Rosewood. Dreadnaughts have a lot of base so because of that a lot of overtones that need to be dampened a bit, Indian Rosewood keeps the tone but filters the overtones in a way. I also left the treble side lower portion of the x-brace unscalloped to help add some more high end to the mix but not too much. I still like the bass they give.

Padauk Acoustic Build
in In Progress and Finished Work
Posted
Setting the neck. I think it's kind of fun to set a dovetail and it's really not all as hard as everyone thinks. Two things though, if you get pissed take a break and you HAVE to work relatively slow otherwise you will screw it up and have to do a lot more work for it to fit right. When setting the necks I start with a chisel by just shaving off dust practically then I switch to sandpaper strips to make the joint clean and straight. You can put chalk on the body to mark where the neck is touching. I only use that while chiseling. I make the joint so I can't fit a .002" feeler guage in any gaps on the neck. When working the dovetail you want to get the centerline straight first then the angle right then you work the twist out of the neck then finally the height. The centerline is adjusted by taking wood off the sides of the neck so don't touch the dovetail yet. The angle is adjusted by taking wood off the bottom of the heel if you need a steeper angle or the top of the heel is it needs to be lowered. Twist is taken out by removing wood from the dovetail on the top and bottom but on opposite sides so lets say I had the bass side higher than the treble I would remove a little wood from the top of the dovetail on the bass side and a little from the bottom of the dovetail on the treble side, just remember to taper your cuts so they come out even or the dovetail won't fit right.
Start by undercutting the neck with a chisel.
This one shows the chalk I was talking about
And the fit after it's almost done. I don't think I have any pictures of the sandpaper but if I do I will post it. When using the sandpaper you want to put it under the heel on the side you are working and pull it out the bottom or top top of the heel. You can set the angle with that too so if you pull out the bottom then you are making the angle steeper.
To measure twist I use a digital caliper and use the little metal bar that slides out the bottom when you open the calipers and just push it down to the sides of the dovetail so I can measure how high up the dovetail is that way too.