


Ron.
-
Posts
22 -
Joined
-
Last visited
Content Type
Profiles
News and Information
Tutorials
Product Reviews
Supplier Listings
Articles
Guitar Of The Month
Links and Resources
Forums
Gallery
Downloads
Posts posted by Ron.
-
-
Hey everyone
I want to thank WezV, Akula, Saxon Marsh and Tim3 for contributing to this thread as well and for all their help, and anyone else that I may have missed, thanks guys. Special thanks to the The Project Guitar Forum.
Ron
-
Quarter Wrote: Great job Ron, I like it a lot!
Thanks Quarter,
I was just trying to make good use of all the great information that you provided.
It is great to see that you put all the information you gleaned from that long and detailed list of questions to good use. The guitar looks great! I must say at the time I was impressed with the scope of the questions you asked. And I was also impressed with the completeness of the answers Quarter provided, not to mention the grace and patience with which they were delivered. I'm sure it is as gratifying to him to see what you were able to accomplish with the knowlege you gained as it was you to build this fine instrument.Well done to you both!

So how does it sound?
SR
Hi,Scott It sounds nice to me. I brought a Vox Da5, and I found a few setting that I really like. The clean setting with a little a reverb added sounds really nice with the humbucker on. It also sounds nice in split mode (north coil on) I haven't had much time to play it but definitely like what I heard so far. I think that the GFS Lip stick humbucker offers a lot of tonal possibilities, particularly when split. I really life the GFS Pro-Tube Lip Stick pickup a lot.
I also agree that Quarter was very patient and helpful answering the many question that I asked. I tried to ask questions that would give me a clear understanding of what I Should and shouldn't do.
I hate copying other peoples designs, so I tried to ad my own little twist to what I was building, and Quarter provided me with information that allowed me to do that. I think that this is one of The best Lap Steel building threads ever, thanks to Quarter and the other contributors.
Ron
-
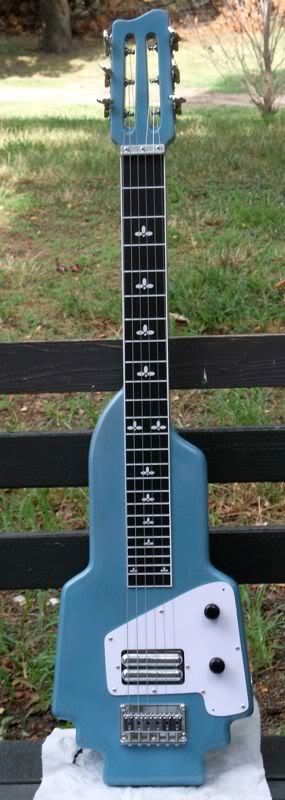
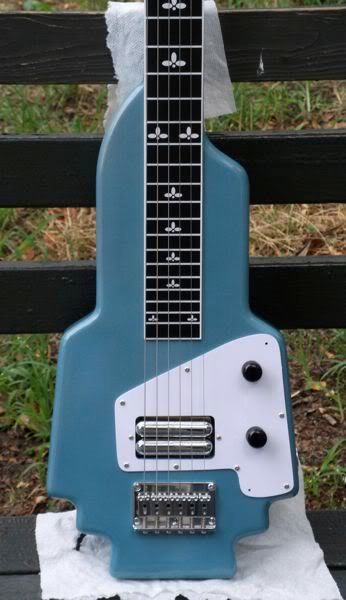
I just wanted to post some (not so great) pictures of my electric lap steel guitar that I built. I made a lot of mistakes but learned from all of them.
The guitar is made of kiln dried poplar from a local lumber yard.
I had It painted Metalic Pelham Blue by a pro at a very reasonable price. The pick up is a GFS Pro-Tube Lipstick pickup that I split so that the north coil sounds like a single coil and the humbucker can be played in series (I hope I'm using the correct terminology).
The Bridge is a Gotoh Hardtail string through Bridge from Stew Mac, Tele Electrosocket jack, Grover Sta-Tite tuners which work great. I do plan on making another pickguard in a week or so because I drilled a couple of pickguard screw holes in the wrong place, and I burned the side of the pickguard a little with the soldering Iron.
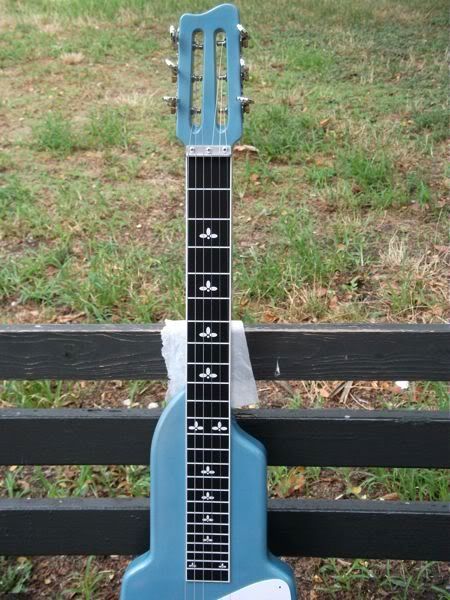
I designed the fingerboard in Adobe Illustrator, and had the design laser etched on "1/8" black top white core board" turned out nice.
I would like to thank everyone who contributed to this thread and the Project Guitar forum. I would especially like to thank Quarter for patiently answering all of my questions. I don't think It would have turned out as well as It did with out your help. Thanks Quarter, you are a great teacher, and you are very generous.
Ron.
-
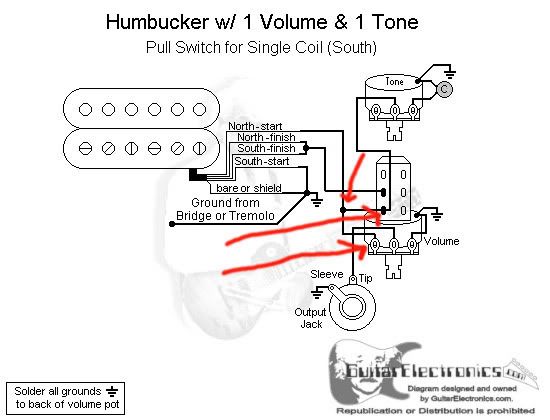
According to the above diagram for splitting a humbucker, the North Start is soldered to the bottom right lug and is jumped to the tone wire. The pickup that I'm trying to split is a humbucker (Prot-Tube Lipstick Humbucker). According to GFS the North Start is a black ground wire. I starting to think that the diagram that I'm using doesn't apply to this pickup. Can someone shine some light on this, thanks?

-
Samba Pa Ti,
I understand. Thank you and Riptorn. I appreciate all your help.
Ron
-
Hi Samba Pa Ti,
thanks for your help. I have one more question. The hole inside the push pull lugs are really small. I'm using small wire but after i tin the wire ends it won't fit through the lug hole. Do the wires have to go through the holes, or can I solder the wire outside the lugs? thanks again.
ron
-
Yes, they are connected. The heavy dot in the lines indicates where wires are soldered together. In more typical schematics and diagrams, you would see a U shape in the line indicating where a wire "jumps" over the other wires and thus there is no connection, but the heavy dot is a very typical symbol indicating the lines there are connected electrically.
Hi Ripthorn,
Thanks for your fast reply. So, I can take a piece of stray wire and connect It to the tone wire lug and then connect that directly to the bottom right (shaft side) lug. I don't have to connect to actual wire but connect to the lug, right?
ron
-
Hello to all. I'm in the process of wiring my first electric build and I'm confused about the wiring according to the attached diagram.
Can someone please clarify the If the north start wire and the tone middle lug wire are soldered to the bottom lug right side near the back of the pot, and then continue to the bottom right side lug (shaft side)? Do i have to add wire to join the 2 wires to and connect them to the bottom right shaft side lug?
Sorry If I'm not using the proper terms, this is all new to me. I marked the areas of confusion with red arrows. Thanks for any help you can offer. Ron
-
the layers go leather(top) fiberglass cloth i used 2 layers and resin of coarse then the thin copper sheeting. the copper isn't necessary but would recomend maybet three layers of fiber cloth if ya dont use it. btw i got the copper frome hobby lobby. what i did was tape a peice of wax paper to a board then tape the leather to it then i put the fiber glass and resin on then the copper foil then layed another piece of wax paper over that then another board and put some wieght on it to make sure every thing set up nice and flat. let that sit a day or so then pull it all apart mounted it to my templates rough cut it as best i could then took it to the router table.
i hope that was clear if not i will see if i can explain it better.
Hi Tim,
You did just fine explaining the process in more detail. Thanks for your help.
Ron.
-
ok dont laugh
the black one still needs some work (some day i will get off my lazy rear and order new screws for the trem pickgaurd and some new sadles) but honestly i dont pick it up much the natual one is the one i usualy go for even though it looks like crap it plays great. anyway the leather isnt for every one but i like it i was mainly sugesting to think a little diffent some times great ideas come for not being able to do the norm.
btw if any one dicides to do this for any strange reason make two tempalates counter sink the screw holes in one of the temps, then double stick tape the back fo the pickgaurd to one then drill out all the screw holes and blot the two templates together sandwiching the pickgaurd between them. it will keep the edges nice and crisp.
Hi Tim,
Thanks for taking the time to post the pics and explain the process. Why would anyone laugh, they look cool and different. I can see myself doing something like that. Your reply and sopabarstrat's have made It clear that you can get really creative when making pickguards.
So that I'm clear, the leather is sandwiched between the copper sheeting and the fiberglass, right? Also, how thick is the fiberglass?
Thanks again,
Ron
-
im about to go to work but i will see if i can get some pics up either tonight or in the morning.
Hi Tim,
that would be great, thanks.
Around .100" is pretty common. I find it interesting that StewMac's clear pickguards are spec'ed at .085" thick, when clear plexi sheets that are so common are around .100"And I mention clear, 'cause you can paint the back side any color (that will stick to the plexi) and it looks top-notch on the shiny side. Or you can do something more simple, yet crazier looking, by backing the clear guard with Christmas wrapping paper or whatever (not gluing it to the guard, but a carefully cut match)
Hey soapbarstrat,
Those are great idea's. Thanks a lot
Ron
-
you can order peraloid from any luthier suply or ebay.
personaly i like ot think outside the box on this one. i have been doing leather just layering fiberglass and then a sheet of copper on the back to stiffin it up and add instant shielding.
Hi Tim,
Thanks for your reply. Fiber glass and leather sure does seem way "outside the box" I would love to see a picture of that.
I'm sure It looks great.
I know there are a lot of places online that sell pickguard material and pearloid, but I need It for tomorrow , so I was hoping that the local plastic store would have something that I could purchase today or tomorrow.
Thanks,
Ron
-
Hey Everyone,
Could you offer some suggestions on pickguard material that can be purchased locally from a plastics store? The local plastic stores don't have Garolite. Is there any other material that can be used? I would prefer something with a pearloid effect, but will settle for a solid color material.
Also, what is the standard thickness for pickguards, 1/16"?
Thanks for all your help.
Ron
-
Torch top cleaners do not work. When I was starting out, I didn't want to shell out the cash, so I gave these a shot. It's not like they kind of work and will get you by. They just outright do not work.
Hi DC Ross,
I was planing on trying both the Feeler Guages and the tip cleaners, but then I decided to get just the feeler guages, thanks.
Ron.
-
No problem Ron, glad to help if I can. ... For the feeler gauges, I'd suggest the steel as they will be harder and more suited to using them for cutting. Most any auto parts store will have some and I've seen the torch tip cleaners in Lowes, Home Depot too.
All of these are fine for a project or two, but in the end, its hard to beat a set of real nut files if you do much nut work.
I agree that using these cheaper tools for not slotting should be temporary, I will eventually get the fret slotting files.
I'll check the local auto parts store monday for the feeler guages.
Thanks,
Ron.
-
That looks great Ron, I like your recurve on top.
There have been a bunch of threads here over the years on alternative nut slotting tools. Feeler gauges with teeth notched in them and welding torch tip cleaners seem to come up quite often. Needle files can work fine if you find a set with the right sizes, in particular, a joint round edge style is helpful. A joint edge file is basically what nut files are and come in gauged sizes. Those Xacto razor saws are great for starting the slot.

.
fngrpepr ... an acoustic bridge certainly could work, but my reservations on that style is that I believe its radiused on the bottom and designed as a floating bridge. Other issues you may have is the overall height and grounding of the strings.
Thanks Quarter, for all the measurements and tips that you offered so generously. I know It would not have turned out as well otherwise. I still have to refine It a little more.
I called a local welding supply store and they have the tip cleaners for $7.
I wouldn't mind buying the feeler guages too because they also seem to be reasonably priced.
I googled Feeler Guages which ones do you recommend? Also should I buy steel or brass, or It doesn't matter?
http://www.ppe.com/10cat/0237.pdf
Thanks,
Ron.
-
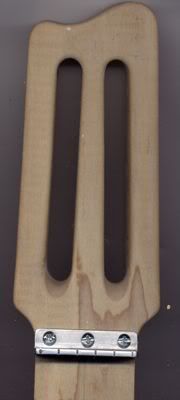
I made a aluminum nut today and cut the slots using a xacto saw for the initial cut, and then I used a small triangle file.
I strung the Low E string, and It stayed in the slot and in tune. I don't know about the rest of the slots yet. I'm not too concerned, because I can just make another one from the 1/8" x 1/2" x48" aluminum angle that I brought for $4.95.
Here is a picture of the peghead, It's not perfect but I think It'll work.
Sorry for the crummy picture. As always thanks for all the help.
Hi fngrpepr,
Im sure someone with more experience will chime in later and offer a better opinion than I can regarding the bridge you posted. As you probably read from my previous post, I'm using a Gotoh hardtail non tremolo bridge, and I have It max out height wise. It's about a half inch high as Quarter said It would be, which seems to be adequate. I'm planning on using a fingerboard that will be about 1/8" thick so I don't bottom out with the bar.
Regards,
Ron.
-
Can someone tell me what can I use to cut nut slots in aluminum angle If I don't have nut files?
thanks,
Ron.
-
Lots of info out there on the web. GuitarElectronics.com has a lot of good diagrams. Here is one using a push pull pot to do a screw side coil split
http://www.guitarelectronics.com/product/W...ingle_Coil.html
You could also do that with a dual pole dual throw toggle switch too, something like this
http://www.guitarelectronics.com/product/S...dle-Chrome.html
Thanks for posting the links Quarter. The diagram looks fairly simple. I was going to order some other electronic hardware from Stew Mac. It's time to slow down and get this right.
Thanks,
Ron.
-
Are you referring the sound with just one of the humbuckers (single coil) turned on?
Yes, split / splitting in terms of a humbucker refers to running just one of the 2 coils that make up a common humbucker. While most any 4 conductor humbucker can be split, the results can vary from quite nice to weak and uninspiring.
A commonly misused term for splitting is tapped. Tapping is very different than splitting and theoretically can be done to any style pickup by the builder / winder. It involves pausing the winding process and splicing in / tapping another wire mid coil to achieve a lower output setting when engaged.
Hi Quarter,
I would like to split the pickup as one option since I've decided to keep this build simple by only installing 1 humbucker near the bridge. So I'm guessing that I can turn on the humbucker as one sound option and split the humbucker as another option.
Any good Books out there regarding electronics pickup wiring diagrams etc...?
Thanks for the lesson.
Ron.
-
Bryans a good guy and is always very helpful. His PUF would be a excellent choice too. Its a little more vintage voiced than the BG Bucker, though the BG Bucker is based on a vintage tone also, maybe a bit more of a modern sound to it if that make sence. One thing I do like about the BG Bucker is it has a very good split tone and in general has a lot of chime to it. A neat in between pickup is I've had Bryan use an A4 mag like on the PUF instead of the A5 the BG Bucker normally uses. Its a particularly nice combo on a brighter body like maple or walnut.
Here is a poorly played clip of some clean noodling with a BG-Bucker in HB mode. Its not Hawaiian, but might give you a bit of an idea.
http://www.4shared.com/file/237346348/8fb5...-bg-c-msc1.html
Hi Quarter,
I understand what you're saying about the modern yet vintage tone of the BG-bucker, because the sound sample sounds just the way you described It. I like the sound. Could you please explain what you meant when you wrote "the BG Bucker is it has a very good split tone" Are you referring the sound with just one of the humbuckers (single coil) turned on? Thanks for the pickup comparison, It's very helpful.
Ron.

Lap Steel Guitar Build Questions
in Solidbody Guitar and Bass Chat
Posted · Edited by Ron.
Hey WezV,
I hope all is well. Thanks for the kind words. Thanks again for all of your help, much appreciated.
ron