


capu
-
Posts
148 -
Joined
-
Last visited
-
Days Won
1
Content Type
Profiles
News and Information
Tutorials
Product Reviews
Supplier Listings
Articles
Guitar Of The Month
Links and Resources
Forums
Gallery
Downloads
Posts posted by capu
-
-
The mold building process is very easy and cheap, you don't need any expensive equipment.
Here a very very short description of the process for building a mold for a neck (just for example):
1. build a wood neck (it doesn't matter what kind of wood you use because it will be, probably, destroied in the process...) without fretboard
2. paint it; you need to have a mirror like surface
3. apply 3 coats of wax
4. screw it on a piece of plexiglass with the "fretboard" side down (on the plexiglass)
5. use the silicon to seal the contact point (plexi / neck)
6. apply mold resin on all the surface
7. reinforce the mold with fiber glass
8. unscrew the neck and extract it from the mold (probably it will break)
At the end of this process you have a mold that can be used for lamination. The only equipment you need is a vacuum pump (for the lamination).
The main problem is that the piece used for building the mold (in this case the neck), needs to be designed in order to be easily extracted from the mold and has to be easily laminated (smooth-cornered).
I hope this explaination will help. If you want I can take some pictures of my last neck mold. Let me know

-
Wow! I really like it! Very very very nice!
Thought you folks might be interested in this headless hollowbody design by luthier Chris Forshage. I've been chatting with both Chris and future owner Marc of the jazz group The Marc Why Group about the guitar. Here is a pic of Chris' personal guitar: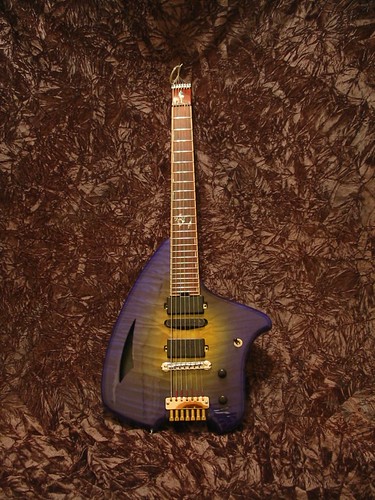
I recently wrote about the guitar - The Forshage Hollowbody Electric Guitar. In addition, Both Chris and Marc have been generous enough to provide me with pics and details of the various stages of the build which I'll be writing about in separate articles.
Regards,
Rob
-
I forgot to tell you that in the next days I'll publish a set of pictures of the building process of the Fiber Carbon Guitar v1.0.
Looking forward to the posting. Very interesting stuff. Its good to see some innovation.
Regards,
Robert
In the next weeks I'll start the building of an headless guitar. In particular, when I'll receive the bridge and the nut (so I'll know the neck requirements), I'll build a fiber carbon neck for it.
I noticed that your "personal photo" is an headless guitar, so I suppose you are experieced in building them, isn't it?
-
I love your guitars, the use of the "epoxy resin with microbaloon" looks like a great alternative to MOP and alot easier to work with
Thank you! The microballon-technique is very easy and looks good enough.
-
Hmm i don´t like headless guitars... but that´s my opinion... what green will you use? Bright green like me?
I forgot to tell you that I'm going to build a fiber carbon neck for it but I can't start until I receive the mechanics (bridge and, in particular, the head string locking nut).
-
Excellent work. Could you tell me how you did the inlay and where you got the materials?
Sorry, I forgot to tell you where to get the materials. You can find all you need in every models shop (these are materials that are frequently used in building RC airplane models)
-
Hmm i don´t like headless guitars... but that´s my opinion... what green will you use? Bright green like me?
At the moment I'm not sure but I think to use, like you, a bright green. The body will have a flamed maple top with a natural binding.
-
Very nice. I think that the only 2 things that I think will have made it look better are the scoop in the trebel cut away, and the cover, alto it has a very nice inlay, I think it would had looked a lot better if it was in a black cover. The natural cover takes a lot of attention away from the overall look of the guitar, if the back would had been natural too like the cover, it would had been the best
You are right. I usually use ebony back plates but in this case the only one I had was this. I probably will replace the back plate with an ebony one. I agree with you, it will look better.
Thank you for your suggestion
-
Excellent work. Could you tell me how you did the inlay and where you got the materials?
Hello,
I made the inlay of the fretboard using epoxy resin and microballon.
The mixture: mix 14g of epoxy resin (resin + hardener) and add microballon (glass or phenolic) till you get a sort of clay (not too hard and not to liquid).
Then fill pattern you routed on the wood and let it harden for 24 hours. At the end, with a radioused sanding block, sand it.
It's very easy!
The color of the mixture can be changed using special colors for resins (liquid or paste). You can also use powdered ones but you cannot use water based or solvent based colors (they cannot evaporate and they also damage the chemical structure of the resin --> the resin is a polymer).
My advice is to do some practice on scrap wood.
Let me know if this description is sufficient and don't hesitate to pose me any question.
-
Heh gladly happened...
This guy lives few kilometers from me... I order parts in his webshop, pictures on his site were also helpfull to me when I was building my first guitar
I´m going to see his workshop some time.. perhaps when I will be buying new parts
By the way I´m going to paint the back black too to have the contrast with green.... This is beautifull image PRS
I think, as you, that if the back is black, the top pops up and the result is aesthetically better.
Now I'm preparing to start a new project: an headless guitar. The color I chose is green with black back.
-
capu, I have discovered PRS similar to yours... one of Slovak guitar builders made it... there are few diferences like pickups, it´s left-handed, it has natural back...
You can find them here Sollerguitars
Incredible!!! They are rella similar! Consider that at the begging I had in mind to leave the back natural then, after the staining, I changed idea because the contrast, from my point of view, was to high... In addition he used the same tuning machines I used: the PlanetWaves Auto-trim...
2 Persons in the world having in mind the same image: a blue PRS style guitar with a tree-of-life inlay on the fretboard.
Thank you very much for the link, I really apreciated it
-
If you want the birds you can ask this guy:
http://stores.ebay.com/The-Guitar-Parts-Ce...sQ3amesstQQtZkm
I know that he had them in stock.
-
Capu, I have a couple of questions for you about the carve on this guitar. 1. What is the overall thickness of the guitar body. 2. Is the plane, where the pickups and the bridge sit, flat (or parallel to the back) or is it angled. If it is angled do you know how much? 3. What is the depth of the carve from where the bridge sits to the low edge of the perimeter.
Thanks in advance for your help, and that is a gorgeous guitar. Nice job!
Hello Jer7440
I'm very pleased to give you an answer.
1. The overall thickness is 51mm
2. it is flat and parallel to the back
3. The initial thickness was 24mm and at the edge it is 7mm
In few words, the thickness of the maple is 24mm and the one of the mahogany is 27mm.
If you have any question don't hesitate to ask me
-
yeah it doesnt work then thats cool
im sure sure about experimenting cuz i cant unless ive decides on a top for it
ideas?
A strange idea can be to do a wood pickguard. If you don't like this idea, give an eye to: http://stores.ebay.com/Greasy-Groove-Productions
-
I forgot to tell you that in the next days I'll publish a set of pictures of the building process of the Fiber Carbon Guitar v1.0.
-
Hello Guys,
Here are 3 sound samples of the first version of the Fiber Carbon Guitar I built:
The sound tests have been recorded by progressively switching the pickup selector from position 1 to 5
-
Hello guys!
Here you can find 3 sound samples:
The sound tests have been performed using Line 6 Guitar Port in order to be easily replicated by someone else with other guitars. This is the only way that I found that allows you to be able to compare the different guitar sounds.
Here you can find the Line 6 Guitar Port presets I used:
Clean tone: Like Heaven
Crunchy tone: Verse
The sound tests have been recorded by progressively switching the pickup selector from position 1 to 5
-
I confirm that the Variax do not have magnetic pickup, they use a L.R. Bagg piezo bridge.
Probably it is possible to put the pickup under the pickguard so they will be invisible (directly fixed on the body) but I think that you need to consider 2 elements:
1. if the pickguard has a conductive tape on it you probably need to cut it out in the position where the pickup will be installed
2. due to the fact that the pickups will lay under the body level (under the pickguard) you probably will need to lower the bridge and the neck in order to reach an accettable distance of the strings from the puckups
I'll stay tuned because I like this experiment.
-
thanks for explaining the neck angle in the heel.looks great I like the router fixture you used.
I'm using Wilkinson wrap around bridges. you replaced your Wilkinson with a bass ass.
was there something wrong using the Wilkinson
The Wilkinson's sounds really good (this is due to the fact that it's made of one piece of aluminium and it doesn't have parts that can move...) and this is the reason why PRS stop tails install this bridge. The main disadvantage (in my opinion) is that the intonation cannot be set up so precisely as the Badass (where you can set each string separately).
-
Really really really a very very very nice work!
-
As I wrote before, there was a "copy&paste" problem: this guitar has a set-neck and not a bolt-on.
Anyway, it is possible to have a "bolt-on" neck that seams a set-neck: I read it on Martin Koch's book.
Here is a link to the book details:
http://buildyourguitar.com/books/beg/index.asp
I never did a test but it seams that it can work.
;-)
To angle a bolt on neck you either need to:A. angle the neck pocket
B. Angle the heel
C. do a bit of both
i prefer to angle the pocket
I would like to know where the bolts for this neck are hidden - it looks just like a set-neck from the back.
Nice work!!
-
Sorry, this is the classical "Copy&paste" problem.
The neck is set neck and not bolt-on, sorry.
I also built a angled bolt on (I called it SC-Curved).
Here is the picture:

The process is the same as a glued neck but the difference is that you bolt it. I decided to angle it because I used a wraparound bridge. In the picture you can see a Wilkinson bridge, I replaced it with a Badass and, due to the fact it is higher than the Wilkinson's one, I had to angle the neck heel.
If you have any question, don't hesistate post it ;-)
Nice Guitar. Very pretty =)I got a question though: You said that neck was a bolt-on? AND it's angled?
How did you manage that?
-
It took me about 2 months.
I angled the neck heel. To determine the angle I put the bridge at the desired height plus at least 7mm and at the correct distance (based on the scale length). Based on this, you can determine the angle.
At that point I put the neck on the table and I put a piece of wood near the nut to rise it to reach the correct angle. Then I fixed the piece of wood with a tape.
I fixed the neck.
Then I routed.
Here some pictures:
It is very important to put the bridge at an height of at least 7mm higher than the expected one because when you angle the neck with the router you reduce the heel height. In addition to this you need to rout the neck pocket considering this so, you need to rout the pocket 7mm less deep.
I hope this quick explaination will help. Please let me know if something is not clear or if you have a better technique.
capu vary nice work.tell us howe long have you benn building.
what angle did you use on the neck pocket to go with the wrap around bridge.
was it on the neck pock or on the neck heel.
-
Hello,
I used a nitro based sanding sealer. I brushed 5 coats and then I level sanded.
I didn't use anything on the maple before staining, I only sanded it.
cool, thx capu, sorry to be a pain again=DBut what type of seal did you use (sanding sealer?) and how many coats?
o, and did you use anythink on the maple before to stained it?
thankyou.

Something A Little Different
in In Progress and Finished Work
Posted
What I suggest you is to apply a couple of coats of laquer with a UV-filter because the epoxy resing tends to become yellow.
Nice job!