


Paul Vogt
-
Posts
17 -
Joined
-
Last visited
Content Type
Profiles
News and Information
Tutorials
Product Reviews
Supplier Listings
Articles
Guitar Of The Month
Links and Resources
Forums
Gallery
Downloads
Posts posted by Paul Vogt
-
-
Hi Chaps,
Been out of the guitar DIY loop for some time now, but recently got my interest rekindled when I stumbled on PVX Guitars. I realise that it may be viewed as a bit of a cop-out, but as someone who isn't entirely confident with the more precise woodworking skills required to turn out a quality instrument a kit guitar seems like a pretty good place to start out. With all the "serious" woodwork done already I'm pretty sure I could handle the assembly, bridge location/installation, finishing etc
Anyone have any experience with PVX Guitars, or know of anyone who's built one of their body/neck kits?
curtisa,
Let me reach out and assure you that we take a personal interest in helping you get a successful result. In practice, this means that we will answer all questions, and do whatever we can, to be a resource to you as you work on your project. All we ask in return is project photos!!
 We include a very thorough finishing guide (hard copy, in color)which we've written, to describe the finishing process in exhaustive detail. We also include scrap wood for you to test your finish ideas and materials. Please let us know if you can think of any way we can help, and Good luck with your project, whatever you decide to do!
 All The Best,
Paul Vogt
PVXGuitars
Charlotte, NC
-
Look at the first three pics here;
http://ryanguitars.com/theworkshop/Buildin...Ears%20Face.htm
also,

make it pneumatic and then your talking..Great pict.
George,
Thanks for sending the link and the photo. The vertical jig is a great concept, exactly in line with what I was hoping to see. Very Nice.
In the link you provided, the author is suggesting CA glue for the ears, to avoid introducing moisture into the neck wood. What do you think of this? I can see wanting to use CA glue simply to eliminate the drying time. Once I get the ears on, I want to flip it and machine the back of the neck without delay.
Do you use wood glue or CA?
Thanks again,
Paul Vogt
PVXGuitars.com
Charlotte, NC
-
I might be asking for something already answered anyway... Does any body knows about a CNC machinnig parts supplier? or in other words, any CNC router owner that can supply me custom bodies and necks?... Thanks!
Jonbuho,
It depends on what you mean by custom. The preliminary work it takes to create CAD files, then tool-paths (G-Code) then proper fixturing for the wood is mind boggling. If your design is fully custom, and true 3D, you're way better off carving it manually. On the other hand, if you want to bacically cut the outline (only) of a custom body shape and add pickup holes and a neck joint, you might find someone willing to do it for you. you could then add more features (like a belly carve) manually.
The task of CAD modeling a fully custom guitar neck is also extremely time consuming. The fixturing t hold the wood is a complex process as well.
Tell us more about what you have in mind? could you live with a custom body and a purchased neck?
How about a kit?
Paul Vogt
PVX Guitars
Charlotte, NC
-
I just plane them to the same thickness as the headstock, then use spring clamps to keep it level with the headstock piece, and in place... then clamp. Pretty simple to me?
Buy thicker neck blanks, thats even easier...
Thank you for all the suggestions. I think I'll make a U-Box clamp and post a photo of it.
Great support on this forum!
All the Best,
Paul Vogt
www.pvxguitars.com
-
I'm sure you could use a jig just like some of those guys use to glue binding on fretboards. Put a slight taper in the headstock part the wings glue to, then put two blocks of wood on a piece of ply with the same angle between them as put into the headstock, yet far enough apart to fit all pieces in how they are glued up. Then spread glue and push everything into the jig to "snug" it and clamp to hold with one clamp. Hopefully that makes sense...
That said, you can just use those squeeze clamps they sell at HD or Lowes. It's pretty easy to get everything lined up just pressing the parts to a flat surface while squeezing up the clamps.
Chris
Chris,
I think I follow what you're suggesting. I use wedge blocks for all kinds of clamping, and a special fixture for "ears" would be easy to make. Thanks for the thought.
Paul
-
PopTartPower,
Regarding Kits, One thing to look at is the material they use. One thing I see alot of, is veneer tops. These
look good, but if you look closer, you'll see that the "carved" tops are pretty lame. They are simplified in such
a way that they can be nicely covered with a sheet of veneer.
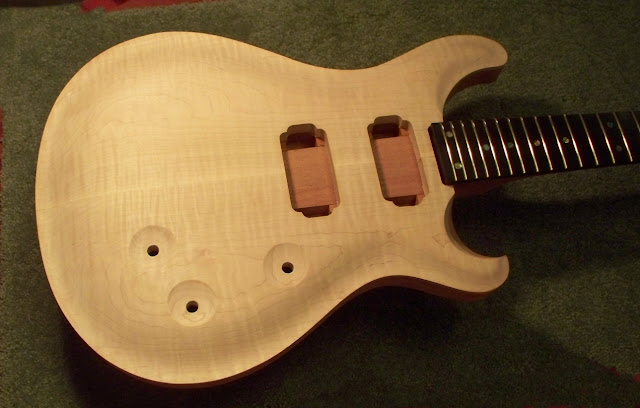
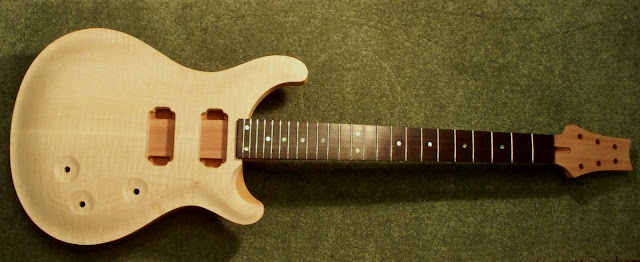
You might like the solid wood kits I'm making. These can be seen at pvxguitars.com. In addition, I have three instructional videos on youtube. To find them, just go to youtube and search on PVXGuitars. I also send my own
finishing guide with every kit, in which I describe and illustrate the use of Behlen's nitrocelulose lacquer products.
These kits are basically PRS in style, although after a couple of letters and a conference call with PRS's legal
folks, we have agree on some subtle changes to avoid infringing on their design.
I love what I'm doing, and I try to make sure that every customer gets my best work.
Check It Out!
Best Regards,
Paul Vogt
PVXGuitars
Charlotte, NC
 Howdy, hi, hello! It's my first post here on the forum.
I am interested in getting a low cost guitar kit like what is being sold on BYOguitar.com. In particular, I am interested in something like a Les Paul or Explorer replica. The kits seem to run for $180 to $190 depending on who is selling them. What is the current opinion on these kits? Are they complete garbage or is there something to them?
I know it is possible to get a whole new guitar for $99 and lower, especially if shopping used. That was me 15 years ago. I had a chance to play everything from a real Explorer to a 69 Strat to a Jackson Dinky. It's been a whole since I played and I think that getting a kit would be a fun way to get back into the instrument. I'm not looking to recreate the experiences of before. Just looking for something fun to assemble, finish, and noodle around with.
I got some search results when looking for info about the Saga kits but the posts were from a few years back. It seems like the kits are more hit than miss. Ideally, I would like to have a guitar kit without the PUs and hardware. I know I would upgrade whatever the kit came with.
Any thoughts?
-- Boris
-
Friends,
One of my least favorite tasks in making guitars is gluing on the "ears" on each side of the
headstock. Messy little parts with glue all over them, held in place by over-sized clamps,
parts sliding all over the place, it just irritates me. I do a lot of these, and am trying to make it easier.
I'm to the point of wanting to make a custom clamping station to simplify this. Has anyone made, or
seen something like this?
Thanks for any tips,
Paul Vogt
PVX Guitars
Charlotte, NC
-
Folks,
There are alot of tutorials out there on youtube. In fact I just added my own to the list.
I have one on dot inlays, another on side markers, and a third on Finish sanding. For dot inlays,
I recommend using a forstner bit. To me, this is a foolproof way of getting a clean hole. My dot
inlays from Stewmac have always been exactly the advertised size. Here's how I do it:
1) Mark the location with a sharp point, like a punch or a sharp nail.
2) Use a forstner bit, which cuts a clean hole, and won't wander.
3) Press the dot into the hole. Don't tap it with a hammer, it will crack.
4) Leave the dot slightly high, or level. Never low.
5) Bond it in place after it is seated, with "thin" superglue.
6) File and sand it flat.
This has worked perfectly every time for me.
Please check out my three videos on youtube. They are new, and I would really love
some feedback, Good or Bad! You can find the fast by searching "PVX Guitars"
All the Best,
Paul Vogt
PVX Guitars
Charlotte, NC
-
Thanks for the note.
I'm finding some of the African I have is almost like balsa.
yuk!
Best Regards,
Paul
Charlotte, NC
PVXGuitars
-
Folks,
Does anyone have any strong opinions about the density of mahogany for necks? I have African Mahogany in a fairly wide density range, and am wondering whether heavy or lighter is generally preferred. (again, for necks specifically)
Thanks,
Paul
Charlotte, NC
-
Folks,
Does anyone have any good strong opinions about the density of mahogany for necks? I have African Mahogany in a fairly wide density range, and am wondering whether heavy or lighter is generally preferred. (again, for necks specifically)
Thanks,
Paul
Charlotte, NC
-
Woodenspoke,
Thanks for the input. I'm pretty sure I'll end up with some kind of a station on a cart, that I can load wood into without fooling with individual bar clamps. I like the examples you provided, but I'm envisioning something more compact. Working in metal is not a problem for me, so I'll probably weld up some kind of a multi-level rack system. I might keep the cost down by using large bolts instead of clamp cranks. I sure appreciate the suggestions, and I'll be sure to post a picture of what I come up with.
Best Regards,
Paul
Charlotte, NC
-
Buter,
The fire hose thing is really a nice solution. The hose comes from a local supplier that sells various rubber products and hoses (Catawba Rubber, Charlotte, NC) . Then I just go to the local tire shop, and ask for a high pressure stem, and install it in a simple hole in the hose. I clamp the ends with a strap of steel with a row of 10-32 machine screws (or similar). The fire hose I'm using is rated at 150 psi, so I'm not concerned with bursting the hose.
Another great thing is the clamping force you develop. My neck blanks are 39 inches by 2.5 inch. That's 97 square inches. Multiply that by 60 psi, and you get 5850 pounds of force. Better be sure your fixture is strong!
For laminating the tops, I have a similar fixture with about a 12 inch wide hose. I'll post a picture of the fixture. Drop in your parts, add air, done!
Your top glue fixture sounds very intriguing. Did you ever built one? It sounds like it's exactly what I'm trying to come up with.
Best Regards,
Paul
Charlotte, NC
-
Yes!
Very similar. Here is a picture.
I love this method. It's really fast, and applies very uniform and controllable force.
Best Regards,
Paul

-
Thanks for the help. I use wedges in pairs when I clamp parts in my CNC machine, but I have not thought to use them for gluing. Do you think this gives adequate clamping force? I suppose it does.
An ideal setup for me would allow me to stack 4 or five sets in some kind of racking system that clamps
everything up, and manages the dripping glue somehow.
By the way, my tops are all 3/4 inch maple sets for carved top electric solid bodies. (Think PRS)
Thanks for all the suggestions, I'll post a photo of what I come up with.
By the way, I have two great fixtures that use fire hose with air stems installed for clamping. These work
great for gluing the tops to the tonewood, or for gluing up laminations in a 5 ply neck. They are easy to make as well.
I'm about to make another for gluing fretboards to necks. If anyone is interested, I'll post a picture or two.
Best Regards,
Paul,
Charlotte, NC
-
Does anyone have what they consider to be a great set-up for gluing up matched tops?
I do these one at at time, using bar clamps. I want to set up a system that would allow me
to glue up 5-10 sets in one evening, without using all those bar clamps. Any suggestions?
Thanks,
Paul
Charlotte, NC
 We include a very thorough finishing guide (hard copy, in color)which we've written, to describe the finishing process in exhaustive detail. We also include scrap wood for you to test your finish ideas and materials. Please let us know if you can think of any way we can help, and Good luck with your project, whatever you decide to do!
Finishing Help
in Inlays and Finishing Chat
Posted
If you are sanding it down to bare wood, I recommend using a nitrocellulose Lacquer finish. It is extremely forgiving and produces an extremely high gloss finish. There is plenty to know about how to do this, but it's probably your best chance of success. I use Behlen Stringed instrument lacquer. This has to be sprayed with a paint gun, and may take as many as 16-20 coats. You will need two quarts, and a supply of lacquer thinner. There are a few things to know, to avoid failure, one of them is to understand what "blush" is, and how to handle it. Let me know if you could use additional information. Nitrocellulose lacquer is a very do-able finish for a beginner, provided you have some patience. Actually, it takes more patience than skill.
Best Regards,
Paul Vogt
PVXGuitars.com