


3DogNate
-
Posts
127 -
Joined
-
Last visited
Content Type
Profiles
News and Information
Tutorials
Product Reviews
Supplier Listings
Articles
Guitar Of The Month
Links and Resources
Forums
Gallery
Downloads
Posts posted by 3DogNate
-
-
My vote is no dragon, especially if you are doing something in a translucent. Graphics and wood grain are 99% of the time just plain Yuck together...
If you must do the dragon then I'd do solid colors especially with the tattoo style graphic that you've got going on there. That's a good lookin' V you have going on... don't jack it up last minute. I went back and looked at your other builds.... you do clean work so I'm sure what ever you do will look nice.
-
Electric: Andy Timmons has earned my respect lately.
Acoustic: Earl Klugh.
All around: Steve Morse
-
Looks like you are making do with really poor quality (and dull) tools, a bit "The Flintstones" looking in the carvings... not my bag. (And I paid money to see GWAR once.)
-
Anyone tried one of these?

Have been using one live for the last 2 years.... love .... love... love it. With the mustbebeta firmware and IR cabinets it really close the gap quite a bit against the AxeFX. But paired with the Control2 foot controller and given the awesome signal routing in the GSP I'd take the GSP over an AxeFX anyday for live performance.
-
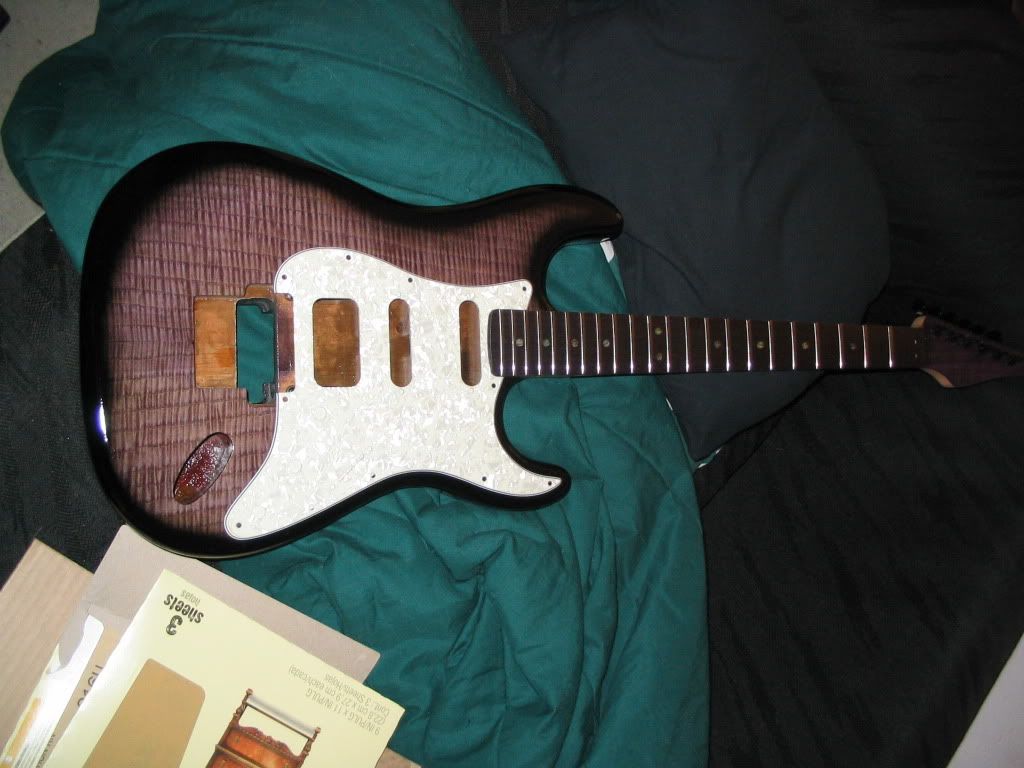
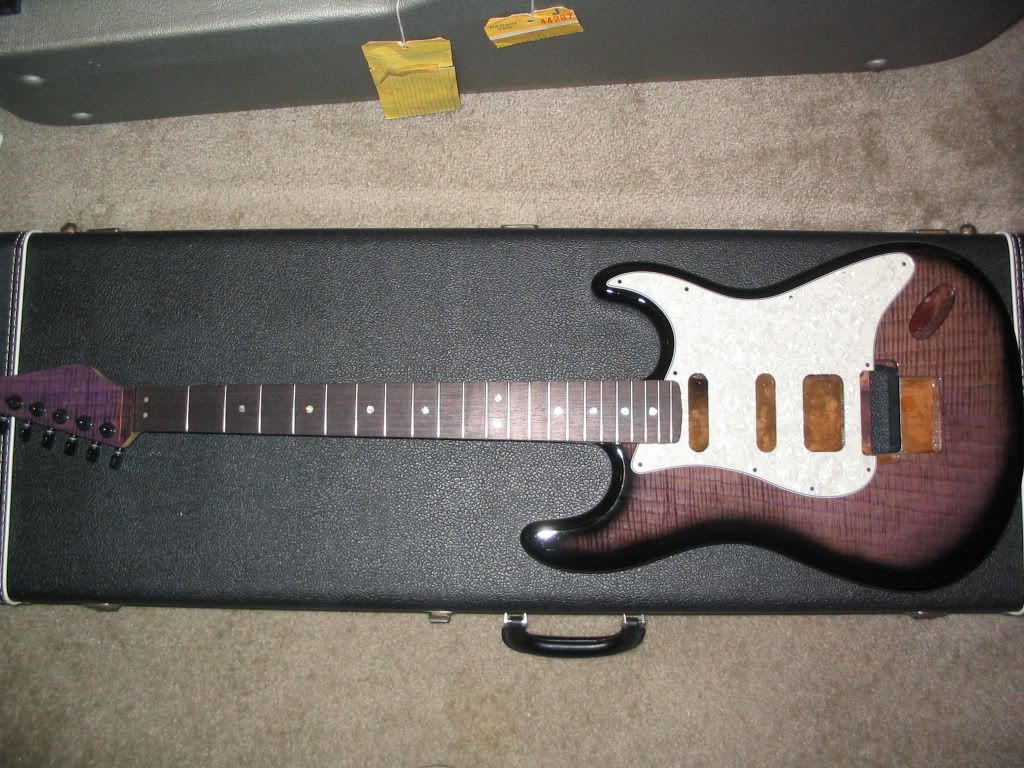
OK, here's my first GOTM submission.
Body: Basswood with carved spalted curly maple top
Binding: White plastic
Neck: 3 ply Maple | Mahogany | Maple
Nut: Bone
Fingerboard: Maple 12" radius
Fretwire: Stainless
Finish: Target EM-6000
Bridge: Gotoh
Tuning Machines: Gotoh
Pickups: Carvin


-
Nice build. Gunna enter it into GOTM? Also, I just had to comment: I just saw the picture of the neck center finder to see if the neck is centered AFTER routing. LOL, peace of mind I'm sure it gives you, but it's a little late by that point if it ain't centered

Chris
HA! but that's the verification that I did it right... better to find out that I f'd up at that stage than later at first string up.
No worries thought the neck pocket was tight and on center.
-
I finally got this one finished... Take a look. Hope you like...


-
Seriously? I figured they were junk just like every other kit. Which one(s) did you do? The Tele kit is cheaper than the body or neck would be by themselves, so a complete kit sounds like a real bargain.
I built a Grizzly Les Paul Style kit before they discontinued it.... The wood and fit and finish quality is pretty darned good. Right on Par with what you would hope to recieve. THe hardware and electronics are poo... complete poo... You'd be best off not even installing it.
Now I understand that the hardware and electronics in the "heirloom" kits are much more normal quality... (not really excellent,but not poor.) YMMV
-
Thanks for all the help! I am wanting to do this on a future telecaster build. Gonna practice on a scrap one first and see how well it does.
Do you guys just use clorox with rags like suggested up there? Or do you have a special application?
No... no. no. You want "wood bleach" not Clorox. Wood bleach is Oxalic Acid.... it'll make Maple as white as Holly.
http://www.hardwareworld.com/12oz-Concen-W...ch-pKZR1W0.aspx
You should have no problems finding it locally.
-
Unless I'm mistaken that finish is accomplished by bleaching the maple.... dying it blue then sanding it back to get the white parts... then clear coated... there is not "white" stain.
-
i just dont get it. That really should not work, the whole idea of a danelectro headstock on something like that is just plain wrong!
why do i want it?
Two words.
Akira Takasaki
Damn Straight Akira Takasaki...
-
Oh... dude... me likey!!! "Lock and Loll"
-
If you wanted to glue the crack, I'd go with original titebond so you can clean up and finish with no problems. I thought you were worried about that though, so I didn't suggest it. Another option would be to wick in some thin CA from the back while it's clamped.
SR
yep
-
I hope it's not aluminum... Aluminum moves all over the place with temperature. Are those Rivets for fret markers? I'm not convinced that this is a good design that is about to revolutionize anything. But as an excercise in engineering if it's made stable is pretty cool.
But even for me who played Wizard style necks for years... I've grown out of the thin necks.
-
Very nice.. Classy and clean.
-
A cabinet scraper would be faster and less messy than about any otehr means you can come up with.
-
A quick mock up to check progress. Screwed up the burst and had to sand and start all over.
Managed to get some clear on the body finally.
Should get the rest of the hardware ordered this weekend. Gonna try a DiMarzio Tone Zone in the
bridge and a Virtual Vintage solo in the neck & mid positions. I want to try something a little less
bright than the Cruisers and Jeff Beck I normally use.
I recently added a Dimarzio "Chopper" to the neck position of a couple of guitars that also have a Tone Zone in the bridge and I'm very happy with the tone of the "Chopper"... articulate and smooth.
-
Got a little more done... it's about wrapped up. The bridge is on infinite back order from All-Parts.... Need to make a trussrod cover and give it a final fret dressind finish slotting the nut.


-
Looks weird.... probably feels weird too... I'd suggest a working mockup to see if you even like it. I'm not sure the ergonomics are there for it to be easy... I know I'm all over the volume knob when I play. I do not like to have to use a thumb and finger to twist a knob. I have to be able to curl my pinky finger around it to manipulate it. Of course this is a bass and not a guitar... might not be as big of a deal as it would be for a guitar.
-
oooh... looking good...
-
Ummmmm.... Don't try this at home kids.
I don't know what else to say. While I understand the concept (like making crown molding on the table saw) it seems a __dangerous__ method for something that can be done with a disc sander or violin gouge.
I would suggest to anyone that is planning on trying this technique to make sure you have a lot of experience with a table saw. Safety first.
3DogNate might have plenty of skill for table saw top carving methods but for n00bs I suggest looking at a less mechanized method.
I will say it again. Safety first.
True... I should have added a warning myself. I do have a lot time behind the table saw, and am able to do this type of thing safely without hands anywhere near a spinning blade. By creeping the blade up maybe 1/6" at time and takeing many passes to get the final depth of cut there is very little stress on the tool. And using work stops... and good technique I'm comfortable with it... Always use caution around the table saw don't ever work beyond your own skill level...
-
What tools did you use for the carve?
Nice work, really good looking guitar.
Bill
I roughed the carve out on the table saw (Half of a cove cut using a stop over the blade.) the followed up with a palm sander and 80 grit to smooth and blend it. Then a rasps to do the cutaways. Easiest way I know to do a consistent carve and leave a flat plateu on top for a flat mount hard-tail bridge.
-
The finish looks really clean, it turned out really nice. I do wish the figure stood out more though.
Yeah, I did some test panels from the off cuts from the top.... I tried popping the curl with black and with tobacco brown and sand it back before adding the red. And the spalt just took too much dye. and looked really 2D. I think I made the right call... the curl is a bit more pronounced in person than in the photos because it does shift visually when viewed at different angles.
I'm happy... now if my bridge would ever get here off of back order....
-
I was able to get the clear coats on over the course of a week and after letting it cure out for a week I got it all buffed out and awaiting hardware and electronics this past Saturday... I'm really pleased with how the EM-6000 turned out... nice and shiny!


Guitar Of The Month For December
in Guitar Of The Month entry/poll archive
Posted
Well, the body shape is a Ibanez RG (exactly ) ... it took on a bit of a different look because of the PRS style set neck joint I did. This build was actually almost a scraps build as I did it to get rid of some extras (7 string pickups, not 100% maple top, extra maple fingerboard (hence the maple board) but the big reason I built this guitar was to test out the Target EM6000 finish on something non-important.
My build thread is here you can see the back of the guitar here...