


LightninMike
-
Posts
114 -
Joined
-
Last visited
-
Days Won
3
Content Type
Profiles
News and Information
Tutorials
Product Reviews
Supplier Listings
Articles
Guitar Of The Month
Links and Resources
Forums
Gallery
Downloads
Posts posted by LightninMike
-
-
This guitar is coming along nicely.... knowing that the line is going to always catch you off guard, what about using a thin piece of the maple inlayed onto the top? set up a router to run a thin cut and then lay the maple in.... it visually breaks the book match, but that is already done.... all you are doing is adding a visual accent but not changing the "color" of wood you are using....or use some of the dark dyed pear wood and give a nice clean separation
-
Congratulations.... It's too bad you can't take pics with the camera and post those (nudge nudge, wink wink)
-
One thing that should be noted: Do NOT expect the wood to be ready to use, even if the tree is dead, untill it has gone through sufficient drying.... take your time and plan it out, and i am sure you will have the instrument you want
-
The first shot of the quilted wood is going to make a beautiful guitar.... i'd be completely forgetting about the spalted stuff
-
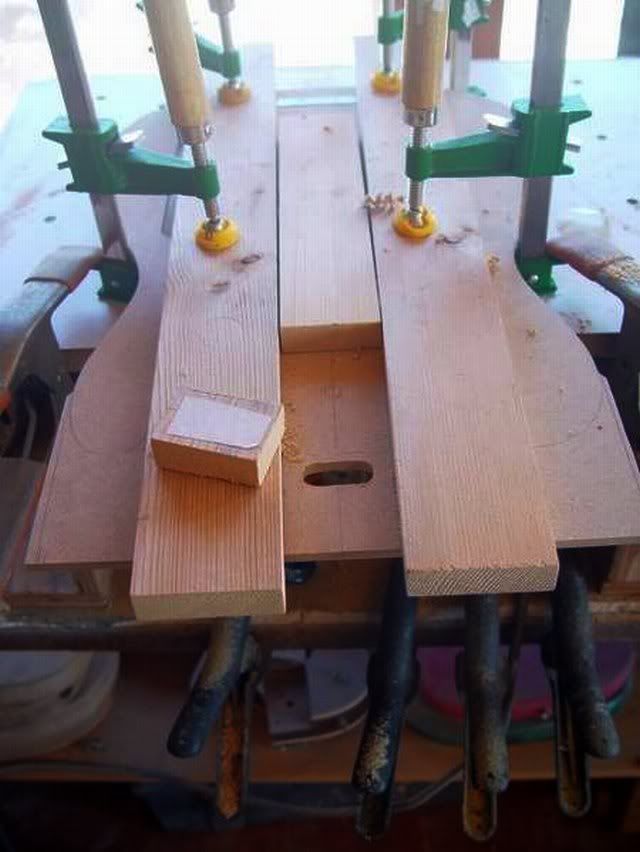
this should help... the outer boards are set to the neck and clamped.... the middle piece is fit in.... you now have a copy of your neck heel in reverse
-

was this the Holy kinda guitar you were thinking about dpm99??
-
do the belly cut first.... then take a straight edge and measure down into the cut to locate it's depth....you now know how much you have to raise the router to keep the same dimensions and keep a consistent back
measure several times and try it on a scrap piece to set yourself up to succeed
also, your outer edge (wall) is thicker on the treble side than the bass side.... really no need to keep it that thick
-
you are using the wrong type of insert.... the ones you want will be threaded inside and outside, with an allen head set inside to lock it down.... go to ebay and type in GUITAR NECK INSERTS.... you will find what you need.... you might need to plug and redrill the holes, might not
-
You have had wood in a non heat or humidity controlled environment for the better part of 10 months.... unsealed....
2 choices.... get the wood into a humidity controlled environment that is is room temp.... let it sit.... don't look at it or rush it.... give it 5 days.... has the cup changed?.... if so, let it stay there until you can get some sealer on it
Or, you need to run it through a planer and expect tearout on that maple..... or multiple passes on that sheet glass with a bunch of sandpaper
in any event, get it sealed!
-
and if the kids do mind, just tell them it's made that way so the stripes are vertical when you hold it properly!( at least on the righty or if they like a head down attitude on the lefty )
and if that doesn't work... send the righty to me... that'll fix it
very nice
-
Question:
Does the placement of the bridge, as well as between the bridge pickup and the edge of the bridge, vary according to scale length? Or is it a fixed distance?
Yes and yes..... take some time and read up first.... building a guitar is a lot of fun, and a lot of learning.... sure they look simple, but dive in and it gets deep quick
-
scale should be 25.5...divide that by 2 = 12.75
start at the nut and check at the 12th fret.... this should be 12.75"
then from the 12th fret to the bridge should be the "other" 12.75"
it's possible the neck is not correct as far as where the holes are drilled.... you will need to have your bridge in place to really check this..... on the bridge, place the adjustment "all the way out" on the screws and check it that way as the true adjustment is actually a bit more than 25.5" on most of the strings
if the neck is not drilled properly, look through the search function and you will find out how to remedy this
-
You would be surprised at how little is actually going to be taken off.... no worries... go for it... just take your time and you will see that it is pretty much what you would have gotten from them had the order been different
now, going from 12 to 16, that would take off more
-
8/32 screws/bolts
-
If you were using threaded ferrules, you can get them at pretty much any hardware store... or go to ebay.... they are all over
-
traditionally, guys are using a 1" blank for the start of a neck (except the laminated or Gibson style necks which are different as far as construction, but the neck profile is basically the same)
7/8" neck you have started with (for guitars) includes the fretboard? if not, no worries.... the 1" blank would be total as guys building Fender style necks are using a 3/4 blank with a 1/4" fretboard....
another thing to think about with a bass is the truss rod(s).... some guys are using 2 rods or one rod and 2 carbon fiber rods.... think of the physical structure you are building, will it take the stress exerted by the strings?
-
Glad to help
-
this should help a bit more.... its a pdf of the manual for that unit
-
if you have it adjusted correctly, it should hold without the slop in the belt.... from the post earlier
"the Ryobi relies on shims (two 0.010-in. shims are provided) to reset the gap between the drum and conveyor at the open end. The table can be shimmed at the open end of the sander and then brought to parallel with the drum. To achieve a wider gap, remove one or two of the shims and retighten the Allen-head screws. To return the drum and table to parallel, the process is reversed."
i don't know if you had done this or not, so forgive me if it was done.... setting up tools that are previously used, and not complete or with instructions can be a real hassle.... my father made his own tools (yes they were awesome) as a part of training he did as a tool and die maker... he would lay out early cad programs for guys to run to make his own stuff.... he always modeled off of other tools and modified what he thought didn't work effectively or well
-
not knowing what model you have, i found this in a search
Adjusting the drum to accommodate wide or narrow stock points out the major difference between the Ryobi and the Performax. Instead of a fine adjustment knob, the Ryobi relies on shims (two 0.010-in. shims are provided) to reset the gap between the drum and conveyor at the open end. The table can be shimmed at the open end of the sander and then brought to parallel with the drum. To achieve a wider gap, remove one or two of the shims and retighten the Allen-head screws. To return the drum and table to parallel, the process is reversed.
untill you are used to this specific machine, you might have to go very slow and not take off a lot of material in each pass.... they no longer make it, so there might be a reason for that.... this certainly doesn't mean it is a poor machine in any event
-
if you check this years' TDPRI challenge, you will find TWo plexi builds... one was a laminated sheet composition and the other was a solid piece, with a plexi neck as well
here's the laminated one
ScatterLee took down his video for the other
(if you search this years' entries, you will find what it took for both to be built...and you do not need to be a member to see the threads)
-
you might need to add a washer under the nut so you aren't bottoming out.... it would seem the wood has compressed a certain amount, and a 3cent part might just be the fix
-
well, you will need to sand it down to remove the scrapes.... then hit it with a sealer to double check that the scratches are gone...then start the priming/final color from there
-
If nothing else, you can use that piece to try out the router bit and see how it goes.....
My First Build....patience
in In Progress and Finished Work
Posted · Edited by LightninMike
So I've been posting here for a while and it struck me that i might come across as another guy who never shares his work.... enough of that...
Around 11 years ago, i heard the difference between two guitars at a show... I sat down at set break with each one on a knee... long story short, the only difference was that the one had a unity gain buffer on board.... Soooo, i set out the next day and bought the Anderson DIY guitar projects book and designed my own on board preamp
I got together with Pat up at Resurrection Guitars and was just going to buy a neck and leave... a few hours later, we had designed my neck.... I too the neck up to Ohio to my Father's workshop and we built the body around the neck....
All in all, it was a very adventurous project for someone who didn't even know how to TUNE a guitar, let alone PLAY one.... some things i would do completely different, but i would not change how i went about it in the slightest
The body is made of Cocobolo, Red Oak and Kingwood.... The neck is Maple and Mahogany laminates with a Pau Ferro fingerboard and Rosewood taken from an old opium bed (for the fans of Jerry Garcia's Cripe guitars, this is from the same stock Stephen had) on the headstock
the four knobs are for Straight guitar volume, Effects Loop volume, Treble tone and Bass Tone
the 5 switches are for on/off of each pickup and then coil splitters(taps) for the humbuckers
the pickups are Dimarzio Super 2's and an SDS-1