


Mattia
-
Posts
4,263 -
Joined
-
Last visited
Content Type
Profiles
News and Information
Tutorials
Product Reviews
Supplier Listings
Articles
Guitar Of The Month
Links and Resources
Forums
Gallery
Downloads
Posts posted by Mattia
-
-
Unless you've suddenly got much larger shop space, do yourself the favour and get something like the Fuji HVLP system. If I had to do it again, much as I like my SATA MiniJet conversion HVLP gun (great quality gun, runs off standard compressor), I'd get the Fuji system in a heartbeat. Why? Less futzing with in-line air or moisture traps needed, it's quieter, and takes up much less space than a full sized compressor - and you need a lot of air volume for HVLP conversion guns!
Airbrush has it's place, and I've seen really nice effects in terms of bursts and the like (Fred's demos at the Dutch building days mostly), and again, nice small pancake compressor and a brush instead of a heavy, loud full-sized compressor. I've got the latter already, so I'm not all too interested in spending cash to replace something that does the job well, just loudly and taking up space.
-
Sorry but from a purely mechanical standpoint and if everything is dead flat which is the case in this exemple, then you are actually getting perfectly even pressure across the entire board...
Sorry, but based on what I've been taught about clamping force distribution, you're wrong. Any mechanical engineers can feel free to correct me if I'm confused here.
This is easy enough to demonstrate using a fairly extreme example: clamp a flat fingerboard to your marble table with just two clamps, one at each end. You'll note you can, in all likelihood, lift up the bit in the middle, between the two clamps, because the downward force is acting the most strongly right over the clamp head, disappating as you move outwards. Same applies if you use cauls, although the additional distance (vertically) means the force is spread more evenly horizontally.
You can quantify this by, for example, using the 2-clamp setup with a thin board (say a guitar side in thickness) and placing a thin lever of some sort underneath it in the middle. Hang weights from the lever arm and measure the deflection, and you'll note the deflection decreases as the clamps get closer to the lever arm.
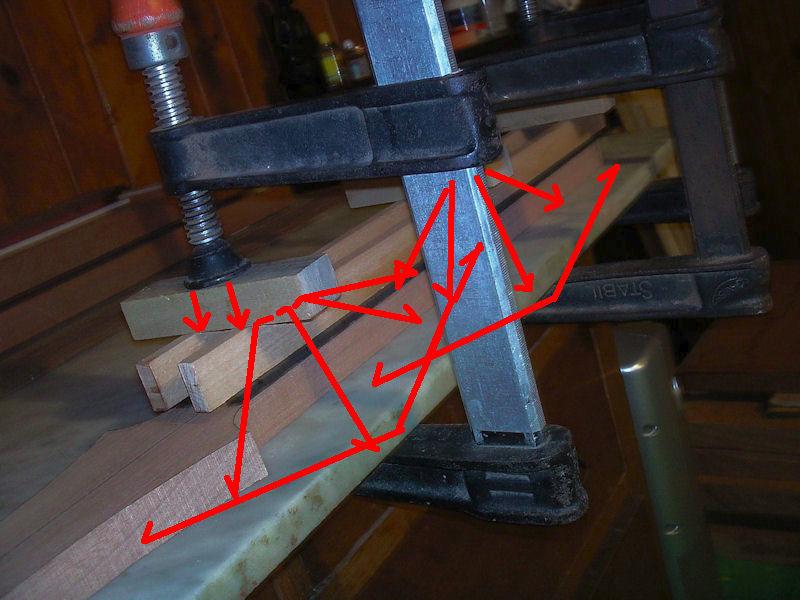
Using more clamps, spaced closer, is also better because it doesn't run the risk of over-clamping - you evenly distribute sufficient pressure across the whole board. The setup you've got there has three points with maximum pressure applied, although (eyeballing it) based on the height of the caul, you're probably only missing overlap of clamping force by a few cm on the top. The stiff caul on the back means you are getting pretty damn good pressure distribution from that side, but the distribution is far less even on top because the caul is less stiff and will flex more. Same principle of a veneer press: heavy, steel plates with zero give can distribute pressure evenly over a larger distance (horizontally) and the lack of flex will prevent excessive pressure in the middle.
Here's my bad force diagram doodling, with guesstimated force vectors taking into account the various cauls:
-
For epoxy (which doesn't need much clamping power) this would work fine, but from a purely mechanical standpoint you're not getting even pressure across the entire board - the clamp's force is only applied in a roughly 90 degree 'pie slice' shape downwards, so you'd need a clamp every 10 cm or so (4") with the setup you've got there, give or take. You can 'cheat' and get more pressure by putting bits of veneer under the slats and between the clamps, which will tension the cauls and apply additional pressure.
-
Epoxy works just fine. I use it to glue fingerboards, never had a problem with either ebony (macassar or black) or rosewood (to date, only indian). Test on a piece of scrap if you're worried. Some folks use Smith's epoxy for extra oily woods (cocobolo might qualify, indian, madagascar, ebony don't), but I have no issues using West Systems on any of the wood species I've got sitting around.
-
...so copy the profile.
-
Fender started without a truss rod because it's easier to manufacture that way. But it's harder to make an instrument that plays perfectly, so the rod gets added.
Whether you add a rod from the back or the fretboard side of the neck doesn't affect the amount of wood removed; only the type of rod used does. Glue in a fillet over the rod from either side and the net result is the same. Martin's been stiffening their necks with solid bars for a long time, and I'm guessing in a lot of ways it's been a 'if it aint broke don't fix it' sort of thing.
Personally, I like the look of a skunk stripe on a maple neck, but I hate maple fingerboards (don't like the feel, don't mind the look)
-
Is it undersaddle? If so, are you sure the bottom of the saddle slot is perfectly flat, and that the saddle itself is perfectly perpendicular and applies even pressure along the entire length? Any wiggle room or sloppiness can cause uneven response for undersaddle piezos. As for relative volume I can't comment on your specific pickup setup. On my piezo electric the volume's on par with the EMGs in the same guitar, and my acoustic is plenty loud either direct or (more normally) via the LR Baggs DI box/external preamp.
-
I plane (handplane) the taper into my fingerboards, and have flat binding stock. Glue in place with thick superglue (particularly end grain is a pain for titebond, and I've had far better results with superglue) and simply use masking tape to hold it in place. Never had any trouble with gaps, visible glue lines or anything. If you need more than minimal finger pressure to hold binding to a fingerboard edge something's wrong with either the binding or the board. I may make an adjustable clamping jig of UHMW one day, since CA glues don't stick to that.
Way I imaging it is similar to Peter's jig, but simpler: base of UHMW plastic, one solid flat 'fence' (wood or metal, faced with a strip of UHMW plastic), another adjustable fence (t-slots or through-slots). Place fingerboard (tapered, without binding) in jig, tighten movable fence so it fits snug. Then apply glue and binding, few small bits of tape to prevent slippage, and wedge the whole thing in. The taper will ensure even pressure on both sides, and since less tape is involved, less potential for CA+tape gunk that needs scraping off.
-
Pictures would help.
-
No ridgid around here, but a similar-ish thing to that UK model is available. Cheap (100 bucks), cheerful (plastic casing, melamine top) but the spindle is solid enough and sturdy enough, takes plenty of sizes and has decently functional dust collection. If I had more space I would've spent about double on a big metal version, but honestly, even if I moved up to 6 guitars a year, I suspect the thing would last me many, many years. There's not much to go wrong there.
-
You'll want an active system for this. Even piezos that will drive an amp without preamping invariably sound better if they do have some sort of tone contouring/preamplification/impedance matching going on.
-
Weird...based on the 'tubing' and the specs (quick search), the V33 strikes me as something in the Vox/British amp family, so I'd look at fiddling with tone settings folks reccomend for something like an AC30 as well.
The 'Rock sounds' you list are fairly diverse; AC/DC is fairly low gain, crunch overdrive coming out of Marshall stacks, Led Zep's also fairly clean with a dirty edge most of the time. I find 'crunch' one of the hardest sounds to really nail perfectly, and for me it usually comes down to a bit (not too much!) gain, and careful fiddling around with the tone knobs. Reverb pretty much optional.
Does your amp manual come with a few recommended settings? My Rivera TBR's does, although admittedly it's a pain in the ass of an amp to dial in sometimes because the controls are fairly interactive...
-
...why not just cut using a jeweller's saw? I mean, seriously, it's pretty quick, and it's very accurate.
-
The same thing as for pretty much any guitar: a dry microfibre cloth, slightly damp if it's too dirty. Any simple guitar polish won't undo the satin finish if you want something to 'revitalize' the finish, but I don't feel it's particularly necessary to do so. The finish is hard enough as it is, just keep it clean.
-
Indeed...why not buy the whole board, eh?
My local yard actually still has a few boards like that - wide enough for 1-piece blanks ribbon, dead on quartered. I got a few I'll mostly be converting to neck stock (largely done) and back/side sets for acoustics, though, because I find most sapele is crazy heavy for electrics. Lots of variability there as well, though..
-
I've built a few of each, and my favourite joint in terms of aesthetics, practicality and sound - for most guitars - remains a set neck. It lets me sculpt, it lets me be picky about neck stock, it lets me shape the neck and body separately and fine-tune the joint, and it somehow sounds a little less 'smooth', bit more character than a neck through. The fact I mostly build chambered instruments plays into this to some degree as well. Honestly, with a good flight case (==$$) I don't think the travel thing is an issue, certainly not for most guitar players. Not all of us tour with plane travel needed, and those of us who do should be able to afford flight cases.
Neck throughs are easier to build than set necks, IMO, because you only need to make two flat joints, really. But I still prefer glued set necks. Except for acoustics, where it's bolt-on every time.
Honestly, in terms of sustain, it's a wash. The only experiment I've ever seen done that measured sustain between a bolted and glued neck showed the bolt-on neck to have a little more sustain than the set neck.
-
Given the fact thicker strings require greater compensation due to their inherent inileasticity, it's no surprise variance will be greater for thicker guage strings thatn for thinner guage strings, which behave more like an 'ideal' theoretical string.
If you want to re-invent history in a madcap manner, you can design a swappable fingerboard arrangement and build use all sorts of 'wacky' fret layouts - there are some articles on the subject in one of the early Big Red Books.
-
http://en.wikipedia.org/wiki/Multi-scale_fingerboard
some people quoted it as 'prior art', maybe making the patent invalid... although i think it involved a differeent method of calculation to the way novax does it centering around this point
"each of said frets extending along a straight line" and "with said plurality of strings substantially converging to a point."(i.e. if you extended all the frets past the treble edge of the fretboard - they would all converge on the exact same point)
which some said was inaccurate anyway as it would cause tuning and intonation issues. cant remember the exact details - it seems like years ago
..and is not the way he does it anyway. Huge discussion (With math) on the MIMF at the time, and I do believe it WAS years ago...
-
At least 300 dollars, probably more like 400. Finishing is labour intensive, and you have to include prep time, material cost, cure time, etc. Then again, I value my time quite highly for things I don't particularly enjoy doing (like finishing).
-
Guys, neck angles are very, very simple trig. I usually draw mine out schematically (ie, not terribly accurately, and not necessary 100% to scale) when double-checking things. I don't do wedges like what's pictured above, bit it is just a simple tangential equation once you figure out where the legs of the triangle live. Perry's method is easiest/best if you don't want to do any math at all, and should be the one used first if you've never fiddled with a neck angle before, if only to let you understand what measurements are important, but after that, if you've got even a little bit of a math-y background, trig works fine and dandy.
-
I've always heard Black Limba was a PITA as a fretboard due to its brittle/chippy nature. You seem to have proven otherwise. How would you rate your fretting experience with Black Limba, and how would you rate it as a fretboard?
The 'it's Padauk' angle has been answered, but let's get back to the 'brittle chippy nature' of limba (white or black)- not any of the stuff I've got. It cuts and planes like butter (like a good south american mahogany, only more so), easy to smooth, easy to carve, beautiful to look at and work with. One of my favourite woods. Too soft for a fingerboard, but a fantastic wood for necks, bodies, backs and sides.
-
don't laugh, but try red kool-aid. ( wear gloves.... for cripes sake wear gloves... )
I built a red ML out of birds eye maple ( very blonde ) and Teak ( very brown ) and the red kool-aid blended them together great. Not identicle, but certainly a lot closer than what it was.
Try it out on your scraps. you never know...
...or, y'know, don't. Use a wood dye designed for the purpose that at least has some history of remaining colour fast over the years. Your kool-aid guitar may look good in 10 years time, but it may look really, really bad. A bottle or two of trans tint aren't that expensive.
-
Interesting reading on the site also includes the tidbit about spanish Cedar being used for guitar necks. I thought cedar would be too soft for a stable neck.
Learnin' every day.......


Nope. Spanish cedar is realy cool. makes a nice neck & a realy good sounding guitar overall. I use it for Les paul type builds with maple, beech or birch tops.
Do a bit of reading on 'cedar', and you'll note there are a lot of mostly unrelated woods that go by that name, with vasty different properties, most of which aren't actually true cedars at all. The most common in guitarmaking are, by far, Western Red Cedar (Thuya Plicata, not a cedar, softwood, fairly stiff, fairly fragile, good for acoustic guitar tops, fine for electric bodies if you don't mind fragility/feel like capping it), Spanish Cedar (Cedrella Odorata, not a cedar, in the meliciae family like mahogany, used in humidors, traditional neck for classical guitars. Fine grain, bit less stiff/strong than mahogany, overall similar working properties, lightweight), and occasionally Port Orford Cedar (Also not a cedar, more of a cypress, some acoustic guitar builders use it).
'True' cedars (genus Cedrus) include Cedar of Lebanon/Atlas Cedar. Pretty much any wood with a characteristic smell seems to get slapped with the cedar label.
-
I'll concur with most of what Wes and Spoke have said.
Personally, I bandsaw close, then generally flush sand until there's only maybe 1/32" (1 to 0.5 mm) left to route, and route that in a normal, full pass. For all other routing (thicker wood) I climb cut some of the sections first. Basically, never, ever route 'uphill' if you've got wood that you're worried will tear out - work from wide parts of the guitar to narrow parts. This does mean climb cutting, which has its own danger of tearout, so practice on scrap and get to know your equipment. Having a properly powerful router and the right bit (1/2" shaft is pretty much essential, minimum 1/2" cutter diameter, and I prefer 3/4") will help with stability of cut as well. You don't want the bit slowing down on contact with the wood.
Also, take heart; I'm guessing there isn't a single person here who hasn't experienced tearout on a guitar body when routing at some point in time.


Swamp Ash
in Solidbody Guitar and Bass Chat
Posted
Sounds heavy, to be honest. My last two swamp ash bodies (tele and strat) weighed well under 2 kg, shaped. Didn't weigh the blanks themselves as it didn't seem all that relevant...