


chunkielad
-
Posts
289 -
Joined
-
Last visited
Content Type
Profiles
News and Information
Tutorials
Product Reviews
Supplier Listings
Articles
Guitar Of The Month
Links and Resources
Forums
Gallery
Downloads
Posts posted by chunkielad
-
-
The sanders now in pieces for me refurb/clean.
All looks in tip-top condition though
 I'm chuffed!
I need to come over to your place ASAP and play with your new toys! I'm only in Leigh, down the east lancs!
-
It ain't perfect photoshop work but.....
I think metallic would be best too.
-
Post a pic, lets have a look. I founf that with a bit of practise it can be quite evenly done.
-
I did like the original myself but if you've done the deed, purple is the way to go for the burst! Think Jimi Hendrix and you'll know the pruple I mean - maybe even metallic!
-
Looks like a standard sky remote to me!
My Go man that's a good look! Why th hell am I trying to get transparent finishes right when material works so well?
-
Very nice! Well worth the wait
-
It is most probably screen printed so a bit of a rub with cutting paste should take it off without too much of a problem. Just be careful not to hit the rest of the logo. If it is under the laquer, I would mask the area and spray it black then do one more coat of clear over the whole headstock.
-
I'm a drummer in bands anyway - Guitar playing is for me so there's no problem there. I think I'll give it a go.
-
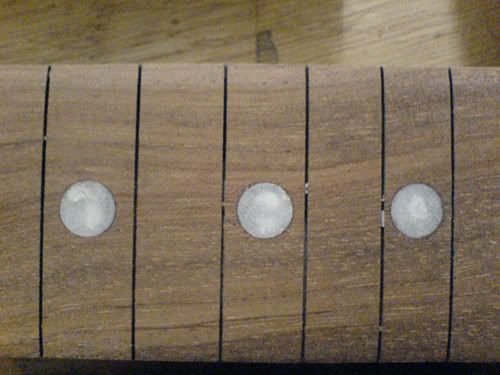
I got bubinga for the fretboard so I might get away with it.
I'd use the CA and baking soda filler like the dots but then again, I drilled 9mm dots so they hit the frets in places - may just fret this one and do a fretless next time.
-
Just been back to the unit and mixed another small batch to see what was going on and it's fine - maybe I didn't mix it right before. I did put too much hardner in this time and wasted some so I'll have to scrimp on it a bit now but at the price I paid for a 1L box I may just buy some more!
-
Thought it was bad - it hasn't got bits in it so much as the whole tub is jelly like almost like a thickened syrup. When I add the hardner and thinners it helps but still....
-
Do you have to coat the fret board? Wouldn't it be OK to just leave it as you would if you had frets? I'd oil it etc but is epoxy that necessary?
-
I just got some and the box looks old. When I poured it, it was like Jelly. Is that right or has it gone off?
I added hardner and thinners to make it a thinner jelly and it painted on but not the best finish.
-
Wow thanks for that reply. It's nice to know someone else likes the work.
I keep looking at it and saying I want this fixing or that changing - it must be the artist in me!
-
I suppose you could put fret markers on the top of the neck to indicate where the frets are supposed to be. That may help with finding the fret positions.
That was the plan. I just saw it as a crazy idea that might just work. I want to make sure it's not a ridiculously stupid crazy idea that's just plain dumb!
-
Anyone done it? Any ideas on why it would be a good or bad idea?
I'm off on a tangent again!
-
Well this is the result
There's much more sanding to do as the board isn't radiused yet. So far they seem quite sturdy and tidy to boot. I think that with a bit more practise I could get them totally even - maybe i won't try though as I like the different opacities.
I think I will have a go at colouring them next.
-
Aaaaaaaaaaaaaaaaaaargh! The last coat of clear went on tonight and can you believe it, the bloody thing went crazy! Dunno why, there's nothing I haven't used before and nothing I wouldn't be confident using again. It just went wrong and started wrinkling up on me.
I've had to strip the body and start again! Hmmmnmph now I'm mad!
-
Phil, yours doesn't seem too accurate to me. Those joints seem a bit squiffy (yes it is a real word!
).How did you cut the triangles?
Cool idea though lads.
-
I'm eager to see how this one turns out. You'v shown more patience than i've ever known and I know i would have been spraying this ages ago without enough practise.
Good luck with the rest and keep us informed.
-
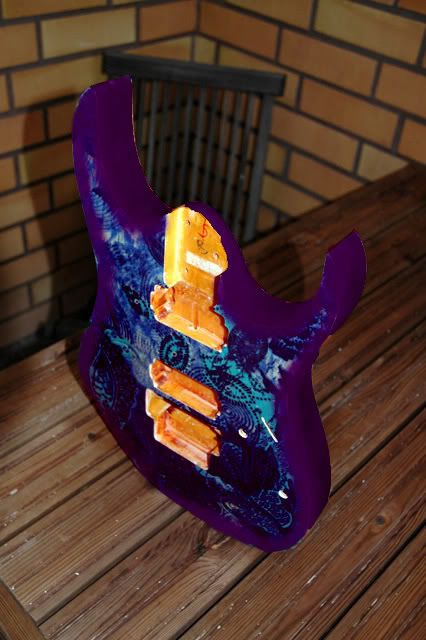
Ahh, someone spotted my centre line!
It's a celtic design in a waterslide decal. I'll take a decent pic as soon as I get the chance. The hardware is silver. Partly because I think black hardware would disapear into the background and mainly because I bought it before the colour changes so I have to use it.

And yes, it's always at least 2am before I get to sleep and then I take the kids to school, stay up all day and get to sleep at about 2am again - insomnia ain't the word!
Looking back at the pics, I think the burst is a little thick on the top 'horn' and could have done with being a little slimmer but it'll be staying like this now as I want to get it completed and it isn't bad enough to warrant me refinishing the guitar.
-
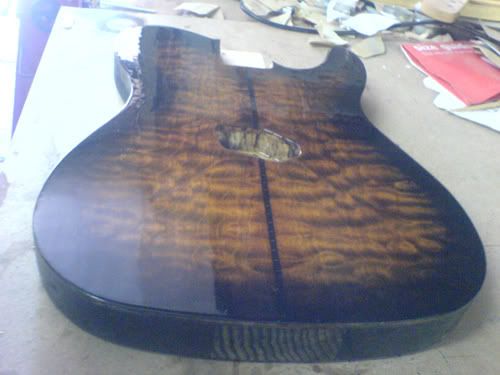
Burst is complete (plasticote black matt enamel through an airbrush [first time using an airbrush])
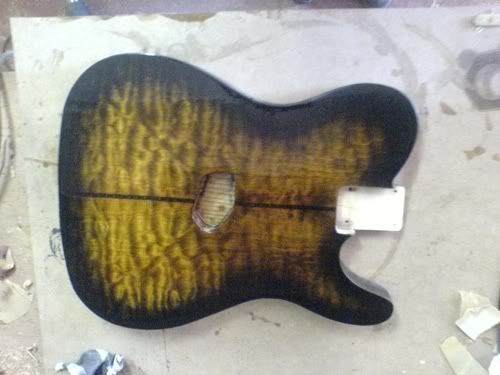
and a bit of a reflection after the next Polyeurethane varnish coat...
http://i100.photobucket.com/albums/m37/chu...ld/DSC00530.jpg
Just the back to paint and then a good coat of poly varnish then body complete. Not to forget that the volume control and jack sockethole are yet to be cut first.
-
White but not even. It's almost a pearl effect without the sheen if you get me. I'll post pics once my touch up fills have dried and been sanded.
-
Well, I've had a go and I'm pretty impressed! You need to work in layers to build it up or you end up with pockets of non CA'd bits and when you sand, you have to fill those bits in again. Generally though it's worked out pretty good. I will test in a day or so to see how hard they get as at the minute (after an hour) they seem slightly soft. Not too much that it'd cause an issue but it would be nice for them to be a little tougher.
Pics will come soon.
 I'm chuffed!
New Build On It's Way And It's A Tele!
in In Progress and Finished Work
Posted
Finally had time to actually do some work on this monster!
Got the neck nearly finalised. It's had rustins on the maple and then been polished - needs a little more buffing but isn't far off. The fretboard is fretless and has a coat of briwax to help with the colour and to stop any water ingress. Front of headstock had not benn buffed yet as it'll get another coat after the decal is added.