


ginner
-
Posts
59 -
Joined
-
Last visited
-
Days Won
6
Content Type
Profiles
News and Information
Tutorials
Product Reviews
Supplier Listings
Articles
Guitar Of The Month
Links and Resources
Forums
Gallery
Downloads
Posts posted by ginner
-
-
Thanks guys! Winning GOTM is very special for me. I have been on and off this forum for 15 years getting inspired and learning from the best so it feels great to be voted as GOTM especially with such incredible competition!
-
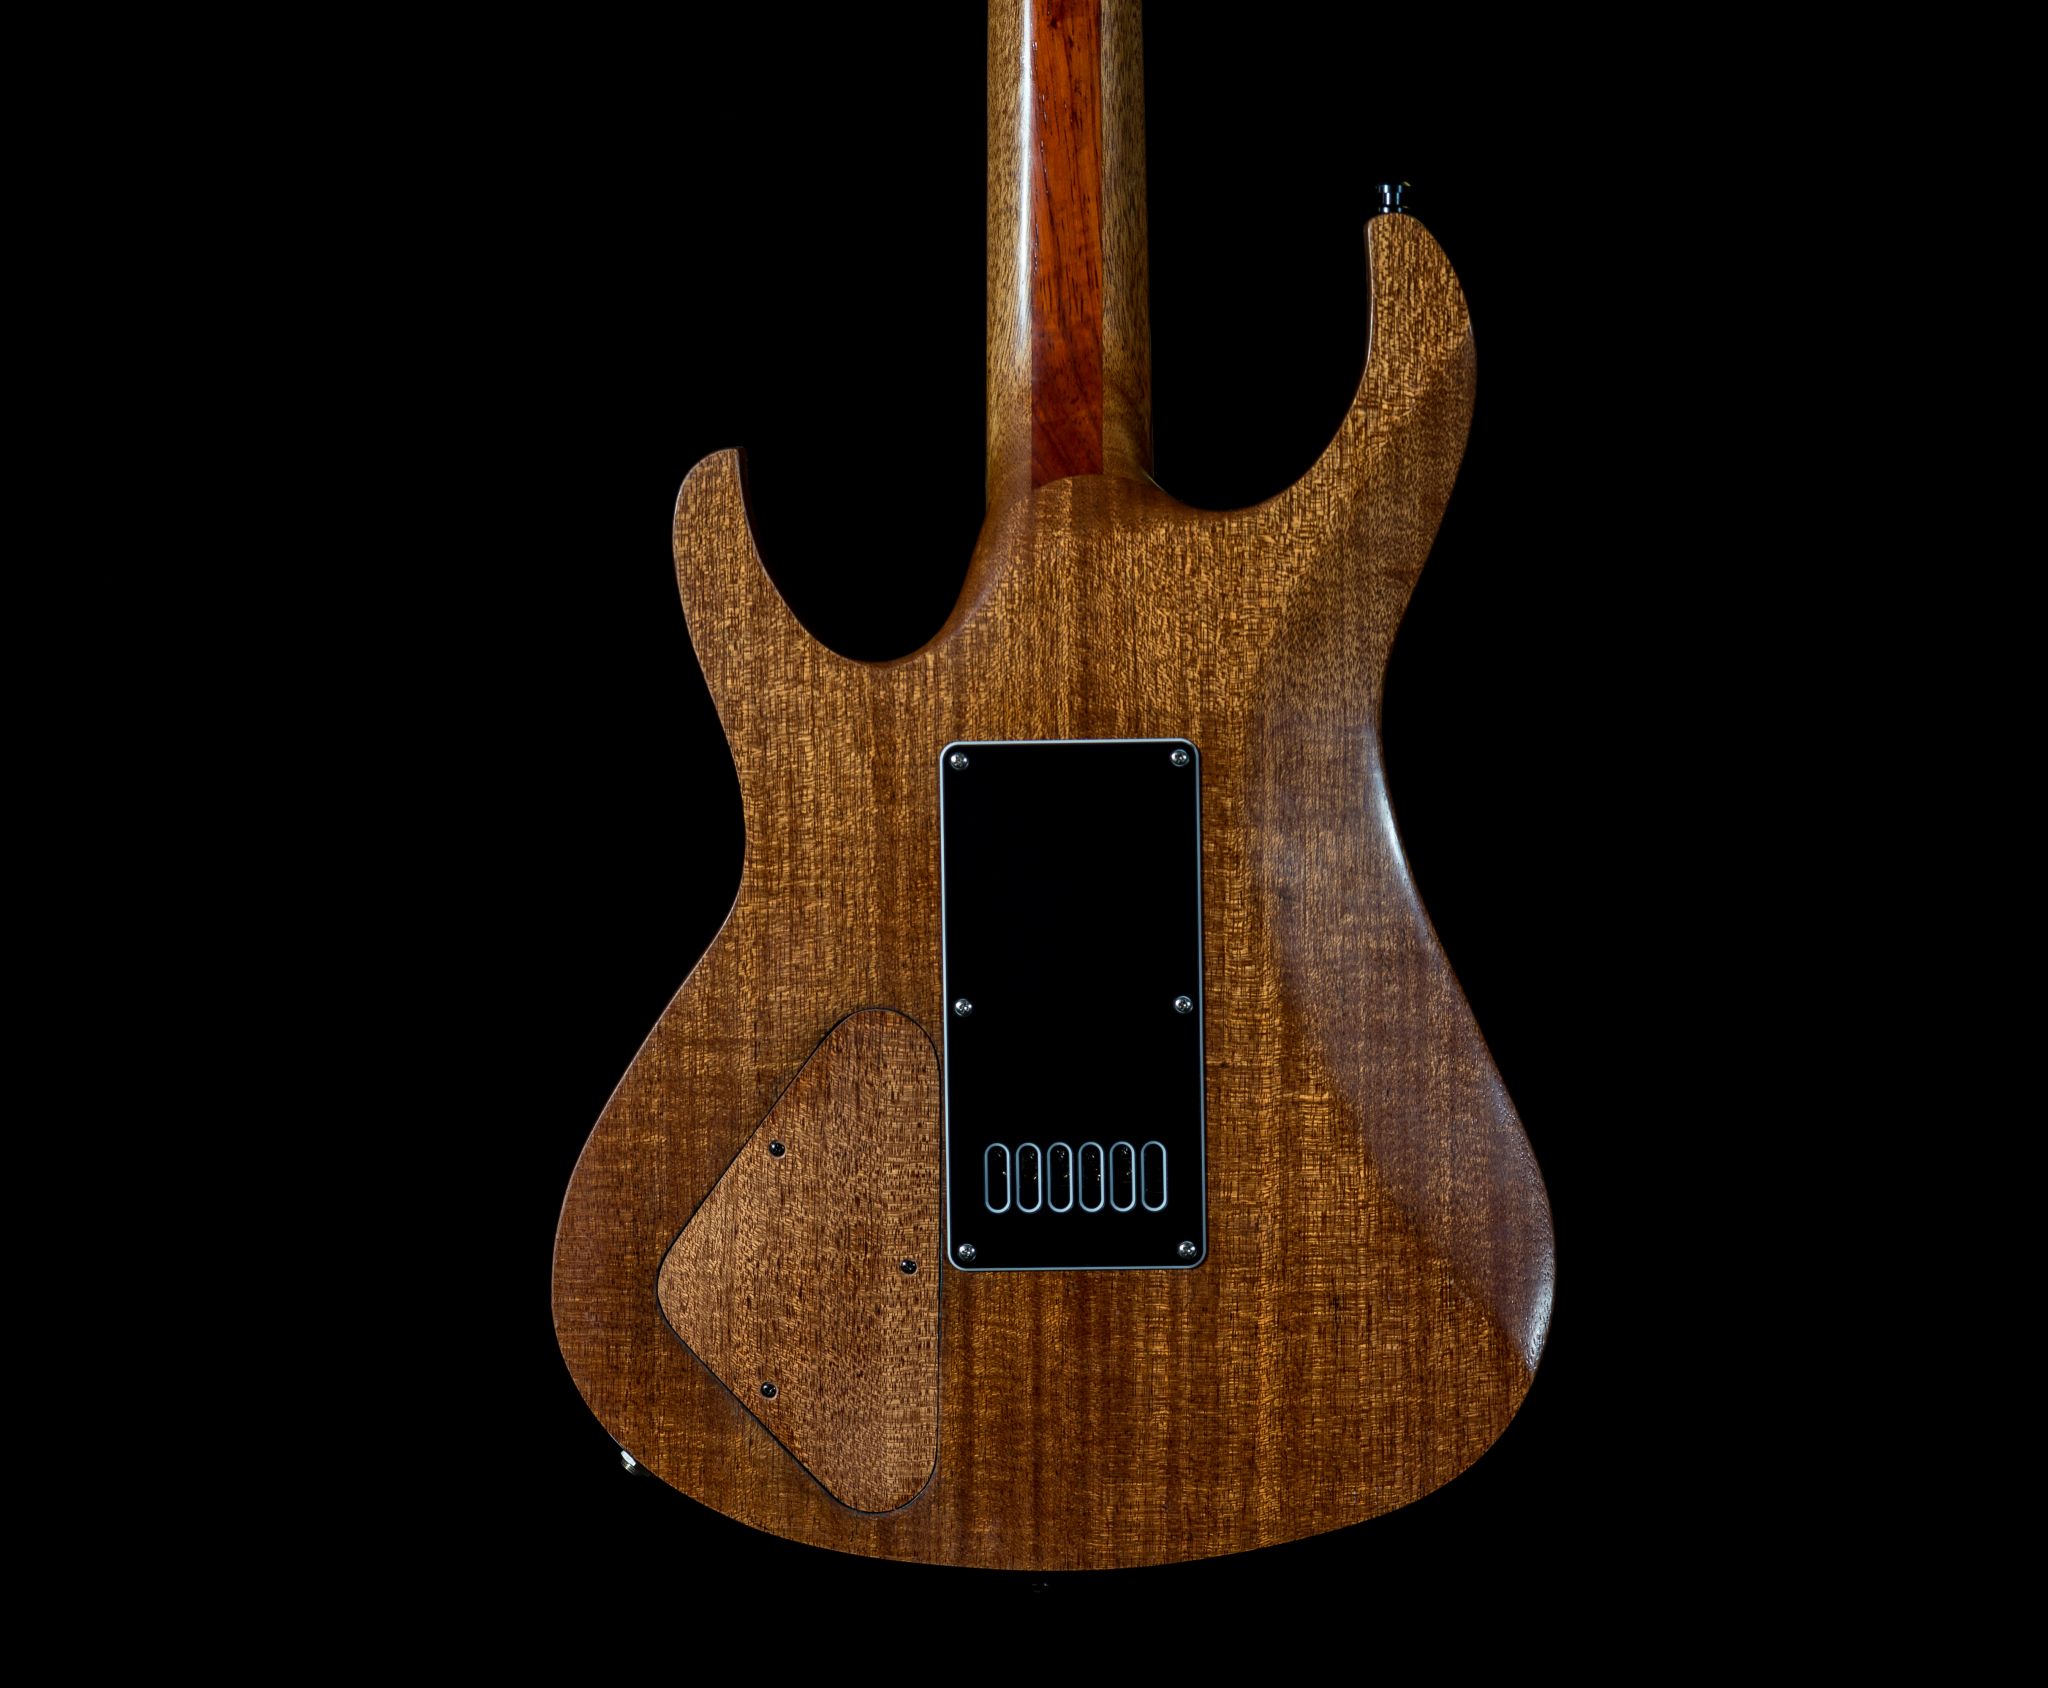
I completed this guitar late last fall. I've been building on and off for 10 years when I get the time. I built two almost identical at the same time but with different stains. One I sold to a client and one I kept for my office as a "test drive" so prospective clients can get a feel for what I build before commiting to a custom.
Build thread is Here.
Specifications:
Name: Claymore
Body: Honduran mahogany (maple veneer) with grain matched cavity covers. Water based lacquer finish.
Neck: Paduak (maple veneers) with flame Maple binding and luminlay side dots. Tru oil finish. 25.5" scale length.
Fretboard: Ziricote with MOP logo at 12th fret.
Headstock: matching maple with Wenge and paduak accents. MOP inlay.
Frets: Jumbo stainless with hemispherical ends.
Hardware: Evertune bridge, Hipshot locking tuners, Graphtech nut.
Electronics: Bareknuckle Holy Diver set with camo finish. Push push volume for coil splitting.


-
 4
4
-
-
9 hours ago, ScottR said:
Beautiful job. Particularly notable are the headstocks and fret work.
What are the the diagonal lines on the heels? A transition from lacquer to oil?
SR
Thank you!
That is correct. Waterbased lacquer on the body and tru oil on the neck. I've had some people comment that it would be easy enough to feather it out and blend them but I like the idea of a dead stop instead of a transition.
-
1
-
-
Just got the finished pics back this week!


-
2
-
-
Then it's time to cut buff and polish the finish. I start with 600 grit and work my way up to 3000 using abralon sanding pads. After I take it to the stewmac buffer and run it through the medium and then fine wheels I have set up. I must have been too preoccupied to get any pictures of the buffing station. I welded a sturdy base for it out of pipe cutoff scraps years ago that works wonderful.
Then I paint all the electronics cavities with conductive shielding paint (stewmac this time but I've used the stuff from "less emf" before and also works great).
Last picture is the guitars finally assembled just missing a couple final touches like truss rod covers which I've made of Wenge to match the headstock.
Pickups are bareknuckles. Tuning machines are hipshot locking. Volume pots are push-push for coil tapping. Luminlay side dots. Graphtech nuts. The purple guitar has a rosewood fretboard and the copper tone one has a ziricote fretboard.
I will be getting pro shots done in February but for now these are all the pics I've got!
Thanks for checking out this thread and I hope it helped some of the builders just starting out there!


-
3
-
-
Then I hang the guitars using a bakers scaffold with poly.surrounding it as a make shift spray booth.
I have an hvlp - Fuji spray mini mite 3 and spray Brite tone (purchased from wood essence in Saskatchewan) slightly reduced. It's a water based lacquer.
It's easy to manipulate while spraying because I'm not spraying the neck. I will be using Tru oil later on for that.
After 16-18 coats I let them sit for about a month to harden up. Then switch to tru-oiling the neck. Starting with thick coats sanding to try and grain fill slightly. After a couple good coats like this I sand back and start applying thinner coats that will build up.
Once the finish is complete and dry I work on the frets. Using a straight edge and sticky back 3m gold running the entire length I hit it in line with each string using 400 grit. I also have a 12" radius block that I also use the sand paper on and sand the last 14-24 frets at an angle to achieve "fret fall off" so I can ensure I'll be able to get low enough action later on during setup.
Then I use the stewmac diamond crowning files to get the crowns back, and then use the stewmac sanding stick and worky.way up from 300 grit all the way up to 8000. Then use a polishing wheel with metal polish on my Dremel to get the final shine.


-
Taped up the the maple and getting ready for grain fill after final sanding.
My grain fill process is to use shellac mixed with saw dust. Because I have paduak Wenge and mahogany I need dust from all three. So I use a random.orbital on scrap to collect it and place it into measuring cups.
Once I'm happy with the fill I do a final sand to make sure I diddnt miss any holes and the a quick thin coat of shellac allover to keep the colour consistent when I switch to clear.
Then the tape is reversed after enough dry time so I can stain the maple.
The next pics are me playing with scrap to get the colours right. I use the prs technique of staining black then sanding back, and then applying multiple layers of colour.


-
Using 3 pieces of MDF I'm able to use double side sticky tape to get the neck pocket shape cut into a bigger MDF board. I know there are better ways to do this but I'm not production building at this point so this works for me to get the tightest neck pockets I can.
Then when I route the actual neck pocket I place a piece of painters tape along the route template to make the pocket just slightly tighter.
The resulting pocket passes the no glue test. Friction fit and gravity doesn't drop the body.
Both of these guitars are getting evertunes so I start throwing on the templates and going through the motions.
Necks are glued to the bodies and then the heels are carved. Last picture shows a quick mineral spirit wipe. Back plates also included in this shot which were - surprise - cut out with the CNC from the billets I re-sawed earlier.


-
These are getting stainless frets with the hemispherical end treatment. I followed the same process that Chris monk from Highline guitars shows in his YouTube videos using a Dremel wheel.
I'm using the summit tools from jescar to cut the frets and de tang the ends. Cuts like butter.
I always instaly frets before Carving the neck as I find it easier, less stress on the neck, and I find they are flatter overall. (The first picture shows the frets in place but pressed yet. I use an arbor press to seat them that has been modified to take the stewmac fret press caul)
The next pic is a side dot jig. CNCd out of clear plexi. Helps me accurately get the holes drilled.
Then I take the neck to the bandsaw for a rough shape. And finally to my favorite part which is neck carve.
I start with the heel shape and the volute shape. I have yet another CNC jig that has the shape in 3 places to help me get consistent neck profiles. Stole that idea from stewmac. I use calipers to ensure I get the right thickness. Dragon file rasps get me the rough shape.
Once the ends of the neck are shaped I start hogging out the inbetween, starting with chisels and moving to a spokeshave.


-
1
-
-
Arm contour - using a Dremel cutting halfway through the maple cap along the lines where it will be bent. Using steam and a closing caul the top is bent and glued into place.
Fretboard inlay CNC d. It's a crest of my "g" logo mirrored. Fretboard glued to the neck using the old staple trick and a stewmac aluminum radius block. Then the flame.maple binding is glued, and the neck is cut out on a bandsaw as close to the binding as I can. Afterwords I finish it off with the router table to get it flush.


-
I use this Whiteside spiral cut template bit to get the body fully shaped after a rough cut on the bandsaw.
Before glueing the top on I cut a channel joining the pickup cavities. I should have done the same to join the control cavity but forgot. D'oh.
In order to get the top as cleanly joined as possible I close them like a book so that the edges are matched and then throw them in my vice. I also have a straight and flat piece of MDF that extends higher than the flame maple so that the side of my plane will ride perfectly 90 degrees. I then hand plane the edges to get a perfect joint.
I use the same set up to get my fretboard edges perfectly straight and true. I will be putting flame maple binding on the fretboard so I've cut it a little short to compensate.


-
1
-
-
To get the headstock shape I use another template from my CNC.
I drill two holes where the tuning machines will eventually be and countersink screws to hold the template in place.
Then rough cut on bandsaw, and then run that through my router table with a template bit to finish it off.
Headstock overlay/inlay -
This design has 3 pieces - the flame maple from the body billet (milled down with a thickness planer - I really need a thickness sander for this but don't have the space for one !), A paduak stripe and a piece of Wenge that the inlay logo will be set into. These pieces are all CNCd as well.
The inlay itself I use a 0.0313" bit from precise bits. It's a three flute coated bit. I have some backing board I've purchased from them that I use to protect my bits. I use thin ca to glue the material to the backing board before cutting with the CNC and then use un-cure to remove the cut out pieces from the backing board.


-
Truss rod route - I have a router table with a fence. I set fence as accurate as I can by measuring then use the headstock cut off as a practice piece to make sure my channel is perfectly centered.
Cutting the headstock thickness -
I have a template I trace from to get the right thickness and volute location/shape.
After curing the shape out with a band saw, I have a spindle sander with a fence to smooth out the back of the headstock. I keep the cut offs from under the headstock for the ears. Using the same piece of wood from right under the headstock will give me a better chance of matching the grain chattoyance than with other scrap. It's extra work but pays off. I don't know how many Gibson's I've seen with ears that look totally out of place in different light.


-
Starting on the body blanks -
Honduran mahogany sandwitched (with maple veneer between to continue the pinstripe theme) with a maple cap.
You can also see the template being made by my CNC.
I had some leftover mahogany from the same billet that I re-sawed for cavity control covers. Grain match won't be 100% perfect this way but it will be close. Normally I'd re saw from the same body billet but because I'm only working with 4 quarter stock I have limited thickness to take.


-
Back in September I started 2 single cut builds. One for a client and one to keep in my office as a "test drive" model for potential future clients.
They are 99% finished now but I thought I would post some of the build process here as I've learned so much in the past from watching other builders here and thought I might be able to spark some ideas in some other builders heads.
First post - paduak neck. Re sawn and altered the grain direction for glue up. 3 pieces each with maple veneer between.
After cleaning them up with a jointer and thickness planer I cut the headstock angle with my table saw jig at 13 degrees.
Some people might think the thickness of the blank is wasteful but I've never liked the aesthetics of a scarf joint and this will be 6 in line tuners, and I'm going to carve volutes.
I also added a pic of the body shape - this is a CNC file I will use to make a template.my CNC isn't powerful enough to cut the full bodies out but is great for inlays and templates.


-
- Popular Post
Hello Everyone, here's my entry for the October GOTM.
Name; Standard General
Body wood: Sapele mahogany and flame maple
Neck wood: Sapele laminated with maple veneer accent stripes
Fretboard: Rosewood bound with flame maple and luminlay side dots
Hardware: Evertune bridge, Hipshot locking tuners
Electronics: BareKnuckle Rebel Yells with coil splitting push push tone pots
Other Features: Grain matched backplates, paduak inlay at 12th fret, neck volute, wenge logo inlay
This guitar is for my bandmate who is in love with Gibson SGs. However with all the inherent problems with them I decided I would build him one to the same specs as an SG, but then buff it up here and there.
Somethings that make it special and a little different than your "standard" SG are upgraded hardware and electronics, a thicker body (to counterbalance the typical neck dive), an added volute so it HOPEFULLY wont break at the headstock, grain matched cavity covers and custom band inlays at the 12th.
This was the first guitar I have ever built that was a) 24.75" scale and b) with any sort of neck angle. It added some challenges and I really enjoyed thinking out side the box to accomplish it precisely.
This was probably the sixth or seventh guitar I have built.
Thanks for looking!


-
6
-
The Cutlass (AKA Skelecaster)
- All wenge body and neck, with maple veneer accents in the neck.
- Flame maple top and rosewood fret board.
- 25.5 scale
- Luminlay side dots
- Grain matched cavity covers
- Maple side block inlays
- Bare knuckle blackguard 55 stagger pickups
- Chambered body with "skull" F-hole
- Evertune bridge, hipshot open back locking tuners
I tried to enter last months GoTM but I waited too long to post it (Sorry admins!) so here we are trying again.
I've always wanted to build a tele, but never liked the idea of a standard looking one. For this design I tried to think of some things that I have not seen before, yet keep all the basic themes of what makes a tele a tele. The one integral part of a tele that I omitted would be the bolt on construction. I really like the heel access on a set neck/neck thru and decided to try that out with this guitar and see how much of a difference in tone it would make. To me, it still spanks like a tele should spank and twangs like a tele should twang.
Between the name, the shape, and the skull F hole I guess you could say this one was fairly pirate inspired. Yarr!!! Nothing says pirate like a... country guitar?
I've also attached a video of a quick improvisation for you to judge if it sounds like a tele!
Thanks!


-
2
-
The Skelecaster
All wenge body and neck, with maple veneer accents in the neck.
Flame maple top and rosewood fretboard.
25.5 scale
Bareknuckle blackgaurd 55 stagger pickups
Chambered body with "skull" F-hole
Evertune bridge, hipshot open back locking tuners
I've always wanted to build a tele, but never liked the idea of a standard looking one. For this design I tried to think of some things that i have not seen before, yet keep all the basic themes of what makes a tele a tele. The one integral part of a tele that I omitted would be the bolt on construction. I really like the heel access on a set neck/neck thru and decided to try that out with this guitar and see how much of a difference in tone it would make. To me, it still spanks like a tele should spank and twangs like a tele should twang.
Thanks!


-
1
-
-
Hello Everyone,
It's been a while since I posted on here. It is hard to find the time to finish some of these projects, Last year I moved into a new house and had to re setup my entire shop before finishing some of the guitars I had been working on. This one is particularly special to me as it has an inlay inspired by one of my old band logo's designs.
This was my first guitar that I had done a drop top on, and it was quite a learning experience. There are some things I would do differently next time regarding that. It was also the first time I tried to do exact grain matching cover plates. Mostly techniques I learned from guys here! This is my 5th serious build, however I do not have any background in woodworking other than trying to figure out guitars. I am actually a welder/electrician by trade.
Name: Titan 7
Neck:
- 7 strings
- 27" scale
- 12"fretboard radius
- Ziricote fretboard
- Wenge/maple/paduak neck
- Maple binding
- Luminlay side dots
- Graphtech nut
- Hipshot open back locking tuners
- 24 frets
- Paduak logo inlay
Body
- Sapele body
- Quilted maple top
- Wenge inlaid pickup ring accents
- "Drop top"
- Grain matched cavity covers
Hardware/Electronics
- Evertune bridge
- 3 way selector
- Coil tapping "push push" volume
- Bareknuckle Juggernauts
I came up with a quick video just so you can see the guitar in action as well.


-
2
-
Hey!
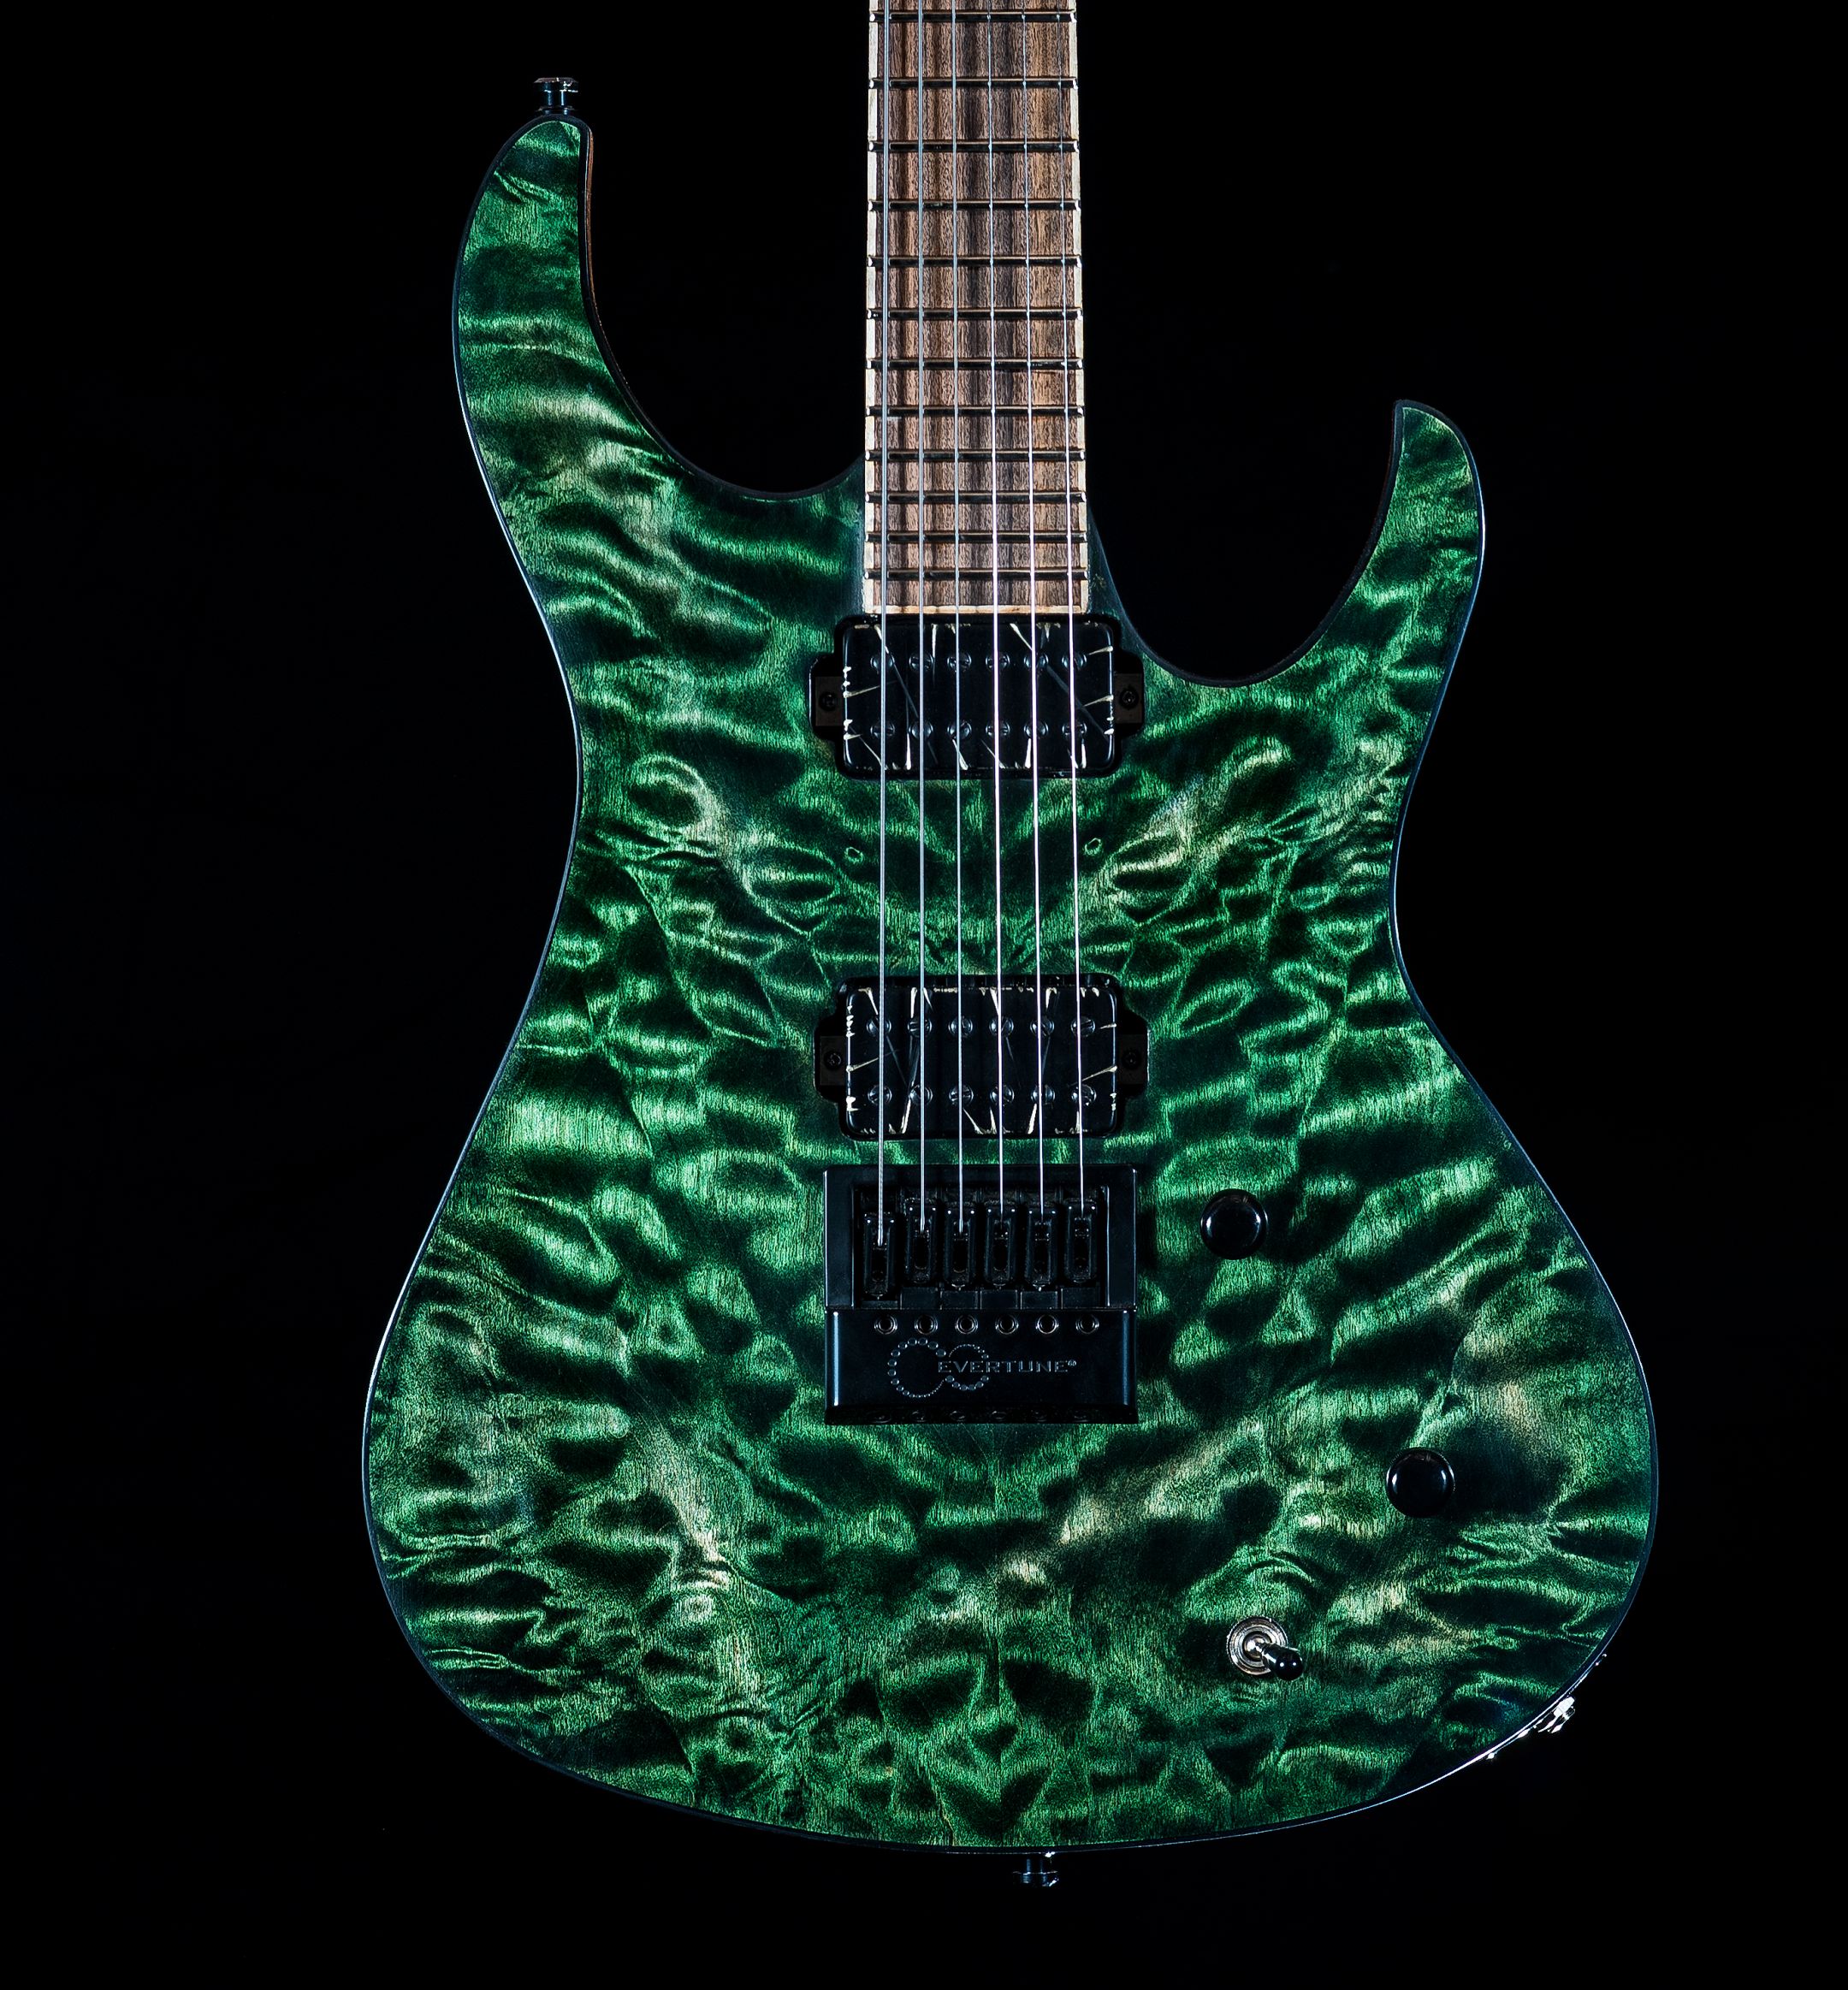
This is my newest creation. I call it the Titan Emerald.
25.5 scale
Honduran mahogany body and neck
Paduak laminate in neck
Quilted maple top/headstock veneer
Bare Knuckle painkillers
Evertune bridge
Coil tapping on the tone knob
Matching backplate
Entirely oiled
Hipshot open gear locking tuners
heavy volute
Something special about this one - to match the bare knuckle battle worn pickups, the top has been gouged and worn down in some spots deep. This is where you see the "lighter" green staining. Between the contouring of the top and the pickup covers, it has a really war torn feel. Hope you like it.


Thanks Guys!
-
Hey guys,
I've been here a heck of a long time as well and this is also my first time entering. Lurking this forum for damn near ten years, I've learned a lot from everyone on here. What to do, how to do it, and what not to do! I appreciate all the help this community has given me, and am finally proud to present a project of my own. Let me know what you think!
I call this one Azure.
-Honduran mahogany body
-Frazer valley flame maple top
-Wenge neck with padauk laminate, maple veneer accent strips
-Truss rod cover made of matching woods padauk/maple/padauk/maple veneers
-Rosewood fretboard with figured koa binding
-Cavity cover made from matching top billet
-Padauk headstock inlay
-Natural wood body and headstock binding
-Jumbo frets
-3 way pickup switching
-Volume and tone control
-Schaller straplocks
-Hipshot open locking tuners
-Evertune bridge
-Bare Knuckle pickups (Painkiller matched set, nickel covered)
-25 1/2 ” scale length
-12” radius fretboard
-1 11/16 ” nut width
Good luck guys! Thanks!
-
1
-
-
Holy horny toads that is suhweeeet! You need to stick that in the GOTM.
That must be the evertone bridge. Can't say I know anything about that. What is it about it that impresses you so much?
SR
Hahaha Thanks Scott!
The only drawback I can say for the evertune bridges is that they take out a hefty part of the body, a la floyd rose style. However, the pros heavily outweigh the cons. These things are super easy to set up, intonate and feel really smooth to play on. The fact that they keep your guitar in perfect tune at all times is unreal. I've never been happier with intonation in my life.
Some people complain that you can't bend or vibrato, but thats not the case. You can set each string so its just before the breaking point of equal tension and still have perfect tuning as well as the ability to bend and vibrato. Unless I'm doing a commission build for someone and they want something else, all my future guitars will have this bridge.
-
Thanks man! Here's another teaser shot...

-
Finishing off with a template bit.
 Using a jointed 2X4 as a router guide I put two angled channels in the body before gluing the top for pickup wires to easily be pushed through the body.
 Thickness planing the headstock veneer.
 Getting ready for the top.....
 After drilling for hipshot hard tails, I was convined to install evertunes instead. Very impressed with these bridges!!!
 Throwing in the veneer. Paduak. (marquetry?)
 Staining process! Basically following the same process as most guys "prs" style. mostly black stain (some of your color added) added, sanded back, and then another of the actual color, sanded back again, and a final stain of the actual color.
 Grain filled with system 3 epoxy. Sanding sealer added and then water based lacquer on top. all from wood essence in saskatchewan.


Guitar Of The Month - July 2021
in Guitar Of The Month entry/poll archive
Posted
This guitar is a twin to the one that won GOTM in May. That one was for a test drive to keep in my office for potential clients and this one I sold to a client. It has almost identical specs other than a rosewood fretboard, different color and pickups.
Build thread is Here.
Specifications:
Name: Claymore
Body: Honduran mahogany (maple veneer) with grain matched cavity covers. Water based lacquer finish.
Neck: Paduak (maple veneers) with flame Maple binding and luminlay side dots. Tru oil finish. 25.5" scale length.
Fretboard: Indian Rosewood with MOP logo at 12th fret.
Headstock: matching maple with Wenge and paduak accents. MOP inlay.
Frets: Jumbo stainless with hemispherical ends.
Hardware: Evertune bridge, Hipshot locking tuners, Graphtech nut.
Electronics: Bareknuckle aftermath set with camo finish. Push push volume for coil splitting.