


ginner
-
Posts
59 -
Joined
-
Last visited
-
Days Won
6
Content Type
Profiles
News and Information
Tutorials
Product Reviews
Supplier Listings
Articles
Guitar Of The Month
Links and Resources
Forums
Gallery
Downloads
Posts posted by ginner
-
-
Hey guys, it's been a long while since I posted. Recently I just finished some new guitars, and wanted to post the build experience. I've learned so much here over the past 10 years. Slowly but surely, I've put together all the priceless knowledge I've gained from lurking these boards for hours and hours coupled with countless time in the shop experience the true taste of "trail and error".
I want to thank everyone on this board for helping me get to where I am. Verhovenc, Drak, Prostheta, ScottR, Westhemann are just a few of the brilliant dudes on here that inspired me to strive for the best I can achieve and always ALWAYS be trying to improve my skills. This is one online community I have always followed, have been extremely proud to be a part of, and respected the members of greatly.
I really want to share some of my techniques for building. There is probably better ways of doing most things I'm posting here, but hopefully I can give somebody who is trying to learn some step in the right direction. Here are some pictures of the build process!
Hand Selected timbers from a local wood enthusiast and owner of one of the largest exotic hardwood emporiums in all of North America, Gary Chanin.

Two different design ideas I was considering between. Some early planning of templates!

Getting some laminates ready!

My fairly crude jig for rough cutting headstock angles.

Gettin the truss rod channel cut!

Squaring the top laminates with my trusty and always sharp Veritas plane


Gluing up the top.

-
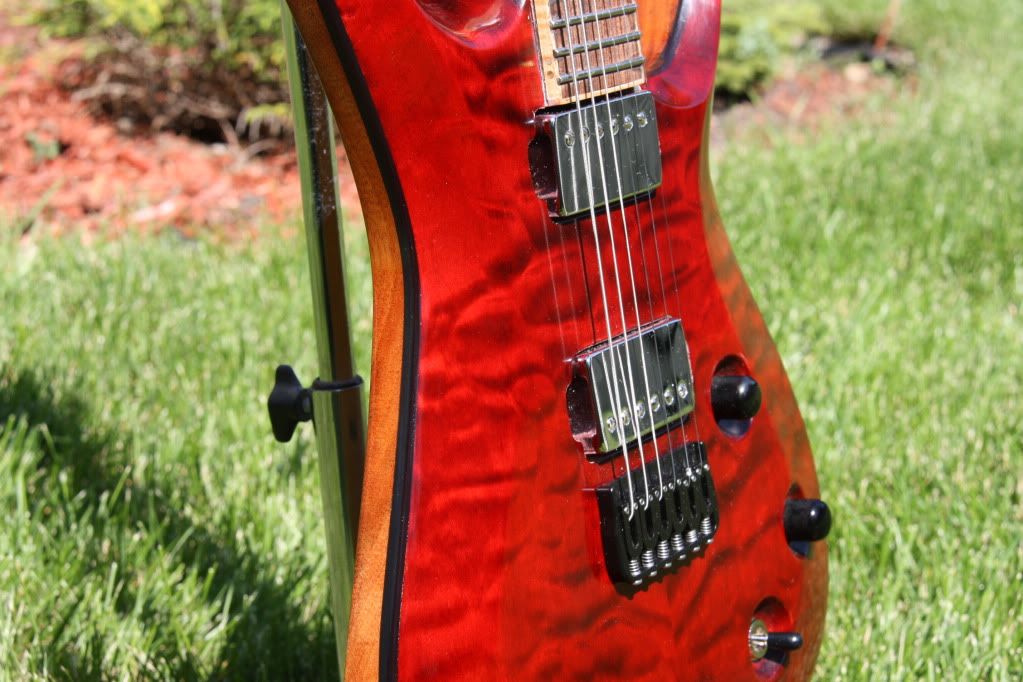
Well, to be perfectly honest I don't have a name for this one, so for now well just call it the pink sock.

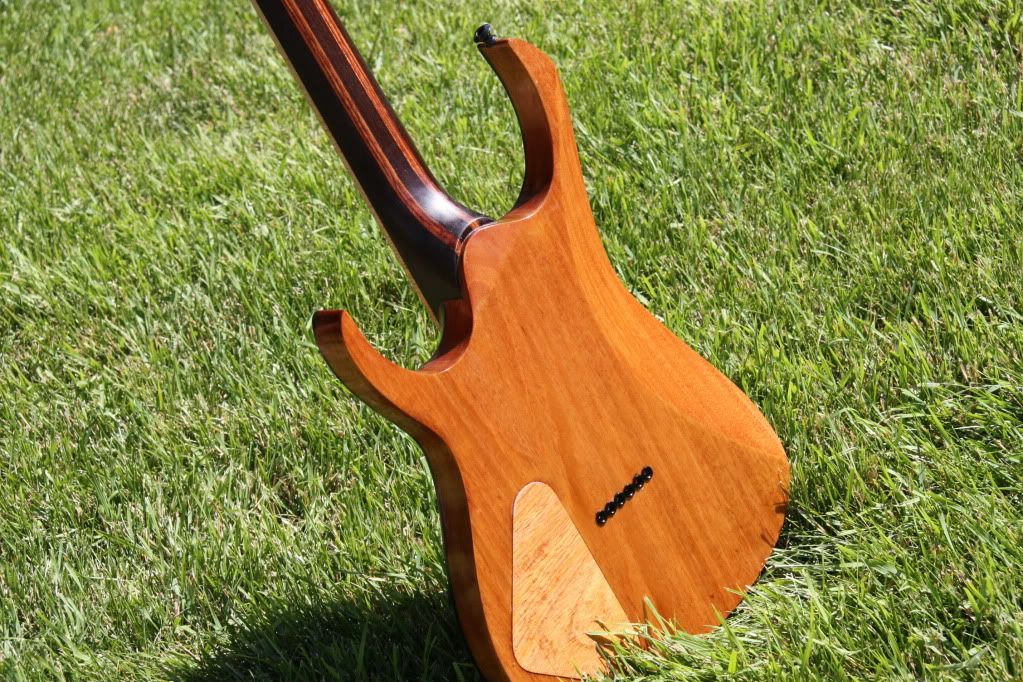
- One piece Honduran mahogany body
- Quilted maple top
- Brazilian rosewood fretboard
- Wenge and bubinga neck
- Sperzel locking tuners
- Hipshot hardtail
- Bareknuckle painkiller set
Hope you enjoy, and I'm looking forward to seeing the rest of this months entries. Thanks!

-
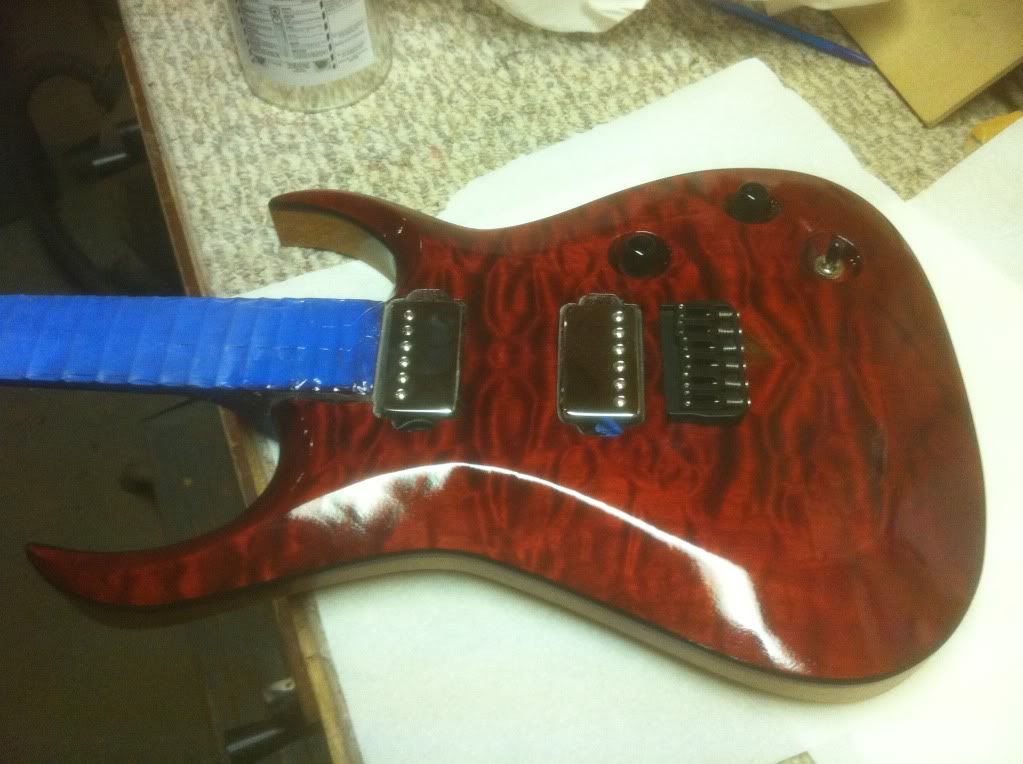
Thanks crazygtr! quick update, did some more spraying.........
-
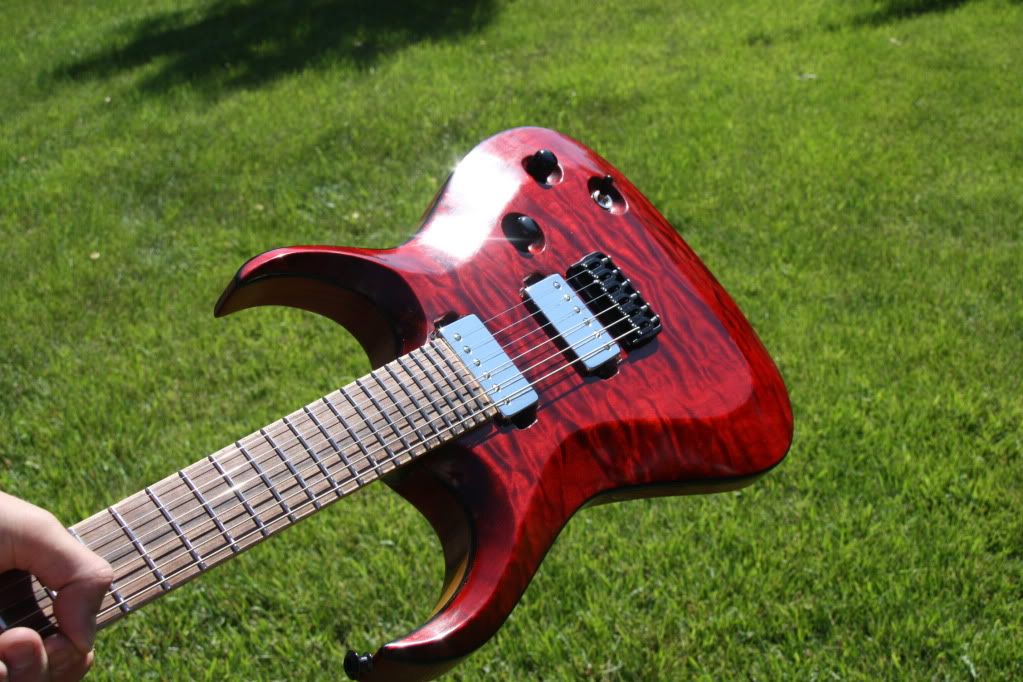
Hey everyone, just thought I'd post some progress pics of my latest build. Let me know what you think!
Quilted maple top
One piece mahogany back
Wenge neck with bubinga laminate stripes
Rosewood fretboard
Matching quilted maple headstock veneer
Black binding
Sperzel locking tuners
Hipshot hard tail bridge
bareknuckle painkiller set (in chrome)
Heres a preview
More pics can be found at :
-
The DT-155 has been parted out into several different auctions.
a
-
Rightous guys, this is all really clear to me now. I like the idea of using the drill because you can still have that little bit of veneer showing just behind the nut, but like wes says its a bit risky if you don't do it perfect. I think i might drill with a slightly smaller bit to reduce my chances of destroying my headstock and then use wes' method after. Thanks alot, appreciate the replies.
-
Use your normal method
Truss rod slot then ears, then the veneer, and then you can drill through the veneer into the access slot that is alread routed into the headstock, and sand the veneer flush to the side of the TR access slot.
Cool, thanks, but how exactly would you drill for it ? could you explain how you would set it up to make it perfect? Thanks.
-
Hey, Ive got a question about how to make the truss rod access channel if i have a veneer on the face of my headstock. Normally I would use a router table with a fence to drill my truss rod routes, including the access before I glue the headstock ears on, and no problems. But now I have to have the ears on before the veneer which means I cant route the access using my usual method. How do you guys do it ? One thing I was thinking was to have a piece of wood the same thickness as the ears and double stick tape it to the heel section of the guitar to make up for the ears, but that seems a little risky to me. Thanks for any input.
-
Check this post. It has pictures of a plywood guitar I built (don't ask - just read the thread if you're curious). The body is dusted with black and flames via airbrush and cleared with the Rustoleum. It provides a crystal clear finish. Depending on the type of wood - there are many ways to accent grain (rubbing stain on grain, roughing the grain with steel wool, etc.). But in short - yup - it works great.
Haha, yes I did see that build. It turned out awesome, the flames are original and look killer. The rustoleum looks great, I'll go and check it out. My first guitar was made of plywood.... diddnt even know it untill i decided to strip it; when i took the pups out i was confused by the layers thinking "this cant actually be plywood". Oh, for accenting the grain I have some stewmac colotone dyes and am doing the classic triple step finish with black, sandback, etc. Btw maybe someone reading this will know... can I get tiger eye brownish color ? I have the red, black, and brown. I picked up some spray cans of this "verathane" high gloss stuff for my flame maple rack spacers.... They have about 8 coats on them right now, im thinking let dry overnight, level sand, apply more coats? Ill post finished pics later.
another side note, hobby store WAS open today and I was able to pickup 2 boxes of Zpoxy, I wasn't sure how long one box would last me so I bought them out of their stock. I did the same with my truoil when I went to wholesale sports, hah. I read alot about truoil being available at wal-mart, but I went to two super-centers today and decided, what the heck Ill take a look anyways and they only had the spray cans, ***'s up with that? Anyways, thanks again Ill try them out and post some progress pics when im nearing completion.
-
For rattlecans, I have had really good luck with Rustoleum Painter's Choice Products. Depending on how you want it finished, it's usually 1 can primer, 2 cans color, 3 cans clear gloss. Prime, paint 3 coats wait 24 hours, sand to 400 grit. Paint 3 coats again. Sand again - the exercise here is that you want a smooth finish that completely covers the body. If you go this route - remember PATIENCE IS A VIRTUE (seldom found in humans and never in a duck for those as old as me). Keep the can about 14" back and spray LIGHT! coats. You should be able to see the primer through the first coat or two. After you're done coloring let it sit for 48 hours. Between 24 and 48 hours spraying too heavily can cause "alligator skin". Just know you don't want it. After 48, sand to 400 and start with a mist coat of clear gloss. Add one thin coat every 1/2 an hour for 5 coats. REMEMBER - when I say coat, I mean thin - just over dusting. The reason for the first coat being a dusting is to let the chemicals date for a while before getting serious. Repeat until you have at least 15 coats (sounds like a lot of work - it isn't). Let rest for at least one week. Rustoleum claims the clear cures in 24 hours - in my region it cures in about 1 week. If unsure, wait 2 then cut, buff.
Oh yeah, to know if you're done sanding - you shouldn't see any really shiny spots and for goodness sake, USE A BLOCK.
If you want a better compressor - pick a Lowes/Home Depot/Sears close by - find one that is at least 10 Gal (I like oil-less because I always forget, this is why I'm back to my 5 gal right now) and disregard everything I said earlier in this post.
Awesome, thanks for the detailed reply but I wasnt thinking of painting any colors, just finishing with clearcoat... and in that I do not know what to choose to bring out the grain/be durable and shiny
Would you still recommend the rustoleum stuff for just the clear gloss? Thanks. -
Your compressor is probably great for a nail gun - just not a paint gun. It may also come in handy if you ever decide to do some small airbrushing. The regulator is supposed to keep the pressure constant so the gauge on the compressor may not be exactly what's going on at the gun (hence hose compensation, etc.).
Even with Acrylic Lacquer I do at least 5 coats - but I'm a "depth of finish" freak. You can make bs rattlecan gloss spray paint shiny... but I like the "oh my gosh! Is that wet?" response.
If you use your fan, check to make sure the motor is sealed. High VOC = High explosion if the fumes get into an unsealed motor. It's kinda cool on a small scale, but if your neighbors bitch about the fumes, imagine their response to your house going up.
As always - try a scrap and see what works for you. Worst case, you stink up the garage and have to clean your gun. And like Syxx, I'm using Gravity Feed now 1) less waste and 2) IMHO, I get a better dial in for pattern/flow.
ONE MORE THING - almost forgot - MAKE SURE your compressor is drained and has a moisture trap before starting. Cracking, orange peel, fish eyes, runs, drags, spatters and pits can be caused by the fine amount of water in the tank due to change of temperature from night to day.
dude, awesome thanks. Assuming I have to go with spray cans or buy a better compressor, what would you suggest I get for spray cans, or a compressor! lol Thanks
-
Thanks for the quick replys guys,
You may want to see what the CFM rating at lower PSI is for your compressor (or find the calculations, I can't right now) but for me, a 1.8 mm nozzle is a fire hose. Right now I'm using an HVLP gravity feed gun 2.5 cfm @ 42 psi with a 1.0 mm nozzle. Following manufacturer's directions for thinning, and adjusting the feed and pattern, I can spray just about anything with a lot less waste. It's connected to a 5 gal tank (I know - I need more tank).2. Grain filler is not a waste of time on a clear-ish finish. Makes smoothing the finish easier in the long run (IMHO)
4. There is a 2-part poly in rattlecan that you can get at some auto parts stores. In my area, it's $27 a can (can't remember the name right now) and two cans is about right. Only problem is it has high VOC so ventilation/respirator is necessary (Syxxstring can fill in more). I've used acrylic lacquer and my dry cage for the last few projects and been quite pleased. Usually going from paint, to clear, to cut and buff in about 2 weeks.
5. If you're using sanding sealer, sand it to 400 - 220's a little rough.
1. So with a smaller (iam assuming diameter, but also in length) hose, you think I should be fine with the setup I have now? Sweet maybe I'll pick one up today. syxxstring, thanks for the info on the gun I did not see it on stewmacs site right away. Thats a bummer, but do you think I could hack it and make it work good for me like kpcrash?
2. Oh, no i did not mean it was a waste of time I just meant the waterbase stewmac stuff was becasue you have to do like 6 coats just to make it feasable, thats why I wanted the zpoxy, which I think I am going to pick up some today if this hobby store is open.
4. as for the 2 part poly wow that is expensive but if it works it works, I have a respirator (the kind lee valley sells) but no real ventilation so that may be a problem... I could use a big fan from my garage's side door to outside, bad idea? I do live in a subdivisions kind of area, neighbors will probably slay me.
5. Thanks for the tip, I just read so many people just go up to 220 (stewmac, people on the forum,) I just thought it was reasonable but maybe Ill try and go higher.
Thanks !
For details on dialing in the gun, and oh yes that does make a difference, the september Rod and Custom magazine has an article on how to spray correctly. It was written by Valspar/HOK's technical instructor and paint superstar, Brian Lynch. Definitley worth owning.Thanks, I'll look into that. Im pretty sure I will take kpcrash's advice and at least try it out first because I don't want to buy a new compressor and spray cans are shitty/expensive... One more quick question, should I wait for it to reach 45 (if thats what Im spraying at) PSI if it lowers a bunch while I'm spraying? will it start to spurt and give me orange peel etc? I tihnk I might have some trouble because this compressor really $%#*ing sucks. Thanks.
-
Hey, I am ready to finish a guitar Ive been working on (other than final sanding) and had alot of confusion about finishing. Ive spent a couple of weeks reading hours and hours every day here, and still am very confused/frightened to start. Ill start with my first question, Is my rig efficient enough to be able to spray a guitar? I have a porter-cable compressor, the specs are "2.6scfm@90 psi", and it is a 6 gallon compressor. For a gun I have the stewmac "production" gun.
Second question - OK, I have the stewmac COLORTONE waterbase grainfiller, sanding sealer and gloss topcoat. Ive read alot of problems with this and that it is very hard to get perfect, its not very durable, and it is not very glossy (a satin finish??). I am looking for a gloss finish for the body and a satin (or oil) for the neck. I also read that the grainfiller is a waste of time; I want to get some "zpoxy" finishing resin to speed up the process, but am not sure if they are compatible if I go with the waterbase finish.
Third question - I'm still debating weather to use some type of satin finish for the neck or tru oil (I have two of the 8oz bottles of it). Ive seen the epic "mahogany and tru oil" thread and learned a lot from jon mattharris and mattia, but are still not sure how to grainfill with it (many coats and wetsanding using truoil as lube, fill with zpoxy, or just lots and lots of coats leveling with steel wool). I am to understand that a satin finish is still more durable than tru oil, and I think that is what I'm after. How do you get a satin finish ? (do I use my waterbase stuff? Can I grainfill using zpoxy?)
Fourth question - For the body I want a glossy, hard, fast curing clear finish and I ve read pros and cons for everything... auto-body sprayable "2 part acrylic urethane" came up, I was wondering opinions, and where I could get some. Does anybody have opinions for what would be good for a beginner with no experience and the spray equipment I am using (if its even feasible at all) and where to get those.
Fifth question - The body is ash topped with maple, and the neck is mahogany sides with a bubinga middle laminate with maple veneers separating them all, and flame maple binding. clicky. The steps for finishing I am assuming would be -
1. sand to 220
2. clean with vacuum/air sprayer
3. apply zpoxy to mahogany and ash (assuming Im doing a satin on the neck and a gloss on the body)
4. sand and re apply with a more viscous application of zpoxy (can someone tell me how to make this happen?)
5. sand and re apply with a less viscous application of zpoxy using denatured alchohol as a thinner (if necessary for sandthroughs etc)
6. cleanup with vacuum/air sprayer
7. mask off FB and neck and spray body with sanding sealer
8. repeat until satisfied with thickness
9. sand and spray choice of laquer
10. repeat until thickness is right
11. do the same steps for the neck only mask off the body and less coats for satin finish using satin finish.
12. wait 3-4 weeks to cure
13. wetsand/buff
- is this the right order of things/right way to do them?
sixth question - OK, the stewmac site tells you how to clean the production gun and it seems excessive tedious and kind of intimidating. I will have to practice before I use real finishes but do you actually have to take the gun apart and put everything in lacquer thinner and clean it all up after every coat? seems like by the time you finish cleaning it your almost ready for another coat! Maybe I just seem lazy but I thought Id ask.
Sorry for the stupid-long post but I hope someone of you will take the time to read it and help me out cus I'm at a loss right now and want to finally get this thing done! But I will however show you some pictures of this guitar and another project I am working on for my rack.
frontal - clicky
sideview - clicky
flame maple rack spacers - clicky
the family - clicky
Thanks a bunch for your patience and any thoughts are welcome, looking foreword to some responses!
-
Thanks alot guys, I appreciate the responses. Rich, when you "wick" the fret, you do it in between hammering the ends and pressing them in? thanks.
-
Hey everybody, I just started a new project this week and its been the first guitar that I've been happy enough with to keep (no mistakes yet!), I have been "practicing" building guitars for about 2-3 years now. I say practicing because I do not have a finished product yet, hahah.
Anyways, I was basically ready for finishing (final sanding and fret leveling) and I went to level my frets. This was my first attempt at it, and like most things, was a learning experience. I ended up either not having a perfectly straight neck or a perfectly level fretboard, and by the time i was done there was hardly any frets left near the nut and the bridge, but full ones in the middle. I mostly realize how to rectify this mistake ( straighten neck, level fretboard and then make sure frets are mostly level before leveling THEM,) but I had a few questions I cant seem to find the answers to.
First question would be should I finish the guitar before leveling the frets, or does the steps matter much? I figure an unfinished neck will be more susceptible to warping and maybe I should finish it before taking on this task.
Second, Now that ive taken out the old frets (I did not use titebond OR CA, and this is also a bound fretboard, I know some would crucify me for not at least CA'n the ends down but anyway) there are obviously indentations where the tangs/barbs used to be. Is it imperative that I now use CA on at least the fret ends, or could I get by without it? I realize I could try and "miss" the old slots by 1/2 a mm or so but is that enough? I just do not want to use CA because now that the fretboard is glued on (its a set neck with a melted heel, warrior guitars-esque) I cant use my drillpress/fretpress insert to get at the higher frets and using CA is intimidating for me because of the skill involved and using paint thinner and solvent etc, among other reasons. Thanks alot for any insight, and I'll probably have some progress pics in the "in progress" section soon. Thanks again.
edit: oh and sorry one more question, I was looking at getting a quality straightedge and wasnt sure where to go... stewmac has their aluminum thing but people seem to either hate it or love it depending on who did QC that day, but lee valley has some cheaper ones that look nice... also how would I check for trueness? would running a piece of say bubinga through my jointer and checking it against that be a good test or no?
-
Thanks guys, I ll definatly do some searches on cheaper alternatives on tools. The thing about slotting my own fretbaords, is i DO plan on using ALOT of exotic boards, plus I will be doing 7 strings and maybe 8 if I am able. I think I will just do without fancy custom inlay for now, drop almost all of the inlay stuff, save myself a few hundred for now. I ll just do it in steps. Also another question, is tru oil good for fretboards?
-
Sounds like you are about to drop a chunk of change on this and I would suggest a few things. For the first few necks...
Buy pre slotted fretboards and drop the fret saw, box and templates.
you can use a hard rubber or urethane hammer and drop the drill press accessories (although I do think that is a better way of seating frets)
If you have the ability to laminate your neck blank with several pieces, you can make your center piece the width of the truss rod 1/4, and cut the channel on the band saw before glueing the neck lams together. No rout needed.
Table saw for truss channel - not a good idea
unles you have a CNC or a laser engraver, most inlay is freehand. Hard to get templates that small, ya'know.
and don't forget the drill bits for the tuner holes too. I also didn't see nut files and clamps on your list, do you have something else you will use?
Another option (because I am not familiar with your abilities) is buy the book only, and go from there.
Hey thanks for the reply. I would drop the saw box and templates, but I will need to get them eventually, plus I think id like to have the practice. Yes, I will be making multilaminated necks. I really like your idea about making a lam for the rod and cutting before glueing, the reason I was asking about the table saw is becasue on stewmacs site there was an article by dan erlewine saying itd be a good idea. Does anyone here go freehand? that scares the crap out of me, does anyone here actually do freehand?!
as for nut files I was told to get a welding file kit, and for way less money itd do the same job. I have a few good clamps and will buy more locally. Drill bits for the tuners... I think I already have some, if not I'm sure id be able to get some locally as well for the right size. Ive been building bodies so far, using some of my old prestige ibanez/warmoth necks, and I also bought a neck from doug at soulmate guitars, I had another one on order, but sadly, I cancelled it becasue I decided I want to start building my own.
thanks.
-
Hi everyone, I am going to order a bunch of tools/supplies from stewmac on building necks, and was thinking I should run my list by the project guitar team before I ordered, becasue maybe I missed some stuff, or maybe I have some dumb things in my list. So, here goes. Well, here goes!
-9.5 and 12 inch radius blocks
-fret press caul (for use with drill press)
-neck support caul (for use with fret press caul)
-fret end dressing file
-fret cutter
-fret saw/fret slotting mitre box
-fret scale templates (25.5)
-fret tang nipper
-curly maple binding
-binding tape
-jumbo stewmac fretwire
-fretwork step by step book
-3 hot rod truss rods
-truss rod router bit
-white bone nut blanks
and for inlays, I have
-pearl cutting jig (inlay tracing scribe, inlay saw, wooden pearl cutting jig, mini air pump, cutting lube)
-international dremel outfit dremel router
-precision router set (binding router bit, dremel stand, edge guide for binding, air pump)
-1/4-1/8 shank adapter collet
-3/32" collet
-3 carbide inlay bits, 3/32, 1/8, 1/16
Now for a few questions,
1.I am not sure how to route the truss rod cavity with the stewmac stuff, becasue the bit supplied is not a bearing bit. I have a table saw, good idea?
2.I do not know how to guide for inlays, or how to use a template if possible, or am I expected to do it freehand ? I would hope not : |
3.Stewmac doesnt sell stainless steel fretwire. Anyone know where to get some?
4.My list is runnin me over 1100 $, and was hoping to cut it down a bit, maybe anyone could help me by getting rid of stuff I dont need?/is there any core stuff I'am missing?
I have some stuff in there for cutting ends of fret tangs down so I can have neck binding. I was hoping the stewmac natural wood binding would be good for binding fretboards, and Id be able to use that.
Any help would be greatly appreciated, and thank you for taking the time to read my long list.
-
Awesome, Thanks alot. The only problem is I wont be getting the ball rolling for a couple of months at least, becasue Doug hasnt started on it yet, but he will pretty soon I hope.
-
OK, here is what I would do with that wood.
BTW, first, I will tell you something of great interest to you. 'Magma Attacks' is made from the EXACT SAME WOOD BILLET as your pieces there. Being as you had such an interest in that guitar, you must be STOKED to know that your guitar can look pretty much EXACTLY the same as mine, being as it came from the same billet of wood.

I have been watching Frasier Valley for some time, and he must have a very large billet of that particular burled wood, because I have seen at least a dozen or more auctions of bookmatched wood from the very same billet that Magma Attacks came from, and yours is one of them. Slightly different obviously, but cut from the same tree, absolutely.
OK, back to the inclusions. Your inclusions are very small. If I had your wood in front of me, what I would do to fill them is use Hot Stuff (Red) and a Pipette with a really small diameter opening and fill those inclusions in before I did anything else.
I will post a pic tomorrow of Hot Stuff Red and a Pipette so you know what I'm talking about.
If you want, we will have 'Magma Attacks II' on the shelves very soon!
:DSince you have the same wood from the same tree as mine came from, I will be more than happy to tell you everything I did to get Magma where she is today...but you will have to have some spray equipment to copy what I did.
Dude! thats awesome news. Thats insane that it is from the same tree, and I hope I can pull it off. I cant wait to get this thing underway. Thanks for the help.
-
Hi, I got a peice of burl maple from frasier valley fine woods (look below this paragraph) but I've never worked with burl before and was hoping drak or anyone else could help me out. I was just wondering the best way to fill in the incursions, and if Id need a CA bath, which products to use, how to do it, etc. Also I was hoping drak would be able to tell me how to stain the top to be very similar to his magma attack body, cus that thing REALLY kicks ass. I am gonna finish it with the stewmac colortone waterbase cleargloss topcoat, clear sealer, and grain filler (if i need it ).

Also as a side note I will be using one of doug from soulmate guitars necks... They are REALLY awesome. Here is a project ive already started with one of his necks.
Here are some pics of it,
before i started work :
http://img9.imagevenue.com/img.php?image=8...0_122_466lo.JPG
after glueing and rough shaping:
http://img129.imagevenue.com/img.php?image...4_122_598lo.JPG
after the carve and some routes
http://img161.imagevenue.com/view.php?imag...1_122_563lo.JPG
after one quick coat of tru oil, just to see what it will look like when im ready to finish it (you can notice my DISGUSTINGLY messy routes, but they will be covered, and im not drak so it wont be WOD'd
:http://img22.imagevenue.com/img.php?image=...8_122_413lo.JPG
I dont have any pics of the heel yet, its mostly done but can use some work so ill post those when its all finished.
the specs are basically 7 string neck thru with stainless steel frets, flame maple neck with bubinga lams, pao ferro baord, walnut back with zebrawood top (carved) dimarzio tone zone and air norton 7, 7 string hardtail bridge, all gold hardware, schaller mini locking tuners, graphite nut. finished in tru oil from head to toe. Ill post some final pics when its all done.
also here is a pic of some quilted maple i will be using that i also got from frasier valley. :
http://img42.imagevenue.com/view.php?image...2_122_547lo.JPG
thanks alot guys.
-
Right on, thanks alot.
-
Yeah, you should totally get a peice. Godin guitars build their LGXT's and most of their "preformance" seriese guitars out of silver leaf maple. Godin is also a really good company so I would trust in their choises.
-
Hey I was wondering if you guys could fill me in on how many tools and machines etc I will need to build a simple solidbody electric guitar (neck included), what they do and how much they are. Thanks allot.


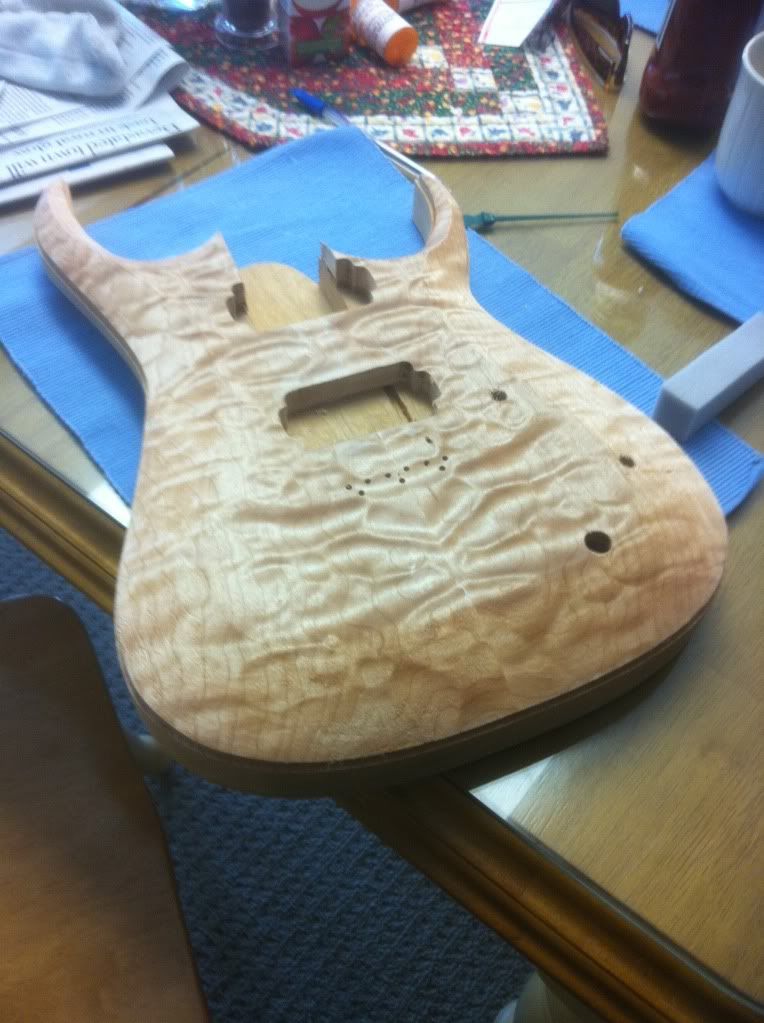
New Build! Carved top double cut with all the fixins.
in In Progress and Finished Work
Posted · Edited by ginner
Body blanks. Honduran mahogany!
Na na na na na na na na bat maaaannn
Using two screws located where the pickup cavities will go, I mount a template to the body. Countersunk screws into the template let the entire project glide.