


birch
-
Posts
75 -
Joined
-
Last visited
-
Days Won
3
Content Type
Profiles
News and Information
Tutorials
Product Reviews
Supplier Listings
Articles
Guitar Of The Month
Links and Resources
Forums
Gallery
Downloads
Posts posted by birch
-
-
Making tools today. I'm trying to find a router base for my Foredom rotary tool to do the fretboard inlay but not having much luck with affordable options. I thought it can't be too to make a simple one. Has anyone made one for a Foredom? There's loads for dremels but not much for any other type of rotary tool.
In the meantime, I found a picture of a hand router plane that may or may not work well on Ebony.
It's a pretty simple design and requires grinding an allen key into a chisel blade.


-
24 minutes ago, Prostheta said:
I think that the inlay works. The two parts next to the body follow on nicely with the body's own curvature and movement. Was that intentional?
Very good of you to take in a stray. We have three cats, however we took in two of them from homes that couldn't take care of them any more. Our third is an old girl, a pedigree. "My" cat Spit is a Norwegian Forest Cat/Siberian cross whilst Malkovich is a Russian Blue with something else in him which manifests as a white chest patch and amber eyes. When I start publishing videos, I am sure they'll make themselves quite known.
26 minutes ago, Prostheta said:Yeah the alignment of the inlay with the upper body contours was intended to keep the flow of curves going up the neck. I like the bottom part but I might rework the part nearest the neck a bit.
In addition to Lasha, we also have a Maroon belly Conure, Gypsy, a Mastiff, Magrat, and a Parrotlet, Uma, who we got from people who didn't want to keep them. All females, leaving me quite outnumbered.
-
2 hours ago, Prostheta said:
Awesome cat!
There seems to be a lot of free string length beyond the nut. That may express itself as phantom overtones as they vibrate in sympathy with the other strings. A bit of foam rubber might be handy if this happens. The string paths themselves look clear enough.
How are you feeling about it so far?
Lasha, the cat, was a stray we found half starved hanging around our house. She's taken to indoor living quite well.
The end of the fretboard you see in the picture isn't the nut, it's the zero fret with about 5 mm behind it. There is still a nut to go on behind it so hopefully that will close up the gap enough to prevent overtones?
I'm not sure about that inlay design yet. I'm mulling it over before I do any routing. It's a bit more "shouty" than I originally intended...
So far I've made quite a few mistakes, changed my mind a bunch, and done things in the wrong order but overall I'm think my first build is going better than expected. I'm happy with it I think.
-
Trial fitting the Sperzels and taped in bridge posts to check string alignment and started working on an inlay design. Paduk with maple outline on the Ebony fretboard with thin Ebony binding. Just loose pieces sitting on top at the moment.


-
 1
1
-
-
16 minutes ago, Prostheta said:
I don't think inwards pressure would be productive. You're more likely to damage the body that achieve any useful clamping pressure. If the tenon is sloppy in its side-to-side fit, that isn't something that clamping pressure can fix. Any chance of a look?
One of my previous posts has pictures of the joint. It's tight enough to hold together without glue so that shouldn't be an issue. So you don't think I need to clamp it sideways then? That's good, saves me some work.
-
3 hours ago, Prostheta said:
I missed this thread! The only immediate disadvantage with a rear-mounted neck is that it will need a bit more depth to account for lost glueing surface area.
I think I have enough glue surface to account for the loss. One thing I haven't figured out yet is how to effectively clamp the body to the sides of the neck heel while glueing. I'm going to have to make some funny shaped cauls to clamp against.
-
Very nice! I love the look of the vertical grain with the burst.
The hard part is deciding which colours will look good with the colour it is now as well as the colour it will become over time.
I'm definitely going to do some testing
-
1
-
-
Any chance you have a picture of that?
1 hour ago, ScottR said:No, but I have on Spanish Mahogany and Sapele, which are similar colors to what padauk will be after the passing of some time. They looked great with that treatment.
SR
-
Has anyone tried a tobacco burst on paduk? I'm thinking of doing a test of it since I can't find any examples. I'm thinking this kind of thing:


-
On March 11, 2016 at 2:25 PM, 2.5itim said:
Today I got the top wood jointed and glued up, it look me a while to get the glue joint perfect. Ended up using a table saw, hand plane and a barrel sander but it ended up being nearly perfect! For some reason my high spots where in the middle but I could only get my hand plane to cut on the ends, i was thinking the ends were the high spots so I kept cutting thinking I was leveling but actually I was making it worse so I used the barrel sander to fix my mistake there. I ended up getting the joint perfect except the last 2 inches which will be all cut off when I cut the body shape and neck pocket out so it will disappear.
all together I'm pretty happy with it!

For long pieces I need perfectly flat I have 2 lengths of sticky back 80 grit sandpaper stuck to a flat piece of 3/4 melamine clamped to the bench. I hand sand the edge i want flat against the long stationary sanding block and it always gets perfectly flat along the length. Got to be careful not to tilt the piece while sanding to avoid bevelling the edge but it works for fretboards, necks, whatever. I've also stuck the sticky paper to my table saw and used the fence to hold the piece vertical and avoid bevelling. Just an idea that works for me.
That top is going to look great.
-
1
-
-
It works fairly well but I'm having trouble with the sharp points. I find Paduk particularly splintery.

-
3
-
-
F-hole carving using hobby knives by hand is hard on the hands. I'm almost at the needle file stage. Curious what tools other people use for this kind of work...


-
1
-
-
3 hours ago, Andyjr1515 said:
That looks great. I meant to say before - that is how I do my through necks. Exactly the same principle except I keep going with the router until I run out of wood
")
i think it makes for a strong joint and leaves the top untouched. As they say, great minds think alike

Thanks, I'm pretty happy with the way it's turning out too.
-
A little more... Drilled the bridge stud holes, tuner holes (I need to get a 25/64" drill bit to finish) and routed the pickup cavity. Had a bit of tearout due to a dull bit judging by the burn marks. Not sure how to fix that yet...
still trying to come up with an f hole design I'm happy with too.


-
Made some progress finally. Routed the pocket in the body and did the 2 degree angle on the tenon. Lined up nice and straight and fit snug.


-
1
-
-
3 minutes ago, ScottR said:
Are you contemplating a flame shaped F-hole?
SR
Thanks, I am working out a design for a flame shaped F-hole and fretboard inlay but I'm not happy with what I've come up with so far.
I was planning on doing all my 2 degree angles on the tenon so that my body route template can sit flat to the body. It has been suggested to me that there might not be enough glue surface area by not using the back of the heel as glueing surface. I will try to find Avengers builds if they are still on the site.
-
I'm contemplating a neck joint that I've been thinking about but haven't been able to find any examples of its use so I'm wondering if there is a good reason that I'm not aware of... I want to do a set neck but my neck blank is not long enough to to a traditional tenon so I'm thinking about glueing it in through the back of the body. This would allow me to avoid a heel and carve a smooth transition from neck to body and make a nice flamed maple accent in the back of the body. I think it would also provide enough surface area for a strong glue joint.
Is there any reason why this is a bad idea?

-
The details:
-chambered solid body of my own design in Mahoganey and Paduk
-Flamed Maple one piece neck
-Ebony fretboard with Paduk bind
ing
-Single bridge humbucker
-Graphtec Wraparound bridge
-Nickel Grover tuners


-
1
-
-
So far all my work has been hotrodding of cheap factory guitars including adding and changing pickups and hardware, and custom paint. Sadly I have no pictures of many projects due to a fried hard drive and my tendency to procrastinate backing up files.
I have one example on my first thread on this site of a strat I painted a couple years ago.
I started my first scratch build last year and have been making slow progress through buying a house and moving, renovating and otherwise eating my spare time away.
I am now making more progress each week and thought it was time to get some feedback before I tackle some of the tasks I've never tried before.
-
Thanks for the vote of confidence. I'm happy it turned out so well. I would definitely put it up in a project gotm, but I have to agree that the full builds going on here are in a league of their own. The past gotm winners I've looked at so far are incredible.
I'm hoping to try a full build this year, but for now I'll be limited to hot rodding factory guitars.
-
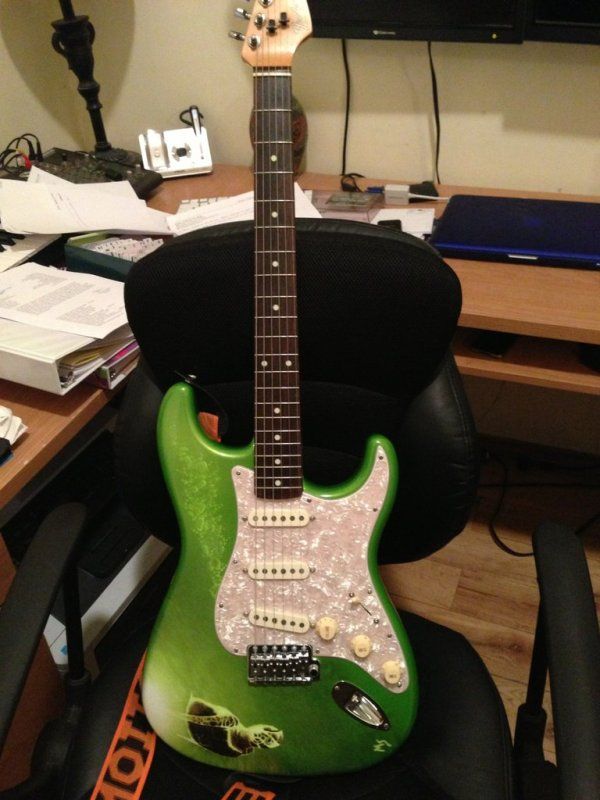
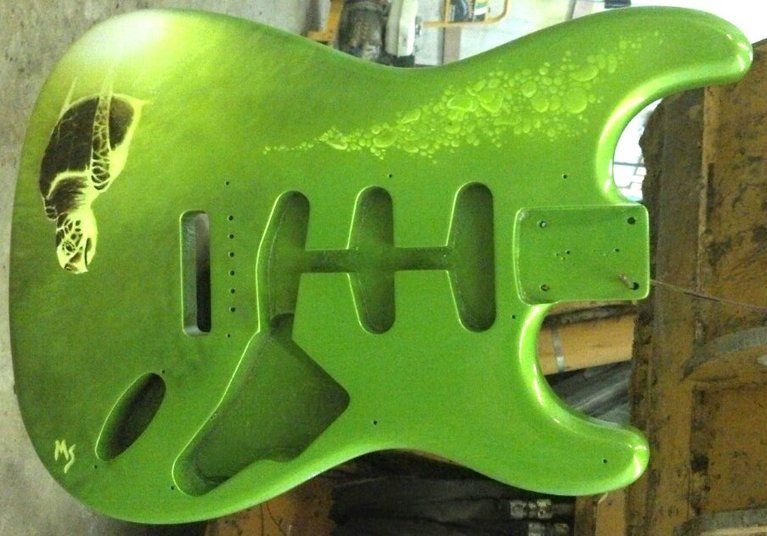
The finished product...
-
Thanks. I will definitely post picks of the finished product. I would like to try building a semi hollow body next I think. I need to learn something about choosing wood...
-
Thanks. The green near the horns is the base colour, a metallic yellow green. The ripple effect was sprayed through flocking, commonly used for making quilts, withe a combination of candy, pearl, and opaque greens, yellos and white. The bubbles were sprayed the a bubble template, and the turtle was freehand with the airbrush and drybrush.
Judging by the level of expertise I've seen in just the few build threads I've had time to look at so far,there is so much I need to learn... So glad to have found this site, you guys do some incredible work.
-
I wish I had found this site before I did this paint job on my friends junkyard find Mexican Strat. I used epoxy primer to fix all the dents in the body and seal it for the metallic lacquer base. The artwork was done with Createx Wicked paints followed by several coats of lacquer clear. It is far from perfect, as I didn't use enough clear to completely flatten the surface before the final polish. There are many things I will do differently on the next project after browsing through the amazing tutorials on this site.
-
3
-


My first full build from scratch
in In Progress and Finished Work
Posted
Yes I concur the blade retention design is hokey at best, but seems to be a common method in the DIY designs. There is also a depth stop collar and set screw arrangement for the top of the blade that could be used for blade support I think.
I really just want to make a router base for the Foredom for routing inlays. I'm at a standstill until I can get the pocket routed out.