


HCRoadie
-
Posts
38 -
Joined
-
Last visited
Content Type
Profiles
News and Information
Tutorials
Product Reviews
Supplier Listings
Articles
Guitar Of The Month
Links and Resources
Forums
Gallery
Downloads
Posts posted by HCRoadie
-
-
WOAH! What are all those Tele parts doing on that Les Paul? We all have seen plenty of Les Paul style electronics, i.e.: double humbuckers, V-T-V-T controls ect...on Tele's, but this is the first I have seen this. Bold choice. That bridge plate is going to hide too much of the quilt. So is the switch plate. For that matter so is the neck pickup...

-
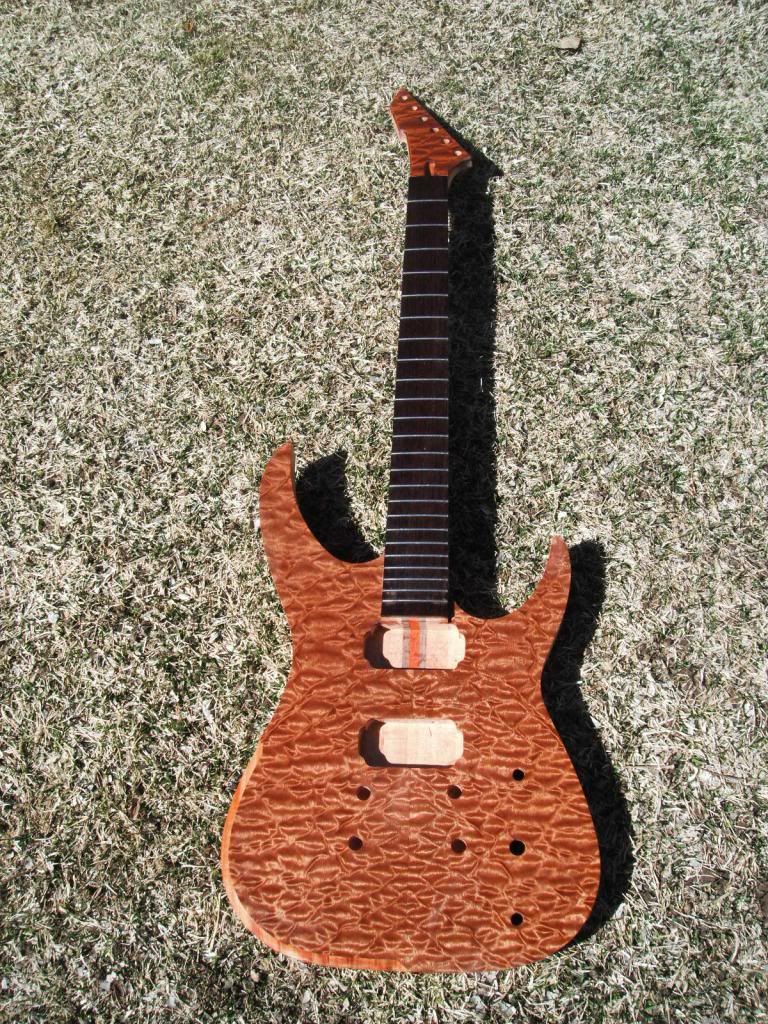
Was it a purposeful decision to have that top/arm area bevel end where there seems to be a circle developing in the quilt pattern on the top?
-
The headstock shape is nice. Very fitting for the style/vibe of the guitar
-
And the worst string thru holes ever award goes to...

How do this happen?
-
That is stunning! I really appreciate how the sound holes' shape is suggested/hinted at/modified, or what ever phrase you wanna use, by other elements of the build. The details you paid attention to is what makes all of that work. Love it
-
My wife wanted to stop at the fabric store on the way home
 , so I turned my misfortune in
 The only thing, is it looks like it was done by a bunch of rabid blind baboons. I think next time I think I will recruit the help from my wife. :
Adorable
-
In keeping with the "buy parts and assemble" ethos of this tutorial, would it be better to avoid the more advanced techniques such as refinishing, bridge conversion and neck construction, and limit yourself to sourcing premade components, fitting a bridge to the route it was intended for, fitting a premade neck and checking for alignment, doing a fret dress and setup etc? You could always include some more detailed steps in the tutorial such as how to plug and re-drill the trem post screws if the bridge doesn't exactly align with the original screw holes, or how to tweak the neck pocket if the neck heel is a slightly different shape.
As a relative new comer to this site, and to guitar building/assembly/construction/design/finishing/, I feel that the site is lacking a bit in these basic tips and principles. There seems to be a lot devoted to the very experienced builder, which is awesome to read about and look at their pretty pictures. However, there seems to be a disparity between the accomplished builder and those that are still learning. I am aware that much time and effort has been spent by those that share their incredible builds with us. And I love going through the "build in progress" threads, but the skill and tool set to get there is daunting. Having some properly illustrated and described "baby step" threads and tutorials would be very encouraging to me and am I sure many others. Nothing is more gratifying than a successful project. And nothing is more discouraging than a failed one.
If you were to make this more of an intermediate tutorial (maybe the reader has a couple of partscaster builds under their belt by this stage?) you could perhaps include a section on building a standard neck from scratch, stripping the body and refinishing, blocking the trem and fitting a hardtail, rerouting the neck pickup for a humbucker etc.
Maybe Two threads are in order? If some of the more seasoned members would each take on different levels of these experimental/edifying builds, it could be quite inspiring. Also, I would like to say how much I genuinely appreciate the generosity of everyone's knowledge on this site.
-
Pictures are gone. Did you edit your photo album?
Ya, no pics
-
The carve is very "dramatic". That blue gtr's finish is off the leash!
-
Long overdue update. The hardware for the V has arrived. Schaller low profile floyd in "vintage copper" finish and matching knobs and tuners. I love the way these look, should match up nicely with the dirty-looking ovangkol (the guitar will most likely get natural finish)


I glued up the scarf joint and added black oak veneer to the face of the headstock:

I truly love this combination of colors. Very classy and unique. The hardware has just the right amount of browns, oranges and reds to complement and draw from the wood's tone. Excellent choice
-
And once that was done and my headstock cap is done as well, I went ahead and made a nut. I used my spacer I made last year to help get parallel slots that have equal spacing between them.

And back to hanging around for another week......
SR
So simple...so brilliant
-
I love the mystery
-
My first electric was a Westone Electra with a Crate amp. I Soooo wanted one of those Dynasty as a kid. That brings back some memories. I should get that axe back from my uncle. I think vintage 80's cheese is awesome. Maybe do a "modern" interpretation of the white with the red stripes.
-
I'm sure it has been mentioned before, but your yard is beautiful! The guitar is nice too
-
That watermelon pink is cute
 Maybe bursting with a green edge will bring out the true melon essence.
 -
Well thanks for everyone's help and suggestions on this.
-
That turned out great. Beautiful work
-

He means set up blocks of wood around the body so the plate has something to ride on and you don't wind up with a wobble to the router..... in essence, you are creating a stable surface to run the plate along as you route the channel
After giving the Dremel tool another look, I think Pan means to place a guide outside of the tool, where the brass roller bearing is. Either way, this could be the ticket to handling that treble bout.
-
Thanks Pan, I saw the dremel attachment on the StewMc site. I am not sure what you mean by
How do you plan to do the body binding? I was also using a dremel with a small routing bit, in the Stewmac routing attachment. The lesson I learned was to always have something with the same height as the body on the outer side, otherwise its hard to keep the whole thing from falling off at the ends of the body horns.

I was also thinking of using a trim router. Of course I am also planning some experimentation pieces for both routing and stain/painting
-
Hello everyone. Long time browser, first time builder here. First of all, thanks to EVERYONE that has been so gracious to share their knowlage. I have learned a tremendous amout in the few months I've been combing through these forums.
I am still in the research and game plan development stages of attempting a build. So I have not made any purchases in tools or materials for a build yet. I have gone through A LOT of the tutorial and build threds and I believe that I can now ask some intelagent questions.
I have dremt about building an Explorer style guitar, but I wanted to put a twist on the shape. I love what killemall8 has done with that body style. So I started poking around the inter-web and found someone who makes an Iceman/Destroyer Hybrid. I like it!
">http://
Here are my questions:
Where I circled the body, how would you approach routing out a binding channel? The sharp turn on the treble bout concerns me the most. The pointy bit on the tail also seems like it could be a challenge.
As far as attaching the binding, I found a YouTube vid on a gentalmen using acetone.
I have read in these "pages" about people mixing acetone and small bits of biding to create filler, with varying degrees of scucess. Is using acetone to adhear the binding an acceptable method? Is ABS binding the best/only type to use with acetone? On that treble side bout with the sharp turn, would you mitter cut the binding or pie cut it?
I would also be attaching a veneer top to this body. Is tear out a big problem when routing a binding channel on a veneered body?
More than likely I will do a one piece veneer, if I can find one big enough. I plan on using the "glue board" method. Does the board need to be cut to the same shape as the guitar?
Once the veneer is on, how would one go about cutting the pickup caveties and bridge holes out on a body that is already routed/drilled? I have some ideas about how, but I am interested in what others have done in this situation.
As mentioned, this would be my first go at someting like this. I also do not have intentions of making any more than two guitars, so expensive specialty tools would have to be replaced with clever work arounds. I am not a professional wood worker, but I live in a very old home and I have had to repair, re-construct, recreate,and refurbish all kinds of home related wooden things. Just saying I am able to use, and own, basic wood working tools.
Thank you in advance for any help and suggestions.
-
 1
1
-
-
.. for obvious reasons you should be binding a veneered top anyways!
I am new, very new. Why do HAVE to bind a veneered top?
-
Looks like a bit of "over masking" between the neck pocket and neck pickup. I'm sure you have a plan.
-
The pics being in reverse order threw me off at first...but now I get it. I do not understand why the control holes are so damn big.
-
Would a roller bridge be better suited in this application?


 Maybe bursting with a green edge will bring out the true melon essence.


Justin's guitar
in In Progress and Finished Work
Posted
How much do you think the quilt pattern will change when you carve it? It is so magnificent right now, I would be afraid to lose any of that extreme depth with the carve. I know you said it will be a mild one, but I was just wondering how deep the quilt pattern stays true.