


Hydrogeoman
-
Posts
192 -
Joined
-
Last visited
-
Days Won
1
Content Type
Profiles
News and Information
Tutorials
Product Reviews
Supplier Listings
Articles
Guitar Of The Month
Links and Resources
Forums
Gallery
Downloads
Posts posted by Hydrogeoman
-
-
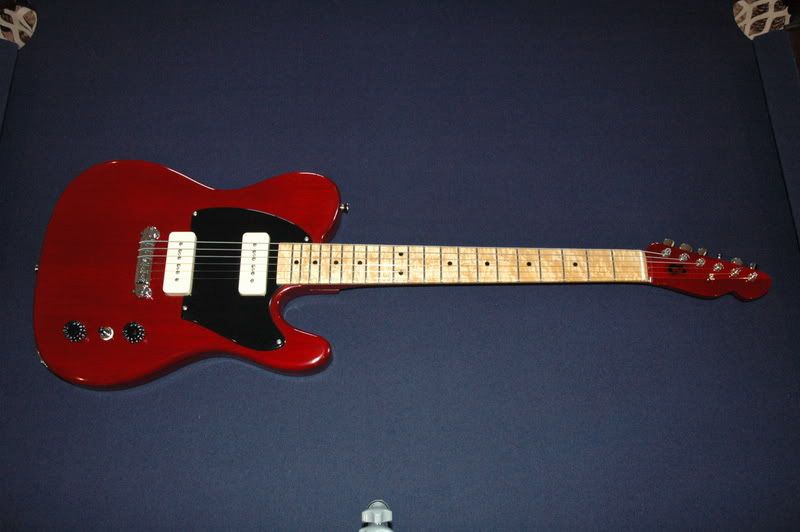
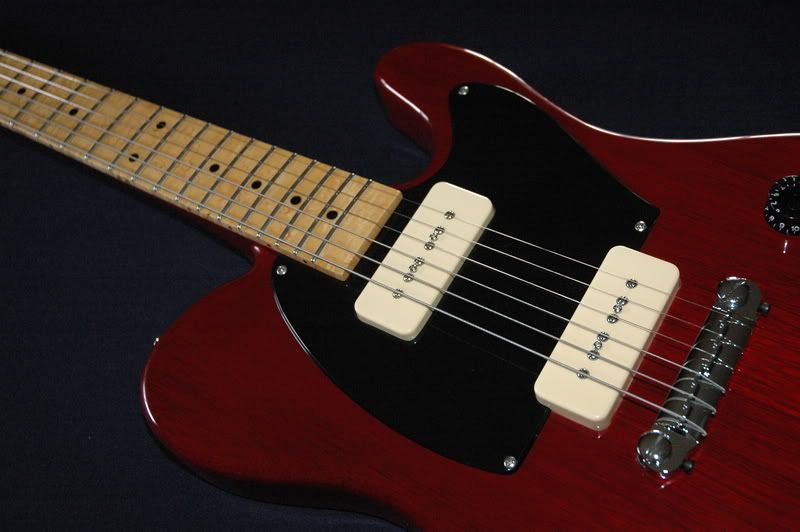
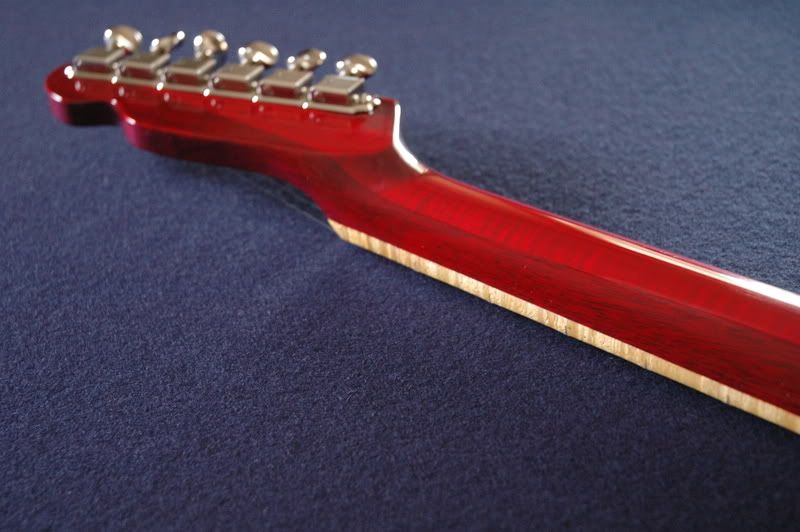
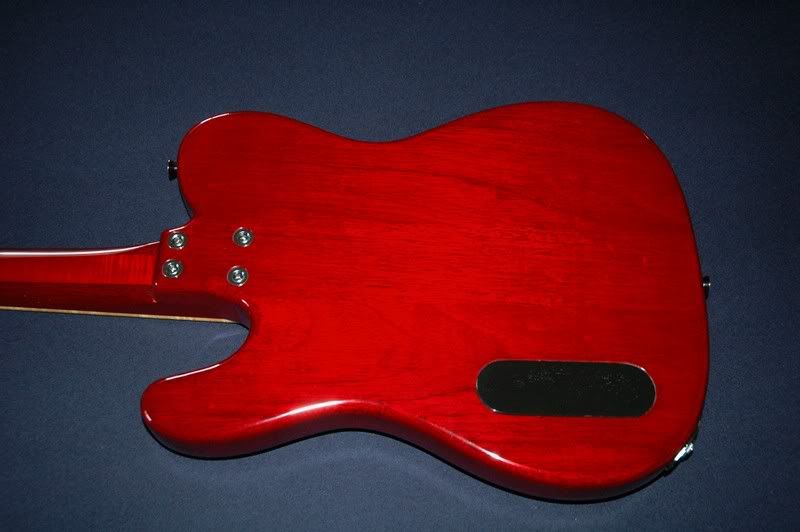
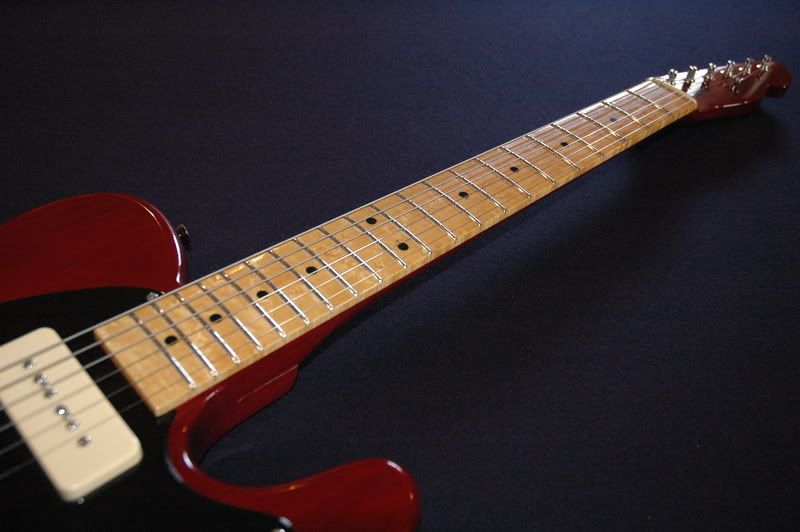
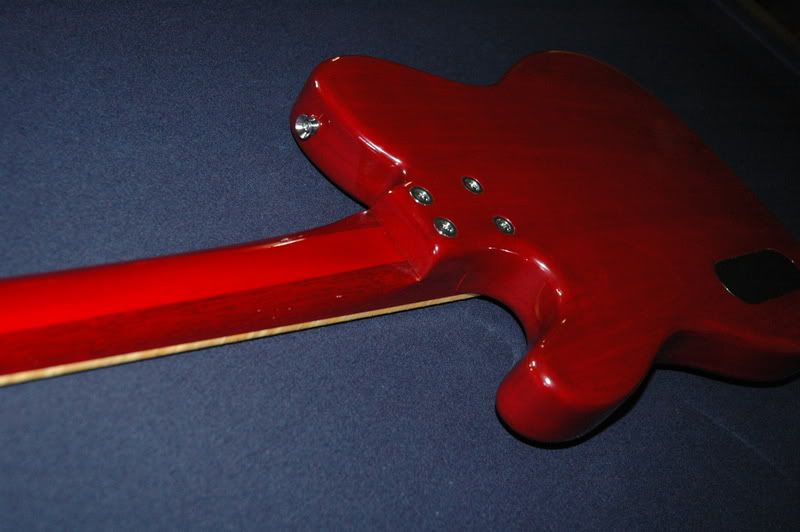
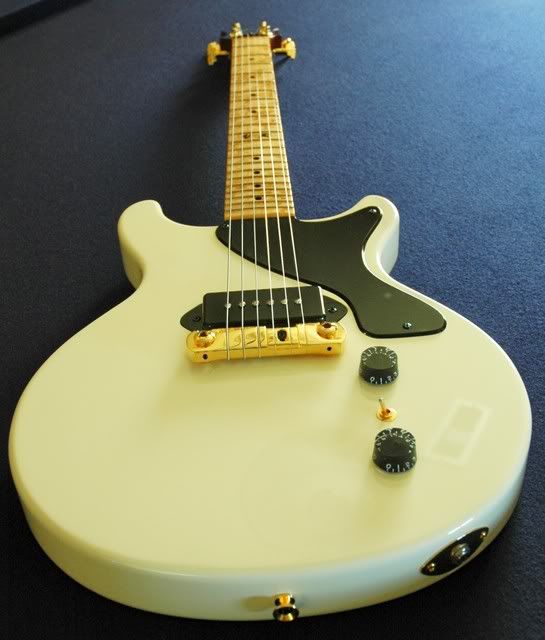
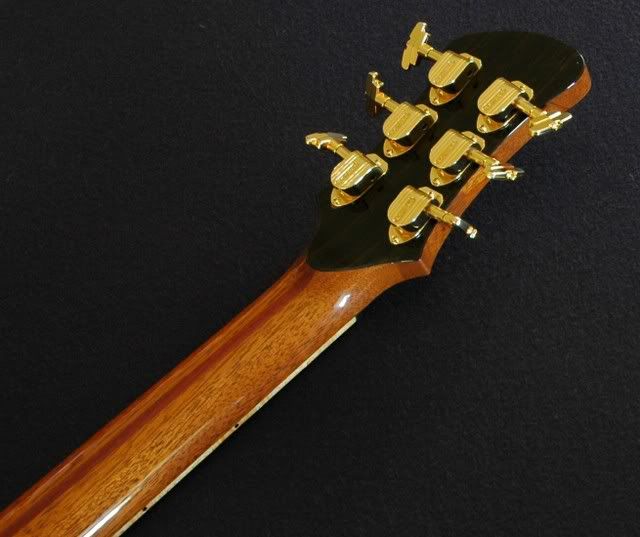
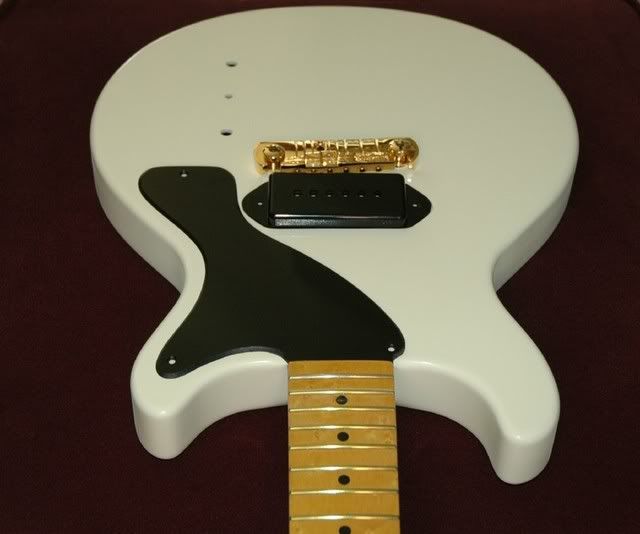
Hi All, just finished this one this month. I'll call it the P-90 tele. I know, pretty unimaginative name. This was built from a mahogany board a friend found laying in the middle of the road right after a truck ran over it. It had some dings and cracks, but there was enough of it intact to make a 5-piece body (2-piece top and 3-piece back sandwiched together) and most of the neck. It is a bit of a hybrid with the P-90s, wrap-around bridge, and neck angle of 1 degree.
Here are the specs/details:
5-piece Honduras mahogany body
3-piece mahogany/curly maple/mahogany neck with birdseye maple fretboard
ebony headstock inlay set in red "play sand" mixed into epoxy (long story)
Cavity cover with magnets instead of screws
J.S. Moore P-90 pups (10k neck, 11k bridge)
Cherry red nitrocellulose lacquer finish (McFaddens)
Thanks for looking
Cheers - Greg

Here are a few more links to pics:
-
Ok I am probably going to get blasted for paying $14.95 (model 15860 TL) for an adjustable soldering station (you know, you get what you pay for), but I got this iron over a year ago and it has performed flawlessly. Of course it does not see a lot of use (have wired 4 guitars with it so far). Not intended for production soldering but fit the bill perfectly for my use. My 2cents
-
Marty,
Like Rich and Setch, I have found shellac drys quickly enough on its own at room temperature. I have also sprayed shellac but the results were less than acceptable (was not very smooth) so I switched back to wiping on the finish well thinned.
I have not tried french polishing yet, but believe that method would give you your best results if you are not putting any other type of finish over the shellac. I have always sprayed clear nitro lacquer over the shellac for the top coat.
Cheers, Greg
-
Sounds like the transperformance dts-1 that came out in the 90's, but from what I understood, that device controled the tuning (string tension) at the bridge, not the headstock. I only heard of rock stars having it. $2,500 price tag to have it put on your guitar(in the 90's), and it seemed to be designed for Les Pauls (Jimmy page toured with such an LP). The LP worshipping guy in Cinderella had one on his favorite LP.
I can't imagine why putting the system at the headstock end would be better, unless the transperformance patent kept them from doing that. The string angles over the nut on an LP are not the best for tuning stability.
I'd have more confidence in a self tuning guitar that was headless with all the workings going on at the bridge. True hands-free tremelo would be nice. I mean with all the strings rapidly going in and out of tune slightly. I assume
"b- bender" effects can be done, but then I often find things are more primative than I had assumed.
Right you are Soapbar. I used to work with the guy that developed the transperformance "robot." He tried selling the idea to Gibson about 5 years ago. Looks like instead of buying his patent, they just put their R&D guys on it to to create basically the same thing and keep the looks of the LP intact.
-
If the water doesn't bring it back to snug, I would use the veneer method you described. I had the same problem with a set neck being just a hair too loose. I glued non-backed maple veneer to each side of the neck and sanded both sides evenly with a hardwood sanding block. The veneer was literally less than the thickness of a sheet of paper on both sides combined and worked perfectly. Just be careful you don't make it too snug, as during the glue-up the wood will swell slightly and you could end up not being able to get the neck set all the way into the pocket (have done that too
 ).
). I'd like to hear how dampening it with water works like Russ suggested. Good luck!
-
....... For the time being, I am into basses in a big way - far less conservative lot .
I hear that. I started this building obsession a few years ago with the idea of building basses of my own designs (heavy Carl Thompson, Ritter, David King influences). I have yet to finish one from scratch for myself because all of my spare time has been consumed building "traditional" guitars (LPs, teles, strats, etc) for friends. I can't wait to go a little nuts with a bass. Bass players are an interesting lot, generally quiet introverts, but often wielding extroverted instruments.
Nice work by the way!
-
Andy,
Glad to see you are moving forward with your build. With that, I am reviving your thread to find out if you have any more progress to post. I can't wait to see your neck finished. That fretboard is going to look sweet.
Oh by the way, can you tell me where you got your tele drawings? Keep up the good work!
Cheers,
Greg
-
I also am switching from rattle can, (Deft), to gun. I wish someone would answer to original question. Which nito lacquer gives the best resaults?
I have only used McFadden's nitro lacquer purchased from Grizzly.com. I have had excellent luck with it, but like the other posts have stated, you still need to go through all the tedious sanding steps before buffing to get the results you are after.
-
I have had very good luck using McFaddens nitro lacquer. I order it from Grizzly tools. http://grizzly.com/
-
... they are still dead flat. So far so good- based on that- I can only recommend these.
Scott (now formerly out of 2 year lurker mode)
Hey thanks Lurker, I mean Scott. I am going to try the 22", I love hidden treasures like this.
Cheers
Greg
-
I have the Delta 13" 22-580. It has been absolutely great, but figured wood is a little dicey. That being said, now I have to get the drum sander. Thanks a lot Rich, David, and Erik. Just when I thought I had everything I needed!
-
Yeah, it's a tele - a really nice one. I wouldn't have thought the fingerboard and body would have looked good together, but it looks good. Nice work!
-
......What I have learned over a long history of tool buying is you get what you pay for. If the price is low the tools is of inferior quality and belongs in the occasional home user category. I especially like the 9" band saw comparison. Which junk band saw is better LOL.
To a degree this is true, but I have had a lot of luck with the "junk" Ryobi stuff as well as other inexpensive tools. I don't think I have ever spent more than $500 for any single tool I own. I think a lot of it has to do with how often you use a tool. My Ryobi plunge router has been a great tool for the money as well as a Ryobi table saw BT3100 that is one of the best $300 I have ever spent. If I were using these things everyday, then yeah, I would probably pony up the $$ for the pricey stuff, but for me, the non-pro quality stuff has worked out well. My big stuff (happy with all of it and didn't mortgage the farm to buy all of it):
Ryobi plunge router $99 (every neck pocket, pu cavity, etc. I have routed with this thing looks and fits just as nice as your $300 Bosch, Porter, etc does)
Ryobi BT3100 table saw (there is a cult following for this little saw, just do a little googling)
Ryobi 18v cordless drill (drills holes and drives screws, what else do you need?)
Shop Fox 17" radial floor standing drill press (very versatile press for under $300)
Cheapo 8" table top drill press (this gets the most use and I spent less than $60 at Harbor Freight)
Delta 6" (refurbished) jointer (another fine tool for under $260 at Tool King)
Delta 22-580 13" planer (think this was ~$400 when I got it)
Grizzly 14" band saw (another great value for under $400)
Rikon 6" x 48" belt/disk sander ($250 and works flawlessly)
Rigid oscillating belt/spindle sander (this thing has paid for itself and probably gets the most use in my shop)
DeWalt scroll saw (this was the most expensive tool I own and probably gets used the least - still under $500)
Dewalt (refurbished) miter saw (under $300)
Ward's radial arm saw (very old but works fine, does not get a lot of use for guitar building though)
Granted, some of this stuff isn't necessarily considered cheap tools. I guess my point is, if you choose tools carefully based on your needs and expected amount of useage they will get, you can get by just fine for a lot less money than you would expect.
-
Lots of ways to get there. I don't know much about those Saga kits but I believe they have a basswood body and a flamed maple top (sure you want to paint solid color over a flamed maple top?) so you don't need to grain fill before spraying. I have only sprayed with nitrocellulose lacquer, but here is a brief list of how I would go about it (this is with a spray gun and compressor; however, you can probably get close to the same thing with spray cans from Guitar Reranch for a lot less $$):
1) finish sand the bare wood to 220 grit
2) seal with 2 coats of vinyl sealer or lacquer wash coat (thinned lacquer)
3) mix about a 1/2 oz white lacquer pigment (I use Stewmac stuff) into about 6 oz of clear lacquer (50% lacquer thinner and 50% clear lacquer). Then mix, one drop at a time, vintage amber tint (TransTint concentrated Dye) into your mixture of clear lacquer and white pigment, stirring constantly, until you get a creamy looking "vintage" white. It helps to start light and spray on a test piece before the guitar, gradually adding the amber toner until you get the color you want.
4) spray the color coats (I let the coats dry about 1 hr between coats) until you get a good build (no wood showing through) and let it dry for at least a day
5) level sand (dry) with 320 grit, being extremely careful not to sand through the color into the wood.
6) spray clear lacquer coats (at least 8) and let the finish dry for at least 3 weeks before final sanding and buffing.
Keep in mind this is a very shortened list of the finishing process and there are many variations (techniques and materials) finishers use to achieve the same endpoint. You should spend a lot more time reading up on this site and also Guitar Reranch has some very good info on their site. Good luck!
-
Hmmm, interesting topic. Don't think that one has ever been covered here.
PG has this great little feature called "search." ;-)
-
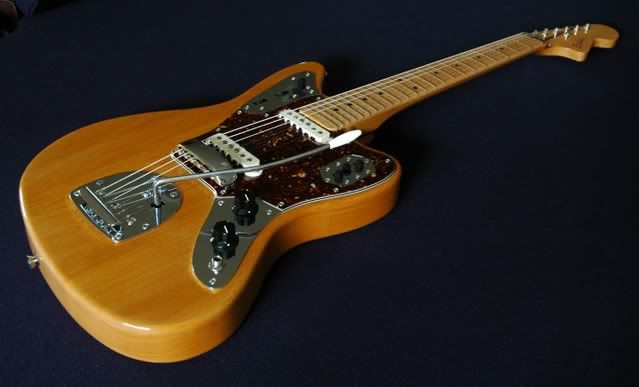
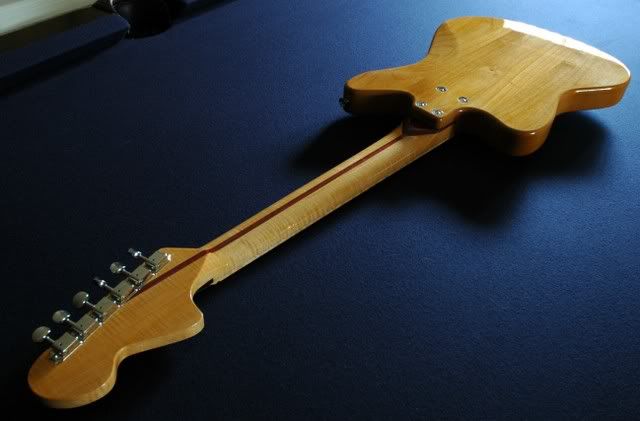
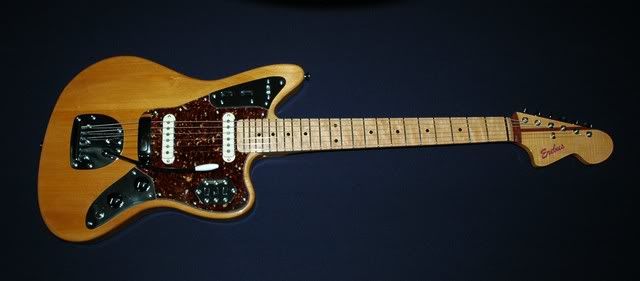
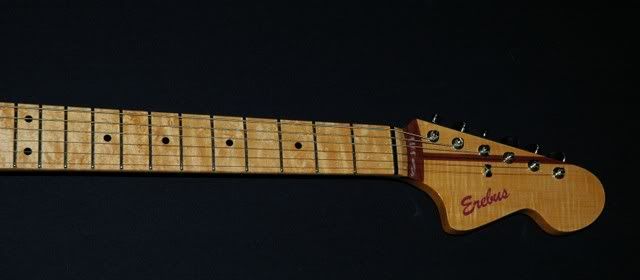
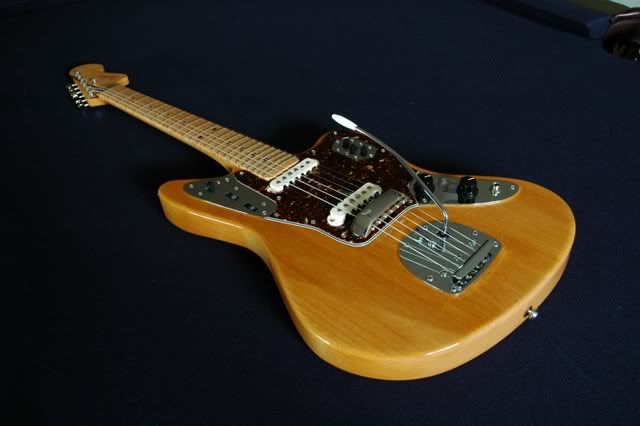
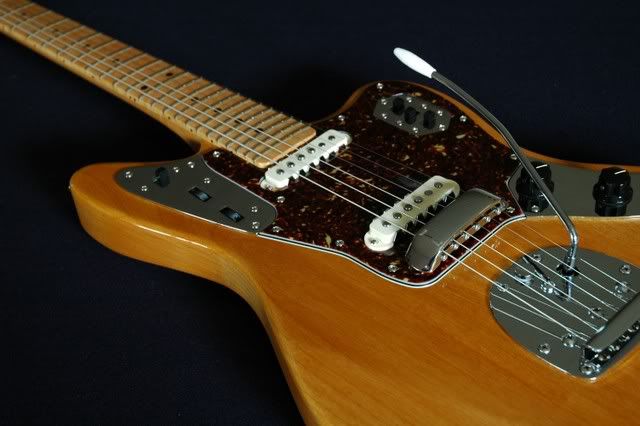
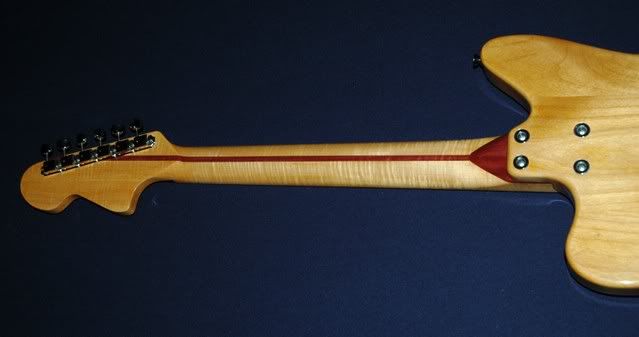
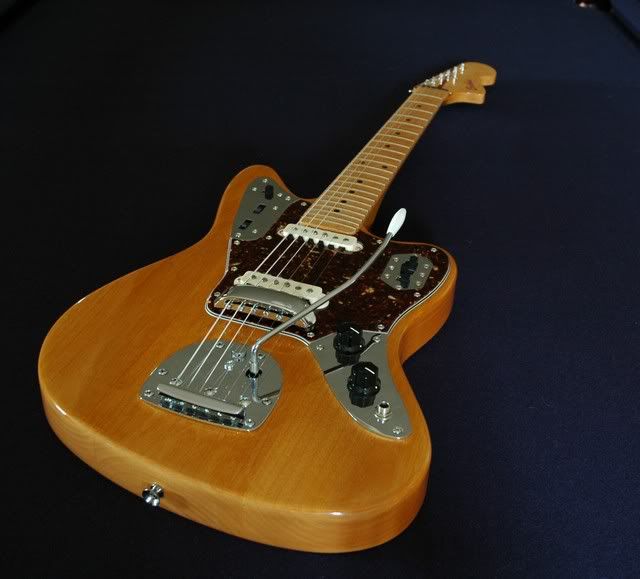
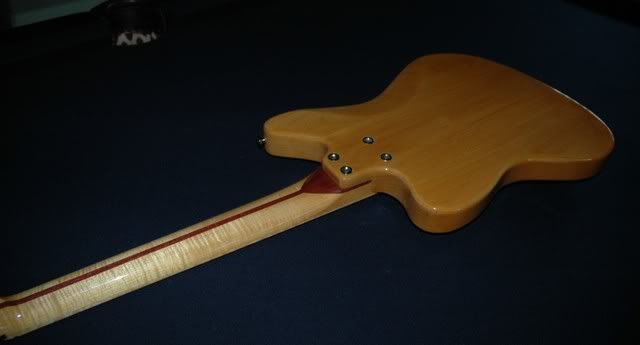
Thought I would try this again this month. Here is my 2nd complete guitar made, named Erebus 03, made for a friend who
It has a 24" scale length and the Jaguar style body was made slightly smaller than an original. The headstock is larger than an original Jag and is shaped differently (although it is not so apparent in the photos). Here are the specs:
Alder body
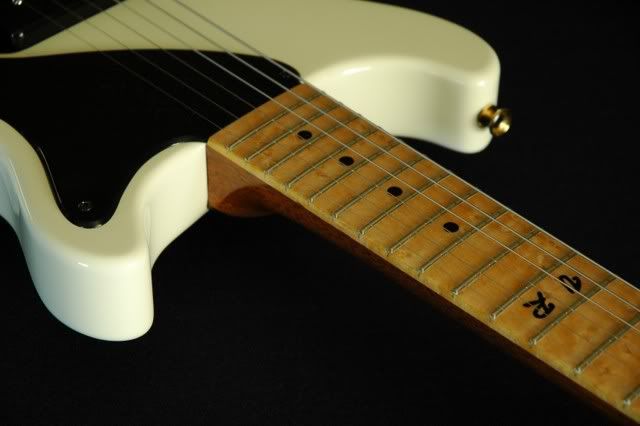
Curly maple and purpleheart neck, 9.5" radius on the birdseye maple fretboard
Hand-wound Kent Armstrong pickups (love the tone from these, I asked Kent to go for a "maximum twang" and these deliver)
Gotoh locking tuners
Nitrocellulose pickguard
Graphtech nut
Orange shellac finish under McFadden's nitro-lacquer clear coats
Cheers - Greg
Some more pics:
Top up close - different angle
-
you can feel free to ignore me when i am being contrary - i broke my little toe yesterday so have been a grumpy sod limping around all day today.
Although i do think your new ebay description will draw in more people, i tend to avoid them when i disagree with the description
Sorry to hear about the Toe Wes, Hope it heals okay. I cut the end off of my second toe on the left foot about 3 weeks ago (DON"T ASK HOW!!!!) Man I forgot what bone really looked like. 12 stitches later and 4 hrs at the ER, Just got the stitches removed today. Man that feels better. SO I know the feeling LOL:)))
Take care
Mike
Sorry to get off topic here, maybe we should start a new thread describing our best (read worst) injuries. So Mike..... since I would like to respect your wishes for not asking how you did it....HOW DID YOU DO THAT!!??
Oh man I hope I never have to see my own bone exposed.
Cheers - Greg
-
Best fret leveller: bits of angle iron. Level your frets under string tension, and it's dirt cheap. Thread with pics:
http://www.luthiersforum.com/forum/forum_p...mp;PN=1##186970
This has probably been discussed somewhere in the forum before, but if you have a cylindrical radius on your fretboard, in essence these angle irons will put a slight compound radius to your frets. Correct?
-
Hooglebug,
Your latest carved top looks awesome. I really like the subtle carve on this one. Do you have any pictures of your carving process you can post? What are your preferred tools for roughing and final shaping, etc? Keep up the good work!
Cheers - Greg
-
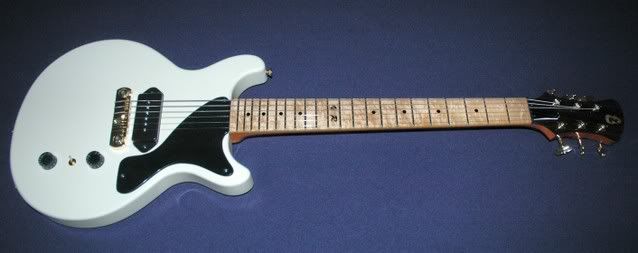
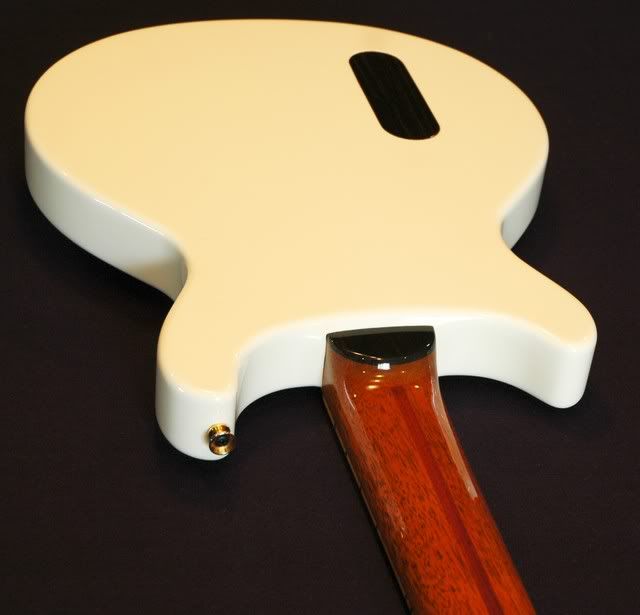
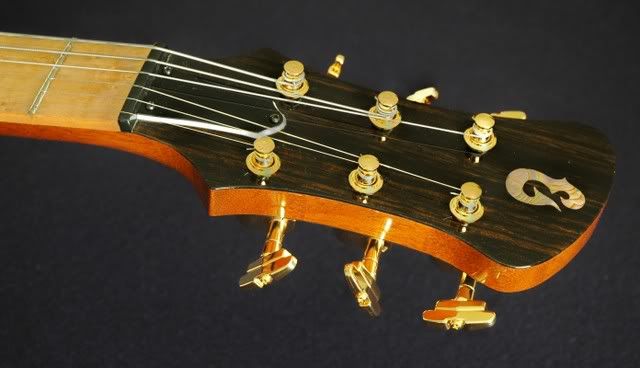
This is my first complete build. It is called the Erebus VR. It was built for a very talented
and long time friend - VR. Here are the specs:
Les Paul Jr double-cut style
2-piece mahogany body
mahogany-purpleheart-mahogany (fat) neck with ebony peghead straps, and heel cap
birdseye maple fretboard, ebony 12th fret initials
Kent Armstrong coil tapped P-90 (10k - 7.5k ohm) pickup
Wilkinson bridge
Grover Imperial tuners
dual action truss rod
Paua abalone inlay
ebony cavity cover held in place with neodymium magnets
nitrocellulose laquer finish
Cheers - Greg
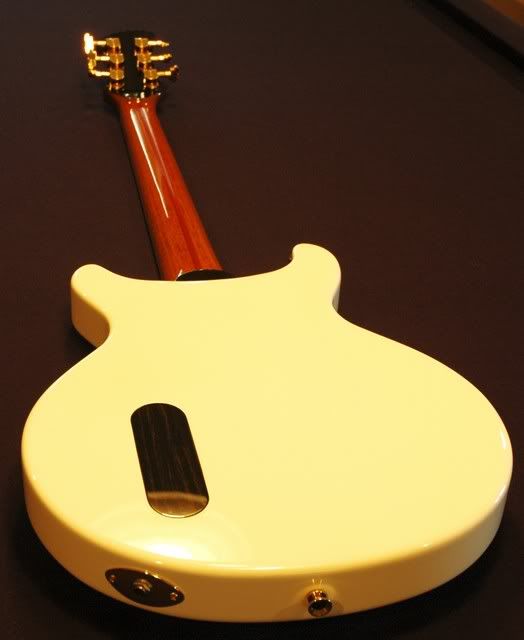
A few more shots:
-
I love the color on the fretboard. What were you having trouble with on your first two tries?
Great build, I love LP Jr.'s
CMA
Thanks CMA, the first time I finished the fretboard with orange shellac which I sprayed on with my HVLP gun. The surface was very rough and I was afraid it would show through with clear coats. So that finish was scraped off back to the bare wood. The next try was with orange shellac again, only this time I wiped it on with a cloth. It looked good, but I screwed it up by putting too much vintage amber in the lacquer top coats which went over the shellac. The board was too yellow as seen here:
So... back to the bare wood again. The 3rd try (that is the current color) is just nitro lacquer toned with just a little vintage amber and a touch of red.
I still have not figured out a great system for scraping the lacquer off of the frets though. After the 3rd finish went on, I let the lacquer cure way too long before scraping it off the frets. When I scraped the dried lacquer off the frets, it chipped into the finish over the fretboard. So......DAMN!
I had to scrap the whole thing back to bare wood a 4th time. For the 4th try I scraped the frets the same day as shooting the lacquer. It worked much better, but the point where the finish meets the fret is still not perfect in all places.I tried the StewMac method of rounding the edge of a nail head to scrape the lacquer off the frets but it is very easy to mess up and hit the finish over the fretboard this way.
I really like maple boards, but so far they have been very labor intensive. I need to get a better method for removing the lacquer from the frets without botching the finish
. By the way, I am using McFaddens nitrocellulose lacquer. I really like it, but it definately sticks very well to frets.Later - HG
-
Great work , nice to see variations on the LP Jr theme. One thing I didn't get was why did you rout out the dog ear cover shape into the body? It should only have required the rout shape of the pup bobin.
Making me want to build a double cut now.
Thirdstone, the route for the dog ear was purely wanting to achieve a bit cleaner/more unique look. I was a bit worried that it would drop the pickup too far from the strings, but it adjusted ok and did not seem to affect the sound in a negative way.
Cheers - HG
PS - my next Jr is going to be a single cut
-
All, thanks for the kind words. This forum has been a HUGE help and has made this learning experience extremely valuable. Hopefully, it shows up in future builds in the form of better efficiency and quality.
Cheers
Greg
-
It has been an incredibly long haul, but my 1st complete build is finally done. After the third try, I finally got the finish on the fretboard the color I wanted. I also learned that you can't leave the nitro lacquer on the frets for very long, otherwise when you scrape it off it will chip right into the finish over the fretboard
Cheers - gpp
Specs: Les Paul Jr style
mahogany body
mahogany-purpleheart-mahogany (fat) neck with ebony peghead straps and heel cap
birdseye maple fretboard
Kent Armstrong coil tapped P-90 (10k - 7.5k ohm)
Wilkinson bridge
Grover Imperial tuners

some more pics
 ).
). 
Tele Build Pictorial
in In Progress and Finished Work
Posted
Hey all,
Decided I was going to try and take photos of most of the steps for the build I am currently working on. Nothing out of the ordinary here, just your basic tele and will probably bore many of you to tears. Hopefully, there will be some pics in here that will be helpful to some. This 1st post takes you primarily through the neck building process (minus fretting) and some simple inlaying on the headstock.
It is going to be pretty pretty economical, probably around $300 (US) total to build.
Curly maple neck and birdseye maple fretboard
Walnut body from a board a friend of mine found in an old miltary building that was getting ready to be demolished.
GFS Vintage Alnico (neck), GFS Vintage Alinco 50 (bridge) These are very inexpensive pickups which I have never tried but thought I would give them a shot.
Gotoh tuners
Wilkinson tele bridge
and other misc parts from Guitar Fetish.
Here is a pic of the body halfs glued up and thickness planed. The nasty knot will get hogged out when the control cavity is routed.
Lots more pics to see if you have the time:
Roughed out body shape click
3-piece neck glueup click
body and neck w/fretboard layed out click
route truss rod channel click
begin slotting fretboard (Stewmac blade and template) click
More slots , I used to use my table saw with a sled but the radial arm saw is quicker and just as accurate click
drilling the neck dot holes click
glueing on the fretboard (tape gets pulled before placing the fretboard click
fretboard will be held in place with two brads to avoid slipping when clamped click
fretboard clamped (did I use enough clamps?) click
No pics of radiusing the fretboard, but I just use the radiused maple sanding blocks (8" and 16" long ones). This fretboard has a 7.25" radius. click
Cutting pearl for inlay click
My logo click
Prepare to route inlay. I made my dremel router base from 2 brass screws that are used to hold a toilet tank to the toilet (they have a nice wide and fairly thin head) a little plexiglass and a piece of flat steel - and bingo. Saved a little money and seems to work pretty well. click
Begin inlay routing click
Finished route click
Epoxy mixed with a little amber toner click
Inlay placed in route with epoxy click
Begin rough cutting headstock shape with scroll saw click
Headstock rough cut click
Ok, in the past, I pressed the frets in at this stage, but this time I decided to rough carve the neck first, allow it to sit for about a week, re-level the fretboard and then fret. Hopefully it will make for a truer neck.
Begin to carve neck at headstock and heel area 1st click
Carving near headstock click
Headstock area and heel area roughed out click
Rough shaping on the heel click
Start carving the space between click
Another angle cut click
Neck roughed out complete click
Drilling tuning machine holes click
Test fit tuning machines click and click
Well, that's all for now folks!
Cheers - Greg