


Hydrogeoman
-
Posts
192 -
Joined
-
Last visited
-
Days Won
1
Content Type
Profiles
News and Information
Tutorials
Product Reviews
Supplier Listings
Articles
Guitar Of The Month
Links and Resources
Forums
Gallery
Downloads
Posts posted by Hydrogeoman
-
-
seriously..the sanding sponge takes care of all of it at the same time...it is ridiculously easy and the end product is exactly the same.usin a razorblade is asking for it to bite into the wood.the pads are much safer
+1 Just look at Brian's tutorial. This method is so easy and the results are excellent.
-
Eureka! I found this in the Grizzly catalog and thought I would pass it along if anybody is interested in building there own buffing arbor on the cheap. Originally, I was looking to assemble this unit from pieces, but this accomplishes the job more economically.
-
First of all, thank you for your service to our country
 and know you and your fellow soldiers are not forgotten in our prayers here in the cushiness of home.
I am another supporter of doing prototypes before jumping into the "real" wood. Although I have not done any complete mockups using pine or similar inexpensive woods, I made a practice neck out of pine doing the neck shaping a partial fret job to get the feel for it. I usually practice on scrap for each particular aspect of the construction I am preparing to do before I dive in on the real thing. It has worked out so far.
It sounds like you already have a lot of experience with guitars and this is a great place to obtain a wealth of info, so it will mainly be a matter of getting some of the woodworking practice under your belt. I hope the year goes fast for you and finds you safely back home.
Cheers,
Greg
-
use Acetone to dissolve the styrofoam, .....
Leaving you with something similar to Napalm
Neh, some motorcycle gas tanks are made this way. Acetone dissolves the styrofoam with ease, just a small drop already causes huge holes in your styrofoam. Just need to do it outside with plenty of ventilation.
Yeah, there probably is not enough styrofoam, and gasoline is a better solvent for napalm
Cool guitar by the way
-
Heck, I was in Sears the other day and I came across this baby -- http://www.sears.com/sr/javasr/product.do?...UseBVCookie=Yes
Pretty cheap and you don't even have to attatch a motor, it already has one. I'm thinking about picking one up.
EDIT: after looking at that sears buffer again, i'm thinking 3450 rpm is way too fast, seeing as Stew Mac recomends only 862 rpm for theirs.
Manquesa, that is pretty cheap, but you are right, too high of an rpm. You might be able to rewire it to run half-speed 1725 rpm, but may end up smoking it. I'm sure some more electrically savy PGers could say for sure whether it could be done or is a bad idea.
-
Mikro, I have checked out the Grizzly, but did not find buffing wheels of the same diameter and bore size as what Stewmac carries. Grizzly's "guitar" buffing wheels do not come in the 3/4" bore that is on the arbor. Since I would probably have to get the buffing wheels from someone other than Grizzly, the slightly lower cost of the arbor gets offset by additional shipping for a second vendor for the wheels. All in all, the Stewmac complete setup looks to be about the same $$ after all is said and done and I would only have to deal with one vendor.
I still may give the home-made route a shot since I already have a spare electric motor laying around.
Cheers,
Greg
-
use Acetone to dissolve the styrofoam, .....
Leaving you with something similar to Napalm
Might need to go headless to get it to balance.
-
Or you could just buy a few of their polishing pads, they're pretty cheap ($15.00 or so?), and all you need is a good drill, that's what I use and they work great in the absence of a good pedestal buffer system, although if you have the money to spend, the pedestal buffer would be the preferred way to go.
I also used the StewMac foam pads in my hand held drill to apply buffing compound. However, on my last guitar, after buffing out with the foam pads, I used a random orbital sander to apply the swirl remover for the final gloss. I think it worked well for that.
Thanks guys, I think I will give the drill method a go for the polishing and then try the glaze and wax with the random orbit sander for starters.
I have been looking at buying the parts needed to make my own buffing arbor setup similar to the Stewmac (Shopfox) setup. I think I can do build the whole thing (less motor) for about half the cost. I will post some pics when I get it put together (unless I get lazy and break down an just buy the setup
)Cheers
-
Happy New Year Everyone.
I am trying to decide whether to get this arbor buffing system from Stewmac:
or
will this dual-action sander that I already own do an decent job in polishing my nitro finishes (I have yet to complete a final wet sand and polish)?
I bought the Porter Cable outfit with several different foam pads and Menzerna liquid polish, glaze, and finishing wax for polishing my car. It works great for that, but it does not spin like a drill, rather it oscillates much like a random orbit palm sander. I was not sure if it will produce enough friction to get a glass like finish in the nitro.
I know many get good results with the finesse pads, but since I already have a fair amount invested in the car polisher I was wondering if anybody has used one of these on guitars with any success. Please help me fight my tool buying addiction if possible
Thanks,
Greg
-
+1 Carl is my main inspiration for getting into building. I was looking at having him build me a bass about 15 years ago. The man was completely generous with his time and sharing of information. He spent over an hour on the phone with me talking bass construction, Les Claypool, how he got into building, etc. Aaron, the kid who set up the website about the bass Carl was building him several years ago is awsome. He has done a lot to get Carl's name the recognition it deserves and has put a ton of info about Carl Thompson basses out there for interested people.
Cheers
-
does anyone know where i should go to get some nice bass pickups? i really don't know anything about bass pickups. i'm willing to drop maybe 75 bucks on them. or so. maybe more if i need to. i've been watching ebay, but i don't really know what to be looking for, even. any suggestions?
Here are a couple of options. I have a couple of basses with the P style dimarzio pups and they sound great. I really think the dimarzio bass pups are under rated.
-
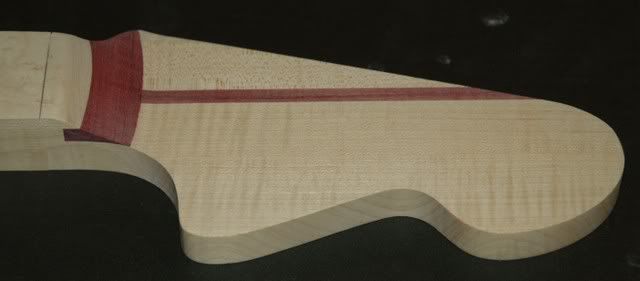
I also decided to thin out the upper horn to shed some weight and it looked a little thick to me. The one on the left is the finished thickness....I like it better!

Shaping up nicely. I like the trimmed down upper horn much better.
-
...... i mean, i wouldn't worry about fretting out notes when bending, thus letting me have lower action......
I hope Perry isn't reading this, or ye shall be damned!
-
You then have to refer to this as a 'feature' and you can even have fun thinking up reasons why you 'intended' to do it in the first place!
LOL - All of my guitars have "features." Here is a recent one. The purpleheart is placed near the nut perpendicular to the neck axis thereby minimizing torsional stresses that may occur in this area of the neck. Or something like that
-
Done
How do you like that Budda? Nice axe by the way
-
...... still need pickups, but i'm thinking about the EMG select hybrid set from stewmac. unless an EMG HZ goes up on ebay for not too much money. or if people have any suggestions for pickups, this is probably going to be a jam band sort of instrument..
Looking good man. I would stay away from the EMG Select pups. I own a korean made Spector NS-4a that came with the Selects. I was never happy with the tone. Muddy is the best description I can give them.
I replaced the Selects with the EMG HZ's P/J combination and it made all the difference in the world. Crisp defined tone that you can hear through two overdriven guitars.
With the time and effort you are investing in your bass, it will be well worth to work on saving the extra $$ and go with the REAL EMGs. Good luck and keep up the progress.
Greg
-
.....
bottom line...you can build a guitar out of compacted buffalo dung and laquer it into submission if you wish...but why would you ever want to put the time an effort into something that every woodworker knows is an inferior material to work with
...
Yeah but what if you impregnated the buffalo dung with epoxy before compacting?
I would probably go with a poly finish on that bad boy. A BD Custom, who wouldn't want to have one of those? -
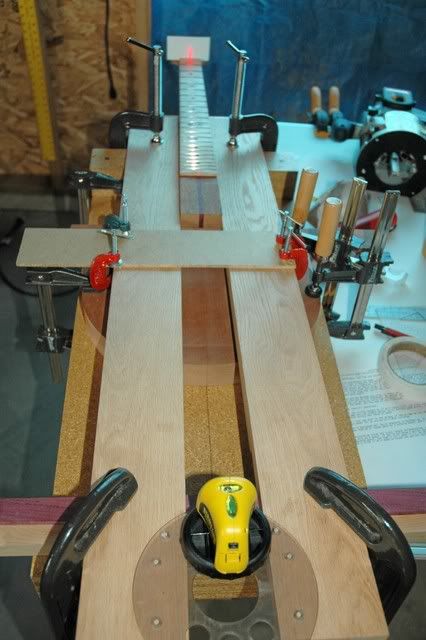
Here is how I use mine. I made a jig based on Myka's and set the laser level on my plastic router bottom plate which stradles the "fences" . Make sure the laser lines up with your centerline from the nut to the butt of the guitar. I use a business card with a vertical line drawn on it to line up with the center of the neck at the nut. To answer your question the laser does reach lower levels to an extent.
-
I'm pretty sure that making a jig would have been easier than sanding the scarf joint, but it worked! Since I don't have a band saw I did make a jig for thinning the neck to 1". I'll get pics of that boring little thing up later. I also cut out roughs for the body wings. Next up is cutting the slots for the fanned frets.
The angle of the photo is off, but it actually lined up quite nice. I'm putting a walnut cap on it anyways, but the back will flow nicely.
I know your wings are only rough cut right now, but your upper horn looks too close to the neck unless you never wrap your thumb over the edge of the fretboard. Otherwise it looks like it is coming along nicely.
I love Carl Thompson basses. My very first build was a similar shape (but far simpler construction than yours):
Keep the updates coming!
Cheers
Greg
-
I found a set of metal drill bits with half sizes, that might help.
Please share!
-
I was taught to snug the bit up in the chuck by hand and then use the chuck key in each of the holes, snugging it up a little bit in each hole until it is good and tight. Kind of like tightening lug nuts on a wheel. The idea being that the jaws on the chuck will tighten equally around the drill bit.
The other problem you may be having though is a slightly bent drill bit.
-
I think I understand your questions.
This sounds very similar to a problem I had yesterday trying to install a set of Gotoh vintage tuners. The press in bushing is .346" diameter and the tuner post is .249" diameter. I drilled the holes for the bushings slightly deeper than the length of the bushing, but not all the way through the peghead, and then followed the center of these holes with the smaller diameter bit for the tuning posts. The problem I encountered though was I did not have the correct diameter bit for the bushings - either too tight or too loose. So what I did was go with the smaller diameter bit and then carefully use a deburring bit on my dremel tool to slightly widen the holes so that the bushing would go in without a sledge hammer
You might try using the nearest size drill bit (but smaller than what is called for) and then carefully enlarge the bushing hole in a similar manner as described above (round file, coarse sand paper glued to a dowel rod in a drill press, dremel, etc.). I think the key is to clamp your peghead to your drill press table (providing you have a drill press), drill your bushing hole to the proper depth, then leaving the peghead clamped in place, drill the same hole with the bit that is the same diameter as your tuning machine post. This will help assure that the two holes are on the same center.
Hope this makes sense.
-
Thanks for the Info. Never even thought of Carvin. There stuff is really cool. I figured it would be a good way to start, building a parts guitar, rather than going whole hog and due to inexperience and ineptitude ending up with an expensive monstrosity.
Teles Rule
I used a Carvin neck on my first "build." It was a bolt on bass neck with a blank paddle headstock. I made the body myself. This was a very good way for me to get my feet wet before advancing to the next step of building the necks myself. I think a kit guitar or at least a pre-routed body and pre-made neck would also be a good way to get started, especially if you do not have some of the basic tools that make the job easier (and more precise).
Be careful though, you could end up with this building addiction that can get very expensive!
-
Your guitar is looking VERY nice man! I think you could let it go as is, but I know what you are saying about it bugging you. So..... I'd fix it. If you are like me, it will continue to bug you after it is finished, and even though no one will probably notice it, it will be the first thing YOU notice everytime you go to pick it up. With that beautiful top, I think it would be worth the extra effort to get it just the way you want.
Good luck!
Greg
 and know you and your fellow soldiers are not forgotten in our prayers here in the cushiness of home.
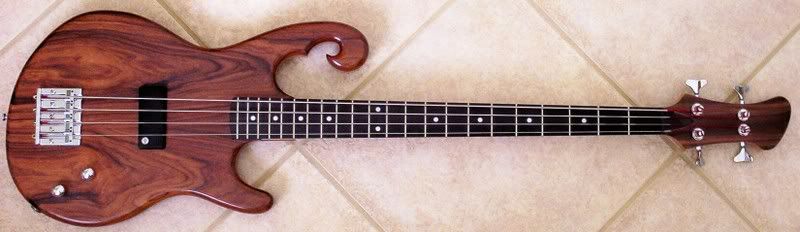
12 String Ric Bass
in In Progress and Finished Work
Posted
Very cool looking bass. So did you bolt the old neck to the new body or did you modify to a set neck?