


Hydrogeoman
-
Posts
192 -
Joined
-
Last visited
-
Days Won
1
Content Type
Profiles
News and Information
Tutorials
Product Reviews
Supplier Listings
Articles
Guitar Of The Month
Links and Resources
Forums
Gallery
Downloads
Posts posted by Hydrogeoman
-
-
It has been quite a while since I last posted any progress on the LP Jr I have been working on. I am getting the body ready for grain filling now. I have been practice spraying with my Harbor Freight gravity feed gun but I do not quite have the hang of it yet. A testament to my lack of spraying skill is the roughness of the shellac coat I put on the neck and fretboard

The body of the guitar will be finished in canary yellow nitro and the neck will be natural.
Kent Armstrong P-90 with coil tap switch
Grover Imperial tuners (yikes those suckers are heavy!)
Wilkinson aluminum bridge
I know most of this stuff is old hat to a lot of the pros out there, but this is my 1st complete build so I thought I would throw in some pics of the entire process to this point:
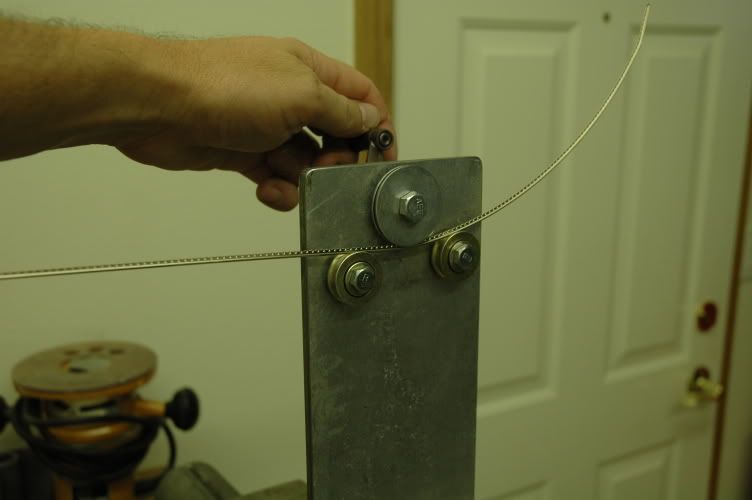
fretwire bending, I made this bender using Jay5's plan (Thanks! it works like a charm and cost me less than $15)
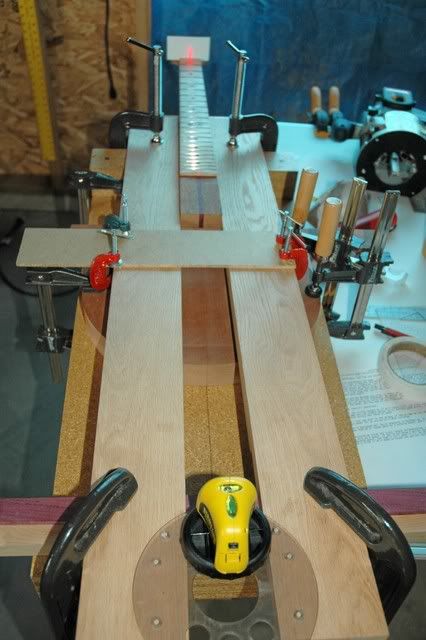
fret press (Harbor Freight, home made caul holder [thanks again Jay5], and Stew Mac 12" radius caul - all for under $40)
begin fret leveling with 12" radius block
begin neck carving with microplane
more roughing out the neck
roughing out the volute
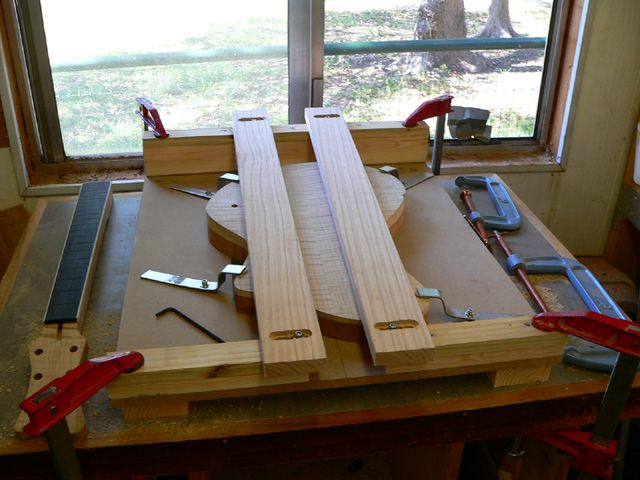
aligning neck in neck pocket jig (thanks to Myka) with cheap laser level
routing neck pocket
route and test fit pickup
control cavity
finished volute
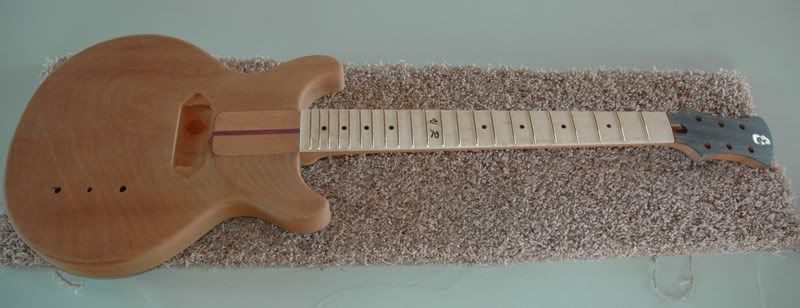
neck glued in
back of guitar, neck is mahogany and purpleheart with ebony veneer on peghead, 2 piece mahogany body
shellaced fretboard - birdseye maple and paua shell inlay on peghead
Well, there you have it to this point. I will be posting some finishing pics soon (hopefully)
Cheers
Greg
-
When spraying shellac, how smooth should the finish be? I have been practicing spraying a slightly less than 2 pound cut of blonde shellac, but no matter how I set my spray gun the finish always feels about like 1000 grit sandpaper. Is this normal?
I want to spray the blonde shellac on a maple fretboard before I spray lacquer to give it a kind of vintage vibe. With this sandpapery feel of the shellac, will I need to level sand the shellac before shooting the lacquer or should I just shoot the lacquer over the rough shellac several times to get a good build and then sand it back?
Thanks for any advice.
Greg
-
Dayvo, that looks nice! Just my 2 cents, but that lacewood looks awsome AS-IS!. Maybe just a touch of amber to pop the grain. Your call obviously, most of us build to make ourselves happy. Looking foward to seeing how it turns out.
Cheers HG
-
This axe is looking great John! What brand of lacquer are you shooting? I am prepping for my first nitro finish and I am terrified
-
Yeah, I'd like to see some follow-up pics as well (and yes, I realize that the last post on this thread was......). ......
Xanthus, sorry I don't have any pics yet. I have been procrastinating
on this neck and working on three others that are a little more straight forward on the finish. I will post some pics when I get back to working on this one. Good luck -
Well hmmmm, I've done at least a dozen Alder guitars in the last year and I've found you can do almost anything to Alder you want and have it work just fine, which includes dying the raw wood first then clearing over (no problems at all and it looks great), clearing the wood first then shooting toner coats (also looks great), and dying the raw wood, clearing over it, then shooting toner coats over that (also looks great).
Alder is pretty no matter what you do to it, and is very forgiving, I can't agree with a lot of the above statements that it's finicky or picky or hard to work with or unspectacular looking, I really dig it, and it's easy to work with.
You know what I find really unnatractive?
Black Limba. I really don't like the natural color of this stuff at all, and am now dying everything I've built with it one color or another. Yech.
I hope it sounds better than it looks. Drak, do you do anything special on the endgrain of your alder guitars? How about putting a tutorial up sometime when you are doing a waterbased stain?

-
....have just stained a top using water based stains and I am very happy with the result. See:
http://s5.photobucket.com/albums/y151/0-fanlee-0/ It's the last few pics. View as a slise show is probavly best.
Anyway I used David Myka's tutorial on this forum and Roger Siminoff's book on mandolin making - the section on dyeing. He used alcohol I used water - same techniques. It worked OK. Also I have had irritating problems using tinted shellac on the SG in the slide show. FWIW the water dyes worked great for me so just do a bit more practice.
RobSm
Nice work Rob. It is interesting, because the best results I have had on scraps is with orange and yellow dye. I have Siminoff's book on building an electric but the finishing section is a little lean. I'll have to give Myka's tutorial another
I haven't tried any of the powdered dyes. I know Drak uses the Solar Lux stuff with excellent results.
I use the Colortone dyes, which mix with water or alcohol. I've dyed both maple and mahogany (bare wood) with really good results - no blotchiness whatsoever. I think part of the trick is knowing how much to apply and working quickly.

Dan Erlewine used Colortone blue for the maple/alder thinline in the Trade Secrets tutorial.
Mike
Mike, OMG!!! that is a beautiful guitar
So did you mix your Colortone with alcohol or water?Alder is blotchy by nature. One thing you can do is let the stain soak in for a little longer before you wipe it off. That will allow it to soak in more evenly. Another thing is to use a washcoat. Perhaps a better choice would be to use a gel stain.
Maple is also blotchy by nature. But figure is the same phenomenon as blotchy so a water based stain that brings out the figure can be desirable in same cases.
Greg, regarding the washcoat, wouldn't that prevent the stain from adhering? I have noticed that it does look best if I just rapidly put the finish on with a sponge brush and let it soak in without wiping. Although I still am having a hard time avoiding overlap.
So here is another thought. I have seen Drak preach the benefits of shellac, i.e., it sticks to just about anything and just about anything sticks to it. Does this apply to a water based stain as well? Anybody tried using a well thinned shellac washcoat BEFORE laying down their stain to help even out the finish or does the stain just bead on the surface of the shellac
?????? -
I ordered a bunch of 1oz packets (dry powder) of water based stain from Lockwood and have been experimenting on scrap pieces of alder, maple, and mahogany with a variety of colors. I am slowly coming to the conclusion that the only way I am going to get a decent finish is to ditch the idea of staining the bare wood and use toner in my lacquer.
I have the stewmac finishing book and have tried using their tips (like wetting the wood with water before putting on the stain), but my stain always looks blotchy, especially on the alder.
I realize staining alder is probably a stretch, but I was just curious as to how many of you actually use water based stains???? I feel like I wasted my money on all of the packets.
-
My question would be why are you destroying a perfectly fine vintage guitar to begin with, when you can probably make one relatively easy?
Just asking.
+1 Thirdstone, if that is really a 50's era LP Jr. you would be well advised to not touch the original finish (providing that is the original finish). Vintage all original LP Jr's bring sick dollars on the vintage guitar market.
-
Thats the one HG,any pics of it finished?? I contemplated extending the neck tenon through to the pup as well but decided against it as it (I thought ) would have caused finishing problems getting the neck to match the body. is that a maple fretboard on top of a mahogany neck??
Kev
It is still in progress. I just finished the neck pocket route. It will be painted a solid color so there will not be a problem with the extended tenon. The fretboard is birdseye maple and the neck is mahog with a purpleheart center strip and ebony veneers on the front and back of the peghead.
I know a lot of folks do not care for maple fretboards but I have always liked the way they look, so the 5 guitars I have in progress right now all have them
-
Mike,
That is freaking beautiful. Have you put it on a scale? Just wondering how heavy a solid purpleheart guitar weighs. Also, did you just use clear over the purpleheart or did you tone it with anything?
I resawed a 2 in thick chunk of purpleheart I obtained to veneer a bass top and back (mahogany center). Was afraid it would be far too heavy going with solid purpleheart.
Again - nice work
-
Oops - sorry about the giant pic
HG
-
Thirdstone,
I am a big fan of LP Jrs myself. (I will post some progress pics on the double cutaway that I have been progressing on slowly).
What did you use for your template? I want to start a single cutaway but have not been able to find any templates here at PG or on the web. Would a standard LP work if you simply made the cutaway portion stickout from the neck join about a 1/4 of an inch? (Hope that made sense)
Thanks - HG
HG I had the same problem tracking down LP Jr single cut plans but I came to the conclusion asyou. ie same outline as LP but with 1/4 inch added to the treble side neck cutout . This is to enable the full width tenon. Its interesting to note that PRS single cut does away with this feature. To my way of thinking they did this to enable mass production. That part is a bit vulnarable with out the neck fitted. They may also think that it aids neck access but I expect it would be a weaker neck join.
There is a LP Jr doublecut plan on the internet which I suspect might be useful , I havn`t checked but it might be simply a matter of filling in the upper bout.
Another observation is that the controls are the same position to the upper two of a LP.
So to summerise I think that when Gibson designed the Jr they just took a LP 55 blank ,left off the maple cap and only drilled the two upper control holes, then they fitted the full width tenon as its less complicated than the LP join and didn`t require the big angle. The P90 got fitted as the humbucker was not yet designed.
Why they fitted a dogear and not a soapbar I don't know but I am glad they did.
Kev
Kev - I have the doublecut plan you mentioned. That is what I used for this:
http://i79.photobucket.com/albums/j140/hyd...VR/teaser-1.jpg
I may just borrow a friend's LP Standard to trace the outline and then add in the additional wood on the treble cutout.
Keep us posted on your progress!
-
Thirdstone,
I am a big fan of LP Jrs myself. (I will post some progress pics on the double cutaway that I have been progressing on slowly).
What did you use for your template? I want to start a single cutaway but have not been able to find any templates here at PG or on the web. Would a standard LP work if you simply made the cutaway portion stickout from the neck join about a 1/4 of an inch? (Hope that made sense)
Thanks - HG
-
I use 4 pipe clamps, 2 bar clamps, and 2 I don't know what you call them clamps to glue body halves together (might be overkill but I never had a problem with a glue line). To keep the two halves even, I use C-clamps, one one each end of the halves
Like so:
http://i79.photobucket.com/albums/j140/hyd...an/0d517671.jpg
After removing from the clamps, I run the body through the thickness planer on each side to smooth it all up.
Cheers
-
+1. Any bearing with narrow walls will be relatively fragile, and easier to cook.
I bore out 90% of my neck pocket with a forstner bit, then use use a template bushing to route within 2mm or so off my final pocket size, and finally use a freud kitchen fitters bit to cut the finished pocket. I run the shank of the cutter against the rails of my neck jig - no bearing to worry about, but you do have to keep the bit moving or you'll burn the rails.
The kitchen fitter bit is 0.5" shank and cut, 2" cutting depth and plenty of shank length to grip it by - about 3.5" length overall. The freud pro cutters are great quality, and best of all, it was on special offer at screwfix - less than £10!
Setch - thanks for the tips. I like the idea of a less expensive bit to get the job done! (although I ordered a Whitesides bit that was discussed above over the weekend).
On a side note - how about posting your laminate bending method for pegheads with some pics one of these days?
Cheers
Greg
-
This is the main reason against inlaying anything dark into anything so light. Wood dust will always fill the grain of aother wood, and Maple is pretty hard as well. Inlaying into a lesser wood would be worse.
If your going for black in maple I would suggest not using ebony but maybe recon stone, plastics, or some other material that won't darken it. I stay away from it completely.
That said, I am not the end all be all of techniques, so maybe someone has found a good way to do this. I would either avoid it, or go with something else black. Not ebony.
I have not posted in a while because I have been so busy with smaller comissions. I have something soon maybe worth doing.
Good luck.
Craig L.
I am not sure I understand what you are saying Craig. I understand about the problem of inlaying dark into light, but I am not sure why a black material other than ebony would work better. I didn't use any ebony dust in my glue, rather I mixed Black Colortone into my clear epoxy to set the inlay. The black epoxy then proceeded to bleed into the maple pores.
As I have 3 other necks with maple pegheads I want to inlay with a similarly shaped design, what type of material or preparatory steps would you recommend that would make it easier on a newb like myself? Thanks - Greg
PS - your work is absolutely gorgeous!
-
IMHO if you spend the extra money and buy the Whiteside 3023, you'll never be sorry.
Yeah, I came to the same conclusion. I am going to order the bit today.
Thanks for everybodies input!
One more question though. This quote comes from the Woodworkersworld.net website about the 3/4 inch cut diameter bits "***Whiteside recommends the 1 1/8" dia. tools in the 1/2" shank whenever possible due to the fragile nature of the B19 bearing."
Has anybody experienced problems with the smaller bearing? I doubt it will be an issue given relatively light use it will get for guitar building but I just thought I would check.
Thanks again!
-
IMHO if you spend the extra money and buy the Whiteside 3023, you'll never be sorry.
Yeah, I came to the same conclusion. I am going to order the bit today.
Thanks for everybodies input!
-
Thanks for the link. So do you let the bearing ride down in the neck pocket if you are setting a neck deeper than the 3/4 in cut depth? If so, doesn't that leave a tiny lip inside the pocket?
-
I have not had any problems with cutting deep enough on mine.
I use a bit I got at homedepot that has an abnormally long shaft that allows a deeper cut. The last guitar had the pocket routed almost to the back and I had no trouble reaching.
The guitar is even 1/4" below the oak boards.
Could you let me know what bit you are using? I was at HD today and did not see anything that would work.
Thanks!
-
http://www.routerbits.com/cgi-routerbits/s...4123778_5193+47
check out router bit #3023. If that's not long enough, I don't know what is. I think that's what I used, can't remember off the top of my head though.
peace,
russ
Thank Russ, I think that bit may get me to where I need to be. Except I didn't really want to spend $38 for a bit - ouch!
The heel on this neck is 1.4 inches thick from the bottom of the fretboard (which I want to be flush with the top of the body)
-
Why not try to add some kinda frame around your inlay?
It would look really cool and hide all of the bleeding!
I am open to ideas. When you say frame it, would you do it by routing out the bleeding area and filling with another type of inlay material, or colored epoxy, or ???
-
Ok, what am I doing wrong? I made a simple version of Myka's pocket jig,

but here is my dilema. I can't get deep enough routes. Even with my plunge router set as low as it will go and my pattern bit pulled out some in the collet (I know, I know - very dangerous and stupid), I can't make a deep enough route for the set neck I am currently working on.
Here are my specs:
The top of the guitar sits approximately 3/16 below the bottom edge of the oak slats (bearing guide) for the router. The oak slats are about 1 thick.
Even if the slats rest flat against the guitar top, I can't get enough depth using a 2.5 inch long pattern bit with a 1.25 inch cutting face.
I have not found any pattern bits with a longer cutting face than this.I can't think of any solution except for making the guide slats thinner, but that seems like it will allow too much flex resulting in an inaccurate route. Thanks for any guidance!


Flat Fretboard
in Solidbody Guitar and Bass Chat
Posted
+2 Jeez Perry, did somebody pee in your cornflakes?