


erikbojerik
-
Posts
3,869 -
Joined
-
Last visited
Content Type
Profiles
News and Information
Tutorials
Product Reviews
Supplier Listings
Articles
Guitar Of The Month
Links and Resources
Forums
Gallery
Downloads
Posts posted by erikbojerik
-
-
FWIW it is better to build an instrument in dry weather and have it re-hydrate, than the other way around.
-
That would work just fine. I like Tru Oil myself, with the gloss knocked down the same way.
-
This one is on hold until the weather warms up enough to spray my pre-cat conversion varnish outdoors - that means 68° here in Maryland. Maybe late March or early April. Neck has been dry-fit and neck angle looks good.

-
I have seen some bridges where you have 2 strings per bridge pin, but you'd have to notch the saddle to get the strings to stay put.
-
No - you just happened to get a bad pickup. The new one should be fine.
-
I have one Milwaukee and one Porter-Cable - both are bombproof.
-
Hmm. I was once denied a piece of figured bubinga because he knew I wanted to make a guitar out of it, and not a table. "You'll be cutting away too much of the wood for anyone to appreciate its beauty. If you were making a coffee table, then I'd give it to you, but you really don't seem to care enough about this piece for me to sell it to you."
...
Its a freakin' piece of wood, not a magical trophy. *shrugs* I bet it wasn't that pretty anyway.
Hehehe - I'll wager that the economy has turned that guy's viewpoint around 180°....
Even with a perfect piece, if the end is rough (i.e. not recently cut since being out of the kiln) I will lob 2" off the end just to be safe. But I have also been known to hand-select a piece with some end checks, if the figure is what I'm looking or AND I can work around it.
-
has any one ever used loctite slow setting epoxy, we seen some at ace that was 60 min. set time
Forget that stuff - that's for kids. I tried it once and it stayed sticky forever. Go with the real deal (Zpoxy, System3, or West System).
-
Zpoxy is more forgiving on the mix ratio - System 3 is very fussy that way, you need to use a gram scale to weigh it out.
Make sure you get the "Finishing Resin" and not the adhesive.
-
Whatever you pick, definitely go with wall hangars. Save the floor space for the amps and effects.
-
Free = you get what you pay for.
Beta Monkey loops are pretty good, and they're not expensive.
-
Thanks. another link for my collection. Nice set but pricey. Do you know the length since its not listed?
Don't know - but they look similar to the StewMac ones. It would indeed be nice to get a set wide enough for (say) a 6-string bass.
-
You can also get a more complete set of the interchangeable brass cauls from John Watkins at CNC Guitar Parts, especially nice for fretting compound-radius boards.
-
I really want to see someone with plants growing out of their axe - like Chia-Pet for guitar.
-
Mequiars stuff is typically found at any auto parts chain (NAPA, Advance, Pep Boys, etc). 3M also makes a swirl remover that you may see there.
-
In me experience, the three major factors that can mess you up at this stage are:
#1 your sanding/polishing in the prior stages was not good enough. As you move down the grits, you need to completely clean off the instrument between each grit, otherwise you continue to make scratches from little bits of the larger grits that you haven't removed. Also, at each grit you need to make sure you have removed the scratches from the previous grit.
#2 the substrate you're using with the Maguiars is not good enough. It might be causing scratching itself - I use the StewMac foam pad chucked into a drill for this stage, with the drill sitting in a vise so that I can hold the guitar with both hands. If I'm doing it by hand, I use a cotton T-shirt. Whatever you're using, you also have to be very careful to not contaminate it with dust or any other abrasive grit - I keep mine in a clean Tupperware box in a drawer, and from Day 1 I have used it only with Maguiars swirl remover and nothing else (no cross-contamination with other grits).
#3 your finish is not hard enough to get a "dipped in glass" buff-out. This can happen if the material is just too soft (for example, Tru Oil can be buffed but not quite as hard as poly), or it was thinned with the wrong material (never thin with mineral spirits...), or it hasn't cured long enough to harden completely.
-
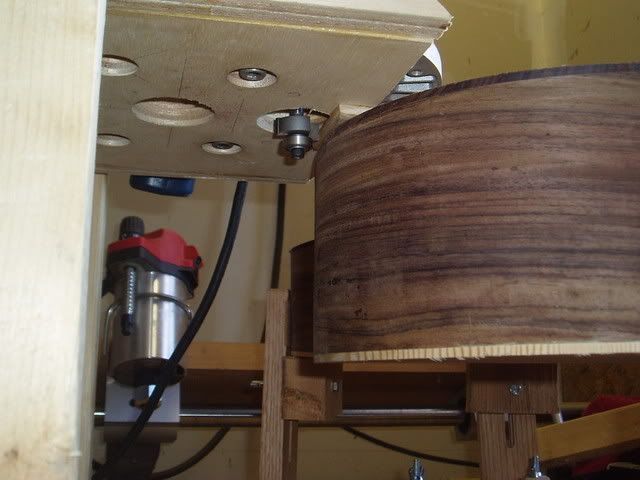
I also started life with this tool, and now it sits unused. After several iterations I finally took the plunge and built the kind of binding channel cutter that is used for acoustic guitars, basically a dedicated router mounted on drawer slides (so it follows the top). I use the StewMac rabbet bit with its set of bearings, keep the bit in the router and just change the bearing underneath for whatever depth channel I need.
Right in front of the bit is a small shelf of wood that registers on the top - really the only tweek I need to do is to make it a little less wide, more like the width of the bit.

-
+1 - buy a used body, make your own template, then sell the body for pretty much what you bought it for.
-
To answer the question YES - do everything in your power to minimize temperature and humidity changes when caring for vintage instruments.
@ your specific guitar - all that stuff is pretty typical for a cheaply made acoustic guitar with some years on it, even if you did keep it well humidified (maybe the only exception is that you don't have too much bridge lift going on). You're looking at a neck reset here in addition to re-joining and cleating the top's center seam.
Those photos make a good case for loosening the strings on your acoustic when its not being played every day.
-
A lot depends on the instrument itself - is it a standard 34" scale? If you have a nice tight B string at normal tuning, then just try dropping everything down by 2 half-steps and see how it works out, you don't need new strings to try that. Works for John Myung.
If its too floppy, then I'd go with a set of light low-B 5'ers (or a 6-string light set if you can't find those) and tune up. La Bella makes a 5-set that goes 40-118 (Super Steps extra light).
-
I have seen it happen twice, a little bit of back-bow when I've glued a rosewood or ebony fretboard onto a neck (maple and walnut) with Titebond - the moisture swells the wood fibers in the neck but not the fretboard, and results in a bit of backbow even when clamped flat. If you have a double-action rod you can tweek it out before you level the board (which I did), but if not then you're stuck. I switched to epoxy because of this.
I also prefer to fret the board off the neck, and work out the back-bow before gluing up - stress-free neck. For the taper I actually shape the neck and fretboard separately to a MDF neck taper template using a router table, and then I rough out the neck's back contour on the same template before gluing up.
-
I think my jaw facings are mahogany, or at least something that looks remarkably similar.
probably Agathis
-
What tuner is it that doesn't pick up notes on open strings?!?!?
-
No.
But I always have the bridge in hand before I cut wood!
Soooooo many things depend on the bridge - neck angle, fretboard radius, pickup rout depths & locations, control positions, etc - you just cannot wait or change your mind on the bridge in the middle of the build and expect to have any of those things work out.

Acoustic Song Suggestions?
in Players Corner
Posted
Take some acoustic songs you like, that are above your range, and transpose them down.